Showing posts with label art. Show all posts

Wednesday, September 11, 2013

A Tryst

Greetings and welcome to Hohenfels Volks, THE place for our place! Another rainy reminder that autumn is upon us. The colors and clarity of the season provide so much to intoxicate the spirit, and numb the body for the long cold ahead! Here, in Hohenfels, it’s no different!

It has been said that art is a tryst, for in the joy of it maker and beholder meet.
Kojiro Tomita

Again, another taste of the artistic and spiritual side. Kojiro Tomita was an early 20th century art expert from Japan. He had come to America to expose the U.S. to Japanese aesthetics and art. He was curator of the Museum of Fine Art in Boston.

I chose to use this particular quote to express what our photography can do, and how we involve our audience in our work.

When we feel our shot is the right one, when we see the scene, and visualize our final image, we often feel something beyond our technical and expressive processes. If we stop and think about what we’re expressing, and who we’re expressing it to, we begin to see a relationship take shape.

Neither party may know each other; indeed, they may be separated by centuries. At the same time, though, we are brought together for a small moment, in some connection that shares our feelings and viewpoints with those of our viewer. We connect.

Just something to think about the next time your out. If you’re out to make a portrait, find a way to include your subject, as well as your audience and yourself, in that connection. You’ll find a photo that will touch lives for generations to come! When making a still life, try to visualize the final product, and put yourself in the shoes of the viewer. How does that visualization make you feel? If your reaction brings you deeper into the scene, then your audience will no longer be your audience; they’ll be a tryst you enjoyed while expressing your vision, and enjoying your creativity! Of course, that’s just my thought!


ISO 3200, f/5, 1/30
Flowers in Vase, my tryst. This was taken in a little Vietnamese restaurant in Bayreuth during my last day trip. I made the shot knowing that the flowers in stark isolation against the background would create a sense of isolation, especially with all the negative space. I also noticed, even in that sea of isolation, that the flowers were not alone. Their isolation created a balance that allowed their relationship to transcend appearances and become tryst like in its relation of tones, shapes, and placement. I knew this one would speak to someone as a reminder that we are never alone, even when we feel like it. To paraphrase Ansel Adams, "There are always two people in every photo." That seems to go along with today's theme nicely.

I hope all our Hohenfels Volks readers will get out and create something of a tryst in their photography, and share it with us on our Hohenfels Volks Faceboook page. We’d love to see your work.

Is there anything you’d like to see here? Do you have a question? Share your thoughts here or at the Hohenfels Volks Facebook page. Of course, commenting on both Facebook and here is always appreciated, too! Don't forget, we're on Google+, too!

Monday, September 9, 2013

Presence

Greetings and welcome to Hohenfels Volks, THE place for our place! Rain, sun, wind, chills, and warmth. All the seasons were experienced in one day here in Hohenfels!

Be still with yourself until the object of your attention affirms your presence.
Minor White

It's amazing the insight in that little quote...

Communication exists between the photographer, the subject, and the viewer, and can only be understood by those few who feel the affirmation of the object upon which you've cast your attention.

I posted that earlier today on our Hohenfels Volks Facebook page. It’s meant to call attention to the fact that our expressions have a link to the subject.

Many of the early and famous photographers were quoted saying things about the importance of creativity. They were also famously quoted speaking or writing about expression and the relation of photography to communication. Ansel Adams said there are always 2 people in a photograph, even one devoid of people, the photographer, and the viewer.

It’s important to remember that even though we see no person when we make the image, we are indeed communicating our feelings, thoughts, and ideas about the subject to our future viewers. We are also expressing something of our feelings and thoughts about our potential viewers. When we think of our viewers, and what we hope for them to feel and opine on our images, we are indeed receiving their affirmation. If our viewers are not an object of our attention, then what else is? Beyond our subject and ourselves, there is little left to affirm our presence.

Of course, our subject affirming our presence may seem ridiculous, as often we photograph the inanimate. This affirmation can be almost spiritual, it’s an awareness of the light, the shade, the texture, and the myriad other things that make our expressions our own, and help us communicate across all boundaries. We generally feel this affirmation as what Cartier-Breson called the “decisive moment.”

Hohenfels Volks: Rebirth In Bayreuth
ISO 1600, f/8, 1/30
Another angle on yesterday's photo. I love the way the green leaves stand out both visually, and metaphorically, against the orange, and even above the greens of the moss. By creating a connection with the scene, I was able to express my love of the way new lives grow from the old, and yet remain part of the old.

I hope everyone gets the chance to seek the their object's affirmation, and will feel their images. I also hope you’ll share them with us on our Hohenfels Volks Facebook page. We’d love to see your work.

Is there anything you’d like to see here? Do you have a question? Share your thoughts here or at the Hohenfels Volks Facebook page. Of course, commenting on both Facebook and here is always appreciated, too! Don't forget, we're on Google+, too!

Tuesday, November 6, 2012

Creative Metering and Exposure

Greetings and welcome to Hohenfels Volks, THE place for our place! I hope everyone is getting a decent start to the week. The Hohenfels area is beautiful this time of year, as many of you know, and full of go-to places for some great shots.

Today we’re going back a little to some basics. We’re primarily going to look at metering and exposure.

We all know the basics by now, that your meter offers a combination to make the measured area fall at 18% reflectance, or neutral gray. Most of us know that by overriding that proffered setting we can take fuller control and get closer to our vision.

I’ve discussed metering and key stops before, but today we’re going to see how it can be used for maximum impact when combined with our vision.

I’ll be referring to the following photo as an example.

Hohenfels Volks: I UnSubjugated
ISO 125, f/22, 1/2 on Ilford FP4+
I, Un-Subjugated.When we leave the I, or in this case the red, unsubjugated, a wider variety can thrive.

In the above image, both the highlights and shadows were extremely close in values, and were identical with the light shifting as it was. My initial reading was 15 c/f2 for the shadows and 30 for the highlights. The brighter leaves are red and the darker ones are green. Knowing the values were so close, with the red reading about 2/3 to a whole stop brighter, I chose a red filter to bring up the reds and decrease the greens. A red filter allows about 97% of the red light through, while only allowing about 12.5% of the blue and green. It also gives a factor of 8x or 3 stops. Throwing in the aperture decrease, I was shooting with 5 stops less available light for the greens and shadows. By adding 4 stops to their initial reading of 30c/f2, their levels were increased and the red was 2 stops over neutral. In yesterday’s shot, the same leaves and exposures were made, only using a green filter, bringing all the levels more in line with their illuminations.

This is the same shot, and levels as the image I posted yesterday. This will allow you to see how using the tools and techniques at our disposal, we can lead our image and our viewer to the desired result.

When we meter at our key stop, both for highlights and shadows, what we’re learning is the illumination of the subject. The reciprocal of our shutter speed is the amount of illumination, expressed in candles per square foot. By metering off the shadows, mid-tones, and highlights, we have a range of illuminations with which we can work. Those readings will always be the same at any key combination. For instance ISO 100 and f/10 or ISO 400 and f/20. So, we meter 100 foot candles at ISO 400, f/22. At ISO 250, we would set f/16 to get the same results. Now to place that value at somewhat higher value, for instance, we could set our shutter speed to 1/50 instead of 1/100 at f/16 ISO 250, and get a result that is lighter than neutral, by about 1 stop.

Throw in the ability to see our desired results and the steps to get them; an image can be made, not captured. We have several tools to modify the exposure we’ve selected without destroying the original image. With digital photography, shooting RAW gives you complete control. By raising your red tones, and lowering your greens and blues, a red filter can be somewhat approximated, and so on.

By combining exposure, processing, and value controls throughout the photo making session, we can bring our creative expressions to life. The first step to learn is metering and how to use that information. This little tool can be used for a record photo that leaves little to interpretation, and one for the magic of creative photography, as well. You can give voice to your thoughts without uttering a word. Using what you know, and the tools available to you, vision can be brought to life, and given a meaning according to your creativity and visualization.

I hope everyone enjoys the rest of the week and makes an image using their knowledge, tools, and vision to share with all of us! Get out and make it happen, then show us, share what you felt through your images on our Hohenfels Volks Faceboook page.

Is there anything you’d like to see here? Do you have a question? Share your thoughts here or at the Hohenfels Volks Facebook page. Of course, commenting on both Facebook and here is always appreciated, too! Don't forget, we're on Google+, too!

Tuesday, September 4, 2012

Now Departing

Greetings and welcome to Hohenfels Volks, THE place for our place! I hope everyone enjoyed a great weekend and is ready for another one! Here in our Hohenfels area, autumn is rapidly approaching. Soon the trees will be awash in reds, golds, and greens, which creates some great opportunities for photos!

Today we’re going to discuss departing from the literal. As you know, most creative images involve some departure from literal translations of the scene. Often, when shooting black and white, we use filters. In color digital photography, we use CPs and editing software.

To begin our discussion, it’s important to point out a simple fact. That fact is that in order to make any meaningful transition from literal values to a creative placement, you need to know the more technical side of photography. Today’s general discussion assumes you already understand exposure and DOF, as well as the other more technical sides of a good image. On the artistic side of creative departures, we need to understand the relationship between place and fall. This has been discussed before, as has the creative use of DOF to enhance or minimize an area’s impact on the scene.

Hohenfels Volks: The Cleric
ISO 125, f/4, 1/160
By bringing the reds more into play and simulating a red filter, the departure creates something that stands on its own. It also left the tree at a level that exceeded the values of reality, creating a nice chunk of texture.

When we place an area of a scene at a certain value, it needn’t be the literal value. You’re meter will give you the value for 18% gray, but not all things are neutral gray. For instance, clouds should be near white or about 3 stops over the meter. By placing the clouds at 3 stops over meter, or M+3, we have placed them at about their literal values. Everything else in the scene will fall to its prospective values and levels, giving us a literal interpretation.

In this hypothetical situation, we may want some part of the scene to be exposed to a higher value. This can be done, as mentioned, with filters or software. For instance, if we desire the bright green leaves of spring to stand out more, we may expose them to M or even higher. Another way is to use a yellow filter in soft light, if you’re shooting black and white. This can be simulated in software applications through the adjustment of color channels.

A big part of this, as always, is your vision. Visualizing your results, and the steps to make them real, will make your creativity stand out more. It also enables you to make creative departures and still end up with an image that says what you’d like it to. Not every image needs to be literal, many of Ansel Adams and Clyde Butcher’s images are not literal, but they connect to almost everyone who views them. They are often viewed as more realistic than the reality of the scene.

This goes back to creativity, visualization, and knowing your tools. Read the manual for every piece of equipment you own, and the software, too. It’ll prepare you to make the best images possible when you make your vision tangible.

Here’s hoping you enjoy the rest of your week and capture the shots you’ve been wanting. Get out and make it happen, then show us, share what you felt through your images on our Hohenfels Volks Faceboook page.

Is there anything you’d like to see here? Do you have a question? Share your thoughts here or at the Hohenfels Volks Facebook page. Of course, commenting on both Facebook and here is always appreciated, too! Don't forget, we're on Google+, too!

Tuesday, August 14, 2012

Your Vision...

Greetings, volks. Welcome to Hohenfels Volks, THE place for our place! I hope this hump-day brings All of Hohenfels into the downside of a great week.

Today’s a quick post on creating an image from an artistic approach.

As we often mention here at Hohenfels Volks, the first part of creating an image is to visualize the final image. During this process, we’re trying to see in our mid and in our heart the image we want to present. Don’t close your eyes and see the scene how it is, see it how you want to show it.

Once you know what you’re trying to show, you can work on visualizing the steps to create that image. One of the things often overlooked is an inventory of the tools you have and how to use them. Perhaps you have Photoshop and want that area of lower color to be more saturated, how do you do it? Photoshop has some great tools to make that happen, including the vibrancy tool, which helps bring out color in under saturated areas without increasing overall saturation. The tools you can use are more than your camera; you can use a flash to highlight part of a scene, bringing the levels to your vision, or add an ND filter to allow longer exposures to make the water more flowing. Know your tools and how to use them. That will get you a long way to creating a wonderful scene.

Another thing to visualize, or know, is how you wish to present your image. Will you make it large? Will it be printed or on a monitor? Knowing these things will improve your images. Should you decide to print it, you may want to make a photo that slightly lighter, and take another for monitor display. What size will you print? The larger the print you desire, the more information you will need to capture. You will also need to have a more accurate focus. This generally means a larger file size. Although, making it a point to always shoot RAW will make you’re your files consistent in size.

Remember to think about how the colors and levels present can affect the viewer. Are they happy or moody? Is there any color? By harmonizing your tones and color, you create an image that impacts far more than a shot made without consideration.

Once you’re ready to make your shot, go for it. Remember though, it won’t look like you visualized without some cleaning up and editing. This isn’t always true, but best kept in mind. When you look on the tiny monitor in your camera, it’s not edited or presented according to your vision. Don’t be disappointed, remember, you planned your shot. Stick to the plan and you’ll get some amazing photos.

The technical side of photography is incredibly important. We need to learn aperture, shutter speed, sensor (or film) speed, and how they work together. However, they are only 1 part of the process. Without vision, creativity, and some thought you’re making snapshots. The see and snaps out there are abundant, but with these things on your side, your images will rock those who view them.

Hohenfels Volks: Vittorio Emanuele II Memorial, Rome
ISO 1600, f/5, 1/30 70mm Canon EOS 7D
Vittorio Emanuele II Memorial in Rome. I wanted to capture this 2 ways, this way in black and white, and again in full color. Knowing the tools I use, including Canon's DPP, allowed me to capture a shot that could be both. In the color version, you can sense the evening in the shot, as the sky behind is dark, and the lights behind the column add beautiful color and depth. By visualizing the shot and taking a little extra time, I got the one I wanted.

Take care, enjoy the downside of your week, and get the shot you’ve been thinking about all day! You’ll feel incredibly accomplished with the shot in your camera. Just think, it’s almost autumn, and that means Hohenfels and our places will be bursting with awesome colors soon! Time to start your visualization!

Please feel free to share your photos on our Faceboook page. Everyone here would love the chance to see your work! Is there anything you’d like to see here? Do you have a question? Share your thoughts here or at the Hohenfels Volks Facebook page. Of course, commenting on both Facebook and here is always appreciated, too! Don't forget, we're on Google+, too!
Tuesday, July 31, 2012

Metering for Effect

Greetings, volks. Welcome to Hohenfels Volks, THE place for our place! I hope everyone managed to break away from the Olympics this weekend and get some great shots of our Hohenfels area.

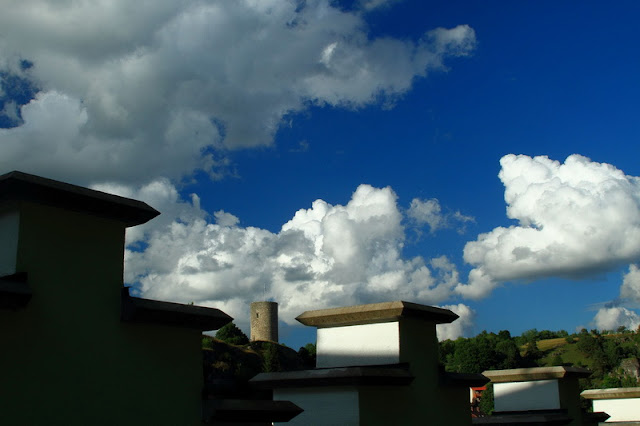
Some beautiful cloudscapes this weekend started me thinking about how we meter and where we place our exposures. Of course, this led to a short post today about shooting bright scenes, or scenes with a large amount of brighter objects.

Hohenfels Volks: Castle in the Clouds
This shot was metered for the bottom of the clouds on the left. This left the bright clouds on the right a little overexposed. The values were brought down using the luminance curves in Canon's Digital Photo Pro to match my visualizing. By composing with the crenelations creating a stairstep effect and framing the castle tower, a brighter image could be created. It also brings the eye back to the tower and clouds, adding interest and depth.

The first thing we should be thinking about is our visualization. Where do we want to place our elements? For instance, if your scene contains fields, nice blue skies, and big fluffy clouds, perhaps metering for the fields will turn the sky white, and metering for the clouds will turn the fields black. Knowing where we want our elements in the range of values is the first step in putting our visualization to work.

After we’ve visually composed our image and noted the areas where significant detail must be maintained, we begin to meter. It’s generally best to make several readings from the different values within the scene, as this lets us know our range. In the above mentioned scene with the fields and clouds, we determine the sky itself to be the middle range. If we give this a +1 exposure, the sky is properly exposed, the fields are likely to be also, but the clouds will usually be overexposed. We can try to fix it on the computer, which is often difficult when the highlights are too far gone, or we can expose the clouds for +1 to +2 stops over their meter reading. This will darken the sky to a nice rich blue, and generally provide some slight underexposure in the field. The lowering of values throughout the scene also increases your overall saturation. It also gives you greater control over the chiaroscuro and play of light in your work.

Of course, none of this is useful to you if you don’t know what you want from your shot. Trying to capture the feeling you wish to share may require something else. Having this general idea, though, gives you another tool in the quest for the perfect shot.

Please feel free to share your photos on our Faceboook page. Everyone here would love the chance to see your work! Is there anything you’d like to see here? Do you have a question? Share your thoughts here or at the Hohenfels Volks Facebook page. Of course, commenting on both Facebook and here is always appreciated, too! Don't forget, we're on Google+, too!

Tuesday, July 17, 2012

Converting Your Image

Greetings, volks. Welcome to Hohenfels Volks, THE place for our place! I hope everyone is faring well as press into the week.

Today we’re going to go over a simple, but interesting way to convert your photo to black and white.

As we all know, sometimes color can change the way an image feels. It can take a moody photo and make it seem wrong or out of place. It can distract from the subject and take away from the beauty of the light. There are many reasons for shooting, or converting to, black and white. For this post, we’re going to do something that takes our shot to a better place.

This is the image we’re working on. I’m using Corel’s Paintshop Pro Photo X4, but the concept is the same in Photoshop, Lightroom, or Gimp.

Hohenfels Volks: The Dom
ISO 6400, f/3.4, 1/15
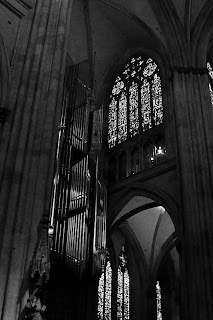
Looking into the Cathedral. The scene was beautiful, yet the image lacks some pop. We'll fix that!

I shot this photo inside the Dom in Regensburg. The beautiful Gothic architecture and art inside this cathedral seem best suited for black and white, and seem quite garish in color. The color temperature also becomes an issue when shooting at high ISOs, although I photographed this with the intent of making it black and white.

Once we’ve converted our image and opened it in our application of choice, we’re going to separate the image into red, green, and blue layers. There we’ll lighten and darken the different layers to our desired levels using curves and levels, and remove the noise. For this image, I slightly decreased the red and blue layers, while only dodging the green along the pipes of the organ. Once you’re content with your adjustments, combine the layers into a new image. For this shot, I slightly darkened the red layer, darkened the blue layer quite a bit, and dodged the pipes of the organ to increase the levels to offset the overall decrease in brightness. The finished combination now looks rather odd, and has some tinting/toning in it.

Hohenfels Volks: The Dom
This is our image after splitting the color channels and recombining them. Notice the green tint on the pipes.

Our next step is to split the image again, this time to hue, saturation, and lightness layers. You can discard the hue and saturation layers, as we will now use the lightness layer for our final canvas. For this image, I adjusted the levels, performed a minor curves adjustment, and increased sharpness. I chose to over-sharpen, using a radius of 1.00, as I would be softening the noisy area under the arch, and applying an edge preserving smooth filter.

Hohenfels Volks: The Dom
Almost finished, a few tweaks and we're there.

The finished result, while no masterpiece, is rewarding. It leaves you with a sense of place and scale that the color version tends to minimize. The chiaroscuro also seems quite well suited to the Gothic cathedral.

Hohenfels Volks: The Dom
And here we go. I think this really brings out the mood and scale of the Dom. Its incredible Gothic architecture and art are magnificent.

Well, that’s one way you can do it. This is by no means the only way. You can also adjust color channels without splitting the image, and then desaturate the image. There are as many ways to convert your image as there are folks playing around to figure out what works best for their photo. One of the biggest keys, though, is color contrast and levels. Getting that where you want it can lead to some very nice results!

Enjoy the rest of your week.

Please feel free to share your photos on our Faceboook page. Everyone here would love the chance to see your work! Is there anything you’d like to see here? Do you have a question? Share your thoughts here or at the Hohenfels Volks Facebook page. Of course, commenting on both Facebook and here is always appreciated, too! Don't forget, we're on Google+, too!

Thursday, June 28, 2012

Process Hang-ups

Greetings, volks. Welcome to Hohenfels Volks, THE place for our place! The skies and lighting these past couple days have created an environment rich with opportunities for making some great shots!

I hope everyone is enjoying the wonderful weather here in our Hohenfels area. Photography is a magic thing during this time, when the sun is up late, and the skies can work their mood into your images. The golden and blue hours can be used to great effect when shooting during this time, and add some drama or serenity to the image you’re creating.

Tonight’s post is based on something I read at Photofocus, by Scott Bourne, about pedantry in learning photography. To sum it up- there are those who are all about the process and sticklers for the “rules” and numbers. I had planned a post about making your image nearly perfect in camera to minimize editing time, but his article struck me as being something to share.

I’m familiar with the process concentration, as I tend to get wrapped up in the process at times. For me, nailing the process leads me to look at ways to improve my images by finding other ways to make the same thing. Learning to do it “correctly” is important to learning how to do it “right.” By correctly, I’m referencing the process and numbers, and by right, I’m referencing the final image I visualized.

The process is a vital tool in making an image, as this is where we start. Learning that reciprocity makes our exposures easier by allowing us to work the exposure triangle is a part of that. Learning that controlling DOF is done through focus and aperture is a part of learning the process. The key is in knowing that the process is not the end, but the beginning. Before we can make impacting departures from the process, we must know the process.

Ansel Adams, one of my favorite photographers and sources of knowledge and inspiration, was well aware of this. Throughout his books, he refers back to visualization and placements. Each book in his series on the Camera, Negative, and Print begins with a chapter on visualization. He constantly references expression while teaching the basic processes and departures from them.

By working together to share our knowledge, we can bring more to expressive and creative photography than just numbers and processes. By sharing our vision and visualizations, we help our fellow photographers in their journey through this wonderful endeavor. The important thing is how does your image feel and how does it impact you and your intended audience. Other than that, the opinions of others, especially the pedants out there, should matter very little. Their opinion requires weighing, and the helpful bits used while the rest are discarded like week old leftovers.

Don’t let those folks disappoint you, don’t let them bring doubt into your mindset, and don’t let them change your style. Your photography is for you, your vision, while shared with others, is still yours. The biggest point in all this is enjoyment. Make sure you’re getting the most enjoyment you can from the time you spend making images, and from those photos you worked to give life to.

You really should check out Photofocus, Scott posts some incredible photos and his articles are a great resource for those of us addicted to the magic of bringing that feeling to life in our art.

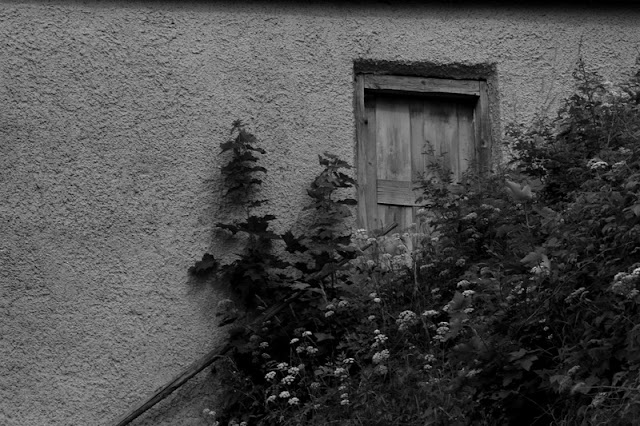
Hohenfels Volks: Abandoned Door
ISO 125, f/11, 1/60
This image is likely to be called too dark by those who think only of the process and "correctness" of an image. It was intentionally left dark to add to the mood and impression of abandonment. By departing from the process we can make our art more meaningful.

I hope you have some great plans for the weekend, and are ready to share your visions with us. We’re all eager to see folks sharing their images, their vision, and thoughts. Enjoy your Friday, and enjoy your time behind the camera!

Do you have an image to share? We’d love to see it! Is there anything you’d like to see here? Do you have a question? Share your thoughts here or at the Hohenfels Volks Facebook page. Of course, commenting on both Facebook and here is always appreciated, too! Don't forget, we're on Google+, too!
Wednesday, June 27, 2012

Projecting Your Vision

Greetings, volks. Welcome to Hohenfels Volks, THE place for our place! Lovely weather, beautiful skies, and an abundance of time give rise for photo opportunities and exercises here.

We’re blessed in the Hohenfels area with such a variety of things to cater to all our interests, at least photographically. Many volks find the castles and historic locations to be the ticket for them, others love the country scenes, and still other volks love seeing the cities. We’re located where you can find something to interest you and fuel your creative fire.

Today we’re going to try to throw some fuel on your fire by revisiting the subject of projects. As we discussed in a previous post, projects can get you thinking and lead to some creative ideas and photos. We’re going to do a short post about getting a project going as an exercise this week.

The first step to completing your project is getting together some ideas thinking through an outline. It’s important to have a theme, something that will tie each image to the other images, and to the project as a whole. Some ideas for projects in the Hohenfels area are shooting only trees, shooting playgrounds, a series of stream shots, or even the local Rathauses. Once you have a general theme, narrow it down some. For instance, if you choose to shoot trees, limit yourself to small trees or something to narrow your scope to less than just “trees.”

Decide on what tools you want to use. Decide on what items you’ll be using in your photography, and put together a kit to bring along. Make sure you have the right tool for the job! If you decide to shoot bugs for instance, don’t use a 24mm wide-angle lens, unless your theme is little specks of bugs in a big scene. Planning now can save you some missed shots later.

Also, think of some limitations on your tools. Perhaps shooting without a flash or using only a prime lens. By adding some creative limitations, you boost your creativity by working with what you have. A very important limitation is limiting the edits you can perform in software. Limit yourself to adjusting levels, curves, brightness, contrast, and saturation. Include these limitations in your visualization, or you may be disappointed with your results. Most photo contests you’re likely to enter limit editing to those listed above. For the purposes of this article, we’re going to use those limitations to help us get the most of the tools we have.

Once all the above have been decided, it’s time to make of list of places where we can the shots to work our project. Know where you’re going, research the places and lighting. You should visit a couple times at different times of day. Know the lighting and knowing how we make the most of it gives you the ability to make your image inspire others.

With everything in place, it’s time to get out and start shooting. Add some variety within your theme by shooting black and white, shooting some color, and low light shots. Keeping to your theme will bring everything together.

Projects can be created for the weekend, for vacation, or even for special days and times. One of my friends, Jen, recently did a series of lighthouses. Her shots were great, and although they have edits like vignettes applied, show how beautiful the structures, and more importantly the locations, are. These things are a marvel for anyone who’s ever seen one, and Jen crafted some wonderful images that fit that to a t! Check out her blog, Jennifer O on our links page, you’ll definitely enjoy her work!

I’ll leave you with a couple shots from one of my on-going projects, featuring crosses and small chapels in our Hohenfels Area.

Hohenfels Volks:Crosses and Crenelations
EI80, f/8, 1/60 Developed N-20% to control tonal range and contrast.
Crosses and Crenelations. Shot on film, exposed to bring the range near bright white on the walls and crenelations of the wall and developed to bring that back to a tone that holds detail. Even though that area is pushing white, the tonal range and detail are available.

Hohenfels Volks:Crosses and Crenelations 2
ISO 125, f/8, 1/30
Castle and Cross. By shooting the sky at about m+1/3, then decreasing exposure by about 1/2 stop and applying an inverted s-curve to the image, the clouds, cross, and castle all add an element to the image, and create a decent balance.

I hope this inspires everyone to undertake a project of their own. A project can take on a life of its own, and can add some inspiration to your time behind the camera. It doesn't have to take all your photo time, but you may end up giving it a more than fair amount! Take care and enjoy the rest of the week!

Is there anything you’d like to see here? Do you have a question? Let us know what project you're working on! Share your thoughts here or at the Hohenfels Volks Facebook page. Of course, commenting on both Facebook and here is always appreciated, too! Don't forget, we're on Google+, too!

Wednesday, June 13, 2012

Shooting What You Eat

Greetings, volks. Welcome to Hohenfels Volks, THE place for our place! Things have been rainy here, but that gives us the chance to show the stormy side of Hohenfels and our surrounds. I trust you’ve bagged some cloud shots!

One of our Facebook readers, Lili, asks “For those of us who don't own an external flash unit, or simply can't afford any sort of lighting equipment; what are the tricks to making food look more appealing and vibrant, and not so flat and 2 dimensional?” We’re addressing that in tonight’s post, so bring your appetite and let’s get going.

The first thing to know is that flash, while an important part of your kit, isn’t necessary for all types of photography, nor at all times. Flash can help by adding light, allowing the use of faster shutter speeds, and by allowing us to shape the feeling our images evoke by shaping the light. There are other ways to accomplish this, though. Let’s look at how we can achieve that.

There are multiple ways to shape existing light. Let’s start by moving your food toward an area that has plenty of the light you’d like. From there, you can modify that light with everyday household items. A pillowcase can be used to soften and spread the light, covering a larger area with nice gentle light. You can use it to shape the light by varying your angle and position. In a previous post, we mentioned the inverse square law that says doubling the distance between a light source and subject gives ¼ the light level. You can see that by tilting the angle between your pillow case diffuser and subject creates the illusion of distance and depth.

Another way to add or shape light is to use a reflector. You can use foil or a 5 in 1 kit to bounce light in from outside the immediate area. This allows you to concentrate your light where you want it, and increase your luminance levels. Again, tilting and angling your bounce can shape the light. A nice little thing to try is bringing your light in from about 45 degrees above your subject, illuminating the top and side. This allows the light to taper, and when you add the softness of the light, creates some depth. You can use a large white piece of gator foam, a piece of matting, or even a cookie sheet.

Another thing you can do is use your pop up flash. I never thought I’d say that, but with a little ingenuity, some foil, and a diffuser, you can add some depth. The trick to this is bouncing the light in from off the lens axis. I’ve used my external flash on camera to bring in lighting from 45 degrees to the side before, just with a piece of white mat. Remember, though, that bouncing your light costs you some of its power and range.

Now we’re going to move on to the best way to add some detail and vibrance. The big secret is DOF, depth of field. Using a longer focal length at a very wide aperture will give you a limited DOF. If you are shooting at 50mm, f/5.6, and focus at 2 feet, your DOF runs from about half an inch in front of your focal point to about the same behind it. You have a little over 1 inch of depth. Anything outside that range will become progressively out of focus. Taking into account the angle from which you’re shooting, you can create some nice little focal points within your scene. I like to think of it as pools of focus. When you place these at locations other than the center, you get some nice depth and intensity. Shooting outside in open or semi-open shade can also give more light and add elements of interest. The key to this is distance between the background and subject. You also want to make sure your focus is spot on where you want it, allowing your subject to leap out from the background in the finished image.

An easy thing to do is set up some Christmas lights or other small lights several feet behind your subject and shoot focused on your subject at your widest aperture. Do this in lower light, bringing in light with a flash or reflector. You’ll see some small circles of light that are incredibly out of focus, adding immediate interest to the scene if done right.

To boost the intensity of your color, shoot at about 1/3 to 1 stop lower that you meter for. By slightly underexposing your scene, you improve color density, saturation, and vibrance. It makes for less time spent editing and more time shooting.

Here are 2 images that show how using DOF can create an interesting sense of the meal or food.

Hohenfels Volks: Ribs...
ISO 800, f/5, 1/30, 44mm
Notice the DOF on this. By focusing toward the center of the ribs and allowing the highlights to fall higher than normal, interest is added in the meat, even though the pepper would seem to dominate. The pepper is diminished in strength through a shallow DOF, and the sharply blurred foreground end of it.

Hohenfels Volks: Meat Platter
ISO 800, f/5, 1/60, 41mm
By focusing on the back edge of the meat, sharpness is retained along the kabob, while bringing down the interest in the cucumber and tomato through minimizing DOF. The spices and browning on the meat hold quite well. Having dominant, complimentary colors, such as red and green, can decrease interest in the main subject. By decreasing their dominance through either DOF or lighting values, interest is brought back to YOUR subject.

Thank you, Lili, for the great question. I hope this gives you some ideas and helps you shoot what you eat the way you like it!

Is there anything you’d like to see here? Do you have a question? Remember, I'll try to answer all your questions. Share your thoughts here or at the Hohenfels Volks Facebook page. Of course, commenting on both Facebook and here is always appreciated, too! Don't forget, we're on Google+, too!
Tuesday, May 29, 2012

Back to Basics...

Greetings, volks. Welcome to Hohenfels Volks, THE place for our place! I hope this lovely evening finds you relaxed and excited about photography here in Hohenfels.

Today we’re going back to basics. We’re talking about one side of the “exposure triangle,” shutter speed.

Shutter speed is, of course, how fast your shutter opens and returns to the closed position. That sounds simple, but like all things in photography, it involves much more than that. Because SLRs use a single moving mirror to allow the composing of an image through your lens, and focusing through the lens, also, that has to be factored in. In long exposures, this can lead to vibrations and shake.

The complexities that go into allowing super fast shutter speeds are too many to discuss here, but we will touch on a couple issues.

Today’s shutters are usually made of metal blades, allowing them slide behind one another and achieve faster speeds. Because they are firm, they are also more durable. Early SLRs used silk shutters, which could snag and tear, or even develop pinholes, causing a waste of entire rolls of film. Most of the SLRs you’re likely to have encountered have curtain shutters that slide up and down. On older cameras, leaf shutters were common, which allowed flash synchronization at all speeds. They generally couldn’t achieve reliable speeds above 1/500 at the top end. They also used clockwork like mechanisms to open the shutter exposing the entire shot or sensor simultaneously to whatever light was present and exposed for.

On today’s cameras, shutter speeds that are very fast do not expose the entire sensor at once. Instead, they use a pair of “curtains” that travel along the focal plane and are synchronized to create a slit of light that progresses until the entirety of the sensor has been exposed. Due to this fact, most entry-level cameras can flash synch anywhere from 1/60-1/200, with high-end dSLRs being capable of synching up to 1/250. If you use your flash at any shutter speed faster than your sync speed, you will have dark bands along part of your scene.

Each halving or doubling of your shutter speed causes a doubling or halving of the exposure to which your sensor is exposed. Most of our better modern cameras can shoot from 30 seconds to 1/8000 second, and include a bulb mode for manual exposures longer than 30 seconds.

The series of shutter speeds, in full stops goes like this:
30 seconds, 15 seconds, 8 seconds, 4 seconds, 2 seconds, 1 second, ½, ¼, 1/8, 1/15, 1/30, 1/60, 1/125, 1/250, 1/500, 1/1000, 1/2000, 1/4000, and 1/8000. Notice the halving of exposure with each change of speed.

Adding in half stops gives you:
24 seconds, 12 seconds, 6 seconds, 3 seconds, 1.5 seconds, 1/3, 1/6, 1/10, 1/20, 1/45, 1/90, 1/180, 1/350, 1/750, 1/1500, 1/3000, and 1/6000.

Finally adding in the third stop increments gives you the following series:
13 seconds, 10 seconds, 6 seconds, 5 seconds, 3 seconds, 2.5 seconds, 1.6 seconds, 1.3 seconds, .6 second, .4 second, 1/5, 1/6, 1/10, 1/13, 1/20, 1/25, 1/40, 1/50, 1/80, 1/100, 1/160, 1/200, 1/320, 1/400, 1/640, 1/800, 1/1250, 1/1600, 1/2500, 1/3200, 1/5000, and finally 1/6400.

The complete range allows for shooting in all lighting situations. They also allow for shots that will freeze even the fastest action or blur even the slightest movement. The creative potential of using your shutter speed in combination with the other sides of the triangle is limited only by your imagination. Try some motion blur, or try panning with a moving object to get the sense of motion and speed. Try to capture a hummingbird’s wings without blur. Remember, though, that every change in one side of the triangle requires a change in another side to maintain the same exposure.

Here's a photo, taken at a local fest, that shows how shutter speed can be used creatively.

Hohenfels Volks: Blurred Color
ISO 125, f/16, 4 seconds
The ferris wheel, with a long exposure for motion blur in the ride, turned into a color wheel!

Back to basics, get there and get the shot using the knowledge you have and your unique vision. I’m convinced that shooting for the basics can help keep us on top of our game and give us another way to expand our potential.

I’d love to know what you think and what you’re doing with your photography. Where are you headed, and is there anything you’d like to see here? Share your thoughts here or at the Hohenfels Volks Facebook page. Of course, commenting on both Facebook and here is always appreciated, too! Don't forget, we're on Google+, too!

Monday, May 28, 2012

Better Late...

Greetings, volks. Welcome to Hohenfels Volks, THE place for our place! Greetings, volks, from Hohenfels. Another weekend passes into the ether of memory, preserved with our cameras and vision.

I hope you’ve had a chance to explore the new layout. By adding our links to another page, we’re able to expand them without limit and improve on the resources we can present. I’m currently working on an advanced section, covering metering, lighting, and other things beyond the basics.

This past weekend provided some excellent opportunities to make some photos and spend some time relaxing. I trust everyone made their shots and got their chill on, as it were.

Here’s what I’m looking at from for future posts. Beginners and Basics, Advanced Concepts and Techniques, Q and A, Composition, both elements and advanced, Reviews, and of course, continuing with our ride along shots and other items. I’d love to hear from everyone out there, if you have a suggestion, idea, or question, let us know through our Facebook link.

I’m going to close this post today with the following photo, made Saturday in Munich. Ride along with me, as we explore the shot as laid out.

Hohenfels Volks: OlympiaZentrum
Olympiazentrum in Munich.

As you can see, this was taken at Olympia Zentrum, the compound built for the 1972 Munich Olympics. Given the amount of visitors that flow through Munich on any given day, not to mention annually, the difficulty is composing your image. The difficulty arises when one realizes that just about every conceivable way of showing the park and Zentrum has most likely been shot. Add the featureless sky, and you’re destined for disappointment.

Walking around the lake and park presented some wonderful shots, some of which I took. The problem was in trying to make an image that was different from all the cookie cutter see and shoot snapshots you see everywhere. We all see the same shots and most of take them. Without ever moving around or seeing with a slightly different point of view, we cut our cookie with our neighbor’s dime store mold.

Stopping to view the flowers and see if I could work them into a shot, I was presented with this view. I knew this shot would give my cookie a life of its own, I metered the flowers at about 500 c/ft2, or about 1 ½ stops brighter than the sky. Setting my camera to f/11 at 1/60 gave me about M+3 on the flowers and M+2ish on the sky. It also allowed the trees and building detail to come through and hold their values quite well. I edited the shot for N-1, giving a nice separation to the sky and flower values, while allowing the trees to retain a large amount of color. Shooting slower allowed some nice DOF softening at the building and trees, without detracting from their form or impact.

This image gives me, what I feel is a departure from the everyday scenes of the place, without removing the ability to tell where it was taken, and at the same time departs slightly from a literal rendering of the scene by placing the values where I visualized them. Visualizing is an important part of any image-creating endeavor, and must be practiced. This little exercise allowed me to improve my skills while on a family outing.

This week's exercise is to visualize a shot of something mundane; creating a scene that you can take ownership of with pride. See the scene as you want to show it, think through the steps to make it a reality, and then make the shot. Practice this, shoot for your vision, and exercise your creativity, you’ll love what starts happening. You’ll love your creations that stand apart from every other shot of the same thing.

I’m looking forward to seeing your results and hearing from you. Get the comments, thoughts, and questions coming. Let me know what you think and how you’re using your camera! Share your thoughts here or at the Hohenfels Volks Facebook page. Of course, commenting on both Facebook and here is always appreciated, too! Don't forget, we're on Google+, too!

Monday, May 14, 2012

Color Balance and Exposure

Greetings, volks. Welcome to Hohenfels Volks, THE place for our place! After a chilly weekend and a wonderful Mother’s Day with the family, it’s time to get back to the regularities of life, which includes plenty of time behind the lens. Let’s hope a nice week present Hohenfels with some great photo ops and we have our cameras ready!

Today we’ll discuss a little bit about color, color balance, and the impact they have on exposure. We most often see the impact when shooting B&W, but in today’s digital age, we see it more and more. So let’s get started.

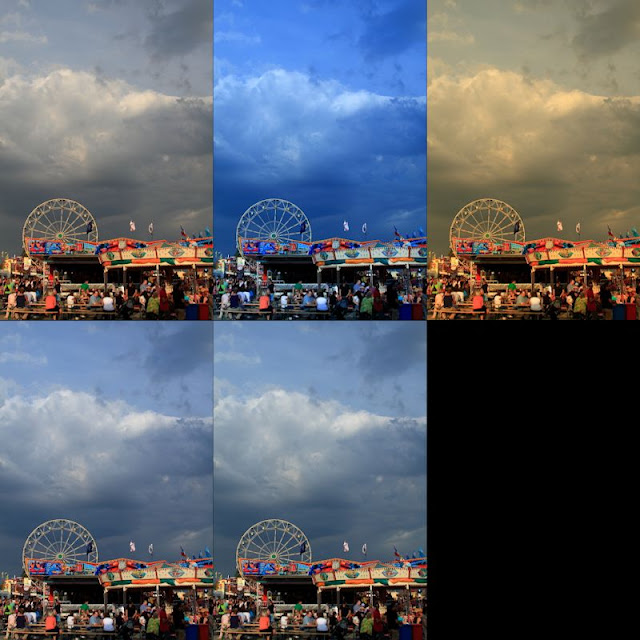
Most of today’s sensors seem biased toward the red. When you decrease the amount of red in the scene, you decrease your overall exposure. Over the course of editing photos and correcting color balance, you’ll start noting that decreasing the color temperature toward 4000K or lower a decrease in brightness generally occurs. This is especially true when using redder lights or in daylight shots. This can be clearly seen in the following series of images. All the settings are identical, except the color balance, which was set for to display this.

Hohenfels Volks: Color and Exposure
Top row L-R; no color balance, 3600K, 8700K Second row; click for the flag, click for the clouds. Notice the apparent changes in both exposure level and contrast.

Color balance also affects your exposure for black and white shots, even digital ones. You can see this in the shots below.

Hohenfels Volks: B&W Color exposure
Here we see the impact of color balance on black and white. The left is set for about 2700K and the right is 7000k.

By adjusting your color balance, you can correct your lighting to match what it was during your shooting. Doing this digitally without balancing your lighting through the proper application of color matching gels or matching your light sources can lead to issues that seem insurmountable, and may well be.

The best method to create proper color balance is to use a white target made for color balancing photographs and setting up a profile for that lighting situation. When you’re shooting a gathering for instance, set your custom white balance using the white target in the actual lighting conditions that you’ll be shooting in. This will enable you to have your white properly balanced, and enable batch white balancing. When shooting RAW this is the preferred method, as it can easily be changed should the results not be to your taste. Another method is to shoot a white balance shot as before, then only apply it where needed during RAW conversion. Of course, in situations like gatherings and events, I’ve found the best results to be obtained by shooting a white balance shot for each direction I’ll be photographing and applying them based on the shots. You usually get better results in mixed lighting this way.

When taking your white shots, make sure to frame the white card so that as much white is showing as possible. I find keeping some of the scene as reference helps when doing multiple white balance shots, so that I can remember which direction the shots were made. You can also use an 18% gray exposure target card, as long as there is no color in the card itself other than gray. Often times, the dyes used can lead to odd colorcasts. This is also true for white cards of lower quality. I used one once that showed up green on all the test shots I made. The actual shots would have been wasted if I had been shooting JPG and not RAW.

All this leads to this week’s exercise. Set your camera to monochrome and shoot a series of shots in different lighting. When you import the RAW files to your favorite converter, adjust your color temperature and see how it influences your exposure levels. Then try to apply several monochrome color filters and see the changes. Then set your picture style to one of the color modes and change your color temperature. You will see in all the cases, your exposure will change over different parts of the scene. Remember how you affect the scene, and when you’re out shooting apply that knowledge to your exposures. You’ll see things different and improve your work!

Time to get out and do some shooting, I hope you’ll be out today getting your shots in, too! Make some for us and share the wealth!

I’m looking forward to seeing your results and hearing from you. Let me know what you think and how you’re using your camera! Share your thoughts here or at the Hohenfels Volks Facebook page. Of course, commenting on both Facebook and here is always appreciated, too! Don't forget, we're on Google+, too!

Thursday, May 10, 2012

Luminance Values and Exposure

Greetings, volks. Welcome to Hohenfels Volks, THE place for our place! Spring, being upon us here in Hohenfels, is ripe with opportunities for our craft. Looking around, the trees are bright and clean, the flowers are bursting with color, and the Germany is waking up to a wonderful summer ahead.

Today’s post, delayed by unfortunate occurrences, is about luminance values, and how we can record, refer to, and use those values to improve our image. There will be some math here, but nothing major.

The first thing we need to discuss is the exposure formula. Ansel Adams described it as being the reciprocal of the luminance at a speeds key stop. The key stop for any speed is the square root of the speed. Here is a list of most speed/stop combinations.

Speed Key Stop
100 10
125 11
160 12
250 16
320 17
400 20
480/500 22
620 25
800 28
1000 32

I began the table at ISO 100 and ended at ISO 1000. ISO 100 is the lowest most consumer cameras go, and f/32 is about as high as most consumer lenses get today.

By setting your camera to any of the pairs in the table, you can read the luminance of your metered object, measured in candles/square foot, or c/ft2. For instance at ISO 125, f/11, metering 1/125, then the luminance value is 125 c/ft2. If your meter shows 30 seconds, then the luminance is 1/30 c/ft2. That will put you at 18%, or neutral gray reference values. This is what I refer to as M, or an M exposure.

When photographing normal scenes, we often encounter a scale of values that for any given exposure will run from approximately M-5 and lower to M+5 or higher. By learning to look at luminance values as described above, you learn to tame that range, creating an image that will make you justifiably proud.

An example of exposing for your luminance reading is when you meter the clear sky; you should read about f/11, ISO125, 1/300. This will put your sky into the range of 18% reflectance. We know that a clear Northern sky should fall about M+1, which means we should expose for the sky at f/11, ISO125, 1/150. Of course, this goes back to place and fall exposures. You must decide the key elements within your scene and where they should be placed. Once this exposure and placement is determined, all other values fall where their luminance levels impact your sensor. Knowing these values will help you determine where you wish to place elements and where your remaining elements will fall.

Even metering clouds, you will find a range of luminance values that may run from 200 c/ft2 to 1000 c/ft2. By meter the brightest part, 1000 c/ft2, then adding 3 stops, you bring your 200 c/ft2 up to nearly M+1 ½ in the exposure range, which is slightly brighter than the surrounding blue sky, and significantly darker than the brights in the clouds. Your brights will print out with slight tonal variations, and darker areas will have adequate or better textural ranges. You also bring areas metering at 50 c/ft2 up to the equivalent exposure of 400 c/ft2. These equivalent values are in relation to your original metering from the bright part of the clouds.

Recording your luminance values across the range of your scene will help you learn to recognize values, and expose with more confidence. It will also help in editing your images and preparing them for either printing or display. I would suggest metering across the range of M-4 to M+4 after determining your priorities, and noting the results. Even if you’re shooting at some combination not listed above, take the luminance readings using a combination. After reading the values, switch to your desired settings, compose, and make your image. Values for M+ and M- can be extrapolated by halving or doubling the values obtained with your meter. This is less accurate, but still of considerable value in perfecting your images.

Another great advantage of knowing your luminance and place values, is the ability to tell anyone about your exposure without giving the ISO, f/stop, EI, shutter speed, and so on. Tell them you metered this at 250 c/ft2, and gave M+1 to get the exposure where you wanted it. Regardless of your settings, they will know that to get that exposure from 250 c/ft2, then they give M+1 at whatever aperture and speed they desire, for instance ISO 125, f/8, 1/250 or ISO 400, f/5.6, 1/1600. Both will give the same results, and use the same values, 250 c/ft2 +1 stop, and make exposing a scene more consistent. It’s also useful when referring to edits performed. Taking the last example, you may have shot at M+1, and then edited it to M to decrease contrast. In this case, you can say this was shot at 250 c/ft2 +1 stop, then edited to M for the final effect. This will help others understand and help you remember your shots without having to know every little bit of detail.

There are other ways of expressing luminance, for instance EV or c/m2, or lumens, and as long as you find a consistent method of evaluating and expressing that exposure, your images will be consistent with your vision. Don’t get hung up on what I use, try it and if it doesn’t work, try something else. You’ll still have a working system, and you’ll still be enjoying what we love to do!

Time to get out and do some shooting, I hope you’ll be out today getting your shots in, too!

I’m looking forward to seeing your results and hearing from you. Let me know what you think and how you’re using your camera! Share your thoughts here or at the Hohenfels Volks Facebook page. Of course, commenting on both Facebook and here is always appreciated, too! Don't forget, we're on Google+, too!

Friday, May 4, 2012

Tech Talk: Rating Your Sensor

Greetings, volks. Welcome to Hohenfels Volks, THE place for our place! WOW! The annual Hohenfels Volksfest was a great time and the weather was perfect. Now the clouds are puffing up some, and that makes for great outdoor photos that include the sky!

Today we’re going to introduce rating and EI.

Your camera has a range of ISOs you can choose from, most likely running from ISO100 to ISO3200 in third stop increments. Camera and film manufacturers used the International Standards Organization methods to set the speed, or ISO, of your sensor or film. They generally are set to favor overexposure, as underexposure is harder to correct. Therefore, in test conditions ISO 100 performs at ISO 80-100 to get you exposed at the general target for the contrast and exposure standards set by the organization. This used to be referred to as a film’s “box speed.” For digital work, I’ve come to think of it as “nominal.” Therefore, when I say I shot it at ISO 125, that’s what I was set and exposed for.

The ISO recognized that most scenes deviated from test conditions, as did developing or processing. A film may be rated at ISO 100, when developed in a certain developer for a specific time, but not for any other combination. Film shooters would “rate” their film at different speeds for their methods, including exposure and development controls. For instance, some would shoot FP4+, which is ISO125 in Ilford’s ID11 developer, rated at EI80 developed in Kodak D-76 for their preferred method of exposing and developing a standard shot.

EI, or “exposure index,” is what you rate your film at for your methods, and usually refers to speed rating assigned that’s different from the film's actual speed. Generally, when you shoot with your digital SLR, you shoot maybe at ISO 100, and edit it in your manufacturer’s provided application and get decent results. You are shooting and making your shot at nominal speed, or box speed with film.

You may find that in high contrast scenes at nominal speed, you are getting shadows that are clipped to black and whites that are blown and have no detail. In that case, it’s time to change your EI, or rate your speed different. To do this correctly, you should test your camera, and we’re going to cover the procedures to do that for YOUR best results. Since this test is based on your equipment, metering, and editing, someone else will get different results using the same equipment. This test is based on your style and methods, which others may not follow. Keep that in mind when “rating” your gear, you can recommend your “rating” to others with the same camera, they will most likely appreciate the information, but each “rating” is subjective, and will work best in your hands.

This testing becomes especially important when shooting at extremes of lighting. In very low light, like that in most old buildings, noise is a real concern when trying to increase your image brightness during editing, and in bright daylight lit landscapes skies and clouds can become just blotches of white without any detail.

The procedures for setting your EI involved a gray card, meter, and your camera. You should be set up for this in light conditions that match your intended shooting conditions to effectively use this method.

Step 1, set up your gray card in lighting that matches your shooting conditions. Step 2, set your desired ISO reading on your camera, and select RAW mode. Step 3; set your camera to f/8 or f/11 and AV mode. Step 4, meter your gray card, use spot metering and fill as much of the frame as possible with the gray card. Note the shutter speed. Step 4, set your camera to manual mode, and enter the shutter speed metered in step3, which should give you an 18% gray image. Step 5: compose your test shot. You can pull back some, including other elements. I have a test screen that includes black and white pieces and collapses nicely into a camera bag, and prefer to use that to check contrast ranges while doing this test. Step 6, take the following series of shots- at the metered reading obtained previously, -1/3 stop, -2/3 stop, -1 stop, +1/3 stop, +2/3 stop, and +1 stop. Step 7, load the images onto your computer. Then open your image editing application. Step 8, Open each image in turn, and find the one that is MOST CLOSELY identical to the gray card in exposure for your set up. Make sure to perform absolutely no adjustments to the images, as we are looking for the most closely identical image. Take note of the settings used for this shot. Step 9, this is your EI for that type of scene with that ISO selected. For example if –1/3 stop produced the best rendition for ISO100, then your EI would be 125 or EI125. You will effectively be rating your ISO100 shots at 125, and removing 1/3 stop on all your shots in those conditions. To accomplish this, when shooting at ISO100 simply remove 1/3 stop exposure, either by increasing your shutter speed 1/3 stop or closing down your aperture 1/3 stop.

Rating your sensor or speed before shooting can save a lot of time editing and the heartbreak of a shot that doesn’t live up to your expectations. It’s not perfect, and varies based up taste, style, and personal preference, but it will bring you closer to achieving your vision. It’s definitely something to try in conjunction with this week’s exercise on contrast and contrast control. Combine it with M+ and M- exposure placement for even better results. By exposing properly, you can keep your contrast in the desired range, and make it easier to achieve your vision in your final processing stage.

For those interested in more information about film speed, Wikipedia has a great article. It includes formulae and details about how box speed and nominal are attained.

I’m looking forward to seeing your results and hearing from you. Let me know what you think and how you’re using your camera! Share your thoughts here or at the Hohenfels Volks Facebook page. Of course, commenting on both Facebook and here is always appreciated, too! Don't forget, we're on Google+, too!

Tuesday, May 1, 2012

Another Exercise...

Greetings, volks. Welcome to Hohenfels Volks, THE place for our place! Hohenfels, basking in the warmth and sun of spring, has really enjoyed having the annual German American Volksfest. I hope the Hohenfels Volks has, too, with all the opportunities to get and make some great shots!

In keeping with our last post, I thought I’d share a photo from Saturday’s fireworks, and then move on to another exercise.

Hohenfels Volks: Flaming Blossoms
f/22, ISO 125, 16 seconds, Bulb mode
Fireworks from the Volks fest

I shot from the parking area, including the windsock in the image, to create some context. Notice the fest tent in the lower left to give a sense of scale. I shot this at f/22 to minimize the impact of the Ferris wheel and to create some nice starbursts with the lighting along the bottom. The timing on this shot was quite lucky, as the combined effects create a flower like appearance of the fireworks. The white “dot” below and to the right of the larger burst was the only star visible at that time. I liked having it there, but could have cloned it out. Things like that are a matter of taste.

On to our exercise, we’re going to look at taming the relationship between highlights and shadows. One way to do this is through a combination of metering and exposure. Shoot scenes with a relatively high range of contrasts, but meter for the desired range. Should the highlights be the most important meter for them, and likewise for the shadows or midtones.

When shooting these shots, keep in mind controls you can use for bringing your images into line with your intention. For instance, a high contrast scene can be tamed slightly using an inverted S curves adjustment, and lowering the contrast. Remember, less is more, as applying too much of only one adjustment can leave the scene looking like, in the words of Ansel Adams, “chalk and charcoal.”

There are ways to increase contrast and lower it at the same time. We’ll look at some in a post later this week, but they include things like toning and intensification.

Hohenfels Volks: Simulated- Skies Over Fest
f/11, ISO 125, 1/60, metered for the highlights on the clouds and exposed at M+3
Stormy looking clouds over the fest. Edited for an old time semi-selenium toning and intensification.

Get out, get shooting, and enjoy the weather while it lasts!

Don’t forget to post any of your images you’d like to see here at the Hohenfels Volks Facebook page. Of course, commenting on both Facebook and here is always appreciated, too! Don't forget, we're on Google+, too!

Thursday, April 26, 2012

Hohenfels; Bursting!

Greetings, volks. Welcome to Hohenfels Volks, THE place for our place! Spring is upon us finally. Hohenfels is bursting to life with the colors and sounds of renewal. This is truly a great time to be out and about, making photos and capturing a fleeting moment of the glory that surrounds us.

Today I’m doing a short post; things have been busy and trying the last few weeks. We’re going to take a short look at capturing fireworks. This is by no means a full list of tips, but something to think about.

The first thing to consider is a tripod! You’re going to need something reasonably sturdy and level when the legs are extended. Another thing to consider is ease of operation, and adjustability.

The next thing that is a must have is a remote release. Without one of these, a steady tripod is more or less useless. This little item, reasonably priced at any photo shop, can make an image stable. Just the act of depressing the shutter release can cause some serious vibration. Another advantage of using a remote trigger or release is the ability to view the scene while you shoot. Just set your composition and focus, and then enjoy the show while shooting.

Make sure you use a lens that is short enough, yet long enough. Too short, and your shots lose the feeling that comes form small town fireworks, and too long you end up without any context.

Set your ISO to 200, or 400 depending on your intentions. Then set your aperture to f/8 and your shutter speed to B. Time your shots to the start of a volley and activate the shutter. Hold your release button for anywhere from 10 to 30 seconds to get a nice full burst and some detail from the area, then release. Over the course of a 20-minute show, you can get some really amazing photos.

One more thing, if your camera allows it, activate your mirror lock up feature. This will lower the vibration even more. Don’t forget to turn off you image stabilization or you’ll end with some blur.

Keep in mid your visualizing and composition, these can make a great shot into a real winner!

Don’t forget to post any of your images you’d like to see here at the Hohenfels Volks Facebook page. Of course, commenting on both Facebook and here is always appreciated, too! Don't forget, we're on Google+, too!
Wednesday, April 18, 2012

Photo Projects Make Photo Prospects

Greetings, volks. Welcome to Hohenfels Volks, THE place for our place! Cold and gray Hohenfels, actually a beautiful area for photographers, is getting ready for more chances to make that winner.

Today’s going to be another short post. We’re going to talk about our art, and one of the many ways we can get our artistic juices flowing, photography projects.

Simply put, a photo project is a chance to put together a series of images related to one another by some underlying thread of reason. It might be shapes or colors, or even related to some current event. The basic premise is to unit a series of images, similar or otherwise, with this thread that is the basis for your project.

Here are a couple ideas to check out, trains, country roads, trees, coffee houses, or even a series of shots with only the street they’re taken on being the commonality. They force us to examine and see threads that are often overlooked and allow us to develop our style, technique, and ability to see the world around for the opportunities it presents.

Hohenfels Volks: Spring in the Park
ISO 200, f/5.6, 1/500, 50mm
Springtime in the park. Spring makes an excellent photo project! This was metered for the tree trunk area and shot at M-2, with -1 stop in conversion from RAW. Using a yellow filter brought out the hanging vine-like leaves of the tree.

I’m hoping everyone will undertake their own photo project over the next couple of weeks; I’d love to see how you’re viewing things. Many of us see the same things every day, but we all view them differently, and these little projects will help you show your point of view!

Don’t forget to post any of your images you’d like to see here at the Hohenfels Volks Facebook page. Of course, commenting on both Facebook and here is always appreciated, too! Don't forget, we're on Google+, too!

Tuesday, April 17, 2012

Ambience...

Greetings, volks. Welcome to Hohenfels Volks, THE place for our place! This time of year in Hohenfels starts seeing some awesome photo opportunities springing up everywhere, I hope you’re seeing some!

First, let me apologize for the sporadic posting, an emergency has left me somewhat distracted. Such is life; I’m making lemonade from those lemons as we speak!

I hope everyone is enjoying the exercises we’ve been sharing. I’ve been shooting mostly film again as I develop a new way of looking at values and value control in digital photography. Today we’re going to cover a couple tips when shooting with ambient light.

Ambient light covers a lot of ground, from the living room lit only by the fireplace to the bright sunlit beaches of the Med. We’re going to focus on the darker side here to make this short.

The first and most important thing to be said about low ambient light shots is that a tripod is required! Without a tripod, you’ll never get a truly spot on level of sharpness that sets an image apart. A shot handheld with a 55mm lens at 1/30 with IS turned on will still be less sharp than a 55mm on a tripod at 1/25 with IS off. You’ll still get something you can use, and be proud of, but nothing like you’d get when you stick it the ground!

Second, consider how dark it is and how much light is available. You will need an ISO that will prove sensitive enough for your range of luminance, yet low enough to prevent excess noise to become a problem.

The third thing to consider is metering and exposure. In case you haven’t noticed, I’ve become big on using the meter to aid in getting things to levels I visualized. Your camera has a built in meter, so let’s put it to use. Do you want to use a small aperture or a faster shutter speed? To control the DOF, go to AV mode and set your desired aperture. To shoot something with more speed, go to TV and set your desired shutter speed. Before you meter, you need to decide where your want your levels to be. For a brighter image, you’ll need greater exposure in the shadows, and conversely less exposure for a darker image. Once you determine that, meter for your intended image. You’ll have a little leeway in editing, but remember that increasing your brightness in editing can introduce some seriously unsightly noise.

Another thing is your composition. You want to compose your image in a way that maximizes visual and emotional appeal. Move around to find that shot, try moving your subject. You may be able to move your light source. Zoom in or out to cover what you envisioned, and you'll notice some interesting things happen, and this ties in to our exercise on shooting only 1 focal length. Remember how you had to move around to get the shot?

Here are a couple more tips for low ambient light shooting. First, use a cable release. This will provide an even steadier platform. Second, if your camera has it, enable mirror lock-up. This locks your mirror in the up position, preventing the mirror vibrations from introducing shake into your image. A lot of cameras let you compose the image, activate the shutter button to lock the mirror, then wait for another shutter activation to actually expose the scene. Third, try to introduce balance into the composition between light and shadow. This allows you to create something that has fewer bright distractions against your main subject. Lastly, this is incredibly important, if your shooting at night or anywhere there is some risk of accident or injury, take a light and play it safe!

I know this all over simplified, but learning your gear and using these simple tips will help improve your low light and ambient light shots. It will also help you get that shot you visualized and not feel like your time was wasted.

Enjoy the week and keep on shooting.

Don’t forget to post any of your images you’d like to see here at the Hohenfels Volks Facebook page. Of course, commenting on both Facebook and here is always appreciated, too! Don't forget, we're on Google+, too!

Tuesday, April 10, 2012

Ride Along Shot: High...

Greetings, volks. Welcome to Hohenfels Volks, THE place for our place! Welcoming Tuesday, Hohenfels finds a nice day breaking out and greeting us back.

Let’s visit Regensburg for another ride along shot. This time we’re going to look at a shot taken on film in the old part of town.

Here’s the image.
Hohenfels Volks: High Key Shopping
ISO 100 Agfa APX100, f/8, 1/50, 50mm
A shop window in Regensburg's old town.

This was taken outside one of the many little shops lining the square, and not far from the Dom, or cathedral. I was immediately attracted to the material, old boxes, wreaths, and some cool roses. Throw in the bottles and glassware in the window, and it really seemed like a “must have” shot.

Metering from the white portion in the bottom right window gave too little exposure, so I shot at M+3 and developed for N. This left white zone to about M+3 and leaves a nice tonal range. This also gives us a nice high key image, with a very suitable contrast, and detail in the brightest parts. The reflections in the windows could have been removed with a CP filter, but I would lose the high key effect of the light reflecting around the scene.

The meter gave me f/16 at 1/100. I think this was shot on Agfa APX100 film. I shot with a 50mm f/1.8 prime, as I did the entire day. The final exposure was f/8 and 1/50, with an ISO of 100. I didn’t want to go slower, as the old cameras had no IS, and any wider would have left the DOF inadequate to express what I had envisioned. The sun was out, it was mid-day, and the weather had warmed up a little that day. It was still snowing back in Hohenfels, which was a bit surprising as I got off the train.

After scanning the negative, editing was most certainly required. The sharpness was quite nearly gone, the contrast had come down, and the whites were nearly blown. By applying curves in an inverse S and adjusting the levels to bring down the shadows, and raise the midtones and highlights, I was nearly complete. The next step was to reduce noise and apply an unsharp mask at about 3px radius, 90 strength, and 2 clipping.

The final image grew on me. At first, being satisfied with the image, it was ok. After editing and revisiting the image several times, I realize it had become something I really liked. It showed that the system of metering for the highlights when you plan an image to be presented digitally, can lead to some really nice results.

By exposing on the plus side, it brought out some detail in the shadows, allowing just enough to bring the eye to them in the middle of the brights. Our eyes are generally drawn to the brightest part of a scene first, which is why we often keep our subject 1/3 to 1 stop brighter that the surrounding. In cases like this, it sets our darks apart and brings focus to the play between shadow and light.

I hope I haven’t bored you too much! Enjoy the rest of a lovely evening, maybe using this time to get some blue or golden hour shots in. Take care and keep shooting.

Don’t forget to post any of your images you’d like to see here at the Hohenfels Volks Facebook page. Of course, commenting on both Facebook and here is always appreciated, too! Don't forget, we're on Google+, too!