Greetings, volks. Welcome to Hohenfels Volks, THE place for our place! Brrr. That’s our word of the day!
Today we’re going to review some of the basics of photography and exposure. This can all be found on our Introduction to Photography page. We should all have a good idea of this stuff, but it always helps to refresh the cup, so to speak.
First, we’ll address our exposure triangle. The triangle consists of 1- ISO or film speed, 2- shutter speed, and 3- aperture. To change exposure, you change any side of the triangle. To keep the same exposure, you have to change at least 2 sides. For instance, we set up on a sunny day at ISO 100, f/16, and 1/100. According to the “sunny 16 rule,” we’re good to go. But we want less DOF, so we need to increase our aperture. We go to f/4 to give us a shallow focus. If we don’t change another side of our triangle, we overexpose and create a mess. We have a 4-stop increase in the amount of light coming in, so we need a four-stop increase in shutter speed or 4-stop decrease in ISO. Since we can’t bring our ISO lower, we need to change our shutter speed to 1/1600. At 1/1600 at f/4, that gives us the same as 1/100 at f/16. If we want to increase our exposure, we can change any 1 side and either decrease our exposure or increase it depending on our new settings. For instance we want to increase our exposure on ISO 100, f/16, 1/100 2 stops, so increasing our aperture to f/8, decreasing our shutter speed to 1/25, or increasing our ISO to 400 will do just that. Remember, when we meter something, or a scene, the meter gives us the exposure for 18% gray, which is zone 5. Knowing this allows us to place the item we meter into different zones or exposure levels.
Next up, we’ll look quickly at depth of field, or DOF. This is a product of our focal length and aperture. The longer our lens’s focal length is, the shallower our DOF. The wider our aperture is, the shallower our DOF. This can be a good way to remove or minimize distractions. A 100mm lens at f/16 has about the same DOF as a 50mm lens at f/4. Focused at 10 feet, both give a DOF running from about 9.17 to 11 feet. Seeing that, you can deduce that a shorter lens has a wider DOF.
Remember, these 2 topics we’ve reviewed go together. By adjusting your aperture for a shallower DOF, you’ll have to change something else to maintain your exposure. If you wish to move into a new zone, you’ll change your DOF if you use your aperture to move zones.
We’ll review composition and inspiration in our next talk. Remember to vote and get your pics in early. I hope you’ll all participate in this week’s theme, solitude. We’re aiming for more votes for our theme, so get involved and let’s enjoy the journey together!
Don’t forget to post any of your images you’d like to see here at the Hohenfels Volks Facebook page. Of course, commenting on both Facebook and here is always appreciated, too! Don't foget, we're on Google+, too!

Showing posts with label introduction. Show all posts
Showing posts with label introduction. Show all posts
Wednesday, February 1, 2012
Thursday, January 5, 2012
What's On the Menu 3
Welcome back to Hohenfels Volks, THE place for our place! Given the weather in Hohenfels, we’re going to stay and learn some more about our cameras.
Today we're going back into the camera menu. The first 2 parts can be found here and here), so get ready to follow along in your manual and with your camera.
Today we’ll cover 2 tabs, one has 2 settings, and the other only has 6. Most of them I don’t worry too much about, as I’ve set mine up the way that works for me. You may want to try them and see what you do and don’t like, as with anything we’ve done so far.
Starting at Shooting Tab 3, we have 2 settings; the first is Dust Delete Data. This allows you to take a shot, and using the spots caused by any dust, append that data to your images. Canon’s DPP program will automatically delete the dust spots, based on the data obtained. To use this feature, take a white sheet of paper, set your lens to 50mm or longer, and your focus to infinity. When you select ok, then set, the sensor is cleaned, then you will need to fill the frame with the solid white sheet of paper, and shoot a shot from about 1 foot away. When the process is complete, all future shots will have that data appended and have those spots noted corrected in DPP.
The second setting on this tab is One-Touch RAW+JPEG. This tab allows you to shoot a RAW image if you’re only shooting JPG, or a JPG image if you’re only shooting RAW. This allows to you to get 2 different copies of the same image. Since I only shoot RAW, I never use this. Shooting RAW+JPEG takes more space and allows fewer images to be captured on your card.
Moving on to Shooting Tab 4, the first selection is Live View Enabled. This allows shooting with Live View. Live View allows you to shoot using your display instead of your viewfinder. The downsides of shooting in the mode are you can’t use the viewfinder, the sensor is exposed the entire time, and heat builds up from the sensor and displayed being powered up. There is another downside, as you will see on the next selection.
The next selection is AF Mode. This controls what type of auto-focus mode used. There are 3 choices. The first is Live Mode. This uses the live View screen for focusing, which is slower and less accurate. The second is Face Detection Live Mode. This uses a larger focus zone, and requires a face looking at the camera. Again, it is slower and can be less accurate. The third is Quick Mode. This allows focus using the same dedicated auto-focus sensor used during viewfinder shooting. This is quickest and most accurate when using Live View.
The next choice is Grid Display. This allows you to superimpose a grid on your screen. It’s useful for composing images, but not much else.
The fourth choice is Expo Simulation. Enabling this feature allows the screen brightness to vary according to your shot settings. It will get darker with less exposure set and brighter with more exposure set. It’s an artificial view, as the aperture doesn’t change, nor does the shutter.
The fifth choice is Silent Mode. There are 3 choices here. Mode 1, which allows for continuous shooting, with somewhat reduced noise, Mode 2 which means that you can only take one shot at a time, this minimizes noise, but requires release of the shutter button after every shot and disables continuous shooting, the last choice is Disabled. This mode is primarily for shooting with accessory lenses and non-Canon flashes.
The final choice for this tab is Metering Timer. This changes the amount of time your camera displays your exposure settings when taking a shot.
That’s the end of the shooting tabs. After these comes your playback tabs. We’ll cover them in future What’s On the Menu posts.
Enjoy the rest of your day, and remember to cast your vote for next week’s theme. Get yours in to have a say! Don’t forget to get your pics posted at the Hohenfels Volks Facebook page. Of course, commenting on both Facebook and here is always appreciated, too!
Thursday, November 17, 2011
Prevalent Art Styles in Our Area
Greetings, Hohenfels, welcome to Hohenfels Volks, THE place for our place. This lovely Thursday came in cold, remained cold, and leaves us shivering in it’s tightening embrace! Things are warming up spiritually, though, with the approach of the holidays, so look forward to the warmth and glow of family, friends, and cheer!
Today I thought we’d touch on some of the different art and architectural styles you’ll encounter during your journeys through our place. We’re only going to touch on a couple of styles and the basic characteristics. The reason we will discuss these is that as you explore cathedrals, palaces, churches, graveyards, and other parts of the area, you will encounter these quite a bit. It helps to know what you’re looking at when folks ask about your photos, so let’s run through a little. I’m not an art authority, so please let me know if I make any mistakes, so I can correct them.
Let’s start with Romanesque, which seems to have started around 1000 AD and ended about the 13th century. There was quite a bit of Byzantine influence, especially in the churches. The tops of columns were often carved with whole scenes. Statues of the Madonna were quite popular during this period. Most of the bright colors used in the art have faded, with the stained glass being the most colorful examples. To see this style, check out the Schottenkirche, St James’s in Regensburg.
Moving on, we run across the Gothic style or period. Gothic art was a medieval style reflecting the themes of the day. A large amount of Gothic art was religious in its nature. The architecture of the time relied heavily upon pointed arches, ribbed vaults, and the flying buttress. These allowed more emphasis of lines and light, and space in the structure. The labor and time to create these majestic Doms was immense! A trend in Gothic art was the integration of sculpture, stained glass, and architecture. Bamberg cathedral has the only life sized horse and rider statue in Europe since about 500AD, look for the "green man" below the horse's hoof. The Gothic period ran from about 1200 until about 1600. A great example of Gothic architecture is the Dom St Peter in Regensburg or the cathedral in Bamberg.
Next up, we find Baroque styles coming into importance. The baroque period ran from about 1600 until 1800. The general characteristics of baroque art were movement and energy. Strong contrasts of light and shadow, chiaroscuro, were very common in the arts of this time. Themes included scenes of ecstasies, martyrs, and other religious events. Artists tried to portray the emotions and feelings in the soul on their subjects. This time gave rise to the Dutch masters and others who worked with light in new ways, and continue to inspire us to this day! In Hohenfels, we have St Ulrich Church, a Baroque church built between 1716 and 1720. The Asam brothers did the frescoes inside.
Rococo Art is often called later Baroque. The Rococo style led to art that was more decorative and served no other real purpose than decoration. Bold colors were favored. Themes involved hobbies of the rich and the nobles, sensual activities, love, frivolity, and romantic intrigue. It was very ornate and playful, with elaborate details and craftsmanship. For some great examples of Rococo style, check out the Residenz in Munich, as well as the Residenz in Wurzburg.
Learning more about these styles can help us in more ways that one. Knowing them allows us to explain what we shot, but it also allows us to learn new ways to work our camera and art. Remember to share your pics and post your questions at the Hohenfels Volks Facebook page, and or by commenting here!
Wednesday, November 16, 2011
Gear Day- Pop Goes the...
Greetings, Hohenfels, welcome to Hohenfels Volks, THE place for our place and our Volks. Another day, trees covered in white and ready for the icy grip of winter, closes around us.
Today we’re going to talk about flash. Learning to use flash is one of the major steps you should take in getting your photos gallery ready.
Today’s electronic flashes work amazingly well and can put a great deal of light right where you need it. The secret to using flash to get the right exposure is knowing how to meter and knowing how to balance your lighting.
First, let’s talk about several terms and features of an average flash.
The first term to know is Guide Number or GN. This is an indication of your flash’s power. It means your flash can provide light up to that distance at maximum zoom, for ISO 100. It’s usually measured in meters. The Canon 580EXII has a guide number of 58, as does the Yongnuo YN-560. This is used to calculate manual flash settings for your camera.
The second term is zoom. Your flash can often zoom to a preset distance to match the zoom of your lens, allowing it to throw light more in line with what you are shooting. This is extremely useful in auto flash; the drawback to that is the camera must be connected to the flash. The longer the zoon, the further the light will travel, and the less it will spread out.
The third term is sync speed, or shutter sync speed. On most higher end cameras, like the EOS 7D and 60D this is 1/250. For the lower end cameras, like the Digital Rebel series, this is 1/200. Some cameras won’t sync above 1/125 to 1/160. The slower the maximum sync speed, the slower you have to shoot. At speeds above the sync speed, either you will need a flash with high-speed sync, or you will get dark bands on your image.
The fourth term is rear or front curtain sync. In rear curtain sync, your flash fires at the end of the exposure, and in front curtain it fires at the start. This really only applies beginning at 1/30 – 1/60, depending on your model.
The last term I’ll introduce is TTL. Most of today’s automatic flashes are capable of being controlled by the camera, provided they are mounted to the camera. Today’s cameras meter through the lens, and pass that information to the flash to set output power and zoom. Many cameras use a more advanced feature called E-TTL, which is electronic metering through the lens. Using this method can improve your flash exposures. The downside is using your flash on camera can be disappointing, as it flattens the light and removes depth and character.
The range of a flash is limited by inverse square law, which states that light drops off from a source rapidly. For instance, a flashlight shined into the dark starts out quite bright, but ends up not even visible beyond some distance based on its power. This law states that doubling the distance from a subject to a source reduces light to ¼ its original level. Almost all light sources follow this rule.
When using your flash on camera, use your E-TTL features to get the best exposure. To correctly expose flash manually, you will need to adjust your aperture to control exposure for the light from the flash and your speed to control ambient light. To find the required to take a photo of a subject use this formula- f-stop number = GN/distance to subject. To figure out the distance to place your flash for a preset aperture use this formula- distance = GN/f-stop number. These are usually measured in meters, so remember to set up accordingly. Guide number is at ISO 100, so any change in ISO, must be accounted for.
A couple points- on camera flash gives a hard light, which results in a loss of shadows in the image making the subject appear flattish. On camera, or flash on the axis of the lens, gives red-eye effect, which is when the eye reflects red light straight back in the direction it came from.
Another thing to mention about off camera flash, besides adding depth, character, and bringing out detail, when used properly it can bring out the eye colors and make them stand out a little. This is especially true in brown and dark eyes. It takes some practice, but the results are worth it!
I like to use the YN-560, as this a nice, inexpensive, and powerful manual flash, paired with my with radio triggers. This allows for shots on camera can’t get, and it creates a nice direction to the light. Having directional lighting on a portrait really adds to the magic. That’s why you see it even in the paintings from the old masters. Next time we talk about flash, we’ll discuss fill, main, and lighting ratios. We’ll also discuss basic lighting patterns for portraits, and how to take the guesswork and mathematics out of getting your manual flash exposures.
I hope this information brings you another tool in our quest for the perfect picture. Let me know if it has! Remember to share your pics and post your questions at the Hohenfels Volks Facebook page, and or by commenting here!
Tuesday, November 15, 2011
What's on the Menu Part II
Greetings, Hohenfels, welcome to Hohenfels Volks, THE place for our place. Another day, starting shrouded in mists and fog, ends on a light note, with blue skies and nice weather.
Let’s return to our series on your camera’s menu. (Part 1 is here)
Press the menu button, and you should be on the first tab. Using your multi-controller or command dial, scroll to the second tab, shooting2.
In order, the settings are as follows:
The Exposure compensation/AEB. This allows the camera to change either the shutter speed or aperture to bracket or compensate for exposure. Adjustments are made in 1/3-stop increments. 3 shots are taken, allowing you to choose the best-exposed shot. This is cancelled at power down.
Auto lighting optimizer. This allows dark or low contrast images to be corrected for in camera when shooting JPG. You can set the amount here, or if shooting RAW, in Canon’s Digital Photo Pro application.
White balance. This setting allows you to select what color temperature to use for your white balance. By selecting the right one, whites will be white, and so on. Color balance can be quicker when the right selection is made. Refer to the post on color balance here.
Custom White balance. By using a custom white balance, you ensure proper whites in all shots taken in that specific lighting. Take a photo of a white object in the lighting you will use for your photo then select that image as your custom white balance source. This allows a more accurate setting of color balance tailored for the specific situation.
White balance shift/BKT. This one is a don’t play with it setting. You need to know about color temperatures and color compensation filters. Read your manual carefully before playing with this one!!!!
Color Space. Select sRGB usually. Adobe RGB is expanded color range that is designed for commercial presses and printers, the type we most likely won’t use. Even Miller’s and Mpix recommend sRGB, to ensure proper color calibration and rendition.
Picture style. These styles are created by Canon, but you customize and create new ones. Selecting one these allows the camera to create an image that matches your intentions. Landscape and portrait are 2 commonly used styles. Another one is Monochrome. When you shoot RAW, these settings can be changed in the DPP software. JPEGs cannot be easily corrected unless you do non-destructive editing or save an original file untouched. They use contrast, color, and levels to create a scene that will usually give you what you want.
It’s important to note here that none of the above settings can be used in the fully automatic modes.
Well, that’s today’s “What’s on the Menu.”
We’ll be exploring more settings in another post. I hope this has been of some help to you. Now go out and use your settings to get some great shots and make yourself proud! Remember to share your pics and post your questions at the Hohenfels Volks Facebook page, and or by commenting here!
Thursday, November 10, 2011
Composition- Seeing in Color
Hello, Volks, welcome to Hohenfels Volks. Another week is almost over here in Hohenfels, and we’re onto another post!
Following up on yesterday’s post about color, today we’re going to talk about how color theory can work for you. Using complimentary and adjacent, or analogous, colors can really improve your compositions. The masters, including the painters and old time photographers knew how to get the most from the colors available to them.
Color theory is an extensive subject, and involves a lot more than we’re going to discuss. If you remember back in grade school, you learned there are 3 primary colors, red, yellow, and blue. They are primary because they cannot be made from combinations of other colors. Here’s a basic primary color wheel.

The 3 primary colors
The secondary colors, made from equal parts of 2 primary colors are orange, green, and purple. Here’s another chart showing the relationship between primaries.

The 3 primaries with the secondary colors
Colors opposite each other on the wheel are called complimentary colors. If you stare at one of the colors for some time, and then shift your view to solid white, the compliment, or opposite, of the stared at color will appear.
Beyond that, you have tertiary colors and other more complex blends and hues. Here is a 12-color wheel showing some of the basic ones.

12 colors, including primary, secondary, and tertiary.
Just as colors opposite each other are complimentary, colors next to each other are analogous, which means they are analogs of or for each other.
In normal human color vision, red focus beyond the focal plane, green directly on it, and blue focuses short of it. This is why red appears to advance and blue seems to recede. Another effect of normal human color vision is that the same color appears brighter and larger against a dark background than against a lighter one. Another interesting fact along that same line is that Da Vinci observed, "Colors appear what they are not, according to the ground that surrounds them." Handy stuff for the photographer!
With all that information, feeling overwhelmed can be a problem. So, to make this subject easier, we’re going to show a couple example of how to combine colors into a harmonious composition, and have them add to your image rather than distract from it.

Analogous color scheme. Using this scheme can create calm scenes and photos. Make sure you have enough color contrast, though, to keep your image interesting.

Complementary. Very vibrant and exciting images. Don't overdo it and you can get something really appealing.

This is called a split complementary scheme. This has a strong visual appeal like complementary colors, but with less risk of overdoing it.
Remember, there are other schemes as well. You could do a three color scheme using colors equally spaced through the wheel, which can create a dynamic image, especially when one is given a greater weight in the composition. A great way to get more information is to use Google "color theory." Another great source is Tiger Color. They also have some nifty software and such that will help you understand color.
Look for an assignment related to this post on Facebook in the next couple days. Hopefully we can get everyone posting a couple photos, and get more assignments going. Drop us a comment and let us know what you think of the idea.
Remember to share your pics and post your questions at the Hohenfels Volks Facebook page, and or by commenting here!
Following up on yesterday’s post about color, today we’re going to talk about how color theory can work for you. Using complimentary and adjacent, or analogous, colors can really improve your compositions. The masters, including the painters and old time photographers knew how to get the most from the colors available to them.
Color theory is an extensive subject, and involves a lot more than we’re going to discuss. If you remember back in grade school, you learned there are 3 primary colors, red, yellow, and blue. They are primary because they cannot be made from combinations of other colors. Here’s a basic primary color wheel.
The 3 primary colors
The secondary colors, made from equal parts of 2 primary colors are orange, green, and purple. Here’s another chart showing the relationship between primaries.
The 3 primaries with the secondary colors
Colors opposite each other on the wheel are called complimentary colors. If you stare at one of the colors for some time, and then shift your view to solid white, the compliment, or opposite, of the stared at color will appear.
Beyond that, you have tertiary colors and other more complex blends and hues. Here is a 12-color wheel showing some of the basic ones.
12 colors, including primary, secondary, and tertiary.
Just as colors opposite each other are complimentary, colors next to each other are analogous, which means they are analogs of or for each other.
In normal human color vision, red focus beyond the focal plane, green directly on it, and blue focuses short of it. This is why red appears to advance and blue seems to recede. Another effect of normal human color vision is that the same color appears brighter and larger against a dark background than against a lighter one. Another interesting fact along that same line is that Da Vinci observed, "Colors appear what they are not, according to the ground that surrounds them." Handy stuff for the photographer!
With all that information, feeling overwhelmed can be a problem. So, to make this subject easier, we’re going to show a couple example of how to combine colors into a harmonious composition, and have them add to your image rather than distract from it.
Analogous color scheme. Using this scheme can create calm scenes and photos. Make sure you have enough color contrast, though, to keep your image interesting.
Complementary. Very vibrant and exciting images. Don't overdo it and you can get something really appealing.
This is called a split complementary scheme. This has a strong visual appeal like complementary colors, but with less risk of overdoing it.
Remember, there are other schemes as well. You could do a three color scheme using colors equally spaced through the wheel, which can create a dynamic image, especially when one is given a greater weight in the composition. A great way to get more information is to use Google "color theory." Another great source is Tiger Color. They also have some nifty software and such that will help you understand color.
Look for an assignment related to this post on Facebook in the next couple days. Hopefully we can get everyone posting a couple photos, and get more assignments going. Drop us a comment and let us know what you think of the idea.
Remember to share your pics and post your questions at the Hohenfels Volks Facebook page, and or by commenting here!
Wednesday, October 19, 2011
What's on the Menu?
Welcome back, Volks! Autumn in Hohenfels is really starting to pick up, moving us faster and faster to winter. Let’s hope it’s not as rough as last year!
Today we're going to start a multi-part investigation of the camera menu. Since most of us shoot Canon, I’m going to use my camera’s menu for this series. I’ll break it down into the pages of my camera menu, but most cameras either have the same or similar menu settings. Some of what we discuss you may not have, and you may have some I don’t. For the purposes of this article, it’s assumed you have set your basics. I hope you’ll follow along in your manual and with your camera.
Press the menu button, and you should be on the first tab. It has a camera symbol with one dot. Your settings are Quality, Red-Eye on/off, Beep, Release shutter without card, Review time, Peripheral illumination correction, and Flash control.
The Quality selection allows you to choose your resolution. I shoot RAW, but you can select your desired resolution. You should be able to select RAW, RAW+JPEG, or JPEG and select the JPEG resolution. Since I shoot full Resolution RAW, I selected the RAW ICON and saved the setting by pressing the menu button.
The Red eye on/off is just what it says. Since red eye is caused by flash that is too close the lens and along the same axis, selecting this to on causes a series of pre-flashes to be emitted by the pop-up or on camera flash. Since we NEVER use the pop-up flash, and most on camera use of a flash should be from bouncing the light, you can leave this off.
Beep allows you to set the camera so that focus will beep, as will timer functions. It’s your choice!
Releasing shutter without card should be off. Having this turned on can lead to some serious disappointment when you’re out shooting. No card, no photos!
The review time sets how long the LCD displays the image after shooting.
Peripheral illumination control, if available, allows the camera to append data to the image that allows for the lens’s light drop off at the corners. Your lens has to be registered in your camera. If it is, setting this will allow corrections to be made by the camera. A good idea to have on. You can register and check which lenses are registered using your EOS utility.
The last control on this tab is the Flash control setting. This is a power full setting. When selected there are more settings available. Let’s explore them!
First up is Flash firing. If this is set to disable, not even an external flash will fire. Maybe you should enable this one!
Next is built in flash function. Unless you have the EOS 7D and use it to control off camera flash, or you use your pop-up, this should be disabled.
Then we have External flash function settings.
You have your flash mode. ETTL, manual, multi flash, TTL, automatic, and manual external flash settings. If your flash is mounted to your camera’s hot-shoe, E-TTL is a good choice to start.
Next is Shutter Sync. Selecting first will fire the flash when the shutter curtain begins to open. Setting it to second will fire the flash once at the start of the exposure and again right before the end. It only works at speeds slower then 1/30.
Then is FEC, or flash exposure compensation. This allows you to adjust the flash output to either brighten or darken the flash exposed areas.
E-TTL II should generally be set to evaluative
Unless you are using a Canon 580EXII or a 7D, the wireless function should be left alone.
Finally, there is the clear all flash settings function. Do you really want to clear your settings?
We’ll be exploring more settings in another post. I hope this has been of some help to you. Reading your manual will give you all you need in the menu areas and operations of your particular camera, so check it out!
Enjoy your week and enjoy the autumn colors, scenes, and events ahead. Keep shooting, and capture that masterpiece! Don't forget to share your pics and questions by posting at the Hohenfels Volks Facebook page, or by commenting here!
Tuesday, October 18, 2011
Color Balance
Welcome back, Volks! Today we're bringing the subject of white balance to Hohenfels Volks.
Generally, white balance is an adjustment made to an image to make your neutral colors, neutral. What we really mean when we speak of white balance is color balance. Color balance removes colorcasts, or imbalances, caused by shooting in light of differing temperatures. Color temperature theory is a little too much for me to explain, so simply put; blue light has a high temperature in degrees Kelvin, as it requires more heat to create. Red requires less, so it has a lower temperature. Who knew engineers would create such a complex way of thinking about colors?
The sensor in your digital camera measures the temperature of the overall light to create a general color balance when set to automatic. It then adds or removes colors that remove the colorcast. In single lighting conditions, automatic can do a good job for you.
The difficulty comes in when we realize that we really don’t shoot with one color light. If you’re shooting on a nice sunny day, there is still light that is differently colored than the sunlight. This is caused by the nature of light. Light has no respect for your boundaries, and doesn’t stop only on your subject. Light tends to reflect and bounce everywhere. So, on this bright day, you’ll have light from the sun, light bounced off buildings, trees, grass, windows, and many other sources. Yikes, time for “white balance.”
When you use a preset white balance, you are telling the camera what type of light you used. The camera then adjusts for that type of light. For tungsten, it removes yellow and/or adds blue. For fluorescent, it adds green and/or removes red. You may end up with a bad colorcast if you have multiple color temperatures that vary by too much.
Shooting in RAW mode allows the most control, so what I describe will work best on images shot in RAW format. There are several options to deal with color temperature in RAW images. The first is to use a preset, as mentioned above. The second is to adjust your color temperature manually. The third is to click a neutral color. This last one can do a good job if you have a large enough neutral area. It samples a variety of pixels around your selection and applies the adjustment to the entire image. There are 2 more that I will mention here. The first is to use an Expodisc, or something similar. This fits onto the end of your lens, and then you take a photo of either your light source or your subject, and apply the resulting image as a custom white balance to your camera. The other and probably better way, at least for most, is a white card. You can use plain white paper, but it tends to have variations in the tone and colors, even between sheets. Your best bet is to get a white balance card. They are made to ensure your neutrals stay neutral. When using a custom white balance, if the lighting changes, you must do a new custom balance source to ensure accuracy.
For best results, take your white balance card and place it with, or near, your subject. Ensure the lighting is the same you will use for your subject, and fill your frame with the card. Make sure there are no colors in the frame, and click your shot. Then go into your menu and select custom white balance. You will have to choose the image you just created, and then apply it. All your shots taken in that lighting will be properly color balanced.
You can also batch color balance in your RAW conversion software by selecting your white card shot and selecting the source, then applying it to all your shots taken in that lighting.

The order of white balance settings in this sample chart is from left to right; as shot, Daylight, Flash, Shade, Cloudy, Color temp 5800k, Click on white, Tungsten, Fluorescent, with the last square white for reference.
There is a lot more to color balance, but this should get you going. Just remember that getting it right takes some practice and knowing your camera.
Thanks to Jennifer O for the suggestion for today's topic. I hope to hear more suggestions and comments! Your input will make this thing of ours great!
Here’s hoping the rest of your week is filled with loads of photos of Hohenfels, and lots of joy! Don't forget to share your pics and questions by posting at the Hohenfels Volks Facebook page, or commenting here!
Generally, white balance is an adjustment made to an image to make your neutral colors, neutral. What we really mean when we speak of white balance is color balance. Color balance removes colorcasts, or imbalances, caused by shooting in light of differing temperatures. Color temperature theory is a little too much for me to explain, so simply put; blue light has a high temperature in degrees Kelvin, as it requires more heat to create. Red requires less, so it has a lower temperature. Who knew engineers would create such a complex way of thinking about colors?
The sensor in your digital camera measures the temperature of the overall light to create a general color balance when set to automatic. It then adds or removes colors that remove the colorcast. In single lighting conditions, automatic can do a good job for you.
The difficulty comes in when we realize that we really don’t shoot with one color light. If you’re shooting on a nice sunny day, there is still light that is differently colored than the sunlight. This is caused by the nature of light. Light has no respect for your boundaries, and doesn’t stop only on your subject. Light tends to reflect and bounce everywhere. So, on this bright day, you’ll have light from the sun, light bounced off buildings, trees, grass, windows, and many other sources. Yikes, time for “white balance.”
When you use a preset white balance, you are telling the camera what type of light you used. The camera then adjusts for that type of light. For tungsten, it removes yellow and/or adds blue. For fluorescent, it adds green and/or removes red. You may end up with a bad colorcast if you have multiple color temperatures that vary by too much.
Shooting in RAW mode allows the most control, so what I describe will work best on images shot in RAW format. There are several options to deal with color temperature in RAW images. The first is to use a preset, as mentioned above. The second is to adjust your color temperature manually. The third is to click a neutral color. This last one can do a good job if you have a large enough neutral area. It samples a variety of pixels around your selection and applies the adjustment to the entire image. There are 2 more that I will mention here. The first is to use an Expodisc, or something similar. This fits onto the end of your lens, and then you take a photo of either your light source or your subject, and apply the resulting image as a custom white balance to your camera. The other and probably better way, at least for most, is a white card. You can use plain white paper, but it tends to have variations in the tone and colors, even between sheets. Your best bet is to get a white balance card. They are made to ensure your neutrals stay neutral. When using a custom white balance, if the lighting changes, you must do a new custom balance source to ensure accuracy.
For best results, take your white balance card and place it with, or near, your subject. Ensure the lighting is the same you will use for your subject, and fill your frame with the card. Make sure there are no colors in the frame, and click your shot. Then go into your menu and select custom white balance. You will have to choose the image you just created, and then apply it. All your shots taken in that lighting will be properly color balanced.
You can also batch color balance in your RAW conversion software by selecting your white card shot and selecting the source, then applying it to all your shots taken in that lighting.
The order of white balance settings in this sample chart is from left to right; as shot, Daylight, Flash, Shade, Cloudy, Color temp 5800k, Click on white, Tungsten, Fluorescent, with the last square white for reference.
There is a lot more to color balance, but this should get you going. Just remember that getting it right takes some practice and knowing your camera.
Thanks to Jennifer O for the suggestion for today's topic. I hope to hear more suggestions and comments! Your input will make this thing of ours great!
Here’s hoping the rest of your week is filled with loads of photos of Hohenfels, and lots of joy! Don't forget to share your pics and questions by posting at the Hohenfels Volks Facebook page, or commenting here!
Friday, September 23, 2011
FOCAL LENGTH
Welcome to another post!
Our topic this time is FOCAL LENGTH, and covers more than just lens sizes.
Let’s start out with the basics; FOCAL LENGTH refers to the length of your lens, usually in millimeters. A 300mm lens is 300 millimeters, but crop factor can change the apparent FOCAL LENGTH of the lens. Crop Factor refers to sensor size on a digital camera. Most of us use cameras with an APS-C sensor, which provides a 1.6x crop factor, or 1.6 times the magnification of the lens’s FOCAL LENGTH. Unless a lens is made for the specific crop factor, for instance Canon’s EF-S lenses, crop factor must be counted to provide the correct focal length. Therefore, a 300mm lens at 1.6x crop factor has an apparent FOCAL LENGTH of 480mm. Since most of us now use the digital lenses that either came with our camera, or we purchased later, I’m not going to make too much of crop factor, that’s for another post.
A large number of folks believe that the perceived change between two FOCAL LENGTHS is caused entirely by magnification. This is actually not entirely true. When you zoom in closer, your lens covers a smaller area of the scene. It doesn’t really magnify it, just shows less in the same amount of space, although there is some magnification from the optics. If you look through a toilet paper tube and take note of what you see, then look through a paper towel tube of about the same diameter, you’ll notice this effect.
Another effect of FOCAL LENGTH, is longer FOCAL LENGTHS, compress the distance between objects in your scene, making them appear closer together. This is great for a portrait with a shallow DOF, as it can blur out and compress the background for a nice effect. It’s something to pay attention to, as the effect can make a great picture look somewhat flat and plain.
For more the rest of this article about FOCAL LENGTH, check out our Intro to Photography page, which contains our full intro series posts so far. And for a great article about the effects of FOCAL LENGTH, check out Photo Tuts+. You can also get into the maths of it at Wikipedia!
I hope this article will be useful on your photographic journey. The knowledge really helped me! Enjoy the weekend folks, and keep your eyes open for more articles, tips, and Hohenfels Volks photo goodness!
Wednesday, September 21, 2011
The Exposure Triangle
Today’s post is on the “Exposure Triangle.”
You’ll find this everywhere on the Internet. A quick Google search turned up 18,300,000 results!
What is the exposure triangle? It’s basically the combination of the three factors that affect your exposure- ISO, shutter speed, and aperture. I put a pic on the Intro to Photography page with the rest of this article.
Remembering it is easy if think of a triangle and visualize that changing as you change your settings. That’s pretty much the gist of it.
Here’s a list as an example. Use that list to visualize your triangle and you’ll be off to the races, at least for the moment. I’ll use whole stops for simplicity. Each stop is either double or half the amount of light compared to the two numbers next to it.
ISO APERTURE SHUTTER SPEED
100 f/4 1/1600
f/5.6 1/800
f/8 1/400
f/11 1/200
f/16 1/100
Looking at the first triangle 1/1600, f/4, at ISO 100, you can see that any changes require a change to another side to remain the same. I can change the exposure to 1/800, f/5.6, at ISO 100 and get the same exposure. Cool, huh?
Let’s try something else. This one will demonstrate the importance of the triangle and knowing how it works. At ISO 200, f/8, 1/400, my image is overexposed. How can I fix it? Try ISO 100, f/8, 1/400. That’s half the previous exposure level!
The first example showing how to get the same exposure is useful to figure out how much DOF you want and to help you keep your exposure constant in constant lighting.
The second example gives you an idea of how to use this tool to get more of your shots usable in changing lighting.
For the rest of this, visit our Intro to Photography page, and do a web search on it. Don't worry, though, more about exposure will be coming around soon!
Focal length will be our next topic.
Please leave your feedback here and on our Facebook page.
Enjoy the rest of your week!
Sunday, September 18, 2011
Metering
Welcome back
This time around, we're going to talk about METERING. Let's dive right in.
What is METERING and why is it important?
Basically METERING is measuring the light. It's extremely important, because it lets us know how to expose the scene.
Sounds simple, right? Unfortunately, it's not as simple as you might think, as there are several types of METERING.
Cameras use reflected light METERING. Almost every camera in existence takes the reading of the scene and tries to make the exposure for the METERED area to be 18% reflected gray. Not based on color, but on a comparison to a gray level that reflects 18% of the light that hits it. Ansel Adams called this ZONE V.
Evaluative METERING- If you haven't read your camera manual, or you've decided not to change your settings, you're most likely using Evaluative METERING. This means it's averaging out the light over the entire scene to get a basic ZONE V exposure. This is good for most photos, especially those that don't have too much range between lighting levels.
Partial METERING- this is set from your menu and decreases to amount of the scene used for METERING. You can set this on some cameras to different parts of the scene.
Spot METERING- In this mode, the camera METERS off a small spot to set the exposure. This is great for tricky lighting, and for more control of your exposure. It also allows you to get some idea of the range of a scene's lighting for manual exposures.
Generally speaking, using your evaluative METERING mode will give pretty good results. There will be times when switching to partial METERING, or even center weighted, can give better results.
The easiest way to METER a scene is to get an 18% Gray card. You have your subject hold it up, zoom in and METER from that. Take the settings you read and enter them into the camera in manual mode. As long as the light doesn't change you will have a good exposure. Using the gray card allows your camera to METER from a target that matches what it is trying to set. This is best accomplished in spot METERING mode, unless you fill the viewfinder with the card. If you do that, then use evaluative METERING, which will average out the light over the card and result in better exposures.
For more info an METERING, check out our Intro to Photography page. The info there is a little more in depth and includes an example. Also visit Cambridge in Colour, their explanation really clarifies a lot!
Don't forget, if you have any questions, ideas, tips, or comments, post them. You can post them here and on our Facebook page.
Thursday, September 15, 2011
Depth of Field
Welcome back!
This time we're going to explore DEPTH OF FIELD, commonly referred to as DOF.
Have you ever noticed that some photos are extremely sharp all the way through the whole range of the image and some stop being sharp with only a small range truly sharp? This range of sharpness in a picture is DEPTH OF FIELD.
How can we control this? There are several tools at our disposal. One is controlling the distance between subjects, another is focal point (an upcoming post), but the most valuable to us, and the one we will discuss here, is our aperture or f-stop.
You might remember that aperture is the size of the "window" in the lens. You might ask, if it controls how much light gets in, how can it control the DOF?
With a narrow aperture, basically, the light becomes more tightly focused, making the DOF wider and allowing an increase in sharpness.
A couple words of caution on this:
1) This is not the cure all for poorly focused or blurry images. One negative side effect of a very small aperture, or large f-stop, is diffraction blur. The bending of light as it squeezes through the aperture causes this, and can make blur more noticeable.
2) This will require longer shutter speeds. Sometimes beyond your ability to hold a camera steady. Camera shake is really bad at long exposures!
So, if a narrow aperture will increase DOF, it makes sense that a wide aperture will decrease your DOF.
Now, it's time to break out your camera. Play with your DOF; adjust your aperture and your focus to get some images with a shallow DOF and some with more depth, or wider DOF. A great way to start is taking 2 items and placing them on your table at different distances from the camera. Shoot at the range between f4 and f16 and examine the results.
Don't you feel more artistic already? I did when I first tried it!
For more information on DEPTH OF FIELD, check out our Intro to Photography page and don't miss out on Cambridge in Colour's excellent in-depth tutorial.
That's it for this post. Here's hoping you have a great week and get some good shooting in this week-end!
And remember, if you have any questions or comments feel free to share them here or on our Facebook page.
More Camera Controls
Today's post is being split in two part, as I intend to address two subjects.
First, more camera controls.
Here are some additional camera settings and controls for for helping you to get it right in the camera.
Exposure compensation- This allows you to tell the camera to overexpose or underexpose the image. You can usually set in in third stop increments. If your subject is a little bright, and you want to darken them up a little, underexpose by 2/3 of a stop and see how that looks. This small change can make a big difference.
Exposure Bracketing- This allows you to take a series of 3 or more shots, one will be what the camera thinks is correct, 1 will be underexposed by a stop, and the last will be overexposed by a stop. This is useful if you're not sure whether the exposure is correct and don't want to risk losing the shot.
Flash exposure lock- Allows you to set your external flash power to the area you lock your metering to. More on metering in another post.
AE Lock or Auto Exposure Lock- Allows you to meter from a different area of the scene than the focus point.
There are many more controls depending on your camera. We'll try to put more as we go!
On to the next post, Depth of Field.
Any questions or comments? Feel free to share them here or on our Facebook page.
Wednesday, September 14, 2011
Shooting MODES
Shooting MODES are part of you camera settings, and should be the first step in getting to know your camera. MODE is going to be all caps in this post to get us into the habit of thinking of these settings correctly, as MODES.
Let's start by looking at a typical dial on a camera.
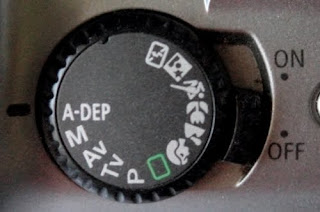
This is the MODE dial on a Canon EOS Digital Rebel, EOS 300D
For the most part, almost all cameras use the same symbols to represent similar MODES.
The green square is the fully automatic MODE. Using this mode lets your camera have full control of the photo. You have no input or choice, so avoid this MODE!
The symbols on the right side, as we look at this image, are for automated MODES based on what you tell the camera you're shooting.
In order, they are:
Portrait MODE- for taking portraits, lower f-stop, and faster shutter speeds with less contrast.
Landscape MODE- for taking landscape style shots, higher f-stop, and slower shutter speeds with more contrast.
Close-up MODE- for macro or close-up shots of things.
Action MODE- for fast moving scenes, uses a higher ISO and faster shutter where possible.
Night scene MODE- for poorly illuminated subjects, usually used at night. High ISO, lower f-stops, slow shutter speeds.
Flash off, but fully automated settings.
It is important to note that none of these MODES offer you any choice of settings, including ISO. They will also use the pop-up flash whenever the camera wants to.
Moving over to the left side, we have:
P- Programmed MODE. You can set the ISO, Exposure Compensation, but not much else. More like the above MODES, with some limited choices.
AV- Aperture priority MODE. You set the ISO and f-stop, and the camera chooses the shutter speed for a correct exposure.
TV- Shutter Priority MODE. You set the shutter speed and ISO, and the camera chooses an f-stop to get a nice exposure.
M- Manual MODE. You set everything, this is where knowing your f-stops, shutter speeds, and ISOs is very important.
On newer cameras you also have
B- Bulb MODE. You use a remote trigger and as long as it's pressed, the shutter stays open. Great for low light and night time pics!
C1...etc- these are for you to pre-program settings that you use a lot.
Most point and shoot cameras have the automated settings MODES. Look for the symbols in the above pic and choose the MODE you want. If you dig around, you can find some advanced setting. For instance, on the Fuji, you can compensate for exposure by moving it up or down, usually in 1/3 of a stop increments. This is very helpful when taking pictures in a room with bright but uneven lighting or outside on a bright day.
So, if your camera tells you it should be shooting 1/250, f8, at ISO 100, but you want the background to be sharper. Switch over to AV MODE and set your f-stop to 11, your shutter speed should automatically go to 1/125.
If you're camera tells you 1/125, ISO 100, f11 but that's too slow for something you're trying to capture. Switch over to TV MODE and set your shutter speed to 1/250, your f-stop should automatically go to f8.
One of the best things you can do right now, is read your owner's manual for your camera. After you finish, read it again, while you have your camera, and try out some of the MODES.
Let's start by looking at a typical dial on a camera.
This is the MODE dial on a Canon EOS Digital Rebel, EOS 300D
For the most part, almost all cameras use the same symbols to represent similar MODES.
The green square is the fully automatic MODE. Using this mode lets your camera have full control of the photo. You have no input or choice, so avoid this MODE!
The symbols on the right side, as we look at this image, are for automated MODES based on what you tell the camera you're shooting.
In order, they are:
Portrait MODE- for taking portraits, lower f-stop, and faster shutter speeds with less contrast.
Landscape MODE- for taking landscape style shots, higher f-stop, and slower shutter speeds with more contrast.
Close-up MODE- for macro or close-up shots of things.
Action MODE- for fast moving scenes, uses a higher ISO and faster shutter where possible.
Night scene MODE- for poorly illuminated subjects, usually used at night. High ISO, lower f-stops, slow shutter speeds.
Flash off, but fully automated settings.
It is important to note that none of these MODES offer you any choice of settings, including ISO. They will also use the pop-up flash whenever the camera wants to.
Moving over to the left side, we have:
P- Programmed MODE. You can set the ISO, Exposure Compensation, but not much else. More like the above MODES, with some limited choices.
AV- Aperture priority MODE. You set the ISO and f-stop, and the camera chooses the shutter speed for a correct exposure.
TV- Shutter Priority MODE. You set the shutter speed and ISO, and the camera chooses an f-stop to get a nice exposure.
M- Manual MODE. You set everything, this is where knowing your f-stops, shutter speeds, and ISOs is very important.
On newer cameras you also have
B- Bulb MODE. You use a remote trigger and as long as it's pressed, the shutter stays open. Great for low light and night time pics!
C1...etc- these are for you to pre-program settings that you use a lot.
Most point and shoot cameras have the automated settings MODES. Look for the symbols in the above pic and choose the MODE you want. If you dig around, you can find some advanced setting. For instance, on the Fuji, you can compensate for exposure by moving it up or down, usually in 1/3 of a stop increments. This is very helpful when taking pictures in a room with bright but uneven lighting or outside on a bright day.
So, if your camera tells you it should be shooting 1/250, f8, at ISO 100, but you want the background to be sharper. Switch over to AV MODE and set your f-stop to 11, your shutter speed should automatically go to 1/125.
If you're camera tells you 1/125, ISO 100, f11 but that's too slow for something you're trying to capture. Switch over to TV MODE and set your shutter speed to 1/250, your f-stop should automatically go to f8.
One of the best things you can do right now, is read your owner's manual for your camera. After you finish, read it again, while you have your camera, and try out some of the MODES.
Tuesday, September 6, 2011
First Post
Welcome to Hohenfels Volks Photo Club.
We'll be sharing photo tips, tricks, and ideas. We'll also be sharing information about our Hohenfels area to enable everyone to get the most from their photography here.
I hope everyone will chime in with their comments, questions, and tips.
We'll also feature photos from members of our club. I hope everyone will get into the spirit and come together to make this a great little club!
Subscribe to:
Comments (Atom)