Showing posts with label ride along. Show all posts

Wednesday, August 15, 2012

Ride Along Rome

Greetings, volks. Welcome to Hohenfels Volks, THE place for our place! Another sunny day in Hohenfels, as we ride out the summer, brings us warmth and brightness.

Today we’re going out on a ride along shot. So, get ready to leave Hohenfels behind, and take a trip through time to ancient Rome.

First, here’s the shot from the camera.

Hohenfels Volks: Colosseum in Rome, Before
ISO 160, f/8, 1/100, Canon EOS 7D
This is washed out and appears to be a failure, but when you shoot for your final result, this is only half the image.

It’s not very pretty, but this goes to show you how you create an image with your vision. I shot it this way fully expecting to get to the final image with some editing in Canon’s DPP. I didn’t use Photoshop or any other program; everything was done in RAW conversion.

We were in Rome a couple weeks ago on a wonderful family vacation with some great friends. The whole family has always wanted to go there, so off we went.

Of course, the Colosseum was a mandatory stop, especially for me. This was shot during our tour, including the underground portion. I got quite a few shots inside, but wanted something that would leave the viewer wondering. I also wanted something that showed its incredible nature, without getting the usual fare.

I was shooting film and digital that day, so used my 7D to meter for both cameras. The film was Kodak Portra 160, which is a color film with a box speed of ISO 160. I metered for the lower wall. I wasn’t concerned about the sky blowing out, as the important details in the tunnel and brick were needed. By metering the lower mid values and exposing for M-1, shadow detail was preserved, as were the mids.

They hardly seem the same. I edited the image by setting my white balance to color temperature. This allows for some contrast control in the final image. The reason color temperature and white balance can be used to control contrast is that our color levels will be adjusted under the RGB tab. After setting the color balance, and setting the exposure to –2/3 stop and adjusting the contrast, I moved over to the RGB tab.

When converting this way, the image starts looking worse as you progress. It simulates color filters. The beauty of digital is that you can simulate different colors for different levels. By increasing the levels of red in the shadows, pretty much removing blue, and giving green a slight decrease, the image looked wonky. Of course, it starts to come together when you slide your saturation under the RGB tab to 0. A little dip of the luminance curve and it’s back to Raw.

By adjusting the color balance back toward blue, you can darken the image. You also increase contrast. Then, once you’re happy with those adjustments, under the RAW tab’s saturation you can further tweak your contrast. With the red bricks, green spots of grass, and blue sky the image was quite suited to this type of conversion. Another suitable type is when one color dominates several neutral or contrasting colors.

Here’s a screen shot of the 2 tabs and the final settings. Shooting RAW gives you so many options to capture shots that bring together your camera work and your vision.

Hohenfels Volks: Colosseum in Rome, RGB tab settings
Here is the RGB tab and the color adjustments.

Hohenfels Volks: Colosseum in Rome, RAW tab settings
And here we see the RAW tab in Canon DPP

Finally, here is the finished image.

Hohenfels Volks: Colosseum Section, Rome
ISO 160, f/8, 1/100
Colosseum Section, Rome, finished. The increased contrast from the color temperature brings detail into the bright stones topping the section. It also makes the entry dark and increases overall image interest.

The tunnel entrance, in dark mysterious shadows, referred to as the vomitorium, allowed for rapid exit during an emergency. The little arches below were entryways into another seating area. The site had a capacity of 50,000 spectators, and even though this small section doesn’t show the full capacity, it does give an impression of the scale and architectural marvel. I also shot a back up to be in color, which pops for the contrast between the sky and walls.

Here’s hoping you finish the week with some great shots. Hohenfels is full of opportunities for photography, and this weekend may be the perfect time to get something in your camera!

Please feel free to share your photos on our Faceboook page. Everyone here would love the chance to see your work! Is there anything you’d like to see here? Do you have a question? Share your thoughts here or at the Hohenfels Volks Facebook page. Of course, commenting on both Facebook and here is always appreciated, too! Don't forget, we're on Google+, too!

Monday, May 28, 2012

Better Late...

Greetings, volks. Welcome to Hohenfels Volks, THE place for our place! Greetings, volks, from Hohenfels. Another weekend passes into the ether of memory, preserved with our cameras and vision.

I hope you’ve had a chance to explore the new layout. By adding our links to another page, we’re able to expand them without limit and improve on the resources we can present. I’m currently working on an advanced section, covering metering, lighting, and other things beyond the basics.

This past weekend provided some excellent opportunities to make some photos and spend some time relaxing. I trust everyone made their shots and got their chill on, as it were.

Here’s what I’m looking at from for future posts. Beginners and Basics, Advanced Concepts and Techniques, Q and A, Composition, both elements and advanced, Reviews, and of course, continuing with our ride along shots and other items. I’d love to hear from everyone out there, if you have a suggestion, idea, or question, let us know through our Facebook link.

I’m going to close this post today with the following photo, made Saturday in Munich. Ride along with me, as we explore the shot as laid out.

Hohenfels Volks: OlympiaZentrum
Olympiazentrum in Munich.

As you can see, this was taken at Olympia Zentrum, the compound built for the 1972 Munich Olympics. Given the amount of visitors that flow through Munich on any given day, not to mention annually, the difficulty is composing your image. The difficulty arises when one realizes that just about every conceivable way of showing the park and Zentrum has most likely been shot. Add the featureless sky, and you’re destined for disappointment.

Walking around the lake and park presented some wonderful shots, some of which I took. The problem was in trying to make an image that was different from all the cookie cutter see and shoot snapshots you see everywhere. We all see the same shots and most of take them. Without ever moving around or seeing with a slightly different point of view, we cut our cookie with our neighbor’s dime store mold.

Stopping to view the flowers and see if I could work them into a shot, I was presented with this view. I knew this shot would give my cookie a life of its own, I metered the flowers at about 500 c/ft2, or about 1 ½ stops brighter than the sky. Setting my camera to f/11 at 1/60 gave me about M+3 on the flowers and M+2ish on the sky. It also allowed the trees and building detail to come through and hold their values quite well. I edited the shot for N-1, giving a nice separation to the sky and flower values, while allowing the trees to retain a large amount of color. Shooting slower allowed some nice DOF softening at the building and trees, without detracting from their form or impact.

This image gives me, what I feel is a departure from the everyday scenes of the place, without removing the ability to tell where it was taken, and at the same time departs slightly from a literal rendering of the scene by placing the values where I visualized them. Visualizing is an important part of any image-creating endeavor, and must be practiced. This little exercise allowed me to improve my skills while on a family outing.

This week's exercise is to visualize a shot of something mundane; creating a scene that you can take ownership of with pride. See the scene as you want to show it, think through the steps to make it a reality, and then make the shot. Practice this, shoot for your vision, and exercise your creativity, you’ll love what starts happening. You’ll love your creations that stand apart from every other shot of the same thing.

I’m looking forward to seeing your results and hearing from you. Get the comments, thoughts, and questions coming. Let me know what you think and how you’re using your camera! Share your thoughts here or at the Hohenfels Volks Facebook page. Of course, commenting on both Facebook and here is always appreciated, too! Don't forget, we're on Google+, too!

Friday, March 9, 2012

Ride Along: Golden Sky

Greetings, volks. Welcome to Hohenfels Volks, THE place for our place!

Today we’re going on another ride along. This one isn’t too far from home, so we’ll keep it short.

While exploring the backside of Hohenfels Sunday, I stumbled upon this scene and knew it was something I wanted to keep.

Hohenfels Volks: Golden Sky
ISO 400, f/22, 1/50, 35mm, Canon EOS 7D
The sun dipping slowly toward night's rest and renewal.

Going over the hill from Hohenfels proper toward Raitenbuch, you come across a small country lane meandering through the fields. Having been down this road before, I knew there were some nice scenics waiting to reward the one bringing them home. There is a tiny little chapel between 2 giant trees there, with some magnificent views of the hills around.

The shot was easy to visualize, I came up with several in fact. Composition was envisioned to include the colors all around as one the key elements. The sky was partly cloudy, with some nice golden glow from the sun hanging around the think veneer of sheeted clouds, and a nice blue in the areas without cloud cover.

I arrived moments before the color really started coming out. I took several shots, hoping to see something I could work with. I included the trees and the chapel in several, but liked this one for matching the closest to what I visualized.

I metered off the tree with the Gossen Sixtomat, at ISO 400. Giving the tree a –2-stop exposure from the meter would have washed out the sky and left the color flat and a bit comical. Metering the tree for –3 stops and the grass for about –2 stops from middle gray, meant I could shoot at f/22, which was part of getting the sun to streak in a nice little starburst. I was also able to shoot at 1/50, which limited the streaking to just a couple rays coming lightly over the hills in the distance through the clouds.

Getting it into Canon DPP, or the digital darkroom, added some magic. Canon has some “Picture Styles” for their application that come standard, allowing for the most common edits to color and contrast to be quickly applied. My first thought was Landscape, but that left the gold too vague and muddled. Having downloaded several other styles from Canon’s site, I settled on Autumn Hues for the picture style. This softened the contrast between the sun and the hills; it also made for some nice separation of the golds, oranges, and reds in the sky. I adjusted my levels, crushing them in some for clarity.

After that, I set the color temperature to about 6000K, which brought the color in line with the lighting hues. Increasing the contrast to +1 and the shadows to +2 added to the glow around the hills and tree, while allowing the levels to hold up throughout the image, including the separation in the distant hills. The last adjustment was to take saturation down –1 and sharpen.

The car coming up the road in the middle ground adds a nice little reference point for the viewer to pause. That was a lucky little bit of happenstance. I liked the lights as he was approaching and shot quickly to include his headlights. This photo captures what I visualized, and expresses the joy one gets when out looking for shots, especially when you find one that works for your vision. Shooting with a vision can make for some interesting stuff, knowing what tools you have at your disposal to make your vision a reality makes easier work of it!

Check out Canon’s site and download some of their picture styles. You’ll see some stuff that probably doesn’t appeal to you, at least I did, but you’ll also find something that does. I’m certain Nikon and other companies have something similar, if not, you can make your own in whatever app is your digital darkroom! Exposure and visualization start your image on its journey; your level controls and tools in software bring it home. Using them all together can make something that brings others to that same place with you!

Take care and enjoy your day!

Don’t forget to post any of your images you’d like to see here at the Hohenfels Volks Facebook page. Of course, commenting on both Facebook and here is always appreciated, too! Don't forget, we're on Google+, too!

Wednesday, March 7, 2012

Ride Along Shot- Braustuberl

Greetings, volks. Welcome to Hohenfels Volks, THE place for our place! Another beautiful day left us feeling nice here in Hohenfels.

Today we’re packing up some film and going shooting in Parsberg. That means it’s time for another Ride Along shot.

Hohenfels Volks: Ivy at the Braustuberl
ISO 400, f/8, 1/50, Zeiss Ikon Ikoflex I, 75mm lens
Ivy at the Braustuberl in Parsberg

I used a mid ‘40s Zeiss Ikon Ikoflex I TLR, with Ilford’s 120 HP5+ film. This film is ISO 400, but can be pushed to 1600, giving it wide exposure latitude. The medium format 120 film combined with the camera’s 1X1 aspect ratio produces biggish 6cmX6cm negatives, which allows for nice print sizes.

I was in Parsberg picking up some film, developer, and color prints from our day trip to Bamberg with some wonderful friends. I made sure to have my camera and look for shots that might make nice prints. The combination of ivy and the rest of the scene set me thinking about how to compose a photo using the elements I desired.

The first step was to visualize what I wanted to see in the final image. I knew I wanted the “Braustuberl” sign and both lanterns. I also wanted to make the ivy a nice part of the scene. How did I want to convey the image? What parts needed detail and how much detail led to the process of putting together the final composition.

Knowing that I wanted detail in the lanterns, enough to show the shadows cast by the lantern tops, meant that they had to be placed about 3 stops down from middle gray. The leaves needed more luminance, so had to be placed about 2 stops down. Remember, when dealing with your shadows, 2 stops down will give you variations in tone, but no texture, and 3 will give you texture and an inkling of nice detail.

Metering off the ivy from about 1 foot away, gave me f/16 at 1/5 second. Metering off the walkway in the lower right for middle gray gave me f/16 at 1/125. Metering from the lanterns gave me ½ at f/16. The final shot was f/8 at 1/50 second. This moved everything up 1 stop above where I wanted it to allow for experimenting with compensating development.

Developing was done for N+1/3 in pre-depleted Tetenal Ultrafin 1+30. The times were 30 seconds of initial inversion agitation, with 4-minute stand cycles followed by 15 seconds inversion agitation. Total developing time was 20 minutes followed by the usual washing, fixing, and a German Jet dry to prevent spots. The film was hung up to dry for about 4 hours before cutting and scanned the next day.

The developing and exposure method allows the developer to deplete rapidly at the highlights, limiting the action there, while allowing more action on the shadow details. It lowers contrast and can give shadows a luminosity that makes them stand out more than just being black.

After scanning, I brought in the levels some, adjusted the curves for a tiny inverted S, and applied sharpening. It was scanned at 4800 DPI and resized to 800x800 at 300 DPI for the web, it won’t print nicely at all at that resolution, but I have the negative and the original file for that. The beauty of the scanning and editing on the computer is that it allows us to revisit our original and edit it multiple ways and times until we are satisfied with the match.

The meter I used was an old Gossen Sixtomat from the 1960s. This meter has a 30-degree field of view, so I had to get close and cup the sides to get the correct reading for the areas that were being measured. The digital camera would have made it easier with its 7-degree field in spot mode. I probably could have gotten the shot in half the time, but doing the old fashioned way was actually quite nice and reinforced what I’ve been learning.

Well, that’s it for this ride. I hope everyone has a great week and gets some photo time!

Don’t forget to post any of your images you’d like to see here at the Hohenfels Volks Facebook page. Of course, commenting on both Facebook and here is always appreciated, too! Don't forget, we're on Google+, too!

Monday, January 30, 2012

Ride Along Shot- The Snowy Track

Greetings, volks. Welcome to Hohenfels Volks, THE place for our place! A sunny Monday greeted us with a chilling embrace. –15 is no way to start the day!

The winner of this week’s poll is The Fortress (For the Superman Fans). Sounds silly, doesn’t it? Well let’s outline it for you!

In the Superman movies, Superman had a place where he could go to be alone and recharge. It was called the Fortress of Solitude. You guessed it; our theme for the week is Solitude, with a kick. Your shots should show the positive aspects of solitude, not loneliness or a single thing, but something positive, in solitude. It could be someone enjoying a moment alone, or someone escaping the world, any image showing something positive about solitude. Maybe your image will even contain more than one person, but will show solitude in a positive light. Remember; get your images for last week in tonight! We’ll feature them here.

Now on to our Ride Along Shot.

Hohenfels Volks: Snowy road through the woods
ISO 400, f/16, 1/500, 50mm
Tracks in the Snow, winter has hit Hohenfels!

While out and about, I noticed an old road. After approaching the road, I saw some tire tracks, as well as tracks from animals. Rather than isolate one or the other, I chose to highlight the road and have both sets of tracks in the shot. While the tire tracks feature more strongly and lead the eye through the frame, seeing the signs of animals, possibly a fox and a rabbit, adds a little dimension to the shot.

Given the time of day, I had to use a fast shutter speed and tight aperture to keep the snow in the range of zone 6-7. That allowed some texture and detail in the snow, and allows darker trees and surrounds that provide nice depth and contrast.

Having the tire tracks curving up through the frame, the eye, as mentioned, is led through the image, but it also creates some tension that brings it to life. Where are the tracks leading? Who was here? Where’d they come from? Several questions can be raised that add that little bit of drama, while preserving the serenity of the scene. Keeping the tracks from being dead center allows them to become the leading line, and add some grace and sweep to the shot.

I thought black and white was the only way to go with this scene. Color distracts from the snow and tracks, and it makes the image somewhat less appealing. Keeping the classic monochrome allows the tones to wander from nearly blown highlights to some slightly clipped shadows and increases the range of the image. I shot this set to monochrome and added a red filter. Putting a red filter on black and white darkens blues and greens, while brightening reds and oranges. This can add some crispness to your shots. Shooting at f/16 allows for both limiting the light, and increasing the DOF.

Remember that when making your photo, visualizing it is the key to getting your image. Take the time to view the scene, absorb what you're seeing, and find the light that allows you to make that magic with your camera. Sometimes, you stumble upon something, sometimes, you have to take what you find and make it work. Ansel Adams said “Sometimes I arrive just when God's ready to have someone click the shutter.” This seems to have been one of those times for me! Find someplace and keep going back, get to know it during all kinds of conditions. You’ll start seeing all sorts of images you can make with it, and one day, you’ll find the one you’ve been seeing.

Well, that’s it for today. Keep seeing the light and your shots before you take them. Keep shooting, and remember this week’s theme on solitude. I hope your week is a great one!

Don’t forget to post any of your images you’d like to see here at the Hohenfels Volks Facebook page. Of course, commenting on both Facebook and here is always appreciated, too! Don't forget our new Hohenfels Volks Google+, too.

Friday, December 23, 2011

A Ride Along For the New Year

Greetings and welcome to Hohenfels Volks, THE place for our place. Aside from the cold and wet, it was a wonderful day here in Hohenfels. 2 days until Christmas and things are looking bright!

Today we’re going to stay in the living room for another ride along. This time we’re shooting my annual New Year’s Toast shot. Every year around this time, I like to shoot a wine and lights shot that I’ll use to greet friends and family for the New Year. So break out your flash, some wine, and let’s get working.

Hohenfels Volks  Almost
ISO 100, f/32, 30 seconds, 49mm
Here's the image.

As you can see in the photo below, I’ve included my set up. Out of the frame, camera left about 3 feet is a flash on a tripod, shooting through a 42” umbrella at 1/32nd power, at about chest height. The flash provides light for the tree and to capture some detail in the scene. By placing everything on some black card stock, we can minimize glare and reflections, or at least control them to an extent.

Hohenfels Volks setting it up
Here is the setup I used for the above image. A few more feet between the tree and the subject would have rendered some magnificent starbursts.

Having the white card to the right provides some bounce from the flash and provides a little bit of detail and edge enhancement for the wine bottle. On a side note, LBV Port is great for a toast, and while sweet, is perfect to ring in the New Year. Port wine developed a series of traditions around it, especially in naval circles, which is part of the joy of it.

I didn’t want too much detail and lighting, as the bottle has no paper label. The label is painted on, increasing the chance of huge glare and direct reflections. I knew that I would have some glare from the candlelight, as well as some reflection of the candle itself. It actually looks a lot better than I thought, as the candle looks like a thin taper, not a ball.

Shooting at f/32 allowed some great starbursts on the lighting. I thought it was a little much, and the bottle looked a little off being set apart so much. I re-did the shot with the bottle closer and shot at f/22. This allowed a small amount of starburst, but nothing overly intrusive, while keeping a long exposure. It also took out the reflection of the candle. Another nice effect is the diminishing of the bounce to a level that retains the edge of the bottle while adding just enough fall-off to create a mystery about the wine.

Here’s the final version. I think this is the one I’ll go with, even though I’ll try several more versions.

Hohenfels Volks  Happy New Year, Hohenfels
ISO 100, f/22, 30 seconds, 45mm
I think this one better captures the message and adds a bit of the old world to the image. Overall the depth of field provides detail that enhances the shot, and the composition just seems to welcome you into the scene.

I have my shot for this week’s theme in the can. How about you, have you done yours? This week’s theme and the tree allowed for several days of playing around with lighting and thought patterns. What is my reward? How do I enjoy it? I toil and work to enjoy something, but what? How do I light it? The list is endless, but I think I have something that is rewarding for me and may even interest you! It follows a pattern similar to today’s shot, if you like spoilers. How’s your shot coming along?

Here’s wishing you a very Merry Christmas. May this weekend be blessed with joy, love, family, peace, and true rewards! Remember, there is so much to life, that we haven’t even begun to measure our gifts.

Remember to cast your vote for next week’s theme. Don’t forget to get your pics posted at the Hohenfels Volks Facebook page. Of course, commenting on both Facebook and here is always appreciated, too!

Thursday, December 1, 2011

Ride Along Shot- Avoiding the Cold

Greetings, Hohenfels, welcome to Hohenfels Volks, THE place for our place. I hope everyone is having a great week and looking forward to something great this weekend.

For our ride along today, I thought we’d stay in lovely Hohenfels. In fact, it’s so cold and gloomy; I thought we’d stay inside. Let’s go to the living room and get started.

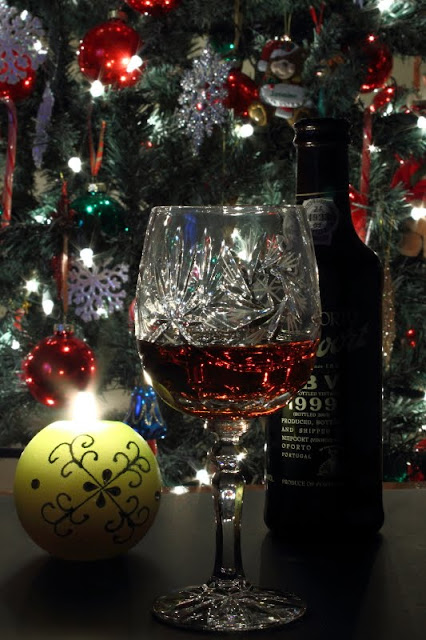
This is my first Christmas photo of the season. There’ll be many more, I’m sure, but getting this one set up and in the camera is always exciting. Last year, it was a bottle of wine with a glass and the tree.

Hohenfels Volks- our first Christmas shot
ISO 100, f/4.5, 15 Seconds, 53mm, 3000K
Merry Christmas!

Come Christmas season, I love to take creative shots that illustrate this time of year. I visualized this shot all day while cruising Nuernberg's Christkindlmarkt. Getting home, I rushed into the house to get the shot set up and going. Of course, this kind of shot requires shooting on a tripod with IS turned off. That means using a remote trigger. I like using a remote trigger cable, some folks prefer wireless. Locking up the mirror allowed for that little bit of extra sharpness in the glass and the decorations surrounding the candleholder. Focus was on the glass to minimize the DOF between tree and candle. Placing the candle holder in sharp focus at or near an intersection of thirds isolates it and makes it the obvious center of interest, while allowing the eye to wander through the tree and memories of long ago Christmases.

This shot proved more difficult than first glance implies. I’ll be trying this one a few more times to get it perfect, but I really enjoy the way it turned out. It just says “Merry Christmas!”

After several failed attempts using multiple flashes to light the tree some and the glass, I went with a longer exposure and used just one flash. After getting the exposure started, I manually fired the flash at 1/128th power with the head zoomed in to 110mm. The flash comes in from camera left at about 45 degrees to the candleholder. The second pop of the flash at the same level was again camera right, zoomed to 50mm almost dead at the tree. The third and final pop, again at 1/128th and 110mm zoom, was aimed at the platter and decorations around the candleholder from camera right.

By setting the flash at minimum power and adjusting the zoom, I was able to bring out the green of the tree, the colors of the decoration, and use the longer focal length with a wide aperture to create some nice boke, or blur, behind the glass. It also highlighted the edges of the glass, and shows the nice, almost home spun, texture of the candle glass. It also allowed some detail in the decorations around the base of the candle.

Shooting at 15 seconds allowed me to manually zoom, aim, and pop the flash. That brought the whole thing together, bringing out detail while allowing a warm winter night feel to the image. The highlights in the image were slightly overexposed to allow for detail in the shadows, and it was darkened during conversion from RAW in Canon Digital Photo Pro software. I lowered the color temperature to about 3000K to bring out the green in the tree and hint at the blue in the platter holding the decorations and candleholder.

The candleholder was one that Mrs. Hohenfels-Volks picked up at a local market. The little things you can pick up at Moebelhof and other such places can really add some flavor to your photos. I’ll definitely try this shot again, perhaps with a snoot over the flash and some black cards to darken the highlights in the glass, perhaps giving a more old timey feel to it.


Same settings as above image
Here’s another version with the color temperature raised to about 3500K. Adding in that little bit of red makes it feel almost as if a fireplace is blazing somewhere in the room.

Now on to other things, remember to get your votes in for next week’s theme. We have a 3-way tie right now, and that means it’s my choice if we end the week that way! This week our theme is “Morning Moments.” I hope to see everyone participating! Get shooting and start posting at the Hohenfels Volks Facebook page. Of course, commenting here is always welcome, too!

Monday, November 21, 2011

Ride Along Shot- Proof of Zombies

Greetings, Hohenfels, welcome to another Monday and to Hohenfels Volks, THE place for our place.

Let’s start out this short week with a ride along shot. Today we’ll look at a photo I shot of one of our local beauties, Michelle.

Halloween night, the family going to our friends for a party and some of that good old trick or treating, followed by hot soup and warm friendship. I came big, knowing the holiday spirit that pervades our place during this time, camera, flashes, umbrella, reflectors, the whole nine yards. I expected to get some decent shots, but not too much. Boy, was I in for a surprise!

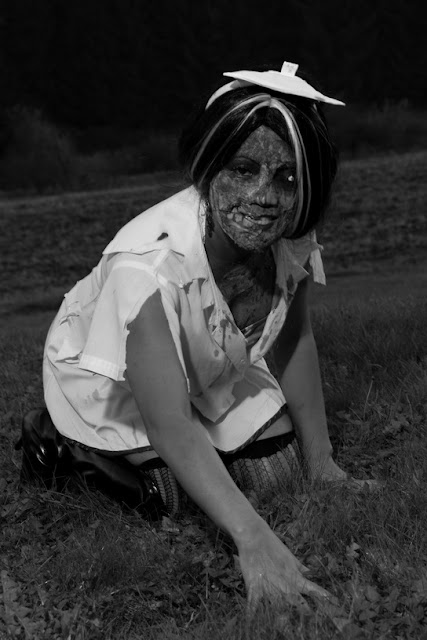
After seeing Michelle and the incredible costume she built, I knew there was a shot waiting to happen. She even scared some of the adults, which was really cool. She looked like something from a George Romero movie, and I thought that it would be fitting to take a couple pics to capture that feel. We went outside and I looked around for some great angles while visualizing several shots.

Hohenfels Volks proof of zombies
ISO 800, f/8, 1/80, 60mm, monochrome with green filter, RAW

As you can see, the shot I posted here was taken with me nearly on the ground. After taking a few pics to get started, I noticed the sun was flaring a little, washing out the sky. Switching over to monochrome and applying a green filter, I shot on. I knelt down and as I readied my camera and flash, Michelle started acted like a real zombie coming out of the ground. That was the one, as the green filter darkened her makeup, while allowing the scenery’s exposure to remain constant. Allowing the background to fade to darkness makes Michelle pop out and creates some negative space to frame our zombie. I think that this shot captures the feel of a Romero film, the kind of black and white film that brings back the late late shows we used to watch as kids.

Here’s one that’s washed out with the sky, that kind of sets the mood of the sun going down and the zombies rising.

Hohenfels
ISO 800, f/8, 1/80, 28 mm, Monochrome with green filter, RAW

And here’s the color version of today’s ride along. Shooting in RAW mode allows all the color data to be preserved and used for several types of shots. Something to think about when you’re visualizing your scene. Sometimes your shot may look better with color, although for the Romero feel, black and white is necessary.

Hohenfels Volks zombie in color
ISO 800, f/8, 1/80, 60mm, daylight balance, landscape picture style, RAW

Also today, we’re introducing a new feature. We’re going to do a weekly shot. Similar to the Internet craze of 365 shots, we’ll be posting a theme and giving you a week to post your shots to our Facebook page. After a week, we’ll choose a new them and post all the photos in a separate post here.

Well, that’s it for today. I’d like to offer special thanks to Michelle for allowing us to feature her photo here, for the incredible job she did making Halloween fun, and for being such a great friend. I’d also like to offer special thanks to Jennifer O for the theme a week suggestion. Always one to help out, her idea really hit the spot!

For our first theme, I thought we'd go with Thanksgiving, with a twist. Show us your thanksgiving, but be creative in your application of Depth of Field, covered here and here. Show us a turkey and the trimmings with a shallow DOF, or maybe that wine glass frame by a sharply focused turkey. Anything that keeps with the theme, remember to post a little comment with your photo, and let us ride along with you!

Remember to share your pics and post your questions at the Hohenfels Volks Facebook page, and or by commenting here!