Showing posts with label dof. Show all posts

Wednesday, June 13, 2012

Shooting What You Eat

Greetings, volks. Welcome to Hohenfels Volks, THE place for our place! Things have been rainy here, but that gives us the chance to show the stormy side of Hohenfels and our surrounds. I trust you’ve bagged some cloud shots!

One of our Facebook readers, Lili, asks “For those of us who don't own an external flash unit, or simply can't afford any sort of lighting equipment; what are the tricks to making food look more appealing and vibrant, and not so flat and 2 dimensional?” We’re addressing that in tonight’s post, so bring your appetite and let’s get going.

The first thing to know is that flash, while an important part of your kit, isn’t necessary for all types of photography, nor at all times. Flash can help by adding light, allowing the use of faster shutter speeds, and by allowing us to shape the feeling our images evoke by shaping the light. There are other ways to accomplish this, though. Let’s look at how we can achieve that.

There are multiple ways to shape existing light. Let’s start by moving your food toward an area that has plenty of the light you’d like. From there, you can modify that light with everyday household items. A pillowcase can be used to soften and spread the light, covering a larger area with nice gentle light. You can use it to shape the light by varying your angle and position. In a previous post, we mentioned the inverse square law that says doubling the distance between a light source and subject gives ¼ the light level. You can see that by tilting the angle between your pillow case diffuser and subject creates the illusion of distance and depth.

Another way to add or shape light is to use a reflector. You can use foil or a 5 in 1 kit to bounce light in from outside the immediate area. This allows you to concentrate your light where you want it, and increase your luminance levels. Again, tilting and angling your bounce can shape the light. A nice little thing to try is bringing your light in from about 45 degrees above your subject, illuminating the top and side. This allows the light to taper, and when you add the softness of the light, creates some depth. You can use a large white piece of gator foam, a piece of matting, or even a cookie sheet.

Another thing you can do is use your pop up flash. I never thought I’d say that, but with a little ingenuity, some foil, and a diffuser, you can add some depth. The trick to this is bouncing the light in from off the lens axis. I’ve used my external flash on camera to bring in lighting from 45 degrees to the side before, just with a piece of white mat. Remember, though, that bouncing your light costs you some of its power and range.

Now we’re going to move on to the best way to add some detail and vibrance. The big secret is DOF, depth of field. Using a longer focal length at a very wide aperture will give you a limited DOF. If you are shooting at 50mm, f/5.6, and focus at 2 feet, your DOF runs from about half an inch in front of your focal point to about the same behind it. You have a little over 1 inch of depth. Anything outside that range will become progressively out of focus. Taking into account the angle from which you’re shooting, you can create some nice little focal points within your scene. I like to think of it as pools of focus. When you place these at locations other than the center, you get some nice depth and intensity. Shooting outside in open or semi-open shade can also give more light and add elements of interest. The key to this is distance between the background and subject. You also want to make sure your focus is spot on where you want it, allowing your subject to leap out from the background in the finished image.

An easy thing to do is set up some Christmas lights or other small lights several feet behind your subject and shoot focused on your subject at your widest aperture. Do this in lower light, bringing in light with a flash or reflector. You’ll see some small circles of light that are incredibly out of focus, adding immediate interest to the scene if done right.

To boost the intensity of your color, shoot at about 1/3 to 1 stop lower that you meter for. By slightly underexposing your scene, you improve color density, saturation, and vibrance. It makes for less time spent editing and more time shooting.

Here are 2 images that show how using DOF can create an interesting sense of the meal or food.

Hohenfels Volks: Ribs...
ISO 800, f/5, 1/30, 44mm
Notice the DOF on this. By focusing toward the center of the ribs and allowing the highlights to fall higher than normal, interest is added in the meat, even though the pepper would seem to dominate. The pepper is diminished in strength through a shallow DOF, and the sharply blurred foreground end of it.

Hohenfels Volks: Meat Platter
ISO 800, f/5, 1/60, 41mm
By focusing on the back edge of the meat, sharpness is retained along the kabob, while bringing down the interest in the cucumber and tomato through minimizing DOF. The spices and browning on the meat hold quite well. Having dominant, complimentary colors, such as red and green, can decrease interest in the main subject. By decreasing their dominance through either DOF or lighting values, interest is brought back to YOUR subject.

Thank you, Lili, for the great question. I hope this gives you some ideas and helps you shoot what you eat the way you like it!

Is there anything you’d like to see here? Do you have a question? Remember, I'll try to answer all your questions. Share your thoughts here or at the Hohenfels Volks Facebook page. Of course, commenting on both Facebook and here is always appreciated, too! Don't forget, we're on Google+, too!

Monday, June 11, 2012

Tools of the Trade: Our First Review...

Greetings, volks. Welcome to Hohenfels Volks, THE place for our place! Another busy week in Hohenfels left us without short on posts, but more will come! I trust all are well and enjoyed some shooting time this weekend!

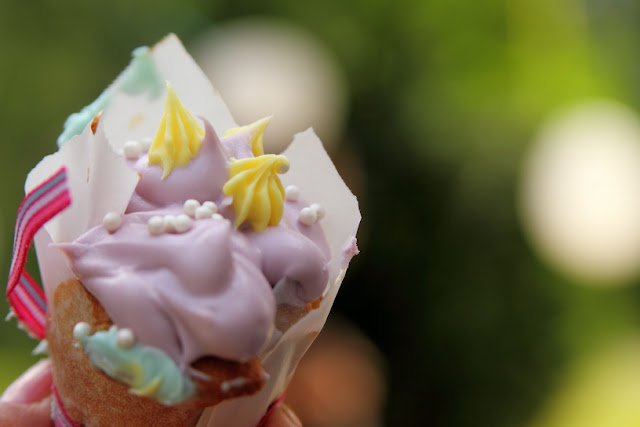
I went out shooting Saturday to test the Tamron 28-75 1:2.8 lens. This fast shooter was a nice break and allowed for some shallow DOF and creative shots, as seen in the shots below.

Hohenfels Volks: Cupcake
ISO 125, f/4, 1/400
Cupcake and icing. This cupcake was about 2 inches across, shot at 70mm with a wide aperture created some nice blur and bokeh.

Hohenfels Volks: Fruit Salad
ISO 125, f/8, 1/100
Fruit bowl. Great colors and even with f/8, at 75mm the DOF is shallow enough to be creative.

The best feature of this lens is the constant aperture throughout the entire zoom range. F/2.8 is nicely fast, and allows a nice low light performance. It also allowed some creative shots that really emphasize DOF effects to highlight part of a scene.

The lens is lightweight, and focuses down to about 13 inches at all zooms. The zoom lock feature makes a nice addition for when you’re moving around with the camera pointing down. The filter size is 67mm, which is large enough to prevent vignetting unless you’re stacking filters and shooting at 28mm.

The lens does not rotate or extend while focusing, which simplifies the use of a CP. Rotating lens barrels often necessitate adjustment of your filter after focusing. The images were sharp through all focal lengths, even wide open. Where you focus will be tack sharp when used properly.

The big downside to this lens is the lack of image stabilization. This saves battery life, but has its own drawback. When you’re shooting handheld, you have to shoot faster than the reciprocal of your focal length. If your focal length is 50mm, than you have to shoot at 1/50 or faster. With an APS-C sized sensor, the focal length has to be multiplied by 1.6 to get the corrected number. For those with APS-C sensors, this means shooting no slower than 1/50 at 28mm. While this little champion performs well in low light, being limited to faster shutter speeds may be a drawback when shooting inside places without adequate illumination. Camera shake becomes very noticeable, even in smaller display sizes, at slow speeds and may lead to some seeming nice shots having to go into the dustbin.

Another drawback to the crop factor of the lens is DOF calculations. You will need to calculate based on the original focal length, not the cropped focal length. This can lead to a DOF you may not desire. This is usually not an issue, but could lead to shallower depth than you find desirable.

With most of today’s cameras capable of giving good performance at 1600 ISO, the lack of IS may not be an issue, but in a church or other extremely low light venue, not being able to handhold is a real setback. Overall, this lens is wonderful, especially in reasonable light. The image quality is spot on. There is no noticeable chromatic aberration, color reproduction is wonderful, sharpness is very fine, and there are no color shifts often seen with lesser lenses. Tamron makes some great stuff, they also make some lower end stuff, but this lens is one to get if you don’t mind the limitation in lower light. I didn’t get the chance to push it too hard, it’s not mine, but the little workout it received proved it a worthy addition.

On other issues, has anyone had the opportunity to get out and make some storm cloud magic? The weather has lifted bits here and there to allow some great photos to be made! Give it a try. Remember to meter for the entire range, and expose for the brightest parts you desire detail at M+2-M+3. You’ll be surprised at your magic!

My thanks to Darris for allowing me to test out this little giant of a lens. Here’s hoping everyone out there has a wonderful week and makes your photo dreams come true!

Is there anything you’d like to see here? Do you have a question? Share your thoughts here or at the Hohenfels Volks Facebook page. Of course, commenting on both Facebook and here is always appreciated, too! Don't forget, we're on Google+, too!

Tuesday, April 10, 2012

Ride Along Shot: High...

Greetings, volks. Welcome to Hohenfels Volks, THE place for our place! Welcoming Tuesday, Hohenfels finds a nice day breaking out and greeting us back.

Let’s visit Regensburg for another ride along shot. This time we’re going to look at a shot taken on film in the old part of town.

Here’s the image.
Hohenfels Volks: High Key Shopping
ISO 100 Agfa APX100, f/8, 1/50, 50mm
A shop window in Regensburg's old town.

This was taken outside one of the many little shops lining the square, and not far from the Dom, or cathedral. I was immediately attracted to the material, old boxes, wreaths, and some cool roses. Throw in the bottles and glassware in the window, and it really seemed like a “must have” shot.

Metering from the white portion in the bottom right window gave too little exposure, so I shot at M+3 and developed for N. This left white zone to about M+3 and leaves a nice tonal range. This also gives us a nice high key image, with a very suitable contrast, and detail in the brightest parts. The reflections in the windows could have been removed with a CP filter, but I would lose the high key effect of the light reflecting around the scene.

The meter gave me f/16 at 1/100. I think this was shot on Agfa APX100 film. I shot with a 50mm f/1.8 prime, as I did the entire day. The final exposure was f/8 and 1/50, with an ISO of 100. I didn’t want to go slower, as the old cameras had no IS, and any wider would have left the DOF inadequate to express what I had envisioned. The sun was out, it was mid-day, and the weather had warmed up a little that day. It was still snowing back in Hohenfels, which was a bit surprising as I got off the train.

After scanning the negative, editing was most certainly required. The sharpness was quite nearly gone, the contrast had come down, and the whites were nearly blown. By applying curves in an inverse S and adjusting the levels to bring down the shadows, and raise the midtones and highlights, I was nearly complete. The next step was to reduce noise and apply an unsharp mask at about 3px radius, 90 strength, and 2 clipping.

The final image grew on me. At first, being satisfied with the image, it was ok. After editing and revisiting the image several times, I realize it had become something I really liked. It showed that the system of metering for the highlights when you plan an image to be presented digitally, can lead to some really nice results.

By exposing on the plus side, it brought out some detail in the shadows, allowing just enough to bring the eye to them in the middle of the brights. Our eyes are generally drawn to the brightest part of a scene first, which is why we often keep our subject 1/3 to 1 stop brighter that the surrounding. In cases like this, it sets our darks apart and brings focus to the play between shadow and light.

I hope I haven’t bored you too much! Enjoy the rest of a lovely evening, maybe using this time to get some blue or golden hour shots in. Take care and keep shooting.

Don’t forget to post any of your images you’d like to see here at the Hohenfels Volks Facebook page. Of course, commenting on both Facebook and here is always appreciated, too! Don't forget, we're on Google+, too!

Thursday, January 19, 2012

Tech Talk: Hyperfocal Distance

Greetings, volks. Welcome to Hohenfels Volks, THE place for our place! Today we’re going to learn about hyperfocal distance.

What is hyperfocal distance? It’s the distance you focus your lens for to have a maximum DOF. When you focus at this distance, everything from about half that distance to infinity is in acceptably sharp focus. To accomplish this and to define acceptably sharp focus you need to know your circle of confusion (COC.) COC is the largest size that a point or spot can be without appearing out of focus. For an APS-C size sensor, which most of us have, that number is .019. The smaller your COC, the greater your sharpness. Although, for different sensors and films that number is different. For 6cmx9cm film, it’s generally accepted to be .07, and for 35mm or full frame sensors, it’s about .03.

Things get mathematical here, so you may want your calculator. You can calculate the hyperfocal distance for a given lens and aperture using this method. Take the focal length of your lens and square it to get variable a, next take your aperture or f/stop and multiply it by the COC to get variable b. Divide a by b, and there you have your hyperfocal distance. Here’s how it looks in mathematical terms

H =F²/(f x C)

In the equation above
H = hyperfocal distance
F = focal length
f = f/stop
C = COC

As an example, your lens is 50mm, you wish to focus on something 10 meters away, use f/11, and you’re using an APS-C sensor. 50x50/(11x.019). This gives us 2500/(11x.019) or 2500/.209, and finally approximately 11.9 meters. If you focus at infinity on your lens, your DOF will run from 11.9 meters to infinity. If you focus at 11.9 meters, your DOF will run about 6 meters to infinity. By focusing at your hyperfocal distance, you can maximize your DOF in an image and get that winning shot. By using this calculation on a variety of focal lengths and f/stops, you can see why smaller apertures (bigger f-numbers) give you greater DOF.

There are 2 other ways to figure it out. Both are much easier, if you are using a higher end lens with a scale on it, you set the infinity symbol on your lens to line up on your f/stop at the far scale, then everything from the matching f/stop on the near scale to infinity will be acceptably sharp. That allows for Maximum DOF and zone focusing. The other easier way is to look it online. There are so many sites that you can find on Google just searching for hyperfocal distance, that you’ll never be at a loss. I prefer using DOF Master, as they have some great stuff there and it’s too easy. You just enter your info and away you go!

I hope this gives you some idea of how to use your focus for maximum DOF and how to get that extra bit of oomph to make your image stand out. Next time we’ll be calculating DOF, more math so keep that calculator handy!

Don’t forget to post any of your images you’d like to see here at the Hohenfels Volks Facebook page. Of course, commenting on both Facebook and here is always appreciated, too!

Wednesday, January 4, 2012

In the Zone- Zone Focusing

Greetings and welcome to Hohenfels Volks, THE place for our place. I hope you’re ready, Hohenfels, to learn about zone focusing. This is something that can make getting some of those passing moments in the can, as it were, quicker and easier.

First off, let’s explain what zone focusing is. Zone focusing is using a combination of focal length, aperture, and distance to allow for enough depth of field to make a usable print. That’s pretty straight forward, right? Well, there is more to it than that, including knowing your equipment.

Zone focus developed as a way for photographers to focus their equipment, as most older cameras had no viewfinder or way to check your focus. Many of the old time greats used zone focusing to maximize the sharpness and detail in their works. Given the nature of early lenses, high f/stops were often required to get good detail and enough DOF to be worth printing. Remember, sheets of film, and rolls, were costly to purchase, develop, and print, so lots of effort went into taking each shot. Zone focusing grew from the concept and practice of hyperfocal distance, which you use to give you the maximum DOF for each lens focal length. We’ll have more on that in another post.

The technique works best with lenses that have markings on them. A distance scale for focusing opposite an aperture scale with DOF markings as shown in the photo below works best. It’s quicker and easier. Unfortunately, most lenses today are auto-focus, and kit lenses generally don’t have such marking. Higher end lenses do have them, as do pro and manual lenses as a rule.

Hohenfels Volks- Voigtlander vitomatic ii showing scale for zone focusing
ISO 200, f/4.5, 1/30, 32mm
Notice the f/stops on the front of the ring. They go out from the diamond marking focal distance, to give you the range, or zone, of acceptable focus.

Referring to the image above, you can see that there is a diamond. That is the distance marker. On the focus ring, there are markers that aren’t shown, that tell you your focal distance. Line up the desired distance, then using the f/stops that radiate out from the diamond, identically on either side, determine your needed aperture and distance. The distance covered will line up with the marks for the desired aperture. It’s that simple, anything in that range will be in sharp enough focus for decent size prints, including 8x10 and 11x14 if your camera has the resolution.

If your lens has a focusing distance scale, much like Canon’s 28-135mm, you can figure out your DOF with a little legwork online. The key when using zone focus, is to turn off your auto-focus. The second factor is to shoot either Aperture Priority or Manual modes only! Any other mode nullifies your efforts!

Know your location, and what’s happening there, and you can figure the ranges you will need. Let’s say for our purposes you’re shooting in a decently lit area at ISO 400 and you need to cover 3 meters and 6 meters, with room to spare. You get you’re framing, that will give you your focal length. You know it’s decently lit and you can get by with f/5.6-f/8. Going with a 55mm focal length, as most kit lenses like to go from 18-55mm, you should be focused at 4 meters for f/5.6 and 3.5 meters for f/8, although 4 meters is adequate, and has the advantage of allowing you to switch over to f/5.6 without losing too much DOF. If your lens doesn’t have a focal distance scale, measure off 4 meters, focus your lens, and mark it. An easy tip for marking your focus, is take 2 fat rubber bands and wrap one around the zoom ring of your lens at the focal length you wish to use, then wrap the other around the focus ring. Mark the one on the zoom ring at the top, focus your camera, then make a mark that lines up with the first mark you made. As time progresses and your lens drifts over the course of events, you always have your focus marked and can return to it in a snap. Then set your aperture and you’re cooking with gas!

A great online DOF calculator that just requires your focal length, camera model, and scale used (feet or meters) is DOF Master's DOF table. They also have some great information on hyperfocal distance and some nifty little software to play with!

If your shooting with a flash, your f/stop will be dictated by the flash when you use manual flash. TTL and E-TTL are great for using flash, but to use it right, you need a sync cable that’s designed for your camera maker or line to get it off camera. You can get a good one that’s about a meter reasonably priced. Add in a Flashbender or Sto-fen to diffuse the light some, and you’re off to the races. This allows you to hand hold your flash off camera and get some directional TTL or E-TTL light in your images that just adds to the quality.

Zone focusing is great for street photography, event photography, candids, and may other things. Try it out in your works and see how it can help you! You can also use it for this week's theme, as it will allow you to appear less obtrusive when shooting work getting done!

Enjoy the rest of your day, and remember to cast your vote for next week’s theme. Get yours in to have a say! Don’t forget to get your pics posted at the Hohenfels Volks Facebook page. Of course, commenting on both Facebook and here is always appreciated, too!

Saturday, November 5, 2011

Ride Along Shot

Welcome to Hohenfels Volks. I hope everyone is having a great weekend. The day is chilly, but the sky is blue, and the light is there. Today we’re going to try something new based on a suggestion by my friend Darris. We’re going to look at a photo and go over how and why it was made, and what kind of thoughts went into it.

I’m going to use a photo taken in Bamberg at the Residenz.

Here’s the image and the settings


ISO 1600, f/5.6, 1/60. Canon EF 28-135mm IS

The imperial hall is a magnificent room, from which you start your tour. It’s also the only room where flash photography is allowed. I wanted to capture something of that grandeur without taking it to the point where there is too much of the room,

Choosing something that would be pleasing and have a point led to this image. Visualizing something with the windows leading to the door gave several possibilities. I liked having something lead to an interesting and mysterious item or subject. The door was the way to go, as it increased interest and curiosity.

By moving around the room, and visualizing several ways of getting the picture I thought placing the door at one of the thirds, and leading in with the chairs would be a great way to draw the viewer in. I set my flash to cast a small amount of light to toward the entry into the main part of the palace. I thought that including some of the windows would be a nice touch, but realized that closing in the window frames toward each other added another way of leading the eyes into the door.The contrast between window light and the dark chairs creates more interest in where they lead.

Creating diagonals with the chairs, I’ve created one set of leading lines. By closing the windows together, the converging parallels created another set of diagonals. All the diagonals converge at the door, leading one into the apartments. What’s in there, what is the light, and where does the door lead? These questions can be created with placement of the subject and leading lines. Keeping it in glorious color helped show the glory and majesty of the hall and increase some curiosity and tension.

The short focal length allowed me to shoot at f/5.6 and keep the DOF needed to bag the shot I visualized and keep the shutter speed high enough to handhold the camera. I knew that a large aperture would be need to get the light from the flash to record properly, and somewhat slower shutter speed to get the ambient light. 1/60 allowed the ambient to record at the desired level, while f/5.6 allowed the flash exposed areas to match the ambient levels.

When shooting manual with a flash, your shutter speed controls the ambient exposure and the aperture controls your flash exposure. This will allow you to adjust either part, as ambient lighting often cannot be changed, and running between your flash and camera can make things tricky.

Remember, with shots like this, you have to include the negative lighting and added lighting in visualization. Include the impact of your counters to the poor lighting, and see the end result. If you know your camera and your exposures, you'll get the shot you want.

Painted beautifully with wonderful scenes and colors, I’ve included a pic of the ceiling.


ISO 1600, f/5.6, 1/60

I love the color, detail, and majesty of this painting.

I hope this post can be of some help. Enjoy your weekend. Today’s golden hour begins at 4 pm, so get out and get shooting! That golden light will make your shots, and you surely can find any number of subjects to photograph in it! Remember to share your pics and post your questions at the Hohenfels Volks Facebook page, and or by commenting here!

Friday, September 23, 2011

FOCAL LENGTH

Welcome to another post!

Our topic this time is FOCAL LENGTH, and covers more than just lens sizes.

Let’s start out with the basics; FOCAL LENGTH refers to the length of your lens, usually in millimeters. A 300mm lens is 300 millimeters, but crop factor can change the apparent FOCAL LENGTH of the lens. Crop Factor refers to sensor size on a digital camera. Most of us use cameras with an APS-C sensor, which provides a 1.6x crop factor, or 1.6 times the magnification of the lens’s FOCAL LENGTH. Unless a lens is made for the specific crop factor, for instance Canon’s EF-S lenses, crop factor must be counted to provide the correct focal length. Therefore, a 300mm lens at 1.6x crop factor has an apparent FOCAL LENGTH of 480mm. Since most of us now use the digital lenses that either came with our camera, or we purchased later, I’m not going to make too much of crop factor, that’s for another post.

A large number of folks believe that the perceived change between two FOCAL LENGTHS is caused entirely by magnification. This is actually not entirely true. When you zoom in closer, your lens covers a smaller area of the scene. It doesn’t really magnify it, just shows less in the same amount of space, although there is some magnification from the optics. If you look through a toilet paper tube and take note of what you see, then look through a paper towel tube of about the same diameter, you’ll notice this effect.

Another effect of FOCAL LENGTH, is longer FOCAL LENGTHS, compress the distance between objects in your scene, making them appear closer together. This is great for a portrait with a shallow DOF, as it can blur out and compress the background for a nice effect. It’s something to pay attention to, as the effect can make a great picture look somewhat flat and plain.

For more the rest of this article about FOCAL LENGTH, check out our Intro to Photography page, which contains our full intro series posts so far. And for a great article about the effects of FOCAL LENGTH, check out Photo Tuts+. You can also get into the maths of it at Wikipedia!

I hope this article will be useful on your photographic journey. The knowledge really helped me! Enjoy the weekend folks, and keep your eyes open for more articles, tips, and Hohenfels Volks photo goodness!

Thursday, September 15, 2011

Depth of Field

Welcome back!

This time we're going to explore DEPTH OF FIELD, commonly referred to as DOF.

Have you ever noticed that some photos are extremely sharp all the way through the whole range of the image and some stop being sharp with only a small range truly sharp? This range of sharpness in a picture is DEPTH OF FIELD.

How can we control this? There are several tools at our disposal. One is controlling the distance between subjects, another is focal point (an upcoming post), but the most valuable to us, and the one we will discuss here, is our aperture or f-stop.

You might remember that aperture is the size of the "window" in the lens. You might ask, if it controls how much light gets in, how can it control the DOF?

With a narrow aperture, basically, the light becomes more tightly focused, making the DOF wider and allowing an increase in sharpness.

A couple words of caution on this:

1) This is not the cure all for poorly focused or blurry images. One negative side effect of a very small aperture, or large f-stop, is diffraction blur. The bending of light as it squeezes through the aperture causes this, and can make blur more noticeable.

2) This will require longer shutter speeds. Sometimes beyond your ability to hold a camera steady. Camera shake is really bad at long exposures!

So, if a narrow aperture will increase DOF, it makes sense that a wide aperture will decrease your DOF.

Now, it's time to break out your camera. Play with your DOF; adjust your aperture and your focus to get some images with a shallow DOF and some with more depth, or wider DOF. A great way to start is taking 2 items and placing them on your table at different distances from the camera. Shoot at the range between f4 and f16 and examine the results.

Don't you feel more artistic already? I did when I first tried it!

For more information on DEPTH OF FIELD, check out our Intro to Photography page and don't miss out on Cambridge in Colour's excellent in-depth tutorial.

That's it for this post. Here's hoping you have a great week and get some good shooting in this week-end!

And remember, if you have any questions or comments feel free to share them here or on our Facebook page.