Showing posts with label black and white. Show all posts

Saturday, April 9, 2016

Back With Salons

Greetings and welcome to Hohenfels Volks, THE place for our place!

"Spring has sprung!" Things are warming up and we're enjoying longer days and more time to make photos. Today, we’re going to revisit photographic salons.

A photographic salon is basically a competition where photographers compete to be included in a photographic exhibition. A circuit is generally several salons with unified coordination.

The advantage of salons is that your fellow photographers judge all the entries. The judges are generally advanced photographers who've been competing for a while and been honored by one or more of the photographic societies. They generally aren't about who has the best gear and does the "fanciest" editing. They're about the photographs entered, and the art of photography.

The biggest drawback is that many of the better-received images are more in line with the current trends and tastes. For instance, HDR images can be highly received, as can images with high contrast or color purity. A well-received style can garner lots of acceptances and quickly becomes recognizable. The big drawback in all this is the tendency to intimidate the newer participant. If you aren't comfortable with your style or willing to try something new, you can get put off salons quickly. The problem is that this mindset and effect is also common outside salons. How many times have you looked at an image and thought, "I wish I could make something like that?" You can see it in many photography forums and groups. Of course, great images should never discourage us; they should inspire us and drive us to pursue our own style and merit.

I suggest every photographer enter a salon, the experience is quite wonderful overall. The joy of getting your images ready, the anticipation of your report, and finally the joy of seeing how many acceptances you receive is quite exciting. You also get valuable feedback by knowing whether you photos were well received. Knowing what worked for one, though, doesn’t guarantee it will work for another, as each salon has different judges. That allows for your work to be seen by real photographers, and to be judged on the photographic merits, rather than sentiment of a random audience. The feedback is more useful that way.

For the second year, I entered the Trierenberg Super Circuit and Special Themes Circuit. I entered The large print divisions. These entries are part of the PSA's Pictorial Print Division. I had 5 images selected into the 4 exhibitions across Austria. After last year's entries, and further acceptances into the Al Thanni Award, exhibited in Qatar, Austria, and London, I'm convinced that the learning experience and joys of achieving such recognition far outweigh the negatives. Those images not accepted have helped improve my technique, editing, and presentation, as well as show where I missed the mark.

The following images were accepted:

Hohenfels Volks : A Temporary State
A Temporary State. Open Color Print.

Hohenfels Volks : For Us
For Us. Open Monochrome Print.

Hohenfels Volks : Christmas Cheer
Christmas Cheer. Experimental Color Print.

Hohenfels Volks : Cross and Field KChrome
Cross and Field: KChrome. Experimental Color Print.

Hohenfels Volks : God's Embrace
God's Embrace. Landscape Color Print.

We want you to share your photos, especially of our place, with us on our Hohenfels Volks Facebook page. You can also e-mail questions, photos, or comments to HohenfelsVolks(at)tks-net.com, and we’ll get them posted!

Is there anything you’d like to see here? Do you have a question? Share your thoughts here or at the Hohenfels Volks Facebook page. Of course, commenting on both Facebook and here is always appreciated, too!

Wednesday, August 27, 2014

Express or Selfie?

Greetings and welcome to Hohenfels Volks, THE place for our place!

Ansel Adams once said, “We must remember that a photograph can hold just as much as we put into it, and no one has ever approached the full possibilities of the medium.”

Given the self absorbed state of the world around us, evidenced by the "art" of the "selfie," it's time to start looking back and moving toward approaching the full possibilities of our medium.

The best "selfie" is made using the external to express something of the internal, allowing a fuller expression of the individual self than a cell phone at arm's length. When we make our photography expressive, as well as creative, we can approach closer the full possibilities of the medium.

Of course, that's just my two cents.


The lodge wall. Antique sleigh on the wall at the lodge.
ISO 800, f/5.6, 1/30, digital

A photo doesn't have to be fancy or artsy to be expressive, creative, and artistic. Look internally, and find the expression in something external!

Well, that’s enough for today. We want you to share your photos, especially of our place, with us on our Hohenfels Volks Facebook page, and we’ll get them posted here! Is there anything you’d like to see here? Do you have a question? Submit them and we’ll get them posted, also. We also welcome any tips, tricks, and ideas. If you’d like to write an article about something photographic or some place of interest, we’d be happy to post it here! You can also e-mail questions, photos, or comments to HohenfelsVolks(at)tks-net.com, and we’ll get them posted! Of course, commenting on both Facebook and here is always appreciated, too!

Tuesday, September 24, 2013

From the Soapbox

Greetings and welcome to Hohenfels Volks, THE place for our place!

Today’s discussion is a short one on a quote from one of the early greats in photography, Alfred Stieglitz.

Photographers must learn not to be ashamed to have their photographs look like photographs. Alfred Stieglitz

First, a little background on Stieglitz. He began photography in the 1880s, and campaigned hard for photography to be recognized as an art unto itself. In 1902 he held one of the first ever photo exhibitions to be judged solely by photographers. Prior to this point, exhibits were being judged by painters and the like, who’s influence led to a more painterly and less vigorous style holding sway in the art. Over the years he influenced many photographers, founded several asscoiations, clubs, organizations, and galleries. He was friends with many famous photographers, including Edward Weston and Ansel Adams. He worked with them to ascribe a new ideal to photographic artistry.

All this brings me around to the quote, and also to today’s message. As we all know, learning photography takes some effort, it’s a task that frustrates and rewards those who set themselves to it. We go through the various stages, and then we find ourselves making photos that can connect, communicate, and express on their own merits. Most of know the joy that somes from that achievement, we know the sense of accomplishment that we feel.

The issue we’re seeing is that too often, marketing tells us that our photos should look like paintings, or that we need to do things with software that we can’t do with our camera. We see plug-ins and products designed to sell us on the idea that our photos should be a little less like photos. My concern is that all too often, we’re being led into a path that doesn’t match what our vision or intent. Frequently, these products and techniques are either marketed or taught to folks to cover up or salvage bad shots, which undermines the learning process.

Hohenfels Volks: Abstract Clarity
ISO 125, f/4.5, 1/25
This was shot in Munich at BMW World during a daytrip. I wanted to share something of how our world may be changing, but some things will remain timeless. Exposing and planning for black and white allowed a more readily grasped sense of that thought. I knew that any other rendition would create an association with different art forms, which I did not want. This is the final intent, to show that abstract use of lines, tones, and texture can still look like a photograph and be artistic. I have a print of this I find very pleasing.

Be proud when your photos look like photos. Show off your photos, share your photos, and let the world know you made your photos! That feeling of pride that comes from the successful matching of our vision, intent, and final product can’t be replaced, and if your intent is canvas, than be proud of that canvas! Jump for joy and shout Hallelujah if it looks the way you want, because that’s what we’re trying to accomplish.

Enough of the old soapbox. I don’t want to discourage anyone from trying something new, but those new ideas can become a crutch all too easily. I relied on some of those crutches myself early on, and I know how easy it happens!

So now, it’s time to get out and get shooting! Plan your presentation while your planning your shot, and you’ll be way ahead. Then, make your shot and share it with us on our Hohenfels Volks Facebook page. We’d love to see your work.

Is there anything you’d like to see here? Do you have a question? Share your thoughts here or at the Hohenfels Volks Facebook page. Of course, commenting on both Facebook and here is always appreciated, too! Don't forget, we're on Google+, too!

Tuesday, September 17, 2013

Autumn Care

Greetings and welcome to Hohenfels Volks, THE place for our place! Here in Hohenfels, the Sun made a couple cameo appearances but wasn’t able to stir up any kind of significant warmth. The rain put a damper on the spirits, as did the fact that it’s a workday!

With autumn’s brutally chilled arrival, we’re nearing the time to shoot some real color! There’s always some excitement about the colors, shapes, textures, and patterns that accompany autumnal photography. As I mentioned in yesterday’s quote, now’s a great time to think about negative space and the use of color to create tension, balance, and harmony in your photos, and bring about the connection you’d like to make.

Hohenfels Volks: Black Velvet, flowers in Bayreuth
ISO 800, f/11, 1/60
These flowers were shot at the Hermitage in Bayreuth. A Wratten #8, yellow, filter was used. By using the filter, the green was brought up slightly, and the white flowers separated from both the red flowers and green leaves. By allowing a rich grey-black to fall on the leaves and red flowers, a velvety feeling of negative space results. While fragmented and carrying visual detail, it is by no means the subject, and yet becomes a subject of its own.

Along with the march of color into the dreariness ahead, comes other factors that photographers should take note of. First, is the rapid decrease in temperatures, the drop in temperature can take the starch out of an exciting day. Another factor is the rain, always something to be ready for in our Hohenfels area. Getting your camera wet can lead to issues that no one wants!

One of the biggies, I’ve found, is the increase in static. For the most part, photographers don’t have to worry about while photographing with digital cameras. It’s when the time comes to change cards or clean your sensor, or even change your lens that it becomes an issue. A typical “zap” can have as much as 30,000 volts jumping from one surface to another. Enough to ruin your day if it arcs over onto your sensor. Since most folks don’t clean their sensors beyond a squirt from a bulb blower, it’s pretty reasonable to say that the standard precautions are sufficient.

With film, though, static can be a big problem. Advancing film, rewinding film, activating the shutter, removing a dark slide, all these things can cause an arc that will ruin your shot. The can also damage your shutter curtains if your camera uses cloth. In the driest and coldest weather, it could damage your sensor, but that’s unlikely.

The biggest threat to digital cameras during this time of year is the condensation from thermal transitions. That’s a fancy way of saying going inside from outside. I’ve found one of the best ways to protect anything is a Ziploc bag and 30 minutes. Don’t plug your camera in, put your card in your reader, or power on your camera when you first come in. The temperature change can cause moisture, which we all know, doesn’t sit well with electronics! Think about glasses fogging over when you come in from the cold!

Another awesome tip- when you get in from the cold, make a big cup of hot cocoa, with extra chocolate. It’ll warm you up, and give time for your gear to reach a suitable temperature! It helps if you have someone to share it with. A nice cup of cocoa with my little princess makes for some fun talk time, and 30 minutes is gone before you know it!

Now’s the time get scouting and planning your autumn shots. Figure out where and when, the rest will follow. Then, make your shot and share it with us on our Hohenfels Volks Facebook page. We’d love to see your work.

Is there anything you’d like to see here? Do you have a question? Share your thoughts here or at the Hohenfels Volks Facebook page. Of course, commenting on both Facebook and here is always appreciated, too! Don't forget, Hohenfels Volks is on Google+, too!

Tuesday, November 6, 2012

Creative Metering and Exposure

Greetings and welcome to Hohenfels Volks, THE place for our place! I hope everyone is getting a decent start to the week. The Hohenfels area is beautiful this time of year, as many of you know, and full of go-to places for some great shots.

Today we’re going back a little to some basics. We’re primarily going to look at metering and exposure.

We all know the basics by now, that your meter offers a combination to make the measured area fall at 18% reflectance, or neutral gray. Most of us know that by overriding that proffered setting we can take fuller control and get closer to our vision.

I’ve discussed metering and key stops before, but today we’re going to see how it can be used for maximum impact when combined with our vision.

I’ll be referring to the following photo as an example.

Hohenfels Volks: I UnSubjugated
ISO 125, f/22, 1/2 on Ilford FP4+
I, Un-Subjugated.When we leave the I, or in this case the red, unsubjugated, a wider variety can thrive.

In the above image, both the highlights and shadows were extremely close in values, and were identical with the light shifting as it was. My initial reading was 15 c/f2 for the shadows and 30 for the highlights. The brighter leaves are red and the darker ones are green. Knowing the values were so close, with the red reading about 2/3 to a whole stop brighter, I chose a red filter to bring up the reds and decrease the greens. A red filter allows about 97% of the red light through, while only allowing about 12.5% of the blue and green. It also gives a factor of 8x or 3 stops. Throwing in the aperture decrease, I was shooting with 5 stops less available light for the greens and shadows. By adding 4 stops to their initial reading of 30c/f2, their levels were increased and the red was 2 stops over neutral. In yesterday’s shot, the same leaves and exposures were made, only using a green filter, bringing all the levels more in line with their illuminations.

This is the same shot, and levels as the image I posted yesterday. This will allow you to see how using the tools and techniques at our disposal, we can lead our image and our viewer to the desired result.

When we meter at our key stop, both for highlights and shadows, what we’re learning is the illumination of the subject. The reciprocal of our shutter speed is the amount of illumination, expressed in candles per square foot. By metering off the shadows, mid-tones, and highlights, we have a range of illuminations with which we can work. Those readings will always be the same at any key combination. For instance ISO 100 and f/10 or ISO 400 and f/20. So, we meter 100 foot candles at ISO 400, f/22. At ISO 250, we would set f/16 to get the same results. Now to place that value at somewhat higher value, for instance, we could set our shutter speed to 1/50 instead of 1/100 at f/16 ISO 250, and get a result that is lighter than neutral, by about 1 stop.

Throw in the ability to see our desired results and the steps to get them; an image can be made, not captured. We have several tools to modify the exposure we’ve selected without destroying the original image. With digital photography, shooting RAW gives you complete control. By raising your red tones, and lowering your greens and blues, a red filter can be somewhat approximated, and so on.

By combining exposure, processing, and value controls throughout the photo making session, we can bring our creative expressions to life. The first step to learn is metering and how to use that information. This little tool can be used for a record photo that leaves little to interpretation, and one for the magic of creative photography, as well. You can give voice to your thoughts without uttering a word. Using what you know, and the tools available to you, vision can be brought to life, and given a meaning according to your creativity and visualization.

I hope everyone enjoys the rest of the week and makes an image using their knowledge, tools, and vision to share with all of us! Get out and make it happen, then show us, share what you felt through your images on our Hohenfels Volks Faceboook page.

Is there anything you’d like to see here? Do you have a question? Share your thoughts here or at the Hohenfels Volks Facebook page. Of course, commenting on both Facebook and here is always appreciated, too! Don't forget, we're on Google+, too!

Tuesday, September 11, 2012

Announcement

Greetings and welcome to Hohenfels Volks, THE place for our place! Tuesday evening finds Hohenfels in the grip of a storm, complete with lightning and thunder!

Today’s post is a short contest announcement. Hohenfels Volks is going to have a photo contest. The prizes are all small, with the winners getting a gift certificate to Photohaus Zacharias. I’ll need to work out some details prior to starting, though.

The winners will be selected based on:
1- Technical Execution- Is the exposure correct is the image sharp, etc.
2- Creativity- How creative is your shot.
3- Theme- Sticking to the posted theme.
4- Impact- Can the viewer connect with the image in some way? What message does it seem to convey?

I’ll post the starting and ending dates Thursday, as well as the theme. A couple notes- first, this is not a photo editing contest. Get it as close to right in the camera, and your job is more than half done! Second-you’ll have to come see me to pick up your prizes. Third- your image is your image, you keep the copyrights, although we’ll feature it here. So start thinking about your shots, planning your tools, and visualizing the image you want to make. This is a great time to practice photography, for all of us!

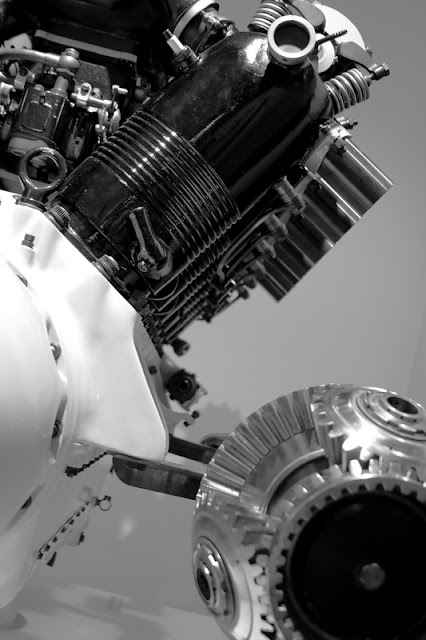
Hohenfels Volks: Rev the Engines
ISO 400, f/3.5, 1/30
An old airplane engine manufactured by BMW, here in Germany. The shapes and lines lead you through the image as you wonder what it is. Sharpness and light work together to creative an interesting draw.

Here’s hoping you enjoy the rest of your week and capture the shots you’ve been wanting. Get out and make it happen, then show us, share what you felt through your images on our Hohenfels Volks Faceboook page.

Is there anything you’d like to see here? Do you have a question? Share your thoughts here or at the Hohenfels Volks Facebook page. Of course, commenting on both Facebook and here is always appreciated, too! Don't forget, we're on Google+, too!
Wednesday, August 15, 2012

Ride Along Rome

Greetings, volks. Welcome to Hohenfels Volks, THE place for our place! Another sunny day in Hohenfels, as we ride out the summer, brings us warmth and brightness.

Today we’re going out on a ride along shot. So, get ready to leave Hohenfels behind, and take a trip through time to ancient Rome.

First, here’s the shot from the camera.

Hohenfels Volks: Colosseum in Rome, Before
ISO 160, f/8, 1/100, Canon EOS 7D
This is washed out and appears to be a failure, but when you shoot for your final result, this is only half the image.

It’s not very pretty, but this goes to show you how you create an image with your vision. I shot it this way fully expecting to get to the final image with some editing in Canon’s DPP. I didn’t use Photoshop or any other program; everything was done in RAW conversion.

We were in Rome a couple weeks ago on a wonderful family vacation with some great friends. The whole family has always wanted to go there, so off we went.

Of course, the Colosseum was a mandatory stop, especially for me. This was shot during our tour, including the underground portion. I got quite a few shots inside, but wanted something that would leave the viewer wondering. I also wanted something that showed its incredible nature, without getting the usual fare.

I was shooting film and digital that day, so used my 7D to meter for both cameras. The film was Kodak Portra 160, which is a color film with a box speed of ISO 160. I metered for the lower wall. I wasn’t concerned about the sky blowing out, as the important details in the tunnel and brick were needed. By metering the lower mid values and exposing for M-1, shadow detail was preserved, as were the mids.

They hardly seem the same. I edited the image by setting my white balance to color temperature. This allows for some contrast control in the final image. The reason color temperature and white balance can be used to control contrast is that our color levels will be adjusted under the RGB tab. After setting the color balance, and setting the exposure to –2/3 stop and adjusting the contrast, I moved over to the RGB tab.

When converting this way, the image starts looking worse as you progress. It simulates color filters. The beauty of digital is that you can simulate different colors for different levels. By increasing the levels of red in the shadows, pretty much removing blue, and giving green a slight decrease, the image looked wonky. Of course, it starts to come together when you slide your saturation under the RGB tab to 0. A little dip of the luminance curve and it’s back to Raw.

By adjusting the color balance back toward blue, you can darken the image. You also increase contrast. Then, once you’re happy with those adjustments, under the RAW tab’s saturation you can further tweak your contrast. With the red bricks, green spots of grass, and blue sky the image was quite suited to this type of conversion. Another suitable type is when one color dominates several neutral or contrasting colors.

Here’s a screen shot of the 2 tabs and the final settings. Shooting RAW gives you so many options to capture shots that bring together your camera work and your vision.

Hohenfels Volks: Colosseum in Rome, RGB tab settings
Here is the RGB tab and the color adjustments.

Hohenfels Volks: Colosseum in Rome, RAW tab settings
And here we see the RAW tab in Canon DPP

Finally, here is the finished image.

Hohenfels Volks: Colosseum Section, Rome
ISO 160, f/8, 1/100
Colosseum Section, Rome, finished. The increased contrast from the color temperature brings detail into the bright stones topping the section. It also makes the entry dark and increases overall image interest.

The tunnel entrance, in dark mysterious shadows, referred to as the vomitorium, allowed for rapid exit during an emergency. The little arches below were entryways into another seating area. The site had a capacity of 50,000 spectators, and even though this small section doesn’t show the full capacity, it does give an impression of the scale and architectural marvel. I also shot a back up to be in color, which pops for the contrast between the sky and walls.

Here’s hoping you finish the week with some great shots. Hohenfels is full of opportunities for photography, and this weekend may be the perfect time to get something in your camera!

Please feel free to share your photos on our Faceboook page. Everyone here would love the chance to see your work! Is there anything you’d like to see here? Do you have a question? Share your thoughts here or at the Hohenfels Volks Facebook page. Of course, commenting on both Facebook and here is always appreciated, too! Don't forget, we're on Google+, too!

Tuesday, July 17, 2012

Converting Your Image

Greetings, volks. Welcome to Hohenfels Volks, THE place for our place! I hope everyone is faring well as press into the week.

Today we’re going to go over a simple, but interesting way to convert your photo to black and white.

As we all know, sometimes color can change the way an image feels. It can take a moody photo and make it seem wrong or out of place. It can distract from the subject and take away from the beauty of the light. There are many reasons for shooting, or converting to, black and white. For this post, we’re going to do something that takes our shot to a better place.

This is the image we’re working on. I’m using Corel’s Paintshop Pro Photo X4, but the concept is the same in Photoshop, Lightroom, or Gimp.

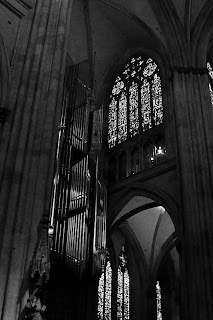
Hohenfels Volks: The Dom
ISO 6400, f/3.4, 1/15
Looking into the Cathedral. The scene was beautiful, yet the image lacks some pop. We'll fix that!

I shot this photo inside the Dom in Regensburg. The beautiful Gothic architecture and art inside this cathedral seem best suited for black and white, and seem quite garish in color. The color temperature also becomes an issue when shooting at high ISOs, although I photographed this with the intent of making it black and white.

Once we’ve converted our image and opened it in our application of choice, we’re going to separate the image into red, green, and blue layers. There we’ll lighten and darken the different layers to our desired levels using curves and levels, and remove the noise. For this image, I slightly decreased the red and blue layers, while only dodging the green along the pipes of the organ. Once you’re content with your adjustments, combine the layers into a new image. For this shot, I slightly darkened the red layer, darkened the blue layer quite a bit, and dodged the pipes of the organ to increase the levels to offset the overall decrease in brightness. The finished combination now looks rather odd, and has some tinting/toning in it.

Hohenfels Volks: The Dom
This is our image after splitting the color channels and recombining them. Notice the green tint on the pipes.

Our next step is to split the image again, this time to hue, saturation, and lightness layers. You can discard the hue and saturation layers, as we will now use the lightness layer for our final canvas. For this image, I adjusted the levels, performed a minor curves adjustment, and increased sharpness. I chose to over-sharpen, using a radius of 1.00, as I would be softening the noisy area under the arch, and applying an edge preserving smooth filter.

Hohenfels Volks: The Dom
Almost finished, a few tweaks and we're there.

The finished result, while no masterpiece, is rewarding. It leaves you with a sense of place and scale that the color version tends to minimize. The chiaroscuro also seems quite well suited to the Gothic cathedral.

Hohenfels Volks: The Dom
And here we go. I think this really brings out the mood and scale of the Dom. Its incredible Gothic architecture and art are magnificent.

Well, that’s one way you can do it. This is by no means the only way. You can also adjust color channels without splitting the image, and then desaturate the image. There are as many ways to convert your image as there are folks playing around to figure out what works best for their photo. One of the biggest keys, though, is color contrast and levels. Getting that where you want it can lead to some very nice results!

Enjoy the rest of your week.

Please feel free to share your photos on our Faceboook page. Everyone here would love the chance to see your work! Is there anything you’d like to see here? Do you have a question? Share your thoughts here or at the Hohenfels Volks Facebook page. Of course, commenting on both Facebook and here is always appreciated, too! Don't forget, we're on Google+, too!