Showing posts with label shutter speed. Show all posts

Tuesday, May 29, 2012

Back to Basics...

Greetings, volks. Welcome to Hohenfels Volks, THE place for our place! I hope this lovely evening finds you relaxed and excited about photography here in Hohenfels.

Today we’re going back to basics. We’re talking about one side of the “exposure triangle,” shutter speed.

Shutter speed is, of course, how fast your shutter opens and returns to the closed position. That sounds simple, but like all things in photography, it involves much more than that. Because SLRs use a single moving mirror to allow the composing of an image through your lens, and focusing through the lens, also, that has to be factored in. In long exposures, this can lead to vibrations and shake.

The complexities that go into allowing super fast shutter speeds are too many to discuss here, but we will touch on a couple issues.

Today’s shutters are usually made of metal blades, allowing them slide behind one another and achieve faster speeds. Because they are firm, they are also more durable. Early SLRs used silk shutters, which could snag and tear, or even develop pinholes, causing a waste of entire rolls of film. Most of the SLRs you’re likely to have encountered have curtain shutters that slide up and down. On older cameras, leaf shutters were common, which allowed flash synchronization at all speeds. They generally couldn’t achieve reliable speeds above 1/500 at the top end. They also used clockwork like mechanisms to open the shutter exposing the entire shot or sensor simultaneously to whatever light was present and exposed for.

On today’s cameras, shutter speeds that are very fast do not expose the entire sensor at once. Instead, they use a pair of “curtains” that travel along the focal plane and are synchronized to create a slit of light that progresses until the entirety of the sensor has been exposed. Due to this fact, most entry-level cameras can flash synch anywhere from 1/60-1/200, with high-end dSLRs being capable of synching up to 1/250. If you use your flash at any shutter speed faster than your sync speed, you will have dark bands along part of your scene.

Each halving or doubling of your shutter speed causes a doubling or halving of the exposure to which your sensor is exposed. Most of our better modern cameras can shoot from 30 seconds to 1/8000 second, and include a bulb mode for manual exposures longer than 30 seconds.

The series of shutter speeds, in full stops goes like this:
30 seconds, 15 seconds, 8 seconds, 4 seconds, 2 seconds, 1 second, ½, ¼, 1/8, 1/15, 1/30, 1/60, 1/125, 1/250, 1/500, 1/1000, 1/2000, 1/4000, and 1/8000. Notice the halving of exposure with each change of speed.

Adding in half stops gives you:
24 seconds, 12 seconds, 6 seconds, 3 seconds, 1.5 seconds, 1/3, 1/6, 1/10, 1/20, 1/45, 1/90, 1/180, 1/350, 1/750, 1/1500, 1/3000, and 1/6000.

Finally adding in the third stop increments gives you the following series:
13 seconds, 10 seconds, 6 seconds, 5 seconds, 3 seconds, 2.5 seconds, 1.6 seconds, 1.3 seconds, .6 second, .4 second, 1/5, 1/6, 1/10, 1/13, 1/20, 1/25, 1/40, 1/50, 1/80, 1/100, 1/160, 1/200, 1/320, 1/400, 1/640, 1/800, 1/1250, 1/1600, 1/2500, 1/3200, 1/5000, and finally 1/6400.

The complete range allows for shooting in all lighting situations. They also allow for shots that will freeze even the fastest action or blur even the slightest movement. The creative potential of using your shutter speed in combination with the other sides of the triangle is limited only by your imagination. Try some motion blur, or try panning with a moving object to get the sense of motion and speed. Try to capture a hummingbird’s wings without blur. Remember, though, that every change in one side of the triangle requires a change in another side to maintain the same exposure.

Here's a photo, taken at a local fest, that shows how shutter speed can be used creatively.

Hohenfels Volks: Blurred Color
ISO 125, f/16, 4 seconds
The ferris wheel, with a long exposure for motion blur in the ride, turned into a color wheel!

Back to basics, get there and get the shot using the knowledge you have and your unique vision. I’m convinced that shooting for the basics can help keep us on top of our game and give us another way to expand our potential.

I’d love to know what you think and what you’re doing with your photography. Where are you headed, and is there anything you’d like to see here? Share your thoughts here or at the Hohenfels Volks Facebook page. Of course, commenting on both Facebook and here is always appreciated, too! Don't forget, we're on Google+, too!

Friday, May 4, 2012

Tech Talk: Rating Your Sensor

Greetings, volks. Welcome to Hohenfels Volks, THE place for our place! WOW! The annual Hohenfels Volksfest was a great time and the weather was perfect. Now the clouds are puffing up some, and that makes for great outdoor photos that include the sky!

Today we’re going to introduce rating and EI.

Your camera has a range of ISOs you can choose from, most likely running from ISO100 to ISO3200 in third stop increments. Camera and film manufacturers used the International Standards Organization methods to set the speed, or ISO, of your sensor or film. They generally are set to favor overexposure, as underexposure is harder to correct. Therefore, in test conditions ISO 100 performs at ISO 80-100 to get you exposed at the general target for the contrast and exposure standards set by the organization. This used to be referred to as a film’s “box speed.” For digital work, I’ve come to think of it as “nominal.” Therefore, when I say I shot it at ISO 125, that’s what I was set and exposed for.

The ISO recognized that most scenes deviated from test conditions, as did developing or processing. A film may be rated at ISO 100, when developed in a certain developer for a specific time, but not for any other combination. Film shooters would “rate” their film at different speeds for their methods, including exposure and development controls. For instance, some would shoot FP4+, which is ISO125 in Ilford’s ID11 developer, rated at EI80 developed in Kodak D-76 for their preferred method of exposing and developing a standard shot.

EI, or “exposure index,” is what you rate your film at for your methods, and usually refers to speed rating assigned that’s different from the film's actual speed. Generally, when you shoot with your digital SLR, you shoot maybe at ISO 100, and edit it in your manufacturer’s provided application and get decent results. You are shooting and making your shot at nominal speed, or box speed with film.

You may find that in high contrast scenes at nominal speed, you are getting shadows that are clipped to black and whites that are blown and have no detail. In that case, it’s time to change your EI, or rate your speed different. To do this correctly, you should test your camera, and we’re going to cover the procedures to do that for YOUR best results. Since this test is based on your equipment, metering, and editing, someone else will get different results using the same equipment. This test is based on your style and methods, which others may not follow. Keep that in mind when “rating” your gear, you can recommend your “rating” to others with the same camera, they will most likely appreciate the information, but each “rating” is subjective, and will work best in your hands.

This testing becomes especially important when shooting at extremes of lighting. In very low light, like that in most old buildings, noise is a real concern when trying to increase your image brightness during editing, and in bright daylight lit landscapes skies and clouds can become just blotches of white without any detail.

The procedures for setting your EI involved a gray card, meter, and your camera. You should be set up for this in light conditions that match your intended shooting conditions to effectively use this method.

Step 1, set up your gray card in lighting that matches your shooting conditions. Step 2, set your desired ISO reading on your camera, and select RAW mode. Step 3; set your camera to f/8 or f/11 and AV mode. Step 4, meter your gray card, use spot metering and fill as much of the frame as possible with the gray card. Note the shutter speed. Step 4, set your camera to manual mode, and enter the shutter speed metered in step3, which should give you an 18% gray image. Step 5: compose your test shot. You can pull back some, including other elements. I have a test screen that includes black and white pieces and collapses nicely into a camera bag, and prefer to use that to check contrast ranges while doing this test. Step 6, take the following series of shots- at the metered reading obtained previously, -1/3 stop, -2/3 stop, -1 stop, +1/3 stop, +2/3 stop, and +1 stop. Step 7, load the images onto your computer. Then open your image editing application. Step 8, Open each image in turn, and find the one that is MOST CLOSELY identical to the gray card in exposure for your set up. Make sure to perform absolutely no adjustments to the images, as we are looking for the most closely identical image. Take note of the settings used for this shot. Step 9, this is your EI for that type of scene with that ISO selected. For example if –1/3 stop produced the best rendition for ISO100, then your EI would be 125 or EI125. You will effectively be rating your ISO100 shots at 125, and removing 1/3 stop on all your shots in those conditions. To accomplish this, when shooting at ISO100 simply remove 1/3 stop exposure, either by increasing your shutter speed 1/3 stop or closing down your aperture 1/3 stop.

Rating your sensor or speed before shooting can save a lot of time editing and the heartbreak of a shot that doesn’t live up to your expectations. It’s not perfect, and varies based up taste, style, and personal preference, but it will bring you closer to achieving your vision. It’s definitely something to try in conjunction with this week’s exercise on contrast and contrast control. Combine it with M+ and M- exposure placement for even better results. By exposing properly, you can keep your contrast in the desired range, and make it easier to achieve your vision in your final processing stage.

For those interested in more information about film speed, Wikipedia has a great article. It includes formulae and details about how box speed and nominal are attained.

I’m looking forward to seeing your results and hearing from you. Let me know what you think and how you’re using your camera! Share your thoughts here or at the Hohenfels Volks Facebook page. Of course, commenting on both Facebook and here is always appreciated, too! Don't forget, we're on Google+, too!

Thursday, April 26, 2012

Hohenfels; Bursting!

Greetings, volks. Welcome to Hohenfels Volks, THE place for our place! Spring is upon us finally. Hohenfels is bursting to life with the colors and sounds of renewal. This is truly a great time to be out and about, making photos and capturing a fleeting moment of the glory that surrounds us.

Today I’m doing a short post; things have been busy and trying the last few weeks. We’re going to take a short look at capturing fireworks. This is by no means a full list of tips, but something to think about.

The first thing to consider is a tripod! You’re going to need something reasonably sturdy and level when the legs are extended. Another thing to consider is ease of operation, and adjustability.

The next thing that is a must have is a remote release. Without one of these, a steady tripod is more or less useless. This little item, reasonably priced at any photo shop, can make an image stable. Just the act of depressing the shutter release can cause some serious vibration. Another advantage of using a remote trigger or release is the ability to view the scene while you shoot. Just set your composition and focus, and then enjoy the show while shooting.

Make sure you use a lens that is short enough, yet long enough. Too short, and your shots lose the feeling that comes form small town fireworks, and too long you end up without any context.

Set your ISO to 200, or 400 depending on your intentions. Then set your aperture to f/8 and your shutter speed to B. Time your shots to the start of a volley and activate the shutter. Hold your release button for anywhere from 10 to 30 seconds to get a nice full burst and some detail from the area, then release. Over the course of a 20-minute show, you can get some really amazing photos.

One more thing, if your camera allows it, activate your mirror lock up feature. This will lower the vibration even more. Don’t forget to turn off you image stabilization or you’ll end with some blur.

Keep in mid your visualizing and composition, these can make a great shot into a real winner!

Don’t forget to post any of your images you’d like to see here at the Hohenfels Volks Facebook page. Of course, commenting on both Facebook and here is always appreciated, too! Don't forget, we're on Google+, too!
Monday, February 27, 2012

Placing and Falling

Greetings, volks. Welcome to Hohenfels Volks, THE place for our place! Lovely weather is starting to work its way around to us again. Slowly, but it’s coming!

Today we’re going to talk about metering and level placements. First things first, though, you need to know your camera and how to set metering types.

We need to start with our visualization and an assessment of the scene we’re trying to bring to life. Where are the most important details, where do we want to keep detail, and where can we sacrifice some detail to get our image to match our vision?

Once we’ve done our initial assessment, we need to place our camera’s metering mode to spot mode. In spot mode, we’re going to meter several places in AV mode, with our aperture set to the key stop for our ISO. Remember, your key stop is the square root of your ISO. To keep things simple, we can go to ISO 125, f/11, and be set. Having 2 sides of the triangle will help us get our exposure the way we want.

Start by metering the darkest part of the scene. Meter the brightest part of the scene, and move through to the middle levels. Take note of what these shutter speeds are. Find the darkest part in which you want to retain full detail and texture and meter off it. Take note of that setting, perhaps you’re showing 1/60 in your most important dark area, and read your brightest area where you want full detail.

Deciding upon which is more important, based on your vision, highlights or shadows, you need to set your exposure. If you decide the shadows are the most important, then you’d set your exposure 2 stop down. If you metered your darkest detail area at 1/60 at f/11 for ISO 125, you’ll want to shoot 2 stops down. You could go 1/125 at f/16 for maximum DOF, or 1/500 at f/8. Alternatively, you could go 1/250 at f/11, which would be 2 stops down. That will place your shadow details 2 stops below middle gray, or about 18% reflectance. This is about zone 3 in the zone system.

This concept is known as place and fall. By deciding the most important part of your image, you are deciding where you want it exposed. As mentioned in the example above, we’re placing our shadows which we find important into zone 3, letting the other values fall where their new levels will be. The same works in reverse for highlights. By moving our desired highlights up 3 stops, we’re placing them at about zone 8. This gives us a range of exposures in our image that should be about what we visualized.

By placing our levels where we want them, we can minimize our editing time, which means more time shooting! It also gives us a starting place for our previous post on developing for our vision. Try shooting a few scenes in monochrome this way, and then try it in color. You’ll see a change in your image and the way you see and approach a scene and photographing it. You’ll also notice that you have a more vibrant color and tonal range than before.

Exposure is the base of all we do in photography. Even printing an image was traditionally done by exposing the paper to light. Most high quality printing by large firms is still exposure using lasers. Learning the triangle and how to manipulate it, in ways beyond the conventional can make for incredible images. Your vision is the starting point to making it happen!

Here’s hoping you find the right light, the right scene, and have your camera by your side to capture it!

Don’t forget to post any of your images you’d like to see here at the Hohenfels Volks Facebook page. Of course, commenting on both Facebook and here is always appreciated, too! Don't forget, we're on Google+, too!

Wednesday, February 1, 2012

Reviewing the Basics

Greetings, volks. Welcome to Hohenfels Volks, THE place for our place! Brrr. That’s our word of the day!

Today we’re going to review some of the basics of photography and exposure. This can all be found on our Introduction to Photography page. We should all have a good idea of this stuff, but it always helps to refresh the cup, so to speak.

First, we’ll address our exposure triangle. The triangle consists of 1- ISO or film speed, 2- shutter speed, and 3- aperture. To change exposure, you change any side of the triangle. To keep the same exposure, you have to change at least 2 sides. For instance, we set up on a sunny day at ISO 100, f/16, and 1/100. According to the “sunny 16 rule,” we’re good to go. But we want less DOF, so we need to increase our aperture. We go to f/4 to give us a shallow focus. If we don’t change another side of our triangle, we overexpose and create a mess. We have a 4-stop increase in the amount of light coming in, so we need a four-stop increase in shutter speed or 4-stop decrease in ISO. Since we can’t bring our ISO lower, we need to change our shutter speed to 1/1600. At 1/1600 at f/4, that gives us the same as 1/100 at f/16. If we want to increase our exposure, we can change any 1 side and either decrease our exposure or increase it depending on our new settings. For instance we want to increase our exposure on ISO 100, f/16, 1/100 2 stops, so increasing our aperture to f/8, decreasing our shutter speed to 1/25, or increasing our ISO to 400 will do just that. Remember, when we meter something, or a scene, the meter gives us the exposure for 18% gray, which is zone 5. Knowing this allows us to place the item we meter into different zones or exposure levels.

Next up, we’ll look quickly at depth of field, or DOF. This is a product of our focal length and aperture. The longer our lens’s focal length is, the shallower our DOF. The wider our aperture is, the shallower our DOF. This can be a good way to remove or minimize distractions. A 100mm lens at f/16 has about the same DOF as a 50mm lens at f/4. Focused at 10 feet, both give a DOF running from about 9.17 to 11 feet. Seeing that, you can deduce that a shorter lens has a wider DOF.

Remember, these 2 topics we’ve reviewed go together. By adjusting your aperture for a shallower DOF, you’ll have to change something else to maintain your exposure. If you wish to move into a new zone, you’ll change your DOF if you use your aperture to move zones.

We’ll review composition and inspiration in our next talk. Remember to vote and get your pics in early. I hope you’ll all participate in this week’s theme, solitude. We’re aiming for more votes for our theme, so get involved and let’s enjoy the journey together!

Don’t forget to post any of your images you’d like to see here at the Hohenfels Volks Facebook page. Of course, commenting on both Facebook and here is always appreciated, too! Don't foget, we're on Google+, too!

Tuesday, January 17, 2012

Tech Talk: Candles and Calculations

Greetings, volks. Welcome to Hohenfels Volks, THE place for our place!

Today we’re going to go a little bit into what makes up your exposure numbers and how metering works. It sounds familiar, but we’ll be dealing with more math and other advanced parts of your exposure settings.

Let’s start with your ISO. Back in the old days there were lots of ways to label film sensitivity. There was by DIN number, ASA, Weston, and EV, as well as various others fallen by the wayside. Today we use ISO, which is for the most part ASA. Some folks use DIN, that’s why film still carries the DIN number. Under today’s scheme, 3 degrees DIN are equal to 1 full stop. ISO 100/21 has half the sensitivity of ISO 200/24. The Weston number, another popular standard used to gauge a film’s sensitivity, referencing Weston’s meters, is usually .8 times the ISO. Since we’re shooting today, we’ll use ISO, but there may be times we reference others in our future.

Moving on we come to light and light levels. Without the fancy gadgets we have to meter our exposure built into cameras, folks used external meters. Ansel Adams broke it down in his book The Negative. Meters used to measure light in candles, or candela, per square foot. That was the basis for your shutter speed. This will become important in a couple paragraphs.

Next we have aperture, the size of the opening through which light enters the camera. Each ISO had its native f/stop. To find the native stop for any ISO take its square root. For ISO 100 the native f/stop is f/10, for ISO 125 it’s 11, for 200 it’s about 14, and for 400 the native f/stop is 20. Apertures are measured in f/stop, which is a ratio based on the square root of 2, as each step is doubling or halving the light.

The last part is shutter speed. For a native aperture, the shutter speed should be 1/ the light measured in candles per square foot, or c/ft². If you read 125 c/ft², your shutter speed for a native aperture should be 1/125 second. It sounds easy doesn’t it? Well, don’t give up hope. Things are about to get tricky.

Since most light meters today don’t measure in c/ft², finding that speed may be difficult. Automation has taken away many of the tools used by those who came before us in every arena. You can buy a cheap ambient light meter and use it for your photography. The readings are usually in LUX. LUX can be converted, however, by dividing by 10.764. Just round to 10, and there you have it. 1000 LUX is 100 c/ft². At your native aperture, shoot 1/100 for zone 5 placement of what you just read and you’re cooking with gas. Using you digital camera’s metering, set your aperture to the ISO’s native aperture in AV mode. Then seeing the required shutter speed tells you there are that many c/ft² or 10 times that much in LUX.

It seems like talking about this doesn’t do much for you shooting digital, but knowing it will help you improve your light reading skill without your camera’s meter and make getting your exposure correct a lot easier. Plus, if you decide to go old school and shoot with an old camera or use an old meter it will help you to figure that stuff out. It also comes in handy when working with the zone system. Reading 1/100 at your native aperture, you have the knowledge of how to combine your speeds and apertures to get the right exposure for 100 c/ft². You also have the knowledge that you can move your image up or down a zone without playing guessing games as much. It’s quicker and easier to figure out once you try it a few times. A good example is on a bright, sunny, semi-cloudless day. The sky reads about 300 c/ft² when read usually. So for ISO 125 at f/11 you should be set for 1/300 as a good starting point. Then adjusting your speed inverse to any desired aperture changes, and you should have a decent exposure with the sky at zone 5. You can adjust just your aperture or speed to move the sky and other subjects into different zones and create what you visualized that way.

Ansel Adams described it as the exposure formula. He taught that zone 5 was 1/c/ft² at a film’s key aperture. It still holds true. Some minor adjustments may need to be made, but you should be almost dead on. It helps to spot meter for your highlights and shadows to get the best range in your image, but for quick shooting, try it out! I think you’ll see something very cool!

The new theme for this week is “Flattery (Not everything complimentary is flattery!)” You may have already guessed that this has to do with colors, right? Your shots should be composed with complimentary colors as a major element of your composition. Another aspect of your image must consist of contrast in your subject, as well as the contrasting complimentary colors. Perhaps age and youth, or hot and cold. I hope that you get the creative juices flowing for this one and get working on it soon! I also hope that we will see everyone out there submitting this time!

Don’t forget to post any of your images you’d like to see here at the Hohenfels Volks Facebook page. Of course, commenting on both Facebook and here is always appreciated, too!

Tuesday, January 10, 2012

Shoot Digital

Welcome back to Hohenfels Volks, THE place for our place! I trust everyone enjoyed the wonderful weather today!

Today let’s talk about thinking. So often, we’re thinking about how to get that great image onto our computer. We’re all about digits. Digital is the way of the future and analog is dead, right? Actually, that’s not true.

What? Aren’t we using digital cameras, editing on our computers, and sharing our work online? That’s digital, duh! Actually that’s true, but have we thought about how light works? Have thought about how we work? Have we thought about how our camera works? Or how our flash works?

Light travels in waves. It’s an analog signal. Those variations in intensity are caused by the signal’s amplitude. It’s a little more involved when we talk about our cameras. When we shoot fast shutter speeds, the shutter is never fully opened; a slit travels across your sensor exposing it in slices. That’s why we have sync speeds for our flash. Digital means it’s either opened or closed; it can’t be both. That’s why focal plane, diaphragm shutters give faster sync speeds, because they are opened, exposing your whole medium for the duration of the shot, although they are in the process of opening, there is still the entire sensor or film exposed.

When you get right down to it, although the medium used to capture light is digital, camera basics are pretty the same now as they were 100 years ago. A medium is placed in a light proof space, an opening is created, then shut, the medium is processed, and a photo is born. The only differences are automation, medium, and sensitivity. We have more automation in the process of creating our image, we shoot to a digital sensor that requires no chemicals or wait, and our sensors can reach speeds unheard of in past decades. Does that mean we no longer need to think through our processes of image creation? No it doesn’t, not now, and probably never.

When shooting film, people took a slower pace in creating a shot. An almost crafting of a shot. Taking the time to see the light, feel the light, and imagine the scene displayed meant fewer pictures, but more works that were pleasing. It’s the same in most pursuits like golf, drawing, or woodworking.

I’m encouraging everyone to slow down some. Take your time crafting your shot. My friend, Mark, used a good expression when he said we used to shoot film like snipers, taking our time, and now we’re machine-gunning everything we see. For even the next few days, make each shot count, and you’ll make each shot a winner. It’s time to slow down, time to “think analog, shoot digital.” You will see an improvement, and others will notice, as well.

Don’t forget our theme this week, blurring the lines. Here’s wishing a great week, and some killer shots!

Don’t forget to post any of your images you’d like to see here at the Hohenfels Volks Facebook page and to get your vote in for next week’s theme. Of course, commenting on both Facebook and here is always appreciated, too!

Tuesday, January 3, 2012

Classic Shooting

Greetings and welcome to Hohenfels Volks, THE place for our place. As promised, a second dose of photography just for Hohenfels, dealing with old fashioned photography. Before we begin, I need to clarify this week's theme. Your images should be of work being done, not the people doing the work. The bulk of your subject should be the work, not the worker. I hope this helps when creating your shots.

As mentioned previously, we're talking about old fashioned photography. I got some very old cameras this weekend, inspiring me to pick up film again and try out what I've learned. It also inspired me to share pics of them with you and encourage you to pick up your film stuff and shoot that, too. It's a great way to test yourself, using film and what you've learned. It also shows you what you've learned and how well you're progressing.

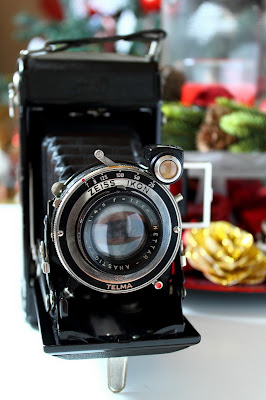
Hohenfels Volks- Nettar 515/2
ISO 400, f/8, 1/25, 37mm
Zeiss Ikon up close. This shows the lens, the "brilliant glass," used to compose your shot, and the speeds available.

This weekend the family and friends surprised me with some gifts. The first gift, from Mrs. Hohenfels Volks and the princess, was an Altissar box camera from 1951.

Hohenfels Volks- Altissar Box camera, 1951
ISO 400, f/8, 1/25, 37mm
The Altissa box camera from 1951. This beauty is a real challenge, as it only has 4 settings! A great little camera with some great meaning!

Eho-Altissa started in Leipzig in 1892. Founded by Richard Knoll as a photographic shop and studio, they eventually started repairing and then manufacturing cameras. 1910 it moved to Dresden, where it was later bought by Berthold Altmann. In about 1951, Berthold Altmann decided to flee the oppressive and anti-business communist East Germany. In absentia, he was tried, convicted, and his company taken over by the communist run government. They were re-named and finally failed, with the machines being sent to Sarajevo to make imitation box cameras. This particular model of box camera, introduced in 1951, was the last while Altissa remained a free company. That scenario reminds me of Atlas Shrugged, in which all the creators and producers abandon their businesses and creations and disappear, leaving an increasingly corrupt, socialistic, and anti-business society to its own failings. Because of that story, and what I see happening today, this camera has meaning beyond photography to me. It’s functional, still works, and I’m taking photos with it! Once I get some developed, I’ll post what comes out here! This camera had 4 settings, f/8, f/16, B for bulb, and 1/25. The lens was fixed focal length and fixed focus. Using 120 film, it produces a negative that is 6cm by 6cm. Composing your image is through a window above the lens.

The next camera, from our friends, was a Zeiss Ikon 515/2. This little winner was introduced in 1937 as a lower priced Ikonta, with virtually all the features. The one I received has an 11cm lens, which runs from f/4.5 to f/32, and has shutter speeds from 1/25 to 1/125. Outside the shutter speed range is B, for bulb mode shots, and T, where you open the shutter with one click and close it with a second click. It uses standard 120 film, and produces a negative that is 6cm by 9cm. The viewfinder is a pair of metal tabs, and only serves for composition. Focusing is accomplished by adjusting the lens for the zone that should be sharpest, by distance. You can also hold it about waist high, and using the “brilliant glass,” frame up your shot. The brilliant glass is a tiny “periscope” like pair of lenses through which you compose your shot. It only allows for framing and composition. It has a PC Sync port for the flash, should you have one, and has a self-timer for setting it up and activating the shutter, allowing you to enter the scene should you desire.

Hohenfels Volks- Zeiss Ikon Nettar 515/2, Circa 1940
ISO 400, f/4.6, 1/25, 33mm
The Zeiss Ikon in all its glory. It takes time to set up your shot with this, which helps with getting your composition tidy.

Zeiss Ikon started in 1926 by the merger of several camera manufacturers and financial backing from Zeiss. Soon several other companies joined the Zeiss Ikon syndicate. Located in Dresden, with plants in Stuttgart and Berlin, Zeiss Ikon split into a West German and an East-German part after the war. Stuttgart became the headquarters after the division of Germany. Later they merged with Voigtländer, who made higher end cameras. In 1972, they stopped producing cameras. After the reunification of Germany, the East and West German divisions re-united into a single company.

The third classic I acquired was a Voigtländer Vitomatic II. This little beauty is a 35mm Rangefinder with a fixed focal length 50mm lens. The lens runs from f/2.8 to f/22, and 1 second to 1/300 second. It uses, like the Zeiss, a leaf shutter, and has no mirror. This feature allows flash to be synched up to the lens’s maximum shutter speed, in this case 1/300. The camera came with 2 filters, a UV, and a green for B&W. This allows for brighter greens, darker reds, and greater separation of greens in your monochrome images. Also included were a lens hood, leather case, and leather strap. Again, through PC sync, my flashes can be remoted off camera and fully controlled. Voigtländer, as you read above, was a very upscale camera maker. They started in Vienna in 1756 as an optics company. Later they introduced the world’s fastest lens at that time, in 1840, it was f/3.5. They were also the first to introduce the zoom lens and the first 35mm camera with a flash built into the camera.

Hohenfels Volks- Voigtlander Vitomatic II 1958
ISO 200, f/4.5, 1/20, 29mm
The Voigtlander Vitomatic II from 1958. In the upper left corner you can see the selenium meter in the camera. Used to help judge your exposure settings.

The cool thing about these cameras is that they show you that even though technology has improved, it hasn’t changed too much since the times represented. Using what we’ve discussed about exposure, composition, and other tips, you can get a great shot, even with old cameras. Don’t give up the learning just because digital means you don’t have to do it. I’ve used my 7D to meter the light for my desired aperture, and then set the old timers accordingly. Remember, being able to sync with your flash means you can do anything with these guys you can do with your digital. I hope this will inspire you to learn more manual applications, so you can put your old film stuff to use again. You’ll be surprised how much you can do with it!

Enjoy the rest of your day, and remember to cast your vote for next week’s theme. Get yours in to have a say! Don’t forget to get your pics posted at the Hohenfels Volks Facebook page. Of course, commenting on both Facebook and here is always appreciated, too!

Friday, December 30, 2011

Tips of the Trade- More Exposing?

Greetings and welcome to Hohenfels Volks, THE place for our place. Tomorrow is the last day 2011, is everyone in Hohenfels ready for the New Year?

Today we’re going to do a short post on long exposures. By that, I don’t mean what you might be thinking… Actually, we’ll be talking about exposures made over an extended period, usually longer than 1 or 2 seconds. Most of you already know this stuff, but a little refresher is always nice. With longer nights upon us, and lovely seasonal decorations and lighting, long exposures can be a real shot maker during this time of year. To create starbursts, for instance, longer exposure means longer rays.

Chances are you already know that long exposures absolutely REQUIRE the use of a tripod. Notice the capitalization of REQUIRE. If you don’t have a tripod, and your exposure is short enough, a monopod will work, but it’s a tradeoff. 30 seconds on a monopod probably won’t get the shot you want. The best option is a slightly heavy tripod, one that has the fewest leg extensions. More leg extensions mean thinner legs and less support. When you can get way with it, don’t extend your legs, and if you have to, start with the top ones, which are thicker until you get the height you need. Try to use a tripod with a center element that doesn’t crank up, but if you do, keep it down where possible to add support.

Don’t use your finger to release your shutter. Get a good shutter release with a long enough cable for your purpose, or go wireless. Turn off your IS, if your lens has it. IS can cause blurring as the elements move looking for motion to offset. If your camera is capable, turn on mirror lock up. Even the motion of the mirror can cause subtle blurring. Compose your image, lock your mirror, and then activate your shutter. If your camera has a delay, activate it to get that extra pause to allow shake to diminish. Carry a good flashlight or other light source, as you’ll likely be working in the dark. Your kids or spouse can be helpful if you’re shooting inside to turn on the lights for focusing, then turning them off when you’re ready to start the shot.

Now I’ll give you a few ideas for using this information.

Has anyone shot star trails? This “simple” long exposure can create some interesting images. Find a strong center of interest and the North Star, Put the North Star at the center of interest and compose your image appropriately. Then expose for about 10 minutes, it will seem as if the stars are rotating around your subject. To do this, you should be in bulb mode and your remote release should have a lock function, as most cameras limit at about 30 seconds. Set your f/stop at about f/16 and your time to B. Longer times equal longer trails, shorter times equal generally brighter trails. Don’t do this during a full moon, as it works best on a moonless night.

How about light painting? Using an exposure time as above, you can use lights, flashes, and other sources to paint your scene with some good light, or create some really interesting effect. Try it with a candle or flashlight for something cool. Candles can create the illusion of fire rings and the like, check it out.

Try making a nighttime scene into a daytime shot. During the fool moon, long enough exposures can create the illusion of daylight. A nice feature of nighttime scenes is the slow shutter allows for nice effects with fog or moving water.

Of course, long exposures can be used to set a mood or allow dark areas to expose better, too. You’re only limited by your creativity! I hope you’ll post some of yours at the Facebook page and share them with us.

Enjoy the rest of your evening, and remember to cast your vote for next week’s theme. We have 2 votes now, and it’s a tie. Get yours in to have a say! Don’t forget to get your pics posted at the Hohenfels Volks Facebook page. Of course, commenting on both Facebook and here is always appreciated, too!

Wednesday, November 16, 2011

Gear Day- Pop Goes the...

Greetings, Hohenfels, welcome to Hohenfels Volks, THE place for our place and our Volks. Another day, trees covered in white and ready for the icy grip of winter, closes around us.

Today we’re going to talk about flash. Learning to use flash is one of the major steps you should take in getting your photos gallery ready.

Today’s electronic flashes work amazingly well and can put a great deal of light right where you need it. The secret to using flash to get the right exposure is knowing how to meter and knowing how to balance your lighting.

First, let’s talk about several terms and features of an average flash.

The first term to know is Guide Number or GN. This is an indication of your flash’s power. It means your flash can provide light up to that distance at maximum zoom, for ISO 100. It’s usually measured in meters. The Canon 580EXII has a guide number of 58, as does the Yongnuo YN-560. This is used to calculate manual flash settings for your camera.

The second term is zoom. Your flash can often zoom to a preset distance to match the zoom of your lens, allowing it to throw light more in line with what you are shooting. This is extremely useful in auto flash; the drawback to that is the camera must be connected to the flash. The longer the zoon, the further the light will travel, and the less it will spread out.

The third term is sync speed, or shutter sync speed. On most higher end cameras, like the EOS 7D and 60D this is 1/250. For the lower end cameras, like the Digital Rebel series, this is 1/200. Some cameras won’t sync above 1/125 to 1/160. The slower the maximum sync speed, the slower you have to shoot. At speeds above the sync speed, either you will need a flash with high-speed sync, or you will get dark bands on your image.

The fourth term is rear or front curtain sync. In rear curtain sync, your flash fires at the end of the exposure, and in front curtain it fires at the start. This really only applies beginning at 1/30 – 1/60, depending on your model.

The last term I’ll introduce is TTL. Most of today’s automatic flashes are capable of being controlled by the camera, provided they are mounted to the camera. Today’s cameras meter through the lens, and pass that information to the flash to set output power and zoom. Many cameras use a more advanced feature called E-TTL, which is electronic metering through the lens. Using this method can improve your flash exposures. The downside is using your flash on camera can be disappointing, as it flattens the light and removes depth and character.

The range of a flash is limited by inverse square law, which states that light drops off from a source rapidly. For instance, a flashlight shined into the dark starts out quite bright, but ends up not even visible beyond some distance based on its power. This law states that doubling the distance from a subject to a source reduces light to ¼ its original level. Almost all light sources follow this rule.

When using your flash on camera, use your E-TTL features to get the best exposure. To correctly expose flash manually, you will need to adjust your aperture to control exposure for the light from the flash and your speed to control ambient light. To find the required to take a photo of a subject use this formula- f-stop number = GN/distance to subject. To figure out the distance to place your flash for a preset aperture use this formula- distance = GN/f-stop number. These are usually measured in meters, so remember to set up accordingly. Guide number is at ISO 100, so any change in ISO, must be accounted for.

A couple points- on camera flash gives a hard light, which results in a loss of shadows in the image making the subject appear flattish. On camera, or flash on the axis of the lens, gives red-eye effect, which is when the eye reflects red light straight back in the direction it came from.

Another thing to mention about off camera flash, besides adding depth, character, and bringing out detail, when used properly it can bring out the eye colors and make them stand out a little. This is especially true in brown and dark eyes. It takes some practice, but the results are worth it!

I like to use the YN-560, as this a nice, inexpensive, and powerful manual flash, paired with my with radio triggers. This allows for shots on camera can’t get, and it creates a nice direction to the light. Having directional lighting on a portrait really adds to the magic. That’s why you see it even in the paintings from the old masters. Next time we talk about flash, we’ll discuss fill, main, and lighting ratios. We’ll also discuss basic lighting patterns for portraits, and how to take the guesswork and mathematics out of getting your manual flash exposures.

I hope this information brings you another tool in our quest for the perfect picture. Let me know if it has! Remember to share your pics and post your questions at the Hohenfels Volks Facebook page, and or by commenting here!

Wednesday, September 21, 2011

The Exposure Triangle

Today’s post is on the “Exposure Triangle.”

You’ll find this everywhere on the Internet. A quick Google search turned up 18,300,000 results!

What is the exposure triangle? It’s basically the combination of the three factors that affect your exposure- ISO, shutter speed, and aperture. I put a pic on the Intro to Photography page with the rest of this article.

Remembering it is easy if think of a triangle and visualize that changing as you change your settings. That’s pretty much the gist of it.

Here’s a list as an example. Use that list to visualize your triangle and you’ll be off to the races, at least for the moment. I’ll use whole stops for simplicity. Each stop is either double or half the amount of light compared to the two numbers next to it.

ISO                                    APERTURE                SHUTTER SPEED
100                                           f/4                                  1/1600
                                                 f/5.6                               1/800
                                                 f/8                                  1/400
                                                 f/11                                1/200
                                                 f/16                                1/100

Looking at the first triangle 1/1600, f/4, at ISO 100, you can see that any changes require a change to another side to remain the same. I can change the exposure to 1/800, f/5.6, at ISO 100 and get the same exposure. Cool, huh?

Let’s try something else. This one will demonstrate the importance of the triangle and knowing how it works. At ISO 200, f/8, 1/400, my image is overexposed. How can I fix it? Try ISO 100, f/8, 1/400. That’s half the previous exposure level!

The first example showing how to get the same exposure is useful to figure out how much DOF you want and to help you keep your exposure constant in constant lighting.

The second example gives you an idea of how to use this tool to get more of your shots usable in changing lighting.

For the rest of this, visit our Intro to Photography page, and do a web search on it. Don't worry, though, more about exposure will be coming around soon!

Focal length will be our next topic.

Please leave your feedback here and on our Facebook page.

Enjoy the rest of your week!