Showing posts with label composing. Show all posts

Thursday, December 6, 2012

10,000 Revisited

Greetings, volks. Welcome to Hohenfels Volks, THE place for our place! Everywhere you look, you’ll see white! Winter is here for the long haul, and that means it’s time to get some seasonal shots. I hope everyone is getting geared up for Christmas and some great photography.

Earlier today, we had blue skies and some nice clouds, perfect for the landscape shooter in all of us. Of course, things turned ugly quick, and left us in the midst of a dark and icy wall of snow. As often happens, the sun managed to beat back the snow and again we were ready for making some great shots.

Enough weather, that’s not what we’re here for, right? Today we’re going to talk about pride and accomplishment. It’s also a chance for an exercise in good old-fashioned photography. Even though we’re using our digital cameras, and often forget the importance of each shot we make, we can return to the old ways. Remember, as Henri Cartier-Bresson said, “You’re first ten thousand shots are your worst.” In a much older post, we addressed this and modified it to be about 100,000 to 1,000,000 shots. This is due to the inherent nature of instantaneous feedback and automatic cameras.

In the earliest days of photography, folks used glass plates for their negatives. Then film came along. In those early days, your film, or plate, was only sensitive to blue light. This made balancing your light and color very important. With the advent of thinner films and panchromatic emulsions, more sensitivity was added. Then, of course, came color film. When you shot either a sheet or roll, you couldn’t change your ISO or color balance. Film and digital sensors can be thought of as the same thing, and for the rest of this article will be used interchangeably.

Film costs money. It cost money in the old days, as well. When a photographer made shots, he weighed the value of the film and the shot. Every photograph was precious, and had to be made with care. Exposure, color balance, even composition had to be weighed and given some measure of value in relation to the photo. Photography took time, to both master, and in terms of the individual image created. Light meters for measuring exposure, going back to the 1800’s, are available on auction sites all over the internet. Focusing aids, powder flashes, apertures, and even shutters were part of the photographer’s knowledge. In many of the older lenses, the aperture was adjusted using an insert placed in the lens at the time of the photo.

Now that we see how valuable the image was, and the knowledge to make an image, we can see how those early photos, and those that have come down to us through the years, were not the product of guesswork or automation.

For the next few days, try doing an exercise in film. Choose one ISO for your camera, choose one color balance, and only limit yourself to 36 shots per session. Remember, getting your color balance and ISO right will require thought and planning. It will also require learning about your intended shooting situation. If you’re shooting outside, shoot in daylight or around 5200K, and inside shoot at tungsten or around 3200K. If you’re shooting in bright conditions, choose ISO 100, in the dark ISO 800. Finish your 36 shots before changing your settings. Also, don’t look at your images on the camera monitor, or delete any shot. Wait until you get home to see what you have. This will encourage you to value your images, while also helping you improve.
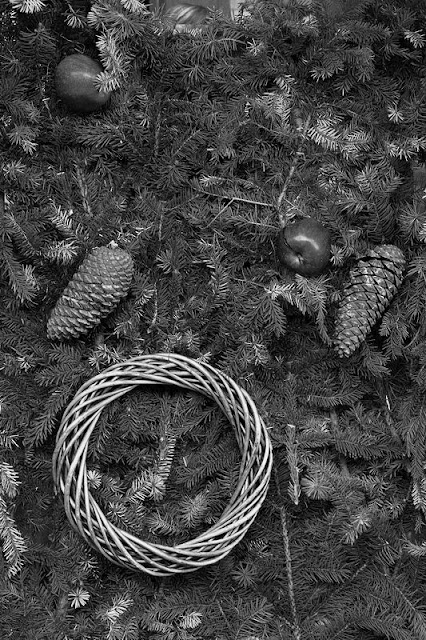
Hohenfels Volks: Dresden Christmas
EI 500, f/5.6, 1/60, 56mm
I couldn't resist this shot, the mix of shapes, textures, and tones are intriguing! Shooting manual all day, let me have control of the camera, instead of the camera controlling me. It also allowed me to use my knowledge to get what I wanted.

This little exercise will require you to know your camera settings, it will require the knowledge to get the shot right, and it will allow for a sense of visualization to settle in. Visualizing your image is an incredibly useful tool in photography. This is a great time to undertake this exercise, as our changing weather conditions, and lighting, will challenge even the best without proving impossible with a little effort. As an added bonus, it’ll make every shoot an adventure, and every moment until the photos are loaded like Christmas. It’s a fun way to experience the anticipation of Christmas with a gift in every session! It’ll also make shorter work of getting the best shots, since you’ll be improving with each photo made. You’ll also develop your confidence, which always helps! Remember, a great camera doesn’t make a great photographer, any more than a great kitchen makes a great cook.

Please feel free to share your photos on our Facebook page. Everyone here would love the chance to see your work! Is there anything you’d like to see here? Do you have a question or an idea? Share your thoughts here or at the Hohenfels Volks Facebook page. Of course, commenting on both Facebook and here is always appreciated, too! Don't forget, we're on Google+, too!

Tuesday, December 4, 2012

Large

Greetings, volks. Welcome to Hohenfels Volks, THE place for our place! Old Man Winter is settling in for his long stay here in Hohenfels! I hope everyone is settling into their anticipation and excitement for the long nights and brilliant moments ahead.

It’s certainly been some time since my last post! I’ve been quite busy as usual. Branching out into large format photography has filled me with new ideas and visions. I hope to make some of the winter shots I’ve been visualizing and preparing for. Large format gives you a way of relating to the scene and subject that it’s hard to imagine without seeing it. This leads us to today’s basic topic, shooting tethered.

One distinct advantage of the digital age is the ability to hook up to a computer and see our images presented quite large. When we load our photos onto our PCs, it gives a way to see detail an ordinary 4x6 print denies us. It also gives us a tool to learn far more rapidly, by allowing us to honestly assess our images in all their glory, and with all their flaws.

But, as many folks don’t know, it also gives us a way to see those flaws prior to making our shot. It allows us to compose our scenes at a scale which invites a more involved relationship with the image. It allows us to troubleshoot our images prior to recording them, and to resolve any images that may prevent the full realization of our vision.

Previously, this has been the domain of those with large format cameras, like the 8x10 field camera or a 4x5 view camera. The composition was done on a negative sized piece of ground glass, with the image upside down and inverted. This naturally led to a slower pace and more contemplative image creation process. Combined with film costs, equipment costs, and time costs, large format photography was largely practiced by those making money from it. With the proliferation of digital cameras and the advent of sites like E-bay, large format become reasonably priced to anyone with the desire and motivation to learn the ins and outs. The format can be daunting and challenging, sometimes extremely so, but it can also be rewarding.

Now that we have DSLRs capable of producing extremely high quality images, and the capabilities of our computers, we can all practice Large Format.

Now that the background is behind us, the steps and equipment are quite simple. You most likely have the equipment you need, as it probably came with your camera. This would include a USB cable to connect to your computer, and the capture software that allows for control of your camera. If your camera didn’t come with the capture software, your manufacturer may have it at their website. If not, there are commercial options available that run from free to higher priced options. You’ll want a tripod and maybe a platform for your PC if you want to use a laptop from other that your desk. That’s it. Just start the software, and for Canon’s, select Remote Live View.

Once you’re connected, you can control everything. You can focus in the autofocus mode using the software, or in manual mode. Both ways give you a giant magnification and full control of your focus. You can control white balance and display your camera’s metering, which will allow you to control your exposure and place your values below, at, or above, neutral gray. It allows for full functionality of the camera, and can even capture directly to your hard drive. The beauty is in a few Windows hot key shortcuts, you can zoom in the live preview, making your preview as large as your monitor. How’s that for large format? Focus, DOF preview, and exposure controls as if shooting directly form the camera, and viewing from the computer, it can’t be beat. You’ll know if you have a keeper even before making the shot.

This has been around some time, just search for tethered shooting, but the first thing to learn is exposure, white balance, and how to use your camera. Once you know these things, you can move on, in ways I can’t even begin to touch upon here! Using tethered shooting will give you an appreciation for all the detail in the scene and lead to a new found way of looking at the smaller parts of a scene to see the big picture. It also saves the frustration of having to sort through the good and the bad. You’ll find yourself making fewer bad images when you shoot tethered.

It has its drawbacks. Who wants to carry a tripod, computer, and cables everywhere? Who feels like lugging extra stuff to make the picture? There are trade-offs in it, but you’ll find if you’re shooting something for your own vision, or if your doing something where there is time to set up and work that way, tethered may be your new default!

I hope this gives you some new ideas. Getting out there and shooting , tethered or un-tethered, will give you the winning shot this winter, so get started making your images now!

Please feel free to share your photos on our Faceboook page. Everyone here would love the chance to see your work! Is there anything you’d like to see here? Do you have a question? Share your thoughts here or at the Hohenfels Volks Facebook page. Of course, commenting on both Facebook and here is always appreciated, too! Don't forget, we're on Google+, too!

Monday, November 12, 2012

Overlooking

Greetings and welcome to Hohenfels Volks, THE place for our place! After a rather gloomy week, punctuated with brief moments of beautiful clarity, we begin another week here, as bland as things have been recently! Hohenfels is turning toward the bleakness of winter, and as we end our autumn, we begin to notice the beauty hidden within the warm grasp of summer’s embrace.

Today we’re going to talk about how we often overlook things, objects, subjects, and other items that could be of interest to an observant photographer.

Humans, being creatures of habit, routine, and ritual, go through life overlooking things they encounter on a daily basis. We take notice only when something is new or suddenly gone. I’ve done this myself, and wound up losing a few shots. Taking anything for granted leaves us a little less than we could be!

Taking notice though, can make for the opportunity of a photographic lifetime! Everyday, during my drives through our wonderful Hohenfels area, I have driven past an area with some ledges and trees alongside the road. This autumn, some Aspen trees along this way turned the most brilliant yellow and orange-gold. They made the change before the rest of the leaves, and held on for so long! With trucks and buses racing by, bringing with them the icy wind clawing on the leaves, trying to pull them down, they have managed to cling for so long, apparently by sheer force of will! The scene was a bit of a “found object” as Ansel Adams called it, and yet everyday I passed it, seeing but not stopping. Today I took the chance, and standing alongside the road, made a couple shots. The negatives developed up nicely, and have some detail that makes me wonder how I ever passed the scene up. Tomorrow, God willing, I’ll make some digital photos, as the scene is too magnificent to pass up!

We begin to take for granted these scenes, and when they depart, we’re left feeling a loss. Of course, there will be next time, if things hold true. But, the disappointment lasts for some time. When we start to pay attention to the world around us, we start to see shots everywhere, there is no shortage of things to make images of. Take the time to stop and observe what’s changed in your area, make a note if you don’t have your camera, and come back to make the shot. You’ll usually be glad you did, and might even make some great memories in the process.

Well, enough preaching! I hope that everyone will see something new in the old, make the shot, and share it with us on our Hohenfels Volks Faceboook page.

Is there anything you’d like to see here? Do you have a question? Share your thoughts here or at the Hohenfels Volks Facebook page. Of course, commenting on both Facebook and here is always appreciated, too! Don't forget, we're on Google+, too!

Thursday, July 12, 2012

Continuing Yesterday

Greetings, volks. Welcome to Hohenfels Volks, THE place for our place! Another rainy day and pleasant evening pass through Hohenfels.

I had planned a post about converting color to black and white today, but didn’t get it done. Instead, we’re going to put up a couple more pointers on bringing your vision to life.

The first tip comes from a Facebook post by Clyde Butcher. Clyde is one of the greats. His photos of the Everglades and Florida in general, are incredible. Clyde’s working hard to preserve the Everglades. His tip of the day is to move forward a few feet when you’re shooting wide-angle lenses. This will bring your composition into your visualized range and remove some of the stray elements from the scene. This can be done through cropping, as mentioned in my edit on yesterday’s post, but combining the 2 can make your shots that much easier to edit. Take it from Clyde, he’s waist deep or higher in swamp water and shooting an 8x10 inch Deardorf view camera or an 12x20 Wisner. Check out his homepage, you’ll be amazed.

Our second tip comes from Strobist. The tips is simple, make an idea list. Taking it one step further, make a short term or single trip list, and make a long-term list. I won’t go into a lot of detail here, click the link and read the article. This site has some great stuff!

Our last tip comes from Photofocus. Try to look beyond the obvious. See what you don’t see right away. Try taking in the scene, closing your eyes, and visualizing the scene. You’ll notice more this way and may find your new subject. Again, I’m paraphrasing. Check out Scott’s page, you’ll be glad you did!

Well, that it for this evening. I hope to have the promised conversion post up Monday! I hope everyone has a great Friday, and an even better weekend! Enjoy and get your dream shot. Make sure to share it with us, too!

Do you have an image to share? We’d love to see it! Is there anything you’d like to see here? Do you have a question? Share your thoughts here or at the Hohenfels Volks Facebook page. Of course, commenting on both Facebook and here is always appreciated, too! Don't forget, we're on Google+, too!

Thursday, June 14, 2012

A Tip for Composition

Greetings, volks. Welcome to Hohenfels Volks, THE place for our place! I hope everyone is doing well.

Here’s a little compositional tip, straight from Clyde Butcher- Close 1 eye when you approach the camera. Because an image is 2 dimensional and we see in 3 dimensions, you can get the feel of your composition before taking the shot. 3D sight requires both eyes open, you see this when you switch between your left eye open to your right eye open. It gives us depth perception. It really works, try it.

Speaking of composition, adding depth to your image by using shadows and the perception of light falloff with increasing distance can make for some great mood in your photos. It can lead the eye to your intended subject when shaped, and increase the 3D feeling when light falls off. Things will seem to pop right off the page. Of course, DOF and sharpness play a role in this, too.

With careful subject placement and light effects, you can create some real drama, or make a powerful scene seem serene. Crafting light and depth are a big part of giving your image life!

Here’s hoping the rest of the week brings you some great shots!

Is there anything you’d like to see here? Do you have a question? Share your thoughts here or at the Hohenfels Volks Facebook page. Of course, commenting on both Facebook and here is always appreciated, too! Don't forget, we're on Google+, too!

Monday, May 28, 2012

Better Late...

Greetings, volks. Welcome to Hohenfels Volks, THE place for our place! Greetings, volks, from Hohenfels. Another weekend passes into the ether of memory, preserved with our cameras and vision.

I hope you’ve had a chance to explore the new layout. By adding our links to another page, we’re able to expand them without limit and improve on the resources we can present. I’m currently working on an advanced section, covering metering, lighting, and other things beyond the basics.

This past weekend provided some excellent opportunities to make some photos and spend some time relaxing. I trust everyone made their shots and got their chill on, as it were.

Here’s what I’m looking at from for future posts. Beginners and Basics, Advanced Concepts and Techniques, Q and A, Composition, both elements and advanced, Reviews, and of course, continuing with our ride along shots and other items. I’d love to hear from everyone out there, if you have a suggestion, idea, or question, let us know through our Facebook link.

I’m going to close this post today with the following photo, made Saturday in Munich. Ride along with me, as we explore the shot as laid out.

Hohenfels Volks: OlympiaZentrum
Olympiazentrum in Munich.

As you can see, this was taken at Olympia Zentrum, the compound built for the 1972 Munich Olympics. Given the amount of visitors that flow through Munich on any given day, not to mention annually, the difficulty is composing your image. The difficulty arises when one realizes that just about every conceivable way of showing the park and Zentrum has most likely been shot. Add the featureless sky, and you’re destined for disappointment.

Walking around the lake and park presented some wonderful shots, some of which I took. The problem was in trying to make an image that was different from all the cookie cutter see and shoot snapshots you see everywhere. We all see the same shots and most of take them. Without ever moving around or seeing with a slightly different point of view, we cut our cookie with our neighbor’s dime store mold.

Stopping to view the flowers and see if I could work them into a shot, I was presented with this view. I knew this shot would give my cookie a life of its own, I metered the flowers at about 500 c/ft2, or about 1 ½ stops brighter than the sky. Setting my camera to f/11 at 1/60 gave me about M+3 on the flowers and M+2ish on the sky. It also allowed the trees and building detail to come through and hold their values quite well. I edited the shot for N-1, giving a nice separation to the sky and flower values, while allowing the trees to retain a large amount of color. Shooting slower allowed some nice DOF softening at the building and trees, without detracting from their form or impact.

This image gives me, what I feel is a departure from the everyday scenes of the place, without removing the ability to tell where it was taken, and at the same time departs slightly from a literal rendering of the scene by placing the values where I visualized them. Visualizing is an important part of any image-creating endeavor, and must be practiced. This little exercise allowed me to improve my skills while on a family outing.

This week's exercise is to visualize a shot of something mundane; creating a scene that you can take ownership of with pride. See the scene as you want to show it, think through the steps to make it a reality, and then make the shot. Practice this, shoot for your vision, and exercise your creativity, you’ll love what starts happening. You’ll love your creations that stand apart from every other shot of the same thing.

I’m looking forward to seeing your results and hearing from you. Get the comments, thoughts, and questions coming. Let me know what you think and how you’re using your camera! Share your thoughts here or at the Hohenfels Volks Facebook page. Of course, commenting on both Facebook and here is always appreciated, too! Don't forget, we're on Google+, too!

Monday, March 5, 2012

Components of Composition: Remembering Our Vision

Greetings, volks. Welcome to Hohenfels Volks, THE place for our place! What a day, all set to be decent, then, WHAM, a huge snowfall!

I hope everyone is doing well. Today we’re going to discuss visualization and envisioning your image. We’re going to deal less with the technical side, and more with our art as an art.

Most people when asked about visualization think about seeing things in their minds. They often associate it with seeing reality. Remember, we can be craftsmen and capture everything purely as it is, or was, and we can be artists. Most of the time we shoot what we see and think would look nice. We don’t really give a lot of thought to our image and the little things like levels, luminosity, luminance, and other small factors.

Thinking about those factors can be technical and very limiting unless you learn to think of them as tools. Starting with your metering, these little factors can be the biggest tools to getter photos that we envisioned.

We all need to slow down sometimes. What better way than doing something we love, our cameras ready and fingers itching to capture something. Stop and look at your scene, what’s it saying? What are you seeing and what are you feeling? How can you create a scene using what you have that will evoke what you wish to convey?

Close your eyes see where you can use your light to bring out a detail, to pluck out something reminiscent of your feeling. Perhaps you wish to convey the wrap around luminous quality of the light, try shooting your spot metered area for 1 stop higher and editing for a slightly lower contrast. Make sure your shadows and highlights will be supported and not blocked or clipped. How about the radiant charm of a sweet little girl running around that party you’re attending? Shoot her at metered + 2 stops, and develop down your levels and mid-tones, while lowering your contrast a small amount. She’ll glow with your vision, in just the way you thought she did!

Here’s a photo to give you an idea. I visualized the sun setting at a very high level and the chapel seeming alive with a lower contrast lighting, which would allow the shadows of the window to remain mysterious. With the chapel part at about metered –1 and the trees at –2, the sun was at about metered +6. Stopping down to the chapel, metered and set at –1 brought the sky down and gave it some detail. By shooting at f/22 the sun becomes part of the image with the flare and star-bursting. During RAW conversion, the levels were crushed in some, the shadows were given +2 and the highlights given –1. With contrast set to –1, the result seems to bring the chapel to life, while keeping the mystery. The trees, with their scattered branches, add to the mystery.

Hohenfels Volks: Sunset at the Chapel
ISO 400, f/22, 1/50, 24mm
Sunset at the Chapel.

Stopping for a moment to think about your intention and visualizing the final image goes a long way toward making it a reality. Take the time to think through your settings, exposure, and edits and your image will come to life.

Here’s wishing you a great Hohenfels week!

Don’t forget to post any of your images you’d like to see here at the Hohenfels Volks Facebook page. Of course, commenting on both Facebook and here is always appreciated, too! Don't forget, we're on Google+, too!

Thursday, February 2, 2012

Reviewing Composition and Inspiration

Greetings, volks. Welcome to Hohenfels Volks, THE place for our place! W-w-w-w-welcome to our review of composition and inspiration.

Today’s review of these things will show how they can work together, as well as refresh us on the topic.

Let’s start with some of the basics of composition. Remember the rule of thirds? Well, there are other guidelines, like the Golden Triangle, and Golden Mean, or Spiral. When we look at 35mm film, and most of our digital sensors, we find that they are 1.5 to 1 in their aspect ratio. The golden Ratio is 1.618 to 1. The dimensions of 35mm are 36mmx24mm. Oskar Barnack of Leitz chose this. By doubling the size of 24mmx18mm motion picture film, he created 35mm film as we know it. Using his film, Leitz created a camera to use it, but production didn’t begin until around 1924. Thus was born the Leica, Leitz Camera. Since his creation of the format for photography, the dimensions have been standard.

By splitting each dimension into thirds, and using those junctions as focal points for your center of interest, you can create nice compositions. This is the rule of thirds. By taking a line from one corner of the frame toward the center, and another extending from corner to corner, you create 3 triangles and can use those to position your center of interest. You can also use them to give weight to your primary subject. By following these rules to a certain point, composing your image becomes a visual exercise in balance, detail, and subject weight. It also allows your to create some interesting photos that will impress even the most die hard see and snapper. These rules are not set in stone, in fact, they are quite flexible. For instance, when shooting something that has converging parallels, it may be best to center the parallels at the bottom center and have them run straight through the frame. The secret to breaking the rules and being successful is knowing why it worked and why you did it.

Some other tips for your composition include not making your horizon centered in your image. It makes for a static scene. Diagonals make a scene dynamic, while curves add grace and elegance. Straight lines across or from top to bottom are very static, having almost no “flow.” Circles are a great tool to lead the viewer into and through the image. Remember that leading lines don’t have to be lines or shapes, but the feeling or implication of lines or shapes. They lead your viewer through your scene, and increase interest in your subject.

Now on to inspiration. What inspires you? What is your muse, your source, the wellspring from which you draw photographic inspiration? Almost all of us are inspired by more than 1 thing. There are times my daughter is my muse, and others; it may be a shaft of light or my wife. I find inspiration in the strangest places and often at strange times.

You don’t have to go looking for inspiration, either. It often strikes unexpectedly. Reading a blog post the other day, I found myself hit by the desire to try something similar to what the author had done. When you get an inspiration for a shot, start out visualizing your composition and lighting. By visualizing those 2 things, you can get a stronger image that will hold the viewer longer. By being open to inspiration, you can get more shots that you like. Take the time to look around you, not for inspiration, but to see the light, the colors, the textures, and the patterns. Seeing them may start the cogs turning toward something that inspires you. Often just looking at something my daughter has inspires a shot of her using it! Her checked coat may make me want to catch the pattern in some way that it brings out a feature of her. Don’t look for inspiration in trying to put others down, but look for it in things that make you feel good, and you’ll usually find it without looking too hard.

For both of today’s review subjects, you can find a wealth of information, and inspiration, on the net. Check out our links and you’ll be surprised at what you find. Look at the Your Works section, and check out the works of our followers, you’ll find something there that appeals to you!

After our 2 posts reviewing some of the basics, you should be ready to get some shots for this week’s theme, Solitude. Look around and find something that inspires your creativity, and visualize your light and composition. Knowing what you want to show, you can get your exposure right, and have a great shot. I hope you’ll be posting yours this week, and get your vote tallied for next week’s theme!

Don’t forget to post any of your images you’d like to see here at the Hohenfels Volks Facebook page. Of course, commenting on both Facebook and here is always appreciated, too!

Thursday, November 10, 2011

Composition- Seeing in Color

Hello, Volks, welcome to Hohenfels Volks. Another week is almost over here in Hohenfels, and we’re onto another post!

Following up on yesterday’s post about color, today we’re going to talk about how color theory can work for you. Using complimentary and adjacent, or analogous, colors can really improve your compositions. The masters, including the painters and old time photographers knew how to get the most from the colors available to them.

Color theory is an extensive subject, and involves a lot more than we’re going to discuss. If you remember back in grade school, you learned there are 3 primary colors, red, yellow, and blue. They are primary because they cannot be made from combinations of other colors. Here’s a basic primary color wheel.


The 3 primary colors

The secondary colors, made from equal parts of 2 primary colors are orange, green, and purple. Here’s another chart showing the relationship between primaries.


The 3 primaries with the secondary colors

Colors opposite each other on the wheel are called complimentary colors. If you stare at one of the colors for some time, and then shift your view to solid white, the compliment, or opposite, of the stared at color will appear.

Beyond that, you have tertiary colors and other more complex blends and hues. Here is a 12-color wheel showing some of the basic ones.


12 colors, including primary, secondary, and tertiary.

Just as colors opposite each other are complimentary, colors next to each other are analogous, which means they are analogs of or for each other.

In normal human color vision, red focus beyond the focal plane, green directly on it, and blue focuses short of it. This is why red appears to advance and blue seems to recede. Another effect of normal human color vision is that the same color appears brighter and larger against a dark background than against a lighter one. Another interesting fact along that same line is that Da Vinci observed, "Colors appear what they are not, according to the ground that surrounds them." Handy stuff for the photographer!

With all that information, feeling overwhelmed can be a problem. So, to make this subject easier, we’re going to show a couple example of how to combine colors into a harmonious composition, and have them add to your image rather than distract from it.


Analogous color scheme. Using this scheme can create calm scenes and photos. Make sure you have enough color contrast, though, to keep your image interesting.


Complementary. Very vibrant and exciting images. Don't overdo it and you can get something really appealing.


This is called a split complementary scheme. This has a strong visual appeal like complementary colors, but with less risk of overdoing it.

Remember, there are other schemes as well. You could do a three color scheme using colors equally spaced through the wheel, which can create a dynamic image, especially when one is given a greater weight in the composition. A great way to get more information is to use Google "color theory." Another great source is Tiger Color. They also have some nifty software and such that will help you understand color.

Look for an assignment related to this post on Facebook in the next couple days. Hopefully we can get everyone posting a couple photos, and get more assignments going. Drop us a comment and let us know what you think of the idea.

Remember to share your pics and post your questions at the Hohenfels Volks Facebook page, and or by commenting here!

Wednesday, November 9, 2011

Elements of Composition- Color

Hello, Volks, welcome to Hohenfels Volks. I hope everyone is having a decent week. The weather on Monday and Tuesday was excellent getting out and shooting some pics weather. Even in this time of shorter days and less time to get the shot you want, you can still get one or two that will make you feel good.

Today we’re doing a quick post on one of the unexpected elements of composition. We’ve talked about chiaroscuro and shadow, and subject placement. There are general guidelines for most situations. Today we’re going to talk a little about using light and color to bring in your viewer.

As you can see in the photo below, there is a lot of shadow in the right side, set for zone 3 at best, which amounts to a lot of unused space. At least it would seem that way.


I shot this photo on a little side road about 15 to 20 KM from Hohenfels.
ISO 400, f/11, 1/40

By leaving so much in deep shadows, it really makes the light streaming in from the left pop out and creates almost a set of diagonal shafts crossing through into the road. It also amplifies the magnificent autumn colors of the trees and the shaft of light green grass. The blend of greens and oranges just makes it seem to jump out from the woods and the shadow.

Pick out a color in a scene and try to find one that either complements or contrasts your chosen color for an extra bit of eye drawing appeal. This even works in black and white, only instead of showing the colors, it creates tones and textures that will pull the viewer in. Remember color is a major part of your composition!

Keep your eyes open, walk around, and believe in your abilities. That will bring home some keepers and treasures, and isn’t there so much around Hohenfels that we can find to treasure? Remember to share your pics and post your questions at the Hohenfels Volks Facebook page, and or by commenting here!

Wednesday, November 2, 2011

Bresson...

Hello, Volks! Welcome to Hohenfels Volks. I hope you’re all doing well, here in Hohenfels!

“Your first 10,000 photos are your worst” ~ Henri Cartier Bresson

As mentioned yesterday, Bresson said that well before digital cameras.

My thought on this quote, being in the digital age, is that it’s no longer your first 10,000, but your first 100,000 to 1,000,000 that qualify for his comment. It’s easy to understand this, given the widespread use of DSLRs and computers. We no longer have to pay for each shot, we don’t have to wait for processing, and we can see it instantly. We now shoot 10-100 times what the old masters did. They had to pay around $10 for one 8x10 piece of negative. Shooting one shot therefore cost quite a bit and they made sure they made it count. Today we don’t. Another downside of the digital age, is that those same worst shots, are also our best.

The reason is simple, when you see your first pic from a nice camera, you think “WOW! This is so cool!” Of course, all your friends tell you how good your pics are, too. Of course, like the old days, you’re learning without even knowing it. You start showing your stuff online and posting to Facebook, people are leaving good comments and life is good.

Then… you start looking at other photographers and their works. You start asking “Why isn’t mine that good?” Maybe they have a better camera! Actually, they’re just a little further down the road. However, that question leads you to the next step, conscious learning. You’ve awoken to the reality of Bresson’s basic statement about your first photos being your worst. You now seek to improve and learn. You start asking for criticism and advice. You read everything, you learn the rules, you start shooting AV or TV, and now your photos are getting better. You can see the improvement, so can others. Still you see all the rules you broke, and think, “How can I do this right?”

Here’s the short answer- you don’t. Photography is art, and adventure, and fun, and frustrating. It’s all about the rules, and breaking them on purpose. If you’re breaking them and not knowing it, not knowing how, and not knowing why, then you’ve not moved on. Learn the rules, and learn when, how and why to break them. You’re images will speak to your art, and start telling volks the story you want told. Learning to use your camera, in AV, TV, or manual mode is a big step. Adding light and flash is another step, knowing about framing inside the image, and other compositional tips, will all improve your work. You’ll still be critical, but in a way that leads to something nice. Asking how to make it better is positive and can be a great way to master your art.

We all learn, all the time, as long as we don’t let ourselves get stuck in the negative thoughts. Don’t be too hard when looking at your work, look more for the technical side, like exposure and sharpness. Let your visualizations and compositions lead you to new rules and to breaking those rules. Whatever you do, don’t stop loving photography or the art. Keep your love and don’t let your criticism of yourself take away the joy you felt at your first few shots. Trust me, that feeling will return, each and every time you learn something new and make it work in your photography.

Enjoy the rest of you week, keep shooting, and remember to share your pics and post your questions at the Hohenfels Volks Facebook page, and or by commenting here!

Tuesday, October 4, 2011

Intro to Composition

Today we’re going to talk about COMPOSITION.

Simply put, COMPOSITION is bringing the image you’ve just visualized to life in a pleasing and attractive fashion. Pretty straight forward, isn’t it? Like many things related to photography, it goes deeper than that, simple- yes, easy - no.

Diving into the subject on a basic level, we’re going to cover some basics today.

First, there is subject and object placement to consider. Then there are color, exposure, DOF, weight, balance, and various other considerations.

The tips I’m outlining are not hard and fast rules! While often called rules, you can break them anytime. The trick is to know when and why to break them. That takes some time and practice.

The most commonly discussed is the “rule of thirds.” This rule states that your subject, or subjects, should be placed along an imaginary line dividing the image into thirds. For a more powerful composition, intersections of horizontal and vertical thirds are used. I’ve included a chart showing this and a sample using it below.


This is just a basic chart to show where things line up.


This is an example using a photo I recently took. Notice how the right line runs through the middle of her eye and the bottom right intersection is right about on the corner of her smile. Also, notice the diagonal lines formed by her eyes, smile, and head.

Another rule is the “Golden Spiral.” This one seems to have several names. This is placing your subject near one of the points of intersection in the thirds, and using a nautilus type spiral to lead the eye through the image to the subject. There is some mathematics behind this using the Fibonacci sequence and the “Golden Ratio” of 1.618 to 1. This can be more appealing than a simple rule of thirds, as this more natural. It just takes some practice and patience. I’ve included a link to a site that shows an applet demonstrating this and several others.

Java Adjuster A cool applet that shows the effects and use of the rules regarding composition.
Golden Section and the Rule of Thirds An informative sight covering more about using these rules.

Place your subjects and objects according to how you visualized their importance to the scene. A subject that is important to the overall composition can be placed on one the intersections, or in the center of your “Golden Spiral,” while objects of lower importance can be placed along either a vertical or horizontal third only. Giving each object or subject a weight or ranking based on how you visualize the scene can help in using, and breaking, the rules.

Another important element in COMPOSITION is lines. By having lines in your image, you can lead your viewer through your vision and tell a story in your work.

Diagonal lines add a dynamic and powerful element to an image. C and S shaped lines create a sense of grace and harmony. Vertical and horizontal lines are static. Including a graceful element, like a river, and ensuring that is either C or S shaped, gives the viewer a sense of calm and grace. Use your leading lines, and you will see a change in how you look at a scene and how you start to visualize your images.

Here's a link to a nice little page about COMPOSITION. It's short, simple, and very helpful! 10 Top Photography Composition Rules

Well enough for today. We’ll dive more into COMPOSITION in another post.

Try this out and let me know how it works for you! There are a large number of places that will help you feel more at ease with your COMPOSITIONS around Hohenfels! I’d love to know if it helps! If you have a question, post it to our Facebook account. Also post it here as a comment on the related post, I’ll review it and get back to you! If you have a photo you’d like to share, add it to our wall on Facebook, and I’ll get it posted here.