Showing posts with label shooting modes. Show all posts

Wednesday, January 4, 2012

In the Zone- Zone Focusing

Greetings and welcome to Hohenfels Volks, THE place for our place. I hope you’re ready, Hohenfels, to learn about zone focusing. This is something that can make getting some of those passing moments in the can, as it were, quicker and easier.

First off, let’s explain what zone focusing is. Zone focusing is using a combination of focal length, aperture, and distance to allow for enough depth of field to make a usable print. That’s pretty straight forward, right? Well, there is more to it than that, including knowing your equipment.

Zone focus developed as a way for photographers to focus their equipment, as most older cameras had no viewfinder or way to check your focus. Many of the old time greats used zone focusing to maximize the sharpness and detail in their works. Given the nature of early lenses, high f/stops were often required to get good detail and enough DOF to be worth printing. Remember, sheets of film, and rolls, were costly to purchase, develop, and print, so lots of effort went into taking each shot. Zone focusing grew from the concept and practice of hyperfocal distance, which you use to give you the maximum DOF for each lens focal length. We’ll have more on that in another post.

The technique works best with lenses that have markings on them. A distance scale for focusing opposite an aperture scale with DOF markings as shown in the photo below works best. It’s quicker and easier. Unfortunately, most lenses today are auto-focus, and kit lenses generally don’t have such marking. Higher end lenses do have them, as do pro and manual lenses as a rule.

Hohenfels Volks- Voigtlander vitomatic ii showing scale for zone focusing
ISO 200, f/4.5, 1/30, 32mm
Notice the f/stops on the front of the ring. They go out from the diamond marking focal distance, to give you the range, or zone, of acceptable focus.

Referring to the image above, you can see that there is a diamond. That is the distance marker. On the focus ring, there are markers that aren’t shown, that tell you your focal distance. Line up the desired distance, then using the f/stops that radiate out from the diamond, identically on either side, determine your needed aperture and distance. The distance covered will line up with the marks for the desired aperture. It’s that simple, anything in that range will be in sharp enough focus for decent size prints, including 8x10 and 11x14 if your camera has the resolution.

If your lens has a focusing distance scale, much like Canon’s 28-135mm, you can figure out your DOF with a little legwork online. The key when using zone focus, is to turn off your auto-focus. The second factor is to shoot either Aperture Priority or Manual modes only! Any other mode nullifies your efforts!

Know your location, and what’s happening there, and you can figure the ranges you will need. Let’s say for our purposes you’re shooting in a decently lit area at ISO 400 and you need to cover 3 meters and 6 meters, with room to spare. You get you’re framing, that will give you your focal length. You know it’s decently lit and you can get by with f/5.6-f/8. Going with a 55mm focal length, as most kit lenses like to go from 18-55mm, you should be focused at 4 meters for f/5.6 and 3.5 meters for f/8, although 4 meters is adequate, and has the advantage of allowing you to switch over to f/5.6 without losing too much DOF. If your lens doesn’t have a focal distance scale, measure off 4 meters, focus your lens, and mark it. An easy tip for marking your focus, is take 2 fat rubber bands and wrap one around the zoom ring of your lens at the focal length you wish to use, then wrap the other around the focus ring. Mark the one on the zoom ring at the top, focus your camera, then make a mark that lines up with the first mark you made. As time progresses and your lens drifts over the course of events, you always have your focus marked and can return to it in a snap. Then set your aperture and you’re cooking with gas!

A great online DOF calculator that just requires your focal length, camera model, and scale used (feet or meters) is DOF Master's DOF table. They also have some great information on hyperfocal distance and some nifty little software to play with!

If your shooting with a flash, your f/stop will be dictated by the flash when you use manual flash. TTL and E-TTL are great for using flash, but to use it right, you need a sync cable that’s designed for your camera maker or line to get it off camera. You can get a good one that’s about a meter reasonably priced. Add in a Flashbender or Sto-fen to diffuse the light some, and you’re off to the races. This allows you to hand hold your flash off camera and get some directional TTL or E-TTL light in your images that just adds to the quality.

Zone focusing is great for street photography, event photography, candids, and may other things. Try it out in your works and see how it can help you! You can also use it for this week's theme, as it will allow you to appear less obtrusive when shooting work getting done!

Enjoy the rest of your day, and remember to cast your vote for next week’s theme. Get yours in to have a say! Don’t forget to get your pics posted at the Hohenfels Volks Facebook page. Of course, commenting on both Facebook and here is always appreciated, too!

Friday, December 30, 2011

Tips of the Trade- More Exposing?

Greetings and welcome to Hohenfels Volks, THE place for our place. Tomorrow is the last day 2011, is everyone in Hohenfels ready for the New Year?

Today we’re going to do a short post on long exposures. By that, I don’t mean what you might be thinking… Actually, we’ll be talking about exposures made over an extended period, usually longer than 1 or 2 seconds. Most of you already know this stuff, but a little refresher is always nice. With longer nights upon us, and lovely seasonal decorations and lighting, long exposures can be a real shot maker during this time of year. To create starbursts, for instance, longer exposure means longer rays.

Chances are you already know that long exposures absolutely REQUIRE the use of a tripod. Notice the capitalization of REQUIRE. If you don’t have a tripod, and your exposure is short enough, a monopod will work, but it’s a tradeoff. 30 seconds on a monopod probably won’t get the shot you want. The best option is a slightly heavy tripod, one that has the fewest leg extensions. More leg extensions mean thinner legs and less support. When you can get way with it, don’t extend your legs, and if you have to, start with the top ones, which are thicker until you get the height you need. Try to use a tripod with a center element that doesn’t crank up, but if you do, keep it down where possible to add support.

Don’t use your finger to release your shutter. Get a good shutter release with a long enough cable for your purpose, or go wireless. Turn off your IS, if your lens has it. IS can cause blurring as the elements move looking for motion to offset. If your camera is capable, turn on mirror lock up. Even the motion of the mirror can cause subtle blurring. Compose your image, lock your mirror, and then activate your shutter. If your camera has a delay, activate it to get that extra pause to allow shake to diminish. Carry a good flashlight or other light source, as you’ll likely be working in the dark. Your kids or spouse can be helpful if you’re shooting inside to turn on the lights for focusing, then turning them off when you’re ready to start the shot.

Now I’ll give you a few ideas for using this information.

Has anyone shot star trails? This “simple” long exposure can create some interesting images. Find a strong center of interest and the North Star, Put the North Star at the center of interest and compose your image appropriately. Then expose for about 10 minutes, it will seem as if the stars are rotating around your subject. To do this, you should be in bulb mode and your remote release should have a lock function, as most cameras limit at about 30 seconds. Set your f/stop at about f/16 and your time to B. Longer times equal longer trails, shorter times equal generally brighter trails. Don’t do this during a full moon, as it works best on a moonless night.

How about light painting? Using an exposure time as above, you can use lights, flashes, and other sources to paint your scene with some good light, or create some really interesting effect. Try it with a candle or flashlight for something cool. Candles can create the illusion of fire rings and the like, check it out.

Try making a nighttime scene into a daytime shot. During the fool moon, long enough exposures can create the illusion of daylight. A nice feature of nighttime scenes is the slow shutter allows for nice effects with fog or moving water.

Of course, long exposures can be used to set a mood or allow dark areas to expose better, too. You’re only limited by your creativity! I hope you’ll post some of yours at the Facebook page and share them with us.

Enjoy the rest of your evening, and remember to cast your vote for next week’s theme. We have 2 votes now, and it’s a tie. Get yours in to have a say! Don’t forget to get your pics posted at the Hohenfels Volks Facebook page. Of course, commenting on both Facebook and here is always appreciated, too!

Wednesday, September 14, 2011

Shooting MODES

Shooting MODES are part of you camera settings, and should be the first step in getting to know your camera. MODE is going to be all caps in this post to get us into the habit of thinking of these settings correctly, as MODES.

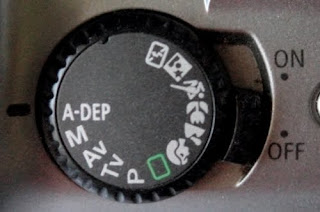
Let's start by looking at a typical dial on a camera.


This is the MODE dial on a Canon EOS Digital Rebel, EOS 300D

For the most part, almost all cameras use the same symbols to represent similar MODES.

The green square is the fully automatic MODE. Using this mode lets your camera have full control of the photo. You have no input or choice, so avoid this MODE!

The symbols on the right side, as we look at this image, are for automated MODES based on what you tell the camera you're shooting.

In order, they are:
Portrait MODE- for taking portraits, lower f-stop, and faster shutter speeds with less contrast.
Landscape MODE- for taking landscape style shots, higher f-stop, and slower shutter speeds with more contrast.
Close-up MODE- for macro or close-up shots of things.
Action MODE- for fast moving scenes, uses a higher ISO and faster shutter where possible.
Night scene MODE- for poorly illuminated subjects, usually used at night. High ISO, lower f-stops, slow shutter speeds.
Flash off, but fully automated settings.

It is important to note that none of these MODES offer you any choice of settings, including ISO. They will also use the pop-up flash whenever the camera wants to.

Moving over to the left side, we have:

P- Programmed MODE. You can set the ISO, Exposure Compensation, but not much else. More like the above MODES, with some limited choices.
AV- Aperture priority MODE. You set the ISO and f-stop, and the camera chooses the shutter speed for a correct exposure.
TV- Shutter Priority MODE. You set the shutter speed and ISO, and the camera chooses an f-stop to get a nice exposure.
M- Manual MODE. You set everything, this is where knowing your f-stops, shutter speeds, and ISOs is very important.

On newer cameras you also have
B- Bulb MODE. You use a remote trigger and as long as it's pressed, the shutter stays open. Great for low light and night time pics!
C1...etc- these are for you to pre-program settings that you use a lot.

Most point and shoot cameras have the automated settings MODES. Look for the symbols in the above pic and choose the MODE you want. If you dig around, you can find some advanced setting. For instance, on the Fuji, you can compensate for exposure by moving it up or down, usually in 1/3 of a stop increments. This is very helpful when taking pictures in a room with bright but uneven lighting or outside on a bright day.

So, if your camera tells you it should be shooting 1/250, f8, at ISO 100, but you want the background to be sharper. Switch over to AV MODE and set your f-stop to 11, your shutter speed should automatically go to 1/125.

If you're camera tells you 1/125, ISO 100, f11 but that's too slow for something you're trying to capture. Switch over to TV MODE and set your shutter speed to 1/250, your f-stop should automatically go to f8.

One of the best things you can do right now, is read your owner's manual for your camera. After you finish, read it again, while you have your camera, and try out some of the MODES.