Showing posts with label seeing. Show all posts

Monday, April 2, 2012

Monday's Exercise

Greetings, volks. Welcome to Hohenfels Volks, THE place for our place! I hope everyone had a chance to grab a shot you can be proud of this weekend.

As promised, today we’re introducing our first exercise. With this exercise, you can learn a lot about composition, as well as spatial compression, DOF, and lighting.

The exercise is simple, for the next week, you’re to only shoot with 1 prime lens. That means if you choose your 50mm, then you can only shoot your 50mm. Whatever the focal length, stick to only one prime focal length lens. If you don’t have a prime, if you only have your kit or some other zoom lens, then choose only 1 focal length, either racked out full zoom, or minimum zoom. Don’t cheat and use the zoom for any of your work.

This simple exercise will teach you how to be creative in your composition. It means you will need to visualize your shot, see the framing and cropping before shooting. You will almost definitely need to move to get the shot. Either move in, out, or change your angle, and you will have something entirely different. Just using zoom doesn’t give you that.

Zooming your lens will change your perspective and create the framing you’d like. However, it also compresses the perspective, which can make for really good DOF. Zooming with your feet and opening your aperture can give some nice DOF effects, too, and does so without compressing perspective. Zooming can change the impact of your lighting, so can moving.

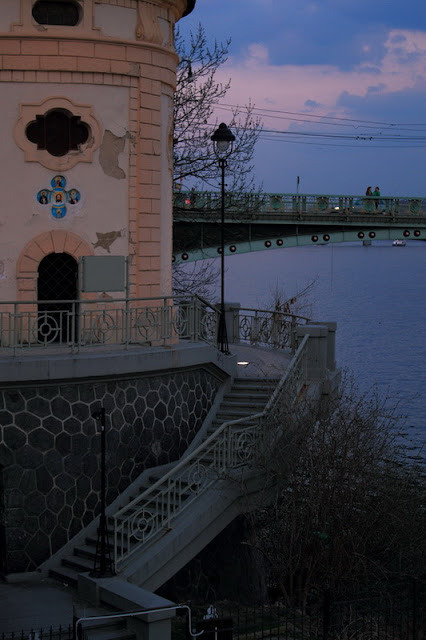
Hohenfels Volks: Sunset in Prague
ISO 400, f/5, 1/100, 44mm, daylight balanced. The shot was metered for the rotunda and exposed for M+1, then edited for M-1, increasing the saturation and improving the tonal range.
This was one of the sunset shots taken in Prague last weekend. It took several attempts to get it right, but just moving around made the scene match what I had envisioned. Give it a try for yourself before you shoot that next pic!

Take a walk around your subject. Approach from different angles and distances. You will start seeing how these little limitations can open up a whole world of possibility. The old masters had to work with 1 focal length or lens for a long time. Lenses were heavy, cumbersome, and often not the way to get the shot. Learning to see in this way is a great tool to open up your creativity and improve your composition.

Rise to the challenge and share your shots. We’d love to see your work and the fruits of your exercise. Enjoy the rest of a wonderful week and make sure you get 1 in the can!

Don’t forget to post any of your images you’d like to see here at the Hohenfels Volks Facebook page. Of course, commenting on both Facebook and here is always appreciated, too! Don't forget, we're on Google+, too!

Friday, March 30, 2012

Weekend Thoughts

Greetings, volks. Welcome to Hohenfels Volks, THE place for our place! The cold weather seems to put a damper on things, but if you’re tenacious, you’ll be able to drag home the shot that would have gotten away.

Today’s post is just a quick review of things going into the weekend, and a little psyching for Monday’s exercise. Remember your exposure triangle and the relationship between the sides, which will be the big factor for a lot of your shooting on the technical side. Also, remember to visualize and compose your shot. See the image before making it. Slow down and get it right before you release your shutter. Use your color to create some detail and interest, go so far as to make it your subject!

O.K. on to the psyching we go. Here are some things to learn, review, and acquire. Over the next few weeks, you’ll need a fixed focal length lens, AKA a prime. You’ll need a flash and some lighting modifiers. A 5 in 1 reflector, if you can’t or don’t want to get a flash. You’re also going to need a handy way to calculate your DOF and shoot accordingly.

Those are just a few things we’ll be working with. If you have them, break out your manuals, if not, get them! It will certainly provide some tools to make your photos the envy of all.

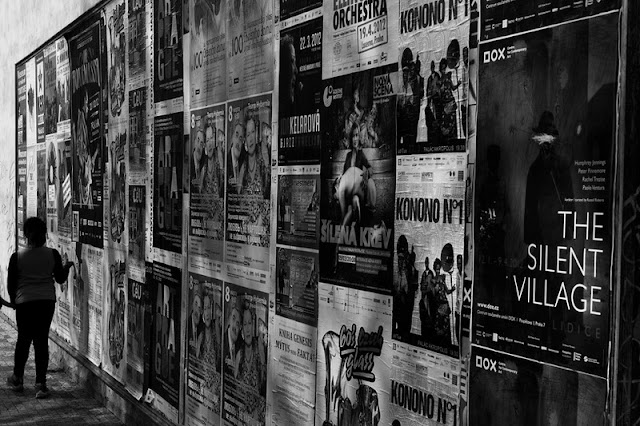
Hohenfels Volks: Wall with Posters
ISO 200, f/11, 1/50, taken with a green filter for contrast and detail.
Girl examining a wall plastered with posters in Prague. With the green filter, the contrast is just about right, and the red detail is dropped about 2 stops, increasing contrast in the red/blue and red/green areas. The higher contrast adds some isolation to the impression from the scene.

Well, that’s enough for now. Enjoy the weekend, have some great adventures, make some magnificent photos, and enjoy the life you have to its fullest!

Don’t forget to post any of your images you’d like to see here at the Hohenfels Volks Facebook page. Of course, commenting on both Facebook and here is always appreciated, too! Don't forget, we're on Google+, too!

Tuesday, January 17, 2012

Tech Talk: Candles and Calculations

Greetings, volks. Welcome to Hohenfels Volks, THE place for our place!

Today we’re going to go a little bit into what makes up your exposure numbers and how metering works. It sounds familiar, but we’ll be dealing with more math and other advanced parts of your exposure settings.

Let’s start with your ISO. Back in the old days there were lots of ways to label film sensitivity. There was by DIN number, ASA, Weston, and EV, as well as various others fallen by the wayside. Today we use ISO, which is for the most part ASA. Some folks use DIN, that’s why film still carries the DIN number. Under today’s scheme, 3 degrees DIN are equal to 1 full stop. ISO 100/21 has half the sensitivity of ISO 200/24. The Weston number, another popular standard used to gauge a film’s sensitivity, referencing Weston’s meters, is usually .8 times the ISO. Since we’re shooting today, we’ll use ISO, but there may be times we reference others in our future.

Moving on we come to light and light levels. Without the fancy gadgets we have to meter our exposure built into cameras, folks used external meters. Ansel Adams broke it down in his book The Negative. Meters used to measure light in candles, or candela, per square foot. That was the basis for your shutter speed. This will become important in a couple paragraphs.

Next we have aperture, the size of the opening through which light enters the camera. Each ISO had its native f/stop. To find the native stop for any ISO take its square root. For ISO 100 the native f/stop is f/10, for ISO 125 it’s 11, for 200 it’s about 14, and for 400 the native f/stop is 20. Apertures are measured in f/stop, which is a ratio based on the square root of 2, as each step is doubling or halving the light.

The last part is shutter speed. For a native aperture, the shutter speed should be 1/ the light measured in candles per square foot, or c/ft². If you read 125 c/ft², your shutter speed for a native aperture should be 1/125 second. It sounds easy doesn’t it? Well, don’t give up hope. Things are about to get tricky.

Since most light meters today don’t measure in c/ft², finding that speed may be difficult. Automation has taken away many of the tools used by those who came before us in every arena. You can buy a cheap ambient light meter and use it for your photography. The readings are usually in LUX. LUX can be converted, however, by dividing by 10.764. Just round to 10, and there you have it. 1000 LUX is 100 c/ft². At your native aperture, shoot 1/100 for zone 5 placement of what you just read and you’re cooking with gas. Using you digital camera’s metering, set your aperture to the ISO’s native aperture in AV mode. Then seeing the required shutter speed tells you there are that many c/ft² or 10 times that much in LUX.

It seems like talking about this doesn’t do much for you shooting digital, but knowing it will help you improve your light reading skill without your camera’s meter and make getting your exposure correct a lot easier. Plus, if you decide to go old school and shoot with an old camera or use an old meter it will help you to figure that stuff out. It also comes in handy when working with the zone system. Reading 1/100 at your native aperture, you have the knowledge of how to combine your speeds and apertures to get the right exposure for 100 c/ft². You also have the knowledge that you can move your image up or down a zone without playing guessing games as much. It’s quicker and easier to figure out once you try it a few times. A good example is on a bright, sunny, semi-cloudless day. The sky reads about 300 c/ft² when read usually. So for ISO 125 at f/11 you should be set for 1/300 as a good starting point. Then adjusting your speed inverse to any desired aperture changes, and you should have a decent exposure with the sky at zone 5. You can adjust just your aperture or speed to move the sky and other subjects into different zones and create what you visualized that way.

Ansel Adams described it as the exposure formula. He taught that zone 5 was 1/c/ft² at a film’s key aperture. It still holds true. Some minor adjustments may need to be made, but you should be almost dead on. It helps to spot meter for your highlights and shadows to get the best range in your image, but for quick shooting, try it out! I think you’ll see something very cool!

The new theme for this week is “Flattery (Not everything complimentary is flattery!)” You may have already guessed that this has to do with colors, right? Your shots should be composed with complimentary colors as a major element of your composition. Another aspect of your image must consist of contrast in your subject, as well as the contrasting complimentary colors. Perhaps age and youth, or hot and cold. I hope that you get the creative juices flowing for this one and get working on it soon! I also hope that we will see everyone out there submitting this time!

Don’t forget to post any of your images you’d like to see here at the Hohenfels Volks Facebook page. Of course, commenting on both Facebook and here is always appreciated, too!
Wednesday, November 2, 2011

Bresson...

Hello, Volks! Welcome to Hohenfels Volks. I hope you’re all doing well, here in Hohenfels!

“Your first 10,000 photos are your worst” ~ Henri Cartier Bresson

As mentioned yesterday, Bresson said that well before digital cameras.

My thought on this quote, being in the digital age, is that it’s no longer your first 10,000, but your first 100,000 to 1,000,000 that qualify for his comment. It’s easy to understand this, given the widespread use of DSLRs and computers. We no longer have to pay for each shot, we don’t have to wait for processing, and we can see it instantly. We now shoot 10-100 times what the old masters did. They had to pay around $10 for one 8x10 piece of negative. Shooting one shot therefore cost quite a bit and they made sure they made it count. Today we don’t. Another downside of the digital age, is that those same worst shots, are also our best.

The reason is simple, when you see your first pic from a nice camera, you think “WOW! This is so cool!” Of course, all your friends tell you how good your pics are, too. Of course, like the old days, you’re learning without even knowing it. You start showing your stuff online and posting to Facebook, people are leaving good comments and life is good.

Then… you start looking at other photographers and their works. You start asking “Why isn’t mine that good?” Maybe they have a better camera! Actually, they’re just a little further down the road. However, that question leads you to the next step, conscious learning. You’ve awoken to the reality of Bresson’s basic statement about your first photos being your worst. You now seek to improve and learn. You start asking for criticism and advice. You read everything, you learn the rules, you start shooting AV or TV, and now your photos are getting better. You can see the improvement, so can others. Still you see all the rules you broke, and think, “How can I do this right?”

Here’s the short answer- you don’t. Photography is art, and adventure, and fun, and frustrating. It’s all about the rules, and breaking them on purpose. If you’re breaking them and not knowing it, not knowing how, and not knowing why, then you’ve not moved on. Learn the rules, and learn when, how and why to break them. You’re images will speak to your art, and start telling volks the story you want told. Learning to use your camera, in AV, TV, or manual mode is a big step. Adding light and flash is another step, knowing about framing inside the image, and other compositional tips, will all improve your work. You’ll still be critical, but in a way that leads to something nice. Asking how to make it better is positive and can be a great way to master your art.

We all learn, all the time, as long as we don’t let ourselves get stuck in the negative thoughts. Don’t be too hard when looking at your work, look more for the technical side, like exposure and sharpness. Let your visualizations and compositions lead you to new rules and to breaking those rules. Whatever you do, don’t stop loving photography or the art. Keep your love and don’t let your criticism of yourself take away the joy you felt at your first few shots. Trust me, that feeling will return, each and every time you learn something new and make it work in your photography.

Enjoy the rest of you week, keep shooting, and remember to share your pics and post your questions at the Hohenfels Volks Facebook page, and or by commenting here!

Thursday, October 20, 2011

I've Seen the Light!!

Welcome back, Volks! Winter is lurking just around the corner, and Hohenfels is starting to feel its presence! I hope you’re prepared for it!

Hallelujah! I have seen the light! I say that about several things, but in this case, I mean something unexpected. Today we’re going to talk about how to see the light. I plan to keep this somewhat short, so let’s get this train moving.

Seeing the light is something that we photographers need to do to get the most from our art. There is more than one way to skin a cat, and more than one way to see the light.

Light isn’t just white. We learned a little bit about that when we discussed color balance. We need to see the effects that color may have on our subject. Color is just a part of it, but it’s important to look at. You can use your white balance card and camera to see that color. There are times of day that photographers know are generally colors by the atmosphere. About sunrise and sunset are prime examples and called the golden hours, for two reasons. The first is that this is one of the best times to shoot photos outside, and the second is that the light takes on an almost golden tint. Just before sunrise and after sunset, the light becomes bluish, and some call these times the blue hour.

Another part of seeing the light is seeing it’s impact on your subject’s tones and exposure. Remember your triangle here, you’ll need to see the light to offset or maximize its impact.

Lastly, let’s mention seeing the light in the context of seeing the light that’s not there. Examine your shadows. How do they interact with your light? How do they interact with your subject? Do your light, shadow, and subject, all play well together? Sometimes we judge what we have by what we don’t. Seeing the shadows helps to gauge your light.

Visualize the light you want, make that light happen. Easier said than done, even with lots of equipment, but can make for some shots that reward your effort with some wonderful warm feelings. You can’t always create light, but you can visualize the scene in different lighting conditions, and either wait for the right lighting or return at the right time. Not every shot needs taking.

Take some time over the course of your day to see the light. Examine how it falls on someone or something. See how you can change it by moving an object or the light source. See how you can shape the shadows, watch grow, shrink, and distort. Even if you don’t really learn, it’s a fun exercise!

Seeing the light, it’s more than becoming a convert to something or seeing the error of one’s way! It’s an important part of our creativity, of our art, and of our special part of the world, right here in Hohenfels!

Enjoy your week. Here’s hoping you enjoy the autumn and see the light in your own neck of the woods. See it and use it, create those masterpieces within you and share them with us on the Hohenfels Volks Facebook page. Don't forget to leave your comments and questions here and there!

Tuesday, September 27, 2011

Visualization

Hello, again!

Welcome to another post. This time we’re going to talk about VISUALIZATION. I won’t be adding this to the Intro series, as this is more about the artistic side of photography.

Ansel Adams defined VISUALIZATION as "the ability to anticipate a finished image before making the exposure." In fact, he dedicated the first chapter of his book “The Negative” to the subject. VISUALIZATION covers more than the simple definition, but we’re dealing with it in a simple sense right now.

Most of us start out as what I call “See and Snaps.” You see something you like and just click the shutter until you get something that looks similar to what you saw. “See and Snaps” who never grow beyond that stage, usually end up giving up on photography or just settling for “seeing and snapping.” They never grow beyond it, because they never learn about VISUALIZATION.

Learning to VISUALIZE will improve your images with some certainty. The first step in VISUALIZATION is learning to separate what you see, from its context and surroundings. This sounds out of sync with reality, but as you will see, is actually easier to develop than you might think. When you take a photo, you are only capturing a piece of the whole scene, even if you go wide angle. See the scene and the piece you want to capture. Figure out how to show it with limited context and surroundings.

Another important part of VISUALIZATION is learning how to see the color, loss of color, and the effect of the light on your sensor and image. This will help you get the best exposure, DOF, and color possible. You need to get familiar with your camera to accomplish this one. This is more technical VISUALIZTION, but it is important in helping set up our shots. Remember, color can refer to the lack of color, too! Shooting black and white leads to some incredible shots, as the works of Ansel Adams, George Hurrell, Yousuf Karsh, and many of the old masters will attest and impress!

Using the technique of VISUALIZATION, you can create art from your photos; you can make some beautiful landscapes, portraits, still lifes, and keepsakes that will warm the heart later in life! VISUALIZATION leads you to think about every shot you take, and helps you to take the time to get it right. If you can’t take the time to get it right, what fun is it?

Here’s an exercise to try. Get a piece of matting or foam core about 8 inches by 10 inches and cut out a rectangle about 4 inches by 6 inches. Try to use black, as it will assist in the exercise, other colors may distract. Carry it around with you whenever you have your camera. Every time you wish to take a photo, first look at the scene, and then look at the image you want to capture through the card you made. Shift yourself, and look through the card again. Check to see if the perspective and framing are harmonious and work together to create something that will make you proud. Take your time and work the scene into what you VISUALIZE it to be. Sometimes that means waiting for the right light, sometimes it means moving, sometimes it means coming back later, but it also always means better pics! Who doesn’t want that? They used to do this exercise in photo courses and schools to teach a little bit about VISUALIZATION. It feels slightly silly, but you’ll be amazed at the outcome. Just using a small frame to get the feel of the image will aid you in developing and perfecting your VISUALIZATION, which will help you to share your vision! Eventually you can see without seeing, at least without seeing through the little card! There are so many places around Hohenfels to practice just VISUALIZING; Regensburg, Hohenfels, Grafenwoehr, Bamberg, Bayreuth, and Munich. Each one has unique things and sites to get you going!

The best source for VISUALIZATION is most likely “The Negative” by Ansel Adams. He writes quite a bit more than I can! Another great post is an article on Ron Bigelow’s Blog. Check it out and don't forget to look at the rest of his site!

Here’s hoping you’re visualizing a great week! Take care and all the best.