Showing posts with label color balance. Show all posts

Thursday, December 6, 2012

10,000 Revisited

Greetings, volks. Welcome to Hohenfels Volks, THE place for our place! Everywhere you look, you’ll see white! Winter is here for the long haul, and that means it’s time to get some seasonal shots. I hope everyone is getting geared up for Christmas and some great photography.

Earlier today, we had blue skies and some nice clouds, perfect for the landscape shooter in all of us. Of course, things turned ugly quick, and left us in the midst of a dark and icy wall of snow. As often happens, the sun managed to beat back the snow and again we were ready for making some great shots.

Enough weather, that’s not what we’re here for, right? Today we’re going to talk about pride and accomplishment. It’s also a chance for an exercise in good old-fashioned photography. Even though we’re using our digital cameras, and often forget the importance of each shot we make, we can return to the old ways. Remember, as Henri Cartier-Bresson said, “You’re first ten thousand shots are your worst.” In a much older post, we addressed this and modified it to be about 100,000 to 1,000,000 shots. This is due to the inherent nature of instantaneous feedback and automatic cameras.

In the earliest days of photography, folks used glass plates for their negatives. Then film came along. In those early days, your film, or plate, was only sensitive to blue light. This made balancing your light and color very important. With the advent of thinner films and panchromatic emulsions, more sensitivity was added. Then, of course, came color film. When you shot either a sheet or roll, you couldn’t change your ISO or color balance. Film and digital sensors can be thought of as the same thing, and for the rest of this article will be used interchangeably.

Film costs money. It cost money in the old days, as well. When a photographer made shots, he weighed the value of the film and the shot. Every photograph was precious, and had to be made with care. Exposure, color balance, even composition had to be weighed and given some measure of value in relation to the photo. Photography took time, to both master, and in terms of the individual image created. Light meters for measuring exposure, going back to the 1800’s, are available on auction sites all over the internet. Focusing aids, powder flashes, apertures, and even shutters were part of the photographer’s knowledge. In many of the older lenses, the aperture was adjusted using an insert placed in the lens at the time of the photo.

Now that we see how valuable the image was, and the knowledge to make an image, we can see how those early photos, and those that have come down to us through the years, were not the product of guesswork or automation.

For the next few days, try doing an exercise in film. Choose one ISO for your camera, choose one color balance, and only limit yourself to 36 shots per session. Remember, getting your color balance and ISO right will require thought and planning. It will also require learning about your intended shooting situation. If you’re shooting outside, shoot in daylight or around 5200K, and inside shoot at tungsten or around 3200K. If you’re shooting in bright conditions, choose ISO 100, in the dark ISO 800. Finish your 36 shots before changing your settings. Also, don’t look at your images on the camera monitor, or delete any shot. Wait until you get home to see what you have. This will encourage you to value your images, while also helping you improve.
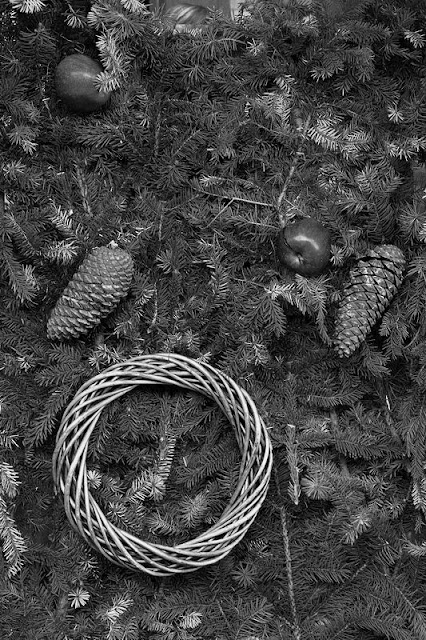
Hohenfels Volks: Dresden Christmas
EI 500, f/5.6, 1/60, 56mm
I couldn't resist this shot, the mix of shapes, textures, and tones are intriguing! Shooting manual all day, let me have control of the camera, instead of the camera controlling me. It also allowed me to use my knowledge to get what I wanted.

This little exercise will require you to know your camera settings, it will require the knowledge to get the shot right, and it will allow for a sense of visualization to settle in. Visualizing your image is an incredibly useful tool in photography. This is a great time to undertake this exercise, as our changing weather conditions, and lighting, will challenge even the best without proving impossible with a little effort. As an added bonus, it’ll make every shoot an adventure, and every moment until the photos are loaded like Christmas. It’s a fun way to experience the anticipation of Christmas with a gift in every session! It’ll also make shorter work of getting the best shots, since you’ll be improving with each photo made. You’ll also develop your confidence, which always helps! Remember, a great camera doesn’t make a great photographer, any more than a great kitchen makes a great cook.

Please feel free to share your photos on our Facebook page. Everyone here would love the chance to see your work! Is there anything you’d like to see here? Do you have a question or an idea? Share your thoughts here or at the Hohenfels Volks Facebook page. Of course, commenting on both Facebook and here is always appreciated, too! Don't forget, we're on Google+, too!

Tuesday, December 4, 2012

Large

Greetings, volks. Welcome to Hohenfels Volks, THE place for our place! Old Man Winter is settling in for his long stay here in Hohenfels! I hope everyone is settling into their anticipation and excitement for the long nights and brilliant moments ahead.

It’s certainly been some time since my last post! I’ve been quite busy as usual. Branching out into large format photography has filled me with new ideas and visions. I hope to make some of the winter shots I’ve been visualizing and preparing for. Large format gives you a way of relating to the scene and subject that it’s hard to imagine without seeing it. This leads us to today’s basic topic, shooting tethered.

One distinct advantage of the digital age is the ability to hook up to a computer and see our images presented quite large. When we load our photos onto our PCs, it gives a way to see detail an ordinary 4x6 print denies us. It also gives us a tool to learn far more rapidly, by allowing us to honestly assess our images in all their glory, and with all their flaws.

But, as many folks don’t know, it also gives us a way to see those flaws prior to making our shot. It allows us to compose our scenes at a scale which invites a more involved relationship with the image. It allows us to troubleshoot our images prior to recording them, and to resolve any images that may prevent the full realization of our vision.

Previously, this has been the domain of those with large format cameras, like the 8x10 field camera or a 4x5 view camera. The composition was done on a negative sized piece of ground glass, with the image upside down and inverted. This naturally led to a slower pace and more contemplative image creation process. Combined with film costs, equipment costs, and time costs, large format photography was largely practiced by those making money from it. With the proliferation of digital cameras and the advent of sites like E-bay, large format become reasonably priced to anyone with the desire and motivation to learn the ins and outs. The format can be daunting and challenging, sometimes extremely so, but it can also be rewarding.

Now that we have DSLRs capable of producing extremely high quality images, and the capabilities of our computers, we can all practice Large Format.

Now that the background is behind us, the steps and equipment are quite simple. You most likely have the equipment you need, as it probably came with your camera. This would include a USB cable to connect to your computer, and the capture software that allows for control of your camera. If your camera didn’t come with the capture software, your manufacturer may have it at their website. If not, there are commercial options available that run from free to higher priced options. You’ll want a tripod and maybe a platform for your PC if you want to use a laptop from other that your desk. That’s it. Just start the software, and for Canon’s, select Remote Live View.

Once you’re connected, you can control everything. You can focus in the autofocus mode using the software, or in manual mode. Both ways give you a giant magnification and full control of your focus. You can control white balance and display your camera’s metering, which will allow you to control your exposure and place your values below, at, or above, neutral gray. It allows for full functionality of the camera, and can even capture directly to your hard drive. The beauty is in a few Windows hot key shortcuts, you can zoom in the live preview, making your preview as large as your monitor. How’s that for large format? Focus, DOF preview, and exposure controls as if shooting directly form the camera, and viewing from the computer, it can’t be beat. You’ll know if you have a keeper even before making the shot.

This has been around some time, just search for tethered shooting, but the first thing to learn is exposure, white balance, and how to use your camera. Once you know these things, you can move on, in ways I can’t even begin to touch upon here! Using tethered shooting will give you an appreciation for all the detail in the scene and lead to a new found way of looking at the smaller parts of a scene to see the big picture. It also saves the frustration of having to sort through the good and the bad. You’ll find yourself making fewer bad images when you shoot tethered.

It has its drawbacks. Who wants to carry a tripod, computer, and cables everywhere? Who feels like lugging extra stuff to make the picture? There are trade-offs in it, but you’ll find if you’re shooting something for your own vision, or if your doing something where there is time to set up and work that way, tethered may be your new default!

I hope this gives you some new ideas. Getting out there and shooting , tethered or un-tethered, will give you the winning shot this winter, so get started making your images now!

Please feel free to share your photos on our Faceboook page. Everyone here would love the chance to see your work! Is there anything you’d like to see here? Do you have a question? Share your thoughts here or at the Hohenfels Volks Facebook page. Of course, commenting on both Facebook and here is always appreciated, too! Don't forget, we're on Google+, too!

Tuesday, July 17, 2012

Converting Your Image

Greetings, volks. Welcome to Hohenfels Volks, THE place for our place! I hope everyone is faring well as press into the week.

Today we’re going to go over a simple, but interesting way to convert your photo to black and white.

As we all know, sometimes color can change the way an image feels. It can take a moody photo and make it seem wrong or out of place. It can distract from the subject and take away from the beauty of the light. There are many reasons for shooting, or converting to, black and white. For this post, we’re going to do something that takes our shot to a better place.

This is the image we’re working on. I’m using Corel’s Paintshop Pro Photo X4, but the concept is the same in Photoshop, Lightroom, or Gimp.

Hohenfels Volks: The Dom
ISO 6400, f/3.4, 1/15
Looking into the Cathedral. The scene was beautiful, yet the image lacks some pop. We'll fix that!

I shot this photo inside the Dom in Regensburg. The beautiful Gothic architecture and art inside this cathedral seem best suited for black and white, and seem quite garish in color. The color temperature also becomes an issue when shooting at high ISOs, although I photographed this with the intent of making it black and white.

Once we’ve converted our image and opened it in our application of choice, we’re going to separate the image into red, green, and blue layers. There we’ll lighten and darken the different layers to our desired levels using curves and levels, and remove the noise. For this image, I slightly decreased the red and blue layers, while only dodging the green along the pipes of the organ. Once you’re content with your adjustments, combine the layers into a new image. For this shot, I slightly darkened the red layer, darkened the blue layer quite a bit, and dodged the pipes of the organ to increase the levels to offset the overall decrease in brightness. The finished combination now looks rather odd, and has some tinting/toning in it.

Hohenfels Volks: The Dom
This is our image after splitting the color channels and recombining them. Notice the green tint on the pipes.

Our next step is to split the image again, this time to hue, saturation, and lightness layers. You can discard the hue and saturation layers, as we will now use the lightness layer for our final canvas. For this image, I adjusted the levels, performed a minor curves adjustment, and increased sharpness. I chose to over-sharpen, using a radius of 1.00, as I would be softening the noisy area under the arch, and applying an edge preserving smooth filter.

Hohenfels Volks: The Dom
Almost finished, a few tweaks and we're there.

The finished result, while no masterpiece, is rewarding. It leaves you with a sense of place and scale that the color version tends to minimize. The chiaroscuro also seems quite well suited to the Gothic cathedral.

Hohenfels Volks: The Dom
And here we go. I think this really brings out the mood and scale of the Dom. Its incredible Gothic architecture and art are magnificent.

Well, that’s one way you can do it. This is by no means the only way. You can also adjust color channels without splitting the image, and then desaturate the image. There are as many ways to convert your image as there are folks playing around to figure out what works best for their photo. One of the biggest keys, though, is color contrast and levels. Getting that where you want it can lead to some very nice results!

Enjoy the rest of your week.

Please feel free to share your photos on our Faceboook page. Everyone here would love the chance to see your work! Is there anything you’d like to see here? Do you have a question? Share your thoughts here or at the Hohenfels Volks Facebook page. Of course, commenting on both Facebook and here is always appreciated, too! Don't forget, we're on Google+, too!

Monday, May 14, 2012

Color Balance and Exposure

Greetings, volks. Welcome to Hohenfels Volks, THE place for our place! After a chilly weekend and a wonderful Mother’s Day with the family, it’s time to get back to the regularities of life, which includes plenty of time behind the lens. Let’s hope a nice week present Hohenfels with some great photo ops and we have our cameras ready!

Today we’ll discuss a little bit about color, color balance, and the impact they have on exposure. We most often see the impact when shooting B&W, but in today’s digital age, we see it more and more. So let’s get started.

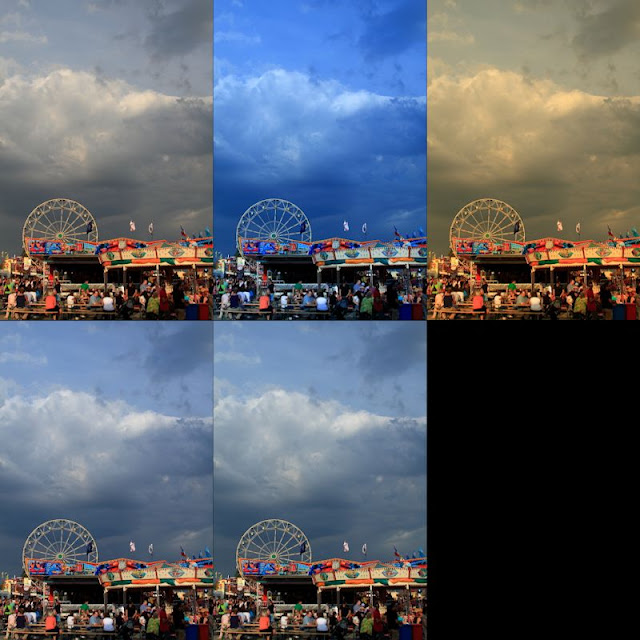
Most of today’s sensors seem biased toward the red. When you decrease the amount of red in the scene, you decrease your overall exposure. Over the course of editing photos and correcting color balance, you’ll start noting that decreasing the color temperature toward 4000K or lower a decrease in brightness generally occurs. This is especially true when using redder lights or in daylight shots. This can be clearly seen in the following series of images. All the settings are identical, except the color balance, which was set for to display this.

Hohenfels Volks: Color and Exposure
Top row L-R; no color balance, 3600K, 8700K Second row; click for the flag, click for the clouds. Notice the apparent changes in both exposure level and contrast.

Color balance also affects your exposure for black and white shots, even digital ones. You can see this in the shots below.

Hohenfels Volks: B&W Color exposure
Here we see the impact of color balance on black and white. The left is set for about 2700K and the right is 7000k.

By adjusting your color balance, you can correct your lighting to match what it was during your shooting. Doing this digitally without balancing your lighting through the proper application of color matching gels or matching your light sources can lead to issues that seem insurmountable, and may well be.

The best method to create proper color balance is to use a white target made for color balancing photographs and setting up a profile for that lighting situation. When you’re shooting a gathering for instance, set your custom white balance using the white target in the actual lighting conditions that you’ll be shooting in. This will enable you to have your white properly balanced, and enable batch white balancing. When shooting RAW this is the preferred method, as it can easily be changed should the results not be to your taste. Another method is to shoot a white balance shot as before, then only apply it where needed during RAW conversion. Of course, in situations like gatherings and events, I’ve found the best results to be obtained by shooting a white balance shot for each direction I’ll be photographing and applying them based on the shots. You usually get better results in mixed lighting this way.

When taking your white shots, make sure to frame the white card so that as much white is showing as possible. I find keeping some of the scene as reference helps when doing multiple white balance shots, so that I can remember which direction the shots were made. You can also use an 18% gray exposure target card, as long as there is no color in the card itself other than gray. Often times, the dyes used can lead to odd colorcasts. This is also true for white cards of lower quality. I used one once that showed up green on all the test shots I made. The actual shots would have been wasted if I had been shooting JPG and not RAW.

All this leads to this week’s exercise. Set your camera to monochrome and shoot a series of shots in different lighting. When you import the RAW files to your favorite converter, adjust your color temperature and see how it influences your exposure levels. Then try to apply several monochrome color filters and see the changes. Then set your picture style to one of the color modes and change your color temperature. You will see in all the cases, your exposure will change over different parts of the scene. Remember how you affect the scene, and when you’re out shooting apply that knowledge to your exposures. You’ll see things different and improve your work!

Time to get out and do some shooting, I hope you’ll be out today getting your shots in, too! Make some for us and share the wealth!

I’m looking forward to seeing your results and hearing from you. Let me know what you think and how you’re using your camera! Share your thoughts here or at the Hohenfels Volks Facebook page. Of course, commenting on both Facebook and here is always appreciated, too! Don't forget, we're on Google+, too!

Tuesday, March 13, 2012

Color Contrast in Monochrome

Greetings, volks. Welcome to Hohenfels Volks, THE place for our place!

Today we’re going to talk about using digital filters for black and white, and color contrast to bring our vision to our images. We’re going to walk through a few different colored filters in our RAW conversion software.

Referring to Canon’s Digital Photo Pro for our software portion, we see that the first thing is to set our picture style to monochrome. After doing that, you’ll notice that color tone and saturation sliders change to filter effects and toning effects.

Once we’re into monochrome picture style, set your white balance to color temperature and play with the slider a little. This will give you some idea of your sensor’s spectral response to color. For instance, raising your temperature from 5200 to 10000 may give a giant boost to your brightness, showing a larger response to red. Lowering it to 3000, seeing a boost would indicate a greater sensitivity to blue and green.

Now that you have some idea of its response to colors and temperature, we can understand how to work our monochrome images for maximum effect. Select the first filter choice as we drag our slider, yellow, and adjust your color temperature. Going either way with your temperature shows a slight shift in brightness throughout the range. As we get lower in temperature, we have less lightness, and more as we raise the temperature.

Selecting an orange filter shows a more pronounce version of the yellow filter’s response, due to an increased presence of red in the light being allowed through the filter, or in our case, allowed to impact the image by software. Moving on to red, we see great swings throughout the temperature range. At 2500, we see our greatest darkening and at 10000, we probably see something washed out and so high in contrast to be unusable.

Going to our last filter, green, we see almost no change as we shift through the temperature range. Since light is composed of all the colors, but most of the time less of the green, we see less impact. Green has a more pronounced effect in film photography than digital, though.

OK, now we’ve seen some pretty cool ways to improve on our vanilla black and white conversions. Let’s move to some interesting ways to use those filters. Select standard for your picture style. Selecting your RGB tab, you can choose between luminance, red, green, or blue. As we cycle through the colors and make adjustments, we end up with a pretty scary image. The color is ugly and unnatural. No that you’re someplace you think might work well with a colored filter, select saturation in the RGB tab and drag the slider to 0. Without saturation, there will be changes in lightness and brightness, but no real change.

Going back to your RAW tab, select monochrome, and choose your filter. Select color temperature. Once your color temperature is about where you want it, go back to the RGB tab and start playing with your color and lightness sliders. Notice how things change as you drag them around? Well, once you have your image about where you want it, you can either save it or finish it here. The reason for going into the color sliders goes back to our discussion on color theory. By adjusting our color curves, levels, and contrast, we can make some very nice black and white images with our initial RAW conversion.

Once you have your image about where you want it, you can save it and open in another editing program, like Paintshop Pro and split the image into CMYK or RGB layers and adjust it even further, or just play with your curves or layers creating a combination that suits your vision, message, and intent. Another nice option is to create a hand painted look or feel. We’ll talk about that in a future post.

I hope everyone is on the road to a great week and has plenty of opportunities to concretize your vision. Happy shooting and have a wonderful week, Hohenfels.

Don’t forget to post any of your images you’d like to see here at the Hohenfels Volks Facebook page. Of course, commenting on both Facebook and here is always appreciated, too! Don't forget, we're on Google+, too!
Tuesday, October 18, 2011

Color Balance

Welcome back, Volks! Today we're bringing the subject of white balance to Hohenfels Volks.

Generally, white balance is an adjustment made to an image to make your neutral colors, neutral. What we really mean when we speak of white balance is color balance. Color balance removes colorcasts, or imbalances, caused by shooting in light of differing temperatures. Color temperature theory is a little too much for me to explain, so simply put; blue light has a high temperature in degrees Kelvin, as it requires more heat to create. Red requires less, so it has a lower temperature. Who knew engineers would create such a complex way of thinking about colors?

The sensor in your digital camera measures the temperature of the overall light to create a general color balance when set to automatic. It then adds or removes colors that remove the colorcast. In single lighting conditions, automatic can do a good job for you.

The difficulty comes in when we realize that we really don’t shoot with one color light. If you’re shooting on a nice sunny day, there is still light that is differently colored than the sunlight. This is caused by the nature of light. Light has no respect for your boundaries, and doesn’t stop only on your subject. Light tends to reflect and bounce everywhere. So, on this bright day, you’ll have light from the sun, light bounced off buildings, trees, grass, windows, and many other sources. Yikes, time for “white balance.”

When you use a preset white balance, you are telling the camera what type of light you used. The camera then adjusts for that type of light. For tungsten, it removes yellow and/or adds blue. For fluorescent, it adds green and/or removes red. You may end up with a bad colorcast if you have multiple color temperatures that vary by too much.

Shooting in RAW mode allows the most control, so what I describe will work best on images shot in RAW format. There are several options to deal with color temperature in RAW images. The first is to use a preset, as mentioned above. The second is to adjust your color temperature manually. The third is to click a neutral color. This last one can do a good job if you have a large enough neutral area. It samples a variety of pixels around your selection and applies the adjustment to the entire image. There are 2 more that I will mention here. The first is to use an Expodisc, or something similar. This fits onto the end of your lens, and then you take a photo of either your light source or your subject, and apply the resulting image as a custom white balance to your camera. The other and probably better way, at least for most, is a white card. You can use plain white paper, but it tends to have variations in the tone and colors, even between sheets. Your best bet is to get a white balance card. They are made to ensure your neutrals stay neutral. When using a custom white balance, if the lighting changes, you must do a new custom balance source to ensure accuracy.

For best results, take your white balance card and place it with, or near, your subject. Ensure the lighting is the same you will use for your subject, and fill your frame with the card. Make sure there are no colors in the frame, and click your shot. Then go into your menu and select custom white balance. You will have to choose the image you just created, and then apply it. All your shots taken in that lighting will be properly color balanced.

You can also batch color balance in your RAW conversion software by selecting your white card shot and selecting the source, then applying it to all your shots taken in that lighting.


The order of white balance settings in this sample chart is from left to right; as shot, Daylight, Flash, Shade, Cloudy, Color temp 5800k, Click on white, Tungsten, Fluorescent, with the last square white for reference.

There is a lot more to color balance, but this should get you going. Just remember that getting it right takes some practice and knowing your camera.

Thanks to Jennifer O for the suggestion for today's topic. I hope to hear more suggestions and comments! Your input will make this thing of ours great!

Here’s hoping the rest of your week is filled with loads of photos of Hohenfels, and lots of joy! Don't forget to share your pics and questions by posting at the Hohenfels Volks Facebook page, or commenting here!