Today we’ll discuss a little bit about color, color balance, and the impact they have on exposure. We most often see the impact when shooting B&W, but in today’s digital age, we see it more and more. So let’s get started.
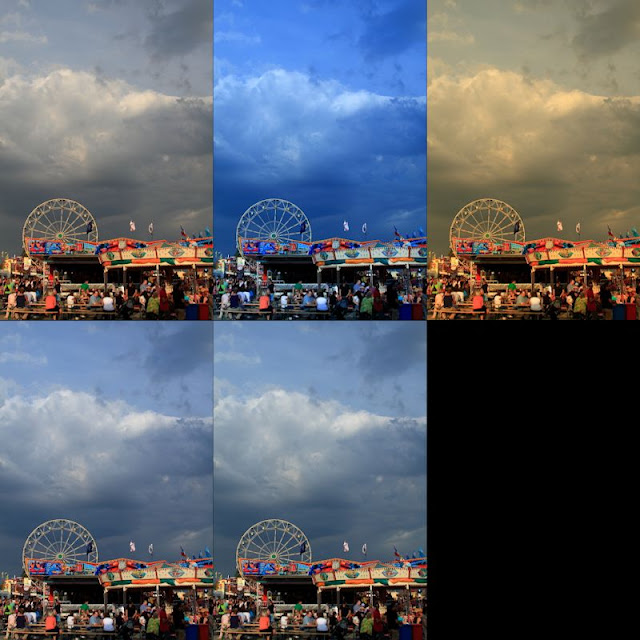
Most of today’s sensors seem biased toward the red. When you decrease the amount of red in the scene, you decrease your overall exposure. Over the course of editing photos and correcting color balance, you’ll start noting that decreasing the color temperature toward 4000K or lower a decrease in brightness generally occurs. This is especially true when using redder lights or in daylight shots. This can be clearly seen in the following series of images. All the settings are identical, except the color balance, which was set for to display this.

Top row L-R; no color balance, 3600K, 8700K Second row; click for the flag, click for the clouds. Notice the apparent changes in both exposure level and contrast.
Color balance also affects your exposure for black and white shots, even digital ones. You can see this in the shots below.

Here we see the impact of color balance on black and white. The left is set for about 2700K and the right is 7000k.
By adjusting your color balance, you can correct your lighting to match what it was during your shooting. Doing this digitally without balancing your lighting through the proper application of color matching gels or matching your light sources can lead to issues that seem insurmountable, and may well be.
The best method to create proper color balance is to use a white target made for color balancing photographs and setting up a profile for that lighting situation. When you’re shooting a gathering for instance, set your custom white balance using the white target in the actual lighting conditions that you’ll be shooting in. This will enable you to have your white properly balanced, and enable batch white balancing. When shooting RAW this is the preferred method, as it can easily be changed should the results not be to your taste. Another method is to shoot a white balance shot as before, then only apply it where needed during RAW conversion. Of course, in situations like gatherings and events, I’ve found the best results to be obtained by shooting a white balance shot for each direction I’ll be photographing and applying them based on the shots. You usually get better results in mixed lighting this way.
When taking your white shots, make sure to frame the white card so that as much white is showing as possible. I find keeping some of the scene as reference helps when doing multiple white balance shots, so that I can remember which direction the shots were made. You can also use an 18% gray exposure target card, as long as there is no color in the card itself other than gray. Often times, the dyes used can lead to odd colorcasts. This is also true for white cards of lower quality. I used one once that showed up green on all the test shots I made. The actual shots would have been wasted if I had been shooting JPG and not RAW.
All this leads to this week’s exercise. Set your camera to monochrome and shoot a series of shots in different lighting. When you import the RAW files to your favorite converter, adjust your color temperature and see how it influences your exposure levels. Then try to apply several monochrome color filters and see the changes. Then set your picture style to one of the color modes and change your color temperature. You will see in all the cases, your exposure will change over different parts of the scene. Remember how you affect the scene, and when you’re out shooting apply that knowledge to your exposures. You’ll see things different and improve your work!
Time to get out and do some shooting, I hope you’ll be out today getting your shots in, too! Make some for us and share the wealth!
I’m looking forward to seeing your results and hearing from you. Let me know what you think and how you’re using your camera! Share your thoughts here or at the Hohenfels Volks Facebook page. Of course, commenting on both Facebook and here is always appreciated, too! Don't forget, we're on Google+, too!

No comments:
Post a Comment