Showing posts with label meter. Show all posts

Tuesday, November 6, 2012

Creative Metering and Exposure

Greetings and welcome to Hohenfels Volks, THE place for our place! I hope everyone is getting a decent start to the week. The Hohenfels area is beautiful this time of year, as many of you know, and full of go-to places for some great shots.

Today we’re going back a little to some basics. We’re primarily going to look at metering and exposure.

We all know the basics by now, that your meter offers a combination to make the measured area fall at 18% reflectance, or neutral gray. Most of us know that by overriding that proffered setting we can take fuller control and get closer to our vision.

I’ve discussed metering and key stops before, but today we’re going to see how it can be used for maximum impact when combined with our vision.

I’ll be referring to the following photo as an example.

Hohenfels Volks: I UnSubjugated
ISO 125, f/22, 1/2 on Ilford FP4+
I, Un-Subjugated.When we leave the I, or in this case the red, unsubjugated, a wider variety can thrive.

In the above image, both the highlights and shadows were extremely close in values, and were identical with the light shifting as it was. My initial reading was 15 c/f2 for the shadows and 30 for the highlights. The brighter leaves are red and the darker ones are green. Knowing the values were so close, with the red reading about 2/3 to a whole stop brighter, I chose a red filter to bring up the reds and decrease the greens. A red filter allows about 97% of the red light through, while only allowing about 12.5% of the blue and green. It also gives a factor of 8x or 3 stops. Throwing in the aperture decrease, I was shooting with 5 stops less available light for the greens and shadows. By adding 4 stops to their initial reading of 30c/f2, their levels were increased and the red was 2 stops over neutral. In yesterday’s shot, the same leaves and exposures were made, only using a green filter, bringing all the levels more in line with their illuminations.

This is the same shot, and levels as the image I posted yesterday. This will allow you to see how using the tools and techniques at our disposal, we can lead our image and our viewer to the desired result.

When we meter at our key stop, both for highlights and shadows, what we’re learning is the illumination of the subject. The reciprocal of our shutter speed is the amount of illumination, expressed in candles per square foot. By metering off the shadows, mid-tones, and highlights, we have a range of illuminations with which we can work. Those readings will always be the same at any key combination. For instance ISO 100 and f/10 or ISO 400 and f/20. So, we meter 100 foot candles at ISO 400, f/22. At ISO 250, we would set f/16 to get the same results. Now to place that value at somewhat higher value, for instance, we could set our shutter speed to 1/50 instead of 1/100 at f/16 ISO 250, and get a result that is lighter than neutral, by about 1 stop.

Throw in the ability to see our desired results and the steps to get them; an image can be made, not captured. We have several tools to modify the exposure we’ve selected without destroying the original image. With digital photography, shooting RAW gives you complete control. By raising your red tones, and lowering your greens and blues, a red filter can be somewhat approximated, and so on.

By combining exposure, processing, and value controls throughout the photo making session, we can bring our creative expressions to life. The first step to learn is metering and how to use that information. This little tool can be used for a record photo that leaves little to interpretation, and one for the magic of creative photography, as well. You can give voice to your thoughts without uttering a word. Using what you know, and the tools available to you, vision can be brought to life, and given a meaning according to your creativity and visualization.

I hope everyone enjoys the rest of the week and makes an image using their knowledge, tools, and vision to share with all of us! Get out and make it happen, then show us, share what you felt through your images on our Hohenfels Volks Faceboook page.

Is there anything you’d like to see here? Do you have a question? Share your thoughts here or at the Hohenfels Volks Facebook page. Of course, commenting on both Facebook and here is always appreciated, too! Don't forget, we're on Google+, too!

Tuesday, July 31, 2012

Metering for Effect

Greetings, volks. Welcome to Hohenfels Volks, THE place for our place! I hope everyone managed to break away from the Olympics this weekend and get some great shots of our Hohenfels area.

Some beautiful cloudscapes this weekend started me thinking about how we meter and where we place our exposures. Of course, this led to a short post today about shooting bright scenes, or scenes with a large amount of brighter objects.

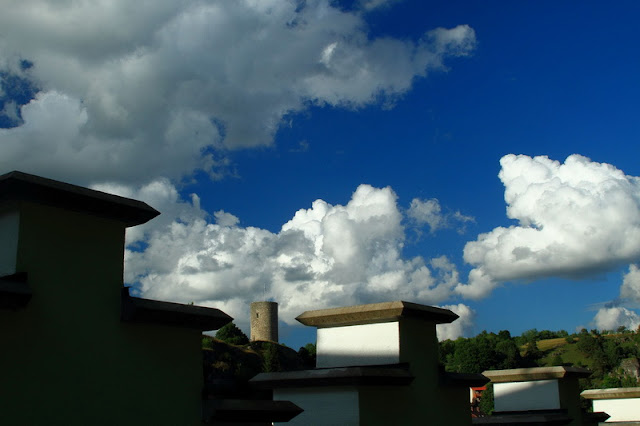
Hohenfels Volks: Castle in the Clouds
This shot was metered for the bottom of the clouds on the left. This left the bright clouds on the right a little overexposed. The values were brought down using the luminance curves in Canon's Digital Photo Pro to match my visualizing. By composing with the crenelations creating a stairstep effect and framing the castle tower, a brighter image could be created. It also brings the eye back to the tower and clouds, adding interest and depth.

The first thing we should be thinking about is our visualization. Where do we want to place our elements? For instance, if your scene contains fields, nice blue skies, and big fluffy clouds, perhaps metering for the fields will turn the sky white, and metering for the clouds will turn the fields black. Knowing where we want our elements in the range of values is the first step in putting our visualization to work.

After we’ve visually composed our image and noted the areas where significant detail must be maintained, we begin to meter. It’s generally best to make several readings from the different values within the scene, as this lets us know our range. In the above mentioned scene with the fields and clouds, we determine the sky itself to be the middle range. If we give this a +1 exposure, the sky is properly exposed, the fields are likely to be also, but the clouds will usually be overexposed. We can try to fix it on the computer, which is often difficult when the highlights are too far gone, or we can expose the clouds for +1 to +2 stops over their meter reading. This will darken the sky to a nice rich blue, and generally provide some slight underexposure in the field. The lowering of values throughout the scene also increases your overall saturation. It also gives you greater control over the chiaroscuro and play of light in your work.

Of course, none of this is useful to you if you don’t know what you want from your shot. Trying to capture the feeling you wish to share may require something else. Having this general idea, though, gives you another tool in the quest for the perfect shot.

Please feel free to share your photos on our Faceboook page. Everyone here would love the chance to see your work! Is there anything you’d like to see here? Do you have a question? Share your thoughts here or at the Hohenfels Volks Facebook page. Of course, commenting on both Facebook and here is always appreciated, too! Don't forget, we're on Google+, too!

Thursday, May 10, 2012

Luminance Values and Exposure

Greetings, volks. Welcome to Hohenfels Volks, THE place for our place! Spring, being upon us here in Hohenfels, is ripe with opportunities for our craft. Looking around, the trees are bright and clean, the flowers are bursting with color, and the Germany is waking up to a wonderful summer ahead.

Today’s post, delayed by unfortunate occurrences, is about luminance values, and how we can record, refer to, and use those values to improve our image. There will be some math here, but nothing major.

The first thing we need to discuss is the exposure formula. Ansel Adams described it as being the reciprocal of the luminance at a speeds key stop. The key stop for any speed is the square root of the speed. Here is a list of most speed/stop combinations.

Speed Key Stop
100 10
125 11
160 12
250 16
320 17
400 20
480/500 22
620 25
800 28
1000 32

I began the table at ISO 100 and ended at ISO 1000. ISO 100 is the lowest most consumer cameras go, and f/32 is about as high as most consumer lenses get today.

By setting your camera to any of the pairs in the table, you can read the luminance of your metered object, measured in candles/square foot, or c/ft2. For instance at ISO 125, f/11, metering 1/125, then the luminance value is 125 c/ft2. If your meter shows 30 seconds, then the luminance is 1/30 c/ft2. That will put you at 18%, or neutral gray reference values. This is what I refer to as M, or an M exposure.

When photographing normal scenes, we often encounter a scale of values that for any given exposure will run from approximately M-5 and lower to M+5 or higher. By learning to look at luminance values as described above, you learn to tame that range, creating an image that will make you justifiably proud.

An example of exposing for your luminance reading is when you meter the clear sky; you should read about f/11, ISO125, 1/300. This will put your sky into the range of 18% reflectance. We know that a clear Northern sky should fall about M+1, which means we should expose for the sky at f/11, ISO125, 1/150. Of course, this goes back to place and fall exposures. You must decide the key elements within your scene and where they should be placed. Once this exposure and placement is determined, all other values fall where their luminance levels impact your sensor. Knowing these values will help you determine where you wish to place elements and where your remaining elements will fall.

Even metering clouds, you will find a range of luminance values that may run from 200 c/ft2 to 1000 c/ft2. By meter the brightest part, 1000 c/ft2, then adding 3 stops, you bring your 200 c/ft2 up to nearly M+1 ½ in the exposure range, which is slightly brighter than the surrounding blue sky, and significantly darker than the brights in the clouds. Your brights will print out with slight tonal variations, and darker areas will have adequate or better textural ranges. You also bring areas metering at 50 c/ft2 up to the equivalent exposure of 400 c/ft2. These equivalent values are in relation to your original metering from the bright part of the clouds.

Recording your luminance values across the range of your scene will help you learn to recognize values, and expose with more confidence. It will also help in editing your images and preparing them for either printing or display. I would suggest metering across the range of M-4 to M+4 after determining your priorities, and noting the results. Even if you’re shooting at some combination not listed above, take the luminance readings using a combination. After reading the values, switch to your desired settings, compose, and make your image. Values for M+ and M- can be extrapolated by halving or doubling the values obtained with your meter. This is less accurate, but still of considerable value in perfecting your images.

Another great advantage of knowing your luminance and place values, is the ability to tell anyone about your exposure without giving the ISO, f/stop, EI, shutter speed, and so on. Tell them you metered this at 250 c/ft2, and gave M+1 to get the exposure where you wanted it. Regardless of your settings, they will know that to get that exposure from 250 c/ft2, then they give M+1 at whatever aperture and speed they desire, for instance ISO 125, f/8, 1/250 or ISO 400, f/5.6, 1/1600. Both will give the same results, and use the same values, 250 c/ft2 +1 stop, and make exposing a scene more consistent. It’s also useful when referring to edits performed. Taking the last example, you may have shot at M+1, and then edited it to M to decrease contrast. In this case, you can say this was shot at 250 c/ft2 +1 stop, then edited to M for the final effect. This will help others understand and help you remember your shots without having to know every little bit of detail.

There are other ways of expressing luminance, for instance EV or c/m2, or lumens, and as long as you find a consistent method of evaluating and expressing that exposure, your images will be consistent with your vision. Don’t get hung up on what I use, try it and if it doesn’t work, try something else. You’ll still have a working system, and you’ll still be enjoying what we love to do!

Time to get out and do some shooting, I hope you’ll be out today getting your shots in, too!

I’m looking forward to seeing your results and hearing from you. Let me know what you think and how you’re using your camera! Share your thoughts here or at the Hohenfels Volks Facebook page. Of course, commenting on both Facebook and here is always appreciated, too! Don't forget, we're on Google+, too!

Wednesday, March 21, 2012

Shot Records

Greetings, volks. Welcome to Hohenfels Volks, THE place for our place! The wonderful weather has given rise to many photographic opportunities; I hope you’ve taken advantage of it to create some art.

Today we’re going to discuss the importance if shot records. No… not a transcript of your vaccinations. We’re going to talk about recording information about your shots as a learning tool.


A sample shot record

In the above shot, you have fields for all the important information. If you remember in a previous post, we discussed the exposure formula. If you recall, your shutter speed should be the reciprocal of the luminance in foot-candles, at your key stop. Your key stop is the square root of your ISO, or the nearest stop to it. For ISO 100, it’s f/10, ISO 125 it’s f/11, ISO 400 it’s f/20 and so on. In the sample record, we see that shot 3 was ISO 125, metered at f/11. At our mid-tones, we metered 1/200, which means we have 200 foot-candles in the middle of the scale. Notice that trying to keep the middle values properly exposed, we changed to f/16 at 1/100, which gives us the same exposure, but more DOF.

By tracking your shots with something similar, you can keep track of what levels you want to record at the desired exposures and refer back to it once your images are on the computer. Another nice thing about it is the ability to recall where and when you took a shot.

By recording your meter readings, you know how to move your image areas to the desired exposure, according to your vision. In the same example, we see the shadows read 1/25 at f/11. That would expose for 18% gray, as we all know by now. By stopping down 2 stops, say to 1/100, we keep our texture in the shadow areas of the image, while allowing our gray to move up to 18% +1 stop, giving a brighter overall appearance to our image and creating a bit of glow about our middle values. This is especially true when they are surrounded by slightly darker tones, and an even, soft light.

The simple fact is that shot records help us learn, as we examine our images and review our settings, we see how to improve our exposures. We also see how to create better lighting and impact by changing values. I am often remiss in keeping records of my settings as I take the shot, but have a form that I use taken from Ansel Adams’s book, The Negative. It uses zones and luminance values, and includes details on development and the like.

As we move through the phases on our journey toward crafting and making the perfect photo, we can see where we’ve been, and where we’re headed if we keep records. In today’s digital age, EXIF gives us our ISO, f/stop, shutter speed, and other information. The things it can’t give us are our luminance values, meter readings for other than middle gray, and it certainly can’t tell us the real subject of the shot.

That’s enough for today. I hope everyone has the chance to work on crafting their images and creating their masterpiece! Just remember to record the details. Enjoy the rest of your week!

Don’t forget to post any of your images you’d like to see here at the Hohenfels Volks Facebook page. Of course, commenting on both Facebook and here is always appreciated, too! Don't forget, we're on Google+, too!

Tuesday, January 17, 2012

Tech Talk: Candles and Calculations

Greetings, volks. Welcome to Hohenfels Volks, THE place for our place!

Today we’re going to go a little bit into what makes up your exposure numbers and how metering works. It sounds familiar, but we’ll be dealing with more math and other advanced parts of your exposure settings.

Let’s start with your ISO. Back in the old days there were lots of ways to label film sensitivity. There was by DIN number, ASA, Weston, and EV, as well as various others fallen by the wayside. Today we use ISO, which is for the most part ASA. Some folks use DIN, that’s why film still carries the DIN number. Under today’s scheme, 3 degrees DIN are equal to 1 full stop. ISO 100/21 has half the sensitivity of ISO 200/24. The Weston number, another popular standard used to gauge a film’s sensitivity, referencing Weston’s meters, is usually .8 times the ISO. Since we’re shooting today, we’ll use ISO, but there may be times we reference others in our future.

Moving on we come to light and light levels. Without the fancy gadgets we have to meter our exposure built into cameras, folks used external meters. Ansel Adams broke it down in his book The Negative. Meters used to measure light in candles, or candela, per square foot. That was the basis for your shutter speed. This will become important in a couple paragraphs.

Next we have aperture, the size of the opening through which light enters the camera. Each ISO had its native f/stop. To find the native stop for any ISO take its square root. For ISO 100 the native f/stop is f/10, for ISO 125 it’s 11, for 200 it’s about 14, and for 400 the native f/stop is 20. Apertures are measured in f/stop, which is a ratio based on the square root of 2, as each step is doubling or halving the light.

The last part is shutter speed. For a native aperture, the shutter speed should be 1/ the light measured in candles per square foot, or c/ft². If you read 125 c/ft², your shutter speed for a native aperture should be 1/125 second. It sounds easy doesn’t it? Well, don’t give up hope. Things are about to get tricky.

Since most light meters today don’t measure in c/ft², finding that speed may be difficult. Automation has taken away many of the tools used by those who came before us in every arena. You can buy a cheap ambient light meter and use it for your photography. The readings are usually in LUX. LUX can be converted, however, by dividing by 10.764. Just round to 10, and there you have it. 1000 LUX is 100 c/ft². At your native aperture, shoot 1/100 for zone 5 placement of what you just read and you’re cooking with gas. Using you digital camera’s metering, set your aperture to the ISO’s native aperture in AV mode. Then seeing the required shutter speed tells you there are that many c/ft² or 10 times that much in LUX.

It seems like talking about this doesn’t do much for you shooting digital, but knowing it will help you improve your light reading skill without your camera’s meter and make getting your exposure correct a lot easier. Plus, if you decide to go old school and shoot with an old camera or use an old meter it will help you to figure that stuff out. It also comes in handy when working with the zone system. Reading 1/100 at your native aperture, you have the knowledge of how to combine your speeds and apertures to get the right exposure for 100 c/ft². You also have the knowledge that you can move your image up or down a zone without playing guessing games as much. It’s quicker and easier to figure out once you try it a few times. A good example is on a bright, sunny, semi-cloudless day. The sky reads about 300 c/ft² when read usually. So for ISO 125 at f/11 you should be set for 1/300 as a good starting point. Then adjusting your speed inverse to any desired aperture changes, and you should have a decent exposure with the sky at zone 5. You can adjust just your aperture or speed to move the sky and other subjects into different zones and create what you visualized that way.

Ansel Adams described it as the exposure formula. He taught that zone 5 was 1/c/ft² at a film’s key aperture. It still holds true. Some minor adjustments may need to be made, but you should be almost dead on. It helps to spot meter for your highlights and shadows to get the best range in your image, but for quick shooting, try it out! I think you’ll see something very cool!

The new theme for this week is “Flattery (Not everything complimentary is flattery!)” You may have already guessed that this has to do with colors, right? Your shots should be composed with complimentary colors as a major element of your composition. Another aspect of your image must consist of contrast in your subject, as well as the contrasting complimentary colors. Perhaps age and youth, or hot and cold. I hope that you get the creative juices flowing for this one and get working on it soon! I also hope that we will see everyone out there submitting this time!

Don’t forget to post any of your images you’d like to see here at the Hohenfels Volks Facebook page. Of course, commenting on both Facebook and here is always appreciated, too!

Tuesday, January 3, 2012

Classic Shooting

Greetings and welcome to Hohenfels Volks, THE place for our place. As promised, a second dose of photography just for Hohenfels, dealing with old fashioned photography. Before we begin, I need to clarify this week's theme. Your images should be of work being done, not the people doing the work. The bulk of your subject should be the work, not the worker. I hope this helps when creating your shots.

As mentioned previously, we're talking about old fashioned photography. I got some very old cameras this weekend, inspiring me to pick up film again and try out what I've learned. It also inspired me to share pics of them with you and encourage you to pick up your film stuff and shoot that, too. It's a great way to test yourself, using film and what you've learned. It also shows you what you've learned and how well you're progressing.

Hohenfels Volks- Nettar 515/2
ISO 400, f/8, 1/25, 37mm
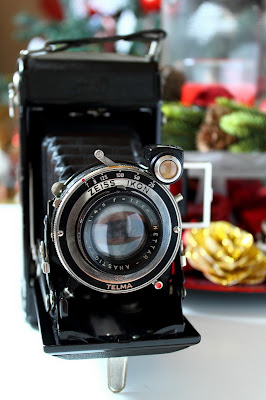
Zeiss Ikon up close. This shows the lens, the "brilliant glass," used to compose your shot, and the speeds available.

This weekend the family and friends surprised me with some gifts. The first gift, from Mrs. Hohenfels Volks and the princess, was an Altissar box camera from 1951.

Hohenfels Volks- Altissar Box camera, 1951
ISO 400, f/8, 1/25, 37mm
The Altissa box camera from 1951. This beauty is a real challenge, as it only has 4 settings! A great little camera with some great meaning!

Eho-Altissa started in Leipzig in 1892. Founded by Richard Knoll as a photographic shop and studio, they eventually started repairing and then manufacturing cameras. 1910 it moved to Dresden, where it was later bought by Berthold Altmann. In about 1951, Berthold Altmann decided to flee the oppressive and anti-business communist East Germany. In absentia, he was tried, convicted, and his company taken over by the communist run government. They were re-named and finally failed, with the machines being sent to Sarajevo to make imitation box cameras. This particular model of box camera, introduced in 1951, was the last while Altissa remained a free company. That scenario reminds me of Atlas Shrugged, in which all the creators and producers abandon their businesses and creations and disappear, leaving an increasingly corrupt, socialistic, and anti-business society to its own failings. Because of that story, and what I see happening today, this camera has meaning beyond photography to me. It’s functional, still works, and I’m taking photos with it! Once I get some developed, I’ll post what comes out here! This camera had 4 settings, f/8, f/16, B for bulb, and 1/25. The lens was fixed focal length and fixed focus. Using 120 film, it produces a negative that is 6cm by 6cm. Composing your image is through a window above the lens.

The next camera, from our friends, was a Zeiss Ikon 515/2. This little winner was introduced in 1937 as a lower priced Ikonta, with virtually all the features. The one I received has an 11cm lens, which runs from f/4.5 to f/32, and has shutter speeds from 1/25 to 1/125. Outside the shutter speed range is B, for bulb mode shots, and T, where you open the shutter with one click and close it with a second click. It uses standard 120 film, and produces a negative that is 6cm by 9cm. The viewfinder is a pair of metal tabs, and only serves for composition. Focusing is accomplished by adjusting the lens for the zone that should be sharpest, by distance. You can also hold it about waist high, and using the “brilliant glass,” frame up your shot. The brilliant glass is a tiny “periscope” like pair of lenses through which you compose your shot. It only allows for framing and composition. It has a PC Sync port for the flash, should you have one, and has a self-timer for setting it up and activating the shutter, allowing you to enter the scene should you desire.

Hohenfels Volks- Zeiss Ikon Nettar 515/2, Circa 1940
ISO 400, f/4.6, 1/25, 33mm
The Zeiss Ikon in all its glory. It takes time to set up your shot with this, which helps with getting your composition tidy.

Zeiss Ikon started in 1926 by the merger of several camera manufacturers and financial backing from Zeiss. Soon several other companies joined the Zeiss Ikon syndicate. Located in Dresden, with plants in Stuttgart and Berlin, Zeiss Ikon split into a West German and an East-German part after the war. Stuttgart became the headquarters after the division of Germany. Later they merged with Voigtländer, who made higher end cameras. In 1972, they stopped producing cameras. After the reunification of Germany, the East and West German divisions re-united into a single company.

The third classic I acquired was a Voigtländer Vitomatic II. This little beauty is a 35mm Rangefinder with a fixed focal length 50mm lens. The lens runs from f/2.8 to f/22, and 1 second to 1/300 second. It uses, like the Zeiss, a leaf shutter, and has no mirror. This feature allows flash to be synched up to the lens’s maximum shutter speed, in this case 1/300. The camera came with 2 filters, a UV, and a green for B&W. This allows for brighter greens, darker reds, and greater separation of greens in your monochrome images. Also included were a lens hood, leather case, and leather strap. Again, through PC sync, my flashes can be remoted off camera and fully controlled. Voigtländer, as you read above, was a very upscale camera maker. They started in Vienna in 1756 as an optics company. Later they introduced the world’s fastest lens at that time, in 1840, it was f/3.5. They were also the first to introduce the zoom lens and the first 35mm camera with a flash built into the camera.

Hohenfels Volks- Voigtlander Vitomatic II 1958
ISO 200, f/4.5, 1/20, 29mm
The Voigtlander Vitomatic II from 1958. In the upper left corner you can see the selenium meter in the camera. Used to help judge your exposure settings.

The cool thing about these cameras is that they show you that even though technology has improved, it hasn’t changed too much since the times represented. Using what we’ve discussed about exposure, composition, and other tips, you can get a great shot, even with old cameras. Don’t give up the learning just because digital means you don’t have to do it. I’ve used my 7D to meter the light for my desired aperture, and then set the old timers accordingly. Remember, being able to sync with your flash means you can do anything with these guys you can do with your digital. I hope this will inspire you to learn more manual applications, so you can put your old film stuff to use again. You’ll be surprised how much you can do with it!

Enjoy the rest of your day, and remember to cast your vote for next week’s theme. Get yours in to have a say! Don’t forget to get your pics posted at the Hohenfels Volks Facebook page. Of course, commenting on both Facebook and here is always appreciated, too!

Wednesday, September 21, 2011

The Exposure Triangle

Today’s post is on the “Exposure Triangle.”

You’ll find this everywhere on the Internet. A quick Google search turned up 18,300,000 results!

What is the exposure triangle? It’s basically the combination of the three factors that affect your exposure- ISO, shutter speed, and aperture. I put a pic on the Intro to Photography page with the rest of this article.

Remembering it is easy if think of a triangle and visualize that changing as you change your settings. That’s pretty much the gist of it.

Here’s a list as an example. Use that list to visualize your triangle and you’ll be off to the races, at least for the moment. I’ll use whole stops for simplicity. Each stop is either double or half the amount of light compared to the two numbers next to it.

ISO                                    APERTURE                SHUTTER SPEED
100                                           f/4                                  1/1600
                                                 f/5.6                               1/800
                                                 f/8                                  1/400
                                                 f/11                                1/200
                                                 f/16                                1/100

Looking at the first triangle 1/1600, f/4, at ISO 100, you can see that any changes require a change to another side to remain the same. I can change the exposure to 1/800, f/5.6, at ISO 100 and get the same exposure. Cool, huh?

Let’s try something else. This one will demonstrate the importance of the triangle and knowing how it works. At ISO 200, f/8, 1/400, my image is overexposed. How can I fix it? Try ISO 100, f/8, 1/400. That’s half the previous exposure level!

The first example showing how to get the same exposure is useful to figure out how much DOF you want and to help you keep your exposure constant in constant lighting.

The second example gives you an idea of how to use this tool to get more of your shots usable in changing lighting.

For the rest of this, visit our Intro to Photography page, and do a web search on it. Don't worry, though, more about exposure will be coming around soon!

Focal length will be our next topic.

Please leave your feedback here and on our Facebook page.

Enjoy the rest of your week!

Sunday, September 18, 2011

Metering

Welcome back

This time around, we're going to talk about METERING. Let's dive right in.

What is METERING and why is it important?

Basically METERING is measuring the light. It's extremely important, because it lets us know how to expose the scene.

Sounds simple, right? Unfortunately, it's not as simple as you might think, as there are several types of METERING.

Cameras use reflected light METERING. Almost every camera in existence takes the reading of the scene and tries to make the exposure for the METERED area to be 18% reflected gray. Not based on color, but on a comparison to a gray level that reflects 18% of the light that hits it. Ansel Adams called this ZONE V.

Evaluative METERING- If you haven't read your camera manual, or you've decided not to change your settings, you're most likely using Evaluative METERING. This means it's averaging out the light over the entire scene to get a basic ZONE V exposure. This is good for most photos, especially those that don't have too much range between lighting levels.

Partial METERING- this is set from your menu and decreases to amount of the scene used for METERING. You can set this on some cameras to different parts of the scene.

Spot METERING- In this mode, the camera METERS off a small spot to set the exposure. This is great for tricky lighting, and for more control of your exposure. It also allows you to get some idea of the range of a scene's lighting for manual exposures.

Generally speaking, using your evaluative METERING mode will give pretty good results. There will be times when switching to partial METERING, or even center weighted, can give better results.

The easiest way to METER a scene is to get an 18% Gray card. You have your subject hold it up, zoom in and METER from that. Take the settings you read and enter them into the camera in manual mode. As long as the light doesn't change you will have a good exposure. Using the gray card allows your camera to METER from a target that matches what it is trying to set. This is best accomplished in spot METERING mode, unless you fill the viewfinder with the card. If you do that, then use evaluative METERING, which will average out the light over the card and result in better exposures.

For more info an METERING, check out our Intro to Photography page. The info there is a little more in depth and includes an example. Also visit Cambridge in Colour, their explanation really clarifies a lot!

Don't forget, if you have any questions, ideas, tips, or comments, post them. You can post them here and on our Facebook page.