Showing posts with label tips. Show all posts

Sunday, September 8, 2013

Jaunty in Hohenfels

Greetings and welcome to Hohenfels Volks, THE place for our place! Several days of beautiful weather have made life comfortable here in Hohenfels and our surrounding areas. Bayreuth last weekend was especially beautiful, as the clouds and lighting made for some magnificent wooded shots. Yesterday’s clear skies made the Nuremberg flea market, scattered throughout the old parts of town, a place full of photographic treasures.

Today’s post is short and simple. We’re going to talk about day jaunts to local areas. We’re not going to expound too much on places, it’s more about finding and making photos we like. Expressive images make the creative process a reward in itself, and being prepared can make a big difference.

I’m planning a mid-Autumn trip to Bayreuth to make some photos. The intent is to make some beautiful photographs of the autumn state at a couple places there. The first one is the Hermitage. I fell in love with this place on my first visit. The lighting, textures, and wooded areas make for something magical. The second one is at the New Residenz, which is similar, but has a completely different feel. I also hope to make a portrait or 2, and shoot some slide film.

The reason I mention that, is our main reason for the topic today. When we make our jaunts and trips, it’s always a good idea to know what to expect. By making a trip or 2 in advance, and maybe some shots of our ideas, we can be prepared for the situations we’re likely to encounter. For instance, at the Hermitage a reflector is a good idea. On a sunny day, it can be used to fill in the shaded areas with light streaming through the trees. Because of the large volume of trees, autumn will increase the warmth of the light, and a clear day will help keep it from going to warm. In Regensburg, I might rely on a golden reflector or gelled flash, as the light in the park by the bahnhof feels quite different. In either place, flash and gels are vital to getting a portrait to be more in line with our vision and intent.

Around our area, going place to place is simply a matter of taking the train. A train to Bamberg doesn’t take too long, and can lead to some quiet contemplation of what our intentions may be. We can also relax on the way back and reflect on our efforts. Trains also provide an easy way to scout a location. They run close to our own schedules in most cases, and we can leave when we see fit, or stay as long as we want. Avoiding the traffic allows for more insightful planning and reflection.
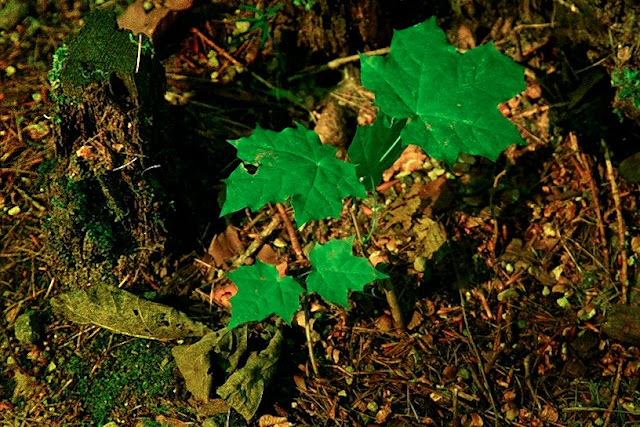
Hohenfels Volks: Rebirth In Bayreuth
ISO 1600, f/8, 1/30
Rebirth in Bayreuth. Green against orange. Leaves intensified by shooting with a yellow filter. Yes, black and white filters can be used on digital cameras. By bringing out the green slightly, the leaves are made to stand out. Just a small fraction of the beauty in Bayreuth. The leaves growing from amidst the decay of an older tree brought a sense of rebirth, and second chances, the shallow DOF allows a more meaningful contemplation. I plan to re-do this shot when the leaves are changing for a different mood.

On another note, I’m hoping we can get some volks to contribute a small article about a place they like to shoot, and maybe some pics. It’ll help flesh out our “Your Works” and “Our Places” pages, and help others out with their day trips.

I hope all of you will get out and plan a day trip to make some shots. I also hope you’ll share it with us on our Hohenfels Volks Faceboook page. We’d love to see your work.

Is there anything you’d like to see here? Do you have a question? Share your thoughts here or at the Hohenfels Volks Facebook page. Of course, commenting on both Facebook and here is always appreciated, too! Don't forget, we're on Google+, too!

Wednesday, July 11, 2012

Creative Exercising

Greetings, volks. Welcome to Hohenfels Volks, THE place for our place! Today, starting out gray and rainy, leaves Hohenfels in the clutches of a very pleasant evening!

Running into one of our friends in the grocery yesterday, I was asked about some exercises for creativity, and photographing some beautiful scenery. I thought a great subject for a post was seeded in that great question, so today, we’ll outline a couple simple ways to get the shot that has others wondering how you did it.

We’ve been posting about exercises to improve your composition, exposure, and creativity, so this is more of a review. It also reinforces how simple photographic techniques can create some winning shots.

The first thing to mention is never take the first shot. Most folks will see something, maybe a statue or other landmark, and take the easy shot. If you have to, take it just to get it out of your system, but then look for some other way to create your unique image. Walk around, check it out from every available and possible angle, view it through your lens, and try moving through a range of focal lengths. Once you’ve settled on the shot, make your image a reality. Remember, part of the creative shooting process is visualization! Edit- Take the first shot, if you pass it up, you may never get the same feeling you had at first. Thanks to Bodensee Bob for that cool tip!

Another simple exercise is to either shoot a prime lens, or use only 1 focal length on a zoom. Remember, doing this forces you to look for other ways to get the shot. You may have to move in closer to tighten up the scene, or move away to add some context. It’s a great way to change how you view the world around you!

The last 2 things are color and scale. First, on color, see how you can use it to create mood. Use your color to balance the mood and feeling, remember complimentary colors? Perhaps shooting a scene with a large red subject, shoot the subject at about 1/3 the frame and use green to fill out the other 2/3. You’ve given importance to the subject through size, and emphasized it by making the color stand out. This is also nice if you use 3 colors in a split complimentary scheme.

Using size and scale to emphasize a subject or restrain non-subject elements is a proven method of increasing interest in an image. It not only adds context, but also can be used creatively. Everyone shoots the trick photos of someone holding up the Leaning Tower, or holding someone in their hand. Moving beyond that, the ability to trick the eyes through scale can make for magic images. Using our first tip combined with this to make an image of a local landmark will stand out. Make the scale of the subject the subject. Instead of taking the Eiffel Tower, take a piece of it, and use the size as part of a composition to reference the actual tower. The same can be done with buildings, statues, and just about anything. Your photo will stand out as more than just another shot of the local scenery. Edit- Another tip from Bodensee Bob is to take the shot of the bigger piece and crop to your liking during editing. Great tip, thanks for sharing!

Hohenfels Volks:Amber Waves of Grain
ISO 125, f/8, 1/125, 56mm, 125 C/ft2 metered at the wheat.
A field of grain in Hohenfels. Using f/8 and 56mm gave me a reasonably shallow DOF, allowing the hills to blur out, and only the foreground section to remain in focus. This combined with the color of the wheat against the color of the sky brings out the wheat as the subject. By shooting from below, I was able to fill the majority of the image with the front wheat, and allude to the size of the field with the shallow DOF. Taking a higher angle allowed more of the field to be seen, yet seemed to lack scale and impact in the final image.

Of course, your best tool for creative and magic images is your mind. A really great photo can convey your reaction and feelings to the scene. It doesn’t have to be a literal rendering; the values you decide to place in each area of exposure are part of your creative process. Making the clouds a little darker than reality or the trees a little brighter is part of spreading your reaction.

I hope this post has helped get your creative regions revving. I can’t wait to see you’re your shots. Tomorrow’s post will hopefully be ready tomorrow. I’m hoping to show a method for converting color images to monochrome in a way that recalls the images of the past. Be sure to check it out.

Do you have an image to share? We’d love to see it! Is there anything you’d like to see here? Do you have a question? Share your thoughts here or at the Hohenfels Volks Facebook page. Of course, commenting on both Facebook and here is always appreciated, too! Don't forget, we're on Google+, too!

Thursday, June 14, 2012

A Tip for Composition

Greetings, volks. Welcome to Hohenfels Volks, THE place for our place! I hope everyone is doing well.

Here’s a little compositional tip, straight from Clyde Butcher- Close 1 eye when you approach the camera. Because an image is 2 dimensional and we see in 3 dimensions, you can get the feel of your composition before taking the shot. 3D sight requires both eyes open, you see this when you switch between your left eye open to your right eye open. It gives us depth perception. It really works, try it.

Speaking of composition, adding depth to your image by using shadows and the perception of light falloff with increasing distance can make for some great mood in your photos. It can lead the eye to your intended subject when shaped, and increase the 3D feeling when light falls off. Things will seem to pop right off the page. Of course, DOF and sharpness play a role in this, too.

With careful subject placement and light effects, you can create some real drama, or make a powerful scene seem serene. Crafting light and depth are a big part of giving your image life!

Here’s hoping the rest of the week brings you some great shots!

Is there anything you’d like to see here? Do you have a question? Share your thoughts here or at the Hohenfels Volks Facebook page. Of course, commenting on both Facebook and here is always appreciated, too! Don't forget, we're on Google+, too!

Tuesday, April 17, 2012

Ambience...

Greetings, volks. Welcome to Hohenfels Volks, THE place for our place! This time of year in Hohenfels starts seeing some awesome photo opportunities springing up everywhere, I hope you’re seeing some!

First, let me apologize for the sporadic posting, an emergency has left me somewhat distracted. Such is life; I’m making lemonade from those lemons as we speak!

I hope everyone is enjoying the exercises we’ve been sharing. I’ve been shooting mostly film again as I develop a new way of looking at values and value control in digital photography. Today we’re going to cover a couple tips when shooting with ambient light.

Ambient light covers a lot of ground, from the living room lit only by the fireplace to the bright sunlit beaches of the Med. We’re going to focus on the darker side here to make this short.

The first and most important thing to be said about low ambient light shots is that a tripod is required! Without a tripod, you’ll never get a truly spot on level of sharpness that sets an image apart. A shot handheld with a 55mm lens at 1/30 with IS turned on will still be less sharp than a 55mm on a tripod at 1/25 with IS off. You’ll still get something you can use, and be proud of, but nothing like you’d get when you stick it the ground!

Second, consider how dark it is and how much light is available. You will need an ISO that will prove sensitive enough for your range of luminance, yet low enough to prevent excess noise to become a problem.

The third thing to consider is metering and exposure. In case you haven’t noticed, I’ve become big on using the meter to aid in getting things to levels I visualized. Your camera has a built in meter, so let’s put it to use. Do you want to use a small aperture or a faster shutter speed? To control the DOF, go to AV mode and set your desired aperture. To shoot something with more speed, go to TV and set your desired shutter speed. Before you meter, you need to decide where your want your levels to be. For a brighter image, you’ll need greater exposure in the shadows, and conversely less exposure for a darker image. Once you determine that, meter for your intended image. You’ll have a little leeway in editing, but remember that increasing your brightness in editing can introduce some seriously unsightly noise.

Another thing is your composition. You want to compose your image in a way that maximizes visual and emotional appeal. Move around to find that shot, try moving your subject. You may be able to move your light source. Zoom in or out to cover what you envisioned, and you'll notice some interesting things happen, and this ties in to our exercise on shooting only 1 focal length. Remember how you had to move around to get the shot?

Here are a couple more tips for low ambient light shooting. First, use a cable release. This will provide an even steadier platform. Second, if your camera has it, enable mirror lock-up. This locks your mirror in the up position, preventing the mirror vibrations from introducing shake into your image. A lot of cameras let you compose the image, activate the shutter button to lock the mirror, then wait for another shutter activation to actually expose the scene. Third, try to introduce balance into the composition between light and shadow. This allows you to create something that has fewer bright distractions against your main subject. Lastly, this is incredibly important, if your shooting at night or anywhere there is some risk of accident or injury, take a light and play it safe!

I know this all over simplified, but learning your gear and using these simple tips will help improve your low light and ambient light shots. It will also help you get that shot you visualized and not feel like your time was wasted.

Enjoy the week and keep on shooting.

Don’t forget to post any of your images you’d like to see here at the Hohenfels Volks Facebook page. Of course, commenting on both Facebook and here is always appreciated, too! Don't forget, we're on Google+, too!