Showing posts with label camera. Show all posts

Sunday, June 29, 2014

National Camera Day

Greetings and welcome to Hohenfels Volks, THE place for our place!

Here's an item from the good Volks at SnapKnot to celebrate National Camera Day.

SnapKnot
Courtesy of: SnapKnot

I hope you have your passport and get some great photos this week.

We want you to share your photos, especially of our place, with us on our Hohenfels Volks Facebook page. You can also e-mail questions, photos, or comments to HohenfelsVolks(at)tks-net.com, and we’ll get them posted!

Is there anything you’d like to see here? Do you have a question? Share your thoughts here or at the Hohenfels Volks Facebook page. Of course, commenting on both Facebook and here is always appreciated, too! Don't forget, we're on Google+, too!

Wednesday, September 25, 2013

Trinkets or Accessories?

Greetings and welcome to Hohenfels Volks, THE place for our place!

The term accessories has come to include a host of photographic gadgets of questionable value...  Ansel Adams

A sucker is born every minute…  PT Barnum

The first accessory we’re going to look at seems to have some merit. At least, for the maker it has merit. It’s the Camera Clip. This is a clip that mounts to your camera’s tripod bushing. The other piece goes on your belt or backpack strap. The 2 pieces clip together to keep your camera in place for easy carrying. It has a quick release button, and when worn on the belt looks kind of like some space alien stun gun thing. I’ve always found the camera strap to work best at carrying the camera, and being slightly free, a painless way to get the shot. No fussing with a clip or having your belt stretched (or worse, your pants falling down) by the weight of your camera.

Then there’s the SLR Pin Hole Lens. This is the cap from an SLR with a pinhole in it. This allows for pinhole photography without a pinhole camera. It’s a good idea, and may have merit if you wish to combine pinhole photography with digital photography. There’s no way to change your aperture, and no way to focus, so auto focus is out the window. This may not be usable with some SLRs, as the focus point has to be acceptably sharp, even in manual focus. This would apply to many DSLRs, therefore check before using!

Next up is a device called the Super-Secret Spy Lens. This gadget has a hole in the side of the lens and uses mirrors to photograph through the side. It allows you to pint your camera one direction, pretending to photograph something, while actually sneaking a photo of something (or someone) unsuspecting. I can see someone getting into trouble with this really quick! By the way, this little lens add on says right on it “Angle Scope!” It even includes in the ad on Amazon a sample use, on the beach…

Last up, my personal favorite for the no merit award goes to the Bottle Cap Tripod. First, there was the tabletop tripod, which allowed folks to shoot their food in fancy restaurants without having to handhold the camera. Then cam the Gorilla-Pod thing that allowed you to mount your camera to leafy tree branches. The final step (I hope!) in this evolution will be this. It’s a standard sized “bottle cap” that mounts to your camera and allows you to put it on a water bottle, juice bottle, cola bottle, whatever bottle, and take a photo, presumably of yourself or your group.

Of course, no list can be complete. Many gadgets may be useful to you, even when no one else finds them to be. This list is only showing a couple money wasters that actually do nothing to help your photography. Who’s to say the bottle cap is bad, if you can get a family shot when you’re out to a special dinner or something similar. There are so many more items that purport to be useful, when they’re actually nothing more than trinkets to make you feel better about your photography.

The best accessory for any camera, of course, is the manual. Read it, learn your camera, learn your style, and you’ll have no need for many of these trinkets. Some good accessories to have include a multicoated circular polarizer, a UV filter, good storage for digital photography, a good camera bag, a good cleaning kit, maybe some black and white filters if you plan to shoot monochrome, a remote release cable, and a flash with a couple mods. These items will flesh a very nice little kit, and have you moving through your scenes with ease after some practice! A very important piece of gear is a meter. Since most cameras today have built in meters, that can come later, and be a life saver in tricky light! Although, whatever accessories you have or use, you have to keep them ready and practice them to get the most from them.

Hohenfels Volks: The Retreat, Hermitage, Bayreuth
ISO 400, f/8, 1/30
One of the buildings at the Hermitage in Bayreuth. The feeling of being away from the world, even in the city, is something one can relate to in this age of stress! The feeling of splendor, yet remote contemplation make this place a winner. Shot with nothing but a Wratten #8, yellow, filter over my lens. No fancy tricks or gadgets were used, other than knowing what my camera would do and how the filter would alter the levels.

I hope that this will give you pause the next time you see that “magic bullet” device that will make all your photos super perfect! As any long time photographer will tell you, there are no magic bullets. Practice and knowing your gear is the closest thing to that magic bullet.

Get out and get making your photos! We’d love for you to share them with us on our Hohenfels Volks Facebook page. We’d love to see your work.

Is there anything you’d like to see here? Do you have a question? Share your thoughts here or at the Hohenfels Volks Facebook page. Of course, commenting on both Facebook and here is always appreciated, too! Don't forget, we're on Google+, too!

Tuesday, September 17, 2013

Autumn Care

Greetings and welcome to Hohenfels Volks, THE place for our place! Here in Hohenfels, the Sun made a couple cameo appearances but wasn’t able to stir up any kind of significant warmth. The rain put a damper on the spirits, as did the fact that it’s a workday!

With autumn’s brutally chilled arrival, we’re nearing the time to shoot some real color! There’s always some excitement about the colors, shapes, textures, and patterns that accompany autumnal photography. As I mentioned in yesterday’s quote, now’s a great time to think about negative space and the use of color to create tension, balance, and harmony in your photos, and bring about the connection you’d like to make.

Hohenfels Volks: Black Velvet, flowers in Bayreuth
ISO 800, f/11, 1/60
These flowers were shot at the Hermitage in Bayreuth. A Wratten #8, yellow, filter was used. By using the filter, the green was brought up slightly, and the white flowers separated from both the red flowers and green leaves. By allowing a rich grey-black to fall on the leaves and red flowers, a velvety feeling of negative space results. While fragmented and carrying visual detail, it is by no means the subject, and yet becomes a subject of its own.

Along with the march of color into the dreariness ahead, comes other factors that photographers should take note of. First, is the rapid decrease in temperatures, the drop in temperature can take the starch out of an exciting day. Another factor is the rain, always something to be ready for in our Hohenfels area. Getting your camera wet can lead to issues that no one wants!

One of the biggies, I’ve found, is the increase in static. For the most part, photographers don’t have to worry about while photographing with digital cameras. It’s when the time comes to change cards or clean your sensor, or even change your lens that it becomes an issue. A typical “zap” can have as much as 30,000 volts jumping from one surface to another. Enough to ruin your day if it arcs over onto your sensor. Since most folks don’t clean their sensors beyond a squirt from a bulb blower, it’s pretty reasonable to say that the standard precautions are sufficient.

With film, though, static can be a big problem. Advancing film, rewinding film, activating the shutter, removing a dark slide, all these things can cause an arc that will ruin your shot. The can also damage your shutter curtains if your camera uses cloth. In the driest and coldest weather, it could damage your sensor, but that’s unlikely.

The biggest threat to digital cameras during this time of year is the condensation from thermal transitions. That’s a fancy way of saying going inside from outside. I’ve found one of the best ways to protect anything is a Ziploc bag and 30 minutes. Don’t plug your camera in, put your card in your reader, or power on your camera when you first come in. The temperature change can cause moisture, which we all know, doesn’t sit well with electronics! Think about glasses fogging over when you come in from the cold!

Another awesome tip- when you get in from the cold, make a big cup of hot cocoa, with extra chocolate. It’ll warm you up, and give time for your gear to reach a suitable temperature! It helps if you have someone to share it with. A nice cup of cocoa with my little princess makes for some fun talk time, and 30 minutes is gone before you know it!

Now’s the time get scouting and planning your autumn shots. Figure out where and when, the rest will follow. Then, make your shot and share it with us on our Hohenfels Volks Facebook page. We’d love to see your work.

Is there anything you’d like to see here? Do you have a question? Share your thoughts here or at the Hohenfels Volks Facebook page. Of course, commenting on both Facebook and here is always appreciated, too! Don't forget, Hohenfels Volks is on Google+, too!

Thursday, December 6, 2012

10,000 Revisited

Greetings, volks. Welcome to Hohenfels Volks, THE place for our place! Everywhere you look, you’ll see white! Winter is here for the long haul, and that means it’s time to get some seasonal shots. I hope everyone is getting geared up for Christmas and some great photography.

Earlier today, we had blue skies and some nice clouds, perfect for the landscape shooter in all of us. Of course, things turned ugly quick, and left us in the midst of a dark and icy wall of snow. As often happens, the sun managed to beat back the snow and again we were ready for making some great shots.

Enough weather, that’s not what we’re here for, right? Today we’re going to talk about pride and accomplishment. It’s also a chance for an exercise in good old-fashioned photography. Even though we’re using our digital cameras, and often forget the importance of each shot we make, we can return to the old ways. Remember, as Henri Cartier-Bresson said, “You’re first ten thousand shots are your worst.” In a much older post, we addressed this and modified it to be about 100,000 to 1,000,000 shots. This is due to the inherent nature of instantaneous feedback and automatic cameras.

In the earliest days of photography, folks used glass plates for their negatives. Then film came along. In those early days, your film, or plate, was only sensitive to blue light. This made balancing your light and color very important. With the advent of thinner films and panchromatic emulsions, more sensitivity was added. Then, of course, came color film. When you shot either a sheet or roll, you couldn’t change your ISO or color balance. Film and digital sensors can be thought of as the same thing, and for the rest of this article will be used interchangeably.

Film costs money. It cost money in the old days, as well. When a photographer made shots, he weighed the value of the film and the shot. Every photograph was precious, and had to be made with care. Exposure, color balance, even composition had to be weighed and given some measure of value in relation to the photo. Photography took time, to both master, and in terms of the individual image created. Light meters for measuring exposure, going back to the 1800’s, are available on auction sites all over the internet. Focusing aids, powder flashes, apertures, and even shutters were part of the photographer’s knowledge. In many of the older lenses, the aperture was adjusted using an insert placed in the lens at the time of the photo.

Now that we see how valuable the image was, and the knowledge to make an image, we can see how those early photos, and those that have come down to us through the years, were not the product of guesswork or automation.

For the next few days, try doing an exercise in film. Choose one ISO for your camera, choose one color balance, and only limit yourself to 36 shots per session. Remember, getting your color balance and ISO right will require thought and planning. It will also require learning about your intended shooting situation. If you’re shooting outside, shoot in daylight or around 5200K, and inside shoot at tungsten or around 3200K. If you’re shooting in bright conditions, choose ISO 100, in the dark ISO 800. Finish your 36 shots before changing your settings. Also, don’t look at your images on the camera monitor, or delete any shot. Wait until you get home to see what you have. This will encourage you to value your images, while also helping you improve.

Hohenfels Volks: Dresden Christmas
EI 500, f/5.6, 1/60, 56mm
I couldn't resist this shot, the mix of shapes, textures, and tones are intriguing! Shooting manual all day, let me have control of the camera, instead of the camera controlling me. It also allowed me to use my knowledge to get what I wanted.

This little exercise will require you to know your camera settings, it will require the knowledge to get the shot right, and it will allow for a sense of visualization to settle in. Visualizing your image is an incredibly useful tool in photography. This is a great time to undertake this exercise, as our changing weather conditions, and lighting, will challenge even the best without proving impossible with a little effort. As an added bonus, it’ll make every shoot an adventure, and every moment until the photos are loaded like Christmas. It’s a fun way to experience the anticipation of Christmas with a gift in every session! It’ll also make shorter work of getting the best shots, since you’ll be improving with each photo made. You’ll also develop your confidence, which always helps! Remember, a great camera doesn’t make a great photographer, any more than a great kitchen makes a great cook.

Please feel free to share your photos on our Facebook page. Everyone here would love the chance to see your work! Is there anything you’d like to see here? Do you have a question or an idea? Share your thoughts here or at the Hohenfels Volks Facebook page. Of course, commenting on both Facebook and here is always appreciated, too! Don't forget, we're on Google+, too!

Tuesday, December 4, 2012

Large

Greetings, volks. Welcome to Hohenfels Volks, THE place for our place! Old Man Winter is settling in for his long stay here in Hohenfels! I hope everyone is settling into their anticipation and excitement for the long nights and brilliant moments ahead.

It’s certainly been some time since my last post! I’ve been quite busy as usual. Branching out into large format photography has filled me with new ideas and visions. I hope to make some of the winter shots I’ve been visualizing and preparing for. Large format gives you a way of relating to the scene and subject that it’s hard to imagine without seeing it. This leads us to today’s basic topic, shooting tethered.

One distinct advantage of the digital age is the ability to hook up to a computer and see our images presented quite large. When we load our photos onto our PCs, it gives a way to see detail an ordinary 4x6 print denies us. It also gives us a tool to learn far more rapidly, by allowing us to honestly assess our images in all their glory, and with all their flaws.

But, as many folks don’t know, it also gives us a way to see those flaws prior to making our shot. It allows us to compose our scenes at a scale which invites a more involved relationship with the image. It allows us to troubleshoot our images prior to recording them, and to resolve any images that may prevent the full realization of our vision.

Previously, this has been the domain of those with large format cameras, like the 8x10 field camera or a 4x5 view camera. The composition was done on a negative sized piece of ground glass, with the image upside down and inverted. This naturally led to a slower pace and more contemplative image creation process. Combined with film costs, equipment costs, and time costs, large format photography was largely practiced by those making money from it. With the proliferation of digital cameras and the advent of sites like E-bay, large format become reasonably priced to anyone with the desire and motivation to learn the ins and outs. The format can be daunting and challenging, sometimes extremely so, but it can also be rewarding.

Now that we have DSLRs capable of producing extremely high quality images, and the capabilities of our computers, we can all practice Large Format.

Now that the background is behind us, the steps and equipment are quite simple. You most likely have the equipment you need, as it probably came with your camera. This would include a USB cable to connect to your computer, and the capture software that allows for control of your camera. If your camera didn’t come with the capture software, your manufacturer may have it at their website. If not, there are commercial options available that run from free to higher priced options. You’ll want a tripod and maybe a platform for your PC if you want to use a laptop from other that your desk. That’s it. Just start the software, and for Canon’s, select Remote Live View.

Once you’re connected, you can control everything. You can focus in the autofocus mode using the software, or in manual mode. Both ways give you a giant magnification and full control of your focus. You can control white balance and display your camera’s metering, which will allow you to control your exposure and place your values below, at, or above, neutral gray. It allows for full functionality of the camera, and can even capture directly to your hard drive. The beauty is in a few Windows hot key shortcuts, you can zoom in the live preview, making your preview as large as your monitor. How’s that for large format? Focus, DOF preview, and exposure controls as if shooting directly form the camera, and viewing from the computer, it can’t be beat. You’ll know if you have a keeper even before making the shot.

This has been around some time, just search for tethered shooting, but the first thing to learn is exposure, white balance, and how to use your camera. Once you know these things, you can move on, in ways I can’t even begin to touch upon here! Using tethered shooting will give you an appreciation for all the detail in the scene and lead to a new found way of looking at the smaller parts of a scene to see the big picture. It also saves the frustration of having to sort through the good and the bad. You’ll find yourself making fewer bad images when you shoot tethered.

It has its drawbacks. Who wants to carry a tripod, computer, and cables everywhere? Who feels like lugging extra stuff to make the picture? There are trade-offs in it, but you’ll find if you’re shooting something for your own vision, or if your doing something where there is time to set up and work that way, tethered may be your new default!

I hope this gives you some new ideas. Getting out there and shooting , tethered or un-tethered, will give you the winning shot this winter, so get started making your images now!

Please feel free to share your photos on our Faceboook page. Everyone here would love the chance to see your work! Is there anything you’d like to see here? Do you have a question? Share your thoughts here or at the Hohenfels Volks Facebook page. Of course, commenting on both Facebook and here is always appreciated, too! Don't forget, we're on Google+, too!

Friday, June 1, 2012

Weekend

Greetings, volks. Welcome to Hohenfels Volks, THE place for our place! I hope everyone in Hohenfels is ready for the weekend. The clouds are out, with their full range and the skies are moody, it’s the perfect time for photos!

Just a quick tips for all of planning to shoot outside this weekend. Bring a clear shower cap and a couple zip lock bags. The shower cap can be used to keep your camera dry during a surprise rain shower, and the zip locks can be used to keep your spare batteries and lenses dry if you use the 1-gallon size.

With the onset of wet weather, it pays to be prepared and have a way to keep your expensive gear dry. The savings could be quite substantial! That doesn’t even take into account your stress level and disappointment.

Keep your eyes open to scenes that include lots of clouds, they’ll bring interest to an otherwise flat landscape. Another great thing about lots of clouds is the soft light they produce when shooting people outside.

Enjoy the weekend and keep shooting. I hope everyone will post at least 1 pic from this weekend, I know we’d all like to see your work!

I’d love to know what you think and what you’re doing with your photography. Where are you headed, and is there anything you’d like to see here? Share your thoughts here or at the Hohenfels Volks Facebook page. Of course, commenting on both Facebook and here is always appreciated, too! Don't forget, we're on Google+, too!

Thursday, May 10, 2012

Luminance Values and Exposure

Greetings, volks. Welcome to Hohenfels Volks, THE place for our place! Spring, being upon us here in Hohenfels, is ripe with opportunities for our craft. Looking around, the trees are bright and clean, the flowers are bursting with color, and the Germany is waking up to a wonderful summer ahead.

Today’s post, delayed by unfortunate occurrences, is about luminance values, and how we can record, refer to, and use those values to improve our image. There will be some math here, but nothing major.

The first thing we need to discuss is the exposure formula. Ansel Adams described it as being the reciprocal of the luminance at a speeds key stop. The key stop for any speed is the square root of the speed. Here is a list of most speed/stop combinations.

Speed Key Stop
100 10
125 11
160 12
250 16
320 17
400 20
480/500 22
620 25
800 28
1000 32

I began the table at ISO 100 and ended at ISO 1000. ISO 100 is the lowest most consumer cameras go, and f/32 is about as high as most consumer lenses get today.

By setting your camera to any of the pairs in the table, you can read the luminance of your metered object, measured in candles/square foot, or c/ft2. For instance at ISO 125, f/11, metering 1/125, then the luminance value is 125 c/ft2. If your meter shows 30 seconds, then the luminance is 1/30 c/ft2. That will put you at 18%, or neutral gray reference values. This is what I refer to as M, or an M exposure.

When photographing normal scenes, we often encounter a scale of values that for any given exposure will run from approximately M-5 and lower to M+5 or higher. By learning to look at luminance values as described above, you learn to tame that range, creating an image that will make you justifiably proud.

An example of exposing for your luminance reading is when you meter the clear sky; you should read about f/11, ISO125, 1/300. This will put your sky into the range of 18% reflectance. We know that a clear Northern sky should fall about M+1, which means we should expose for the sky at f/11, ISO125, 1/150. Of course, this goes back to place and fall exposures. You must decide the key elements within your scene and where they should be placed. Once this exposure and placement is determined, all other values fall where their luminance levels impact your sensor. Knowing these values will help you determine where you wish to place elements and where your remaining elements will fall.

Even metering clouds, you will find a range of luminance values that may run from 200 c/ft2 to 1000 c/ft2. By meter the brightest part, 1000 c/ft2, then adding 3 stops, you bring your 200 c/ft2 up to nearly M+1 ½ in the exposure range, which is slightly brighter than the surrounding blue sky, and significantly darker than the brights in the clouds. Your brights will print out with slight tonal variations, and darker areas will have adequate or better textural ranges. You also bring areas metering at 50 c/ft2 up to the equivalent exposure of 400 c/ft2. These equivalent values are in relation to your original metering from the bright part of the clouds.

Recording your luminance values across the range of your scene will help you learn to recognize values, and expose with more confidence. It will also help in editing your images and preparing them for either printing or display. I would suggest metering across the range of M-4 to M+4 after determining your priorities, and noting the results. Even if you’re shooting at some combination not listed above, take the luminance readings using a combination. After reading the values, switch to your desired settings, compose, and make your image. Values for M+ and M- can be extrapolated by halving or doubling the values obtained with your meter. This is less accurate, but still of considerable value in perfecting your images.

Another great advantage of knowing your luminance and place values, is the ability to tell anyone about your exposure without giving the ISO, f/stop, EI, shutter speed, and so on. Tell them you metered this at 250 c/ft2, and gave M+1 to get the exposure where you wanted it. Regardless of your settings, they will know that to get that exposure from 250 c/ft2, then they give M+1 at whatever aperture and speed they desire, for instance ISO 125, f/8, 1/250 or ISO 400, f/5.6, 1/1600. Both will give the same results, and use the same values, 250 c/ft2 +1 stop, and make exposing a scene more consistent. It’s also useful when referring to edits performed. Taking the last example, you may have shot at M+1, and then edited it to M to decrease contrast. In this case, you can say this was shot at 250 c/ft2 +1 stop, then edited to M for the final effect. This will help others understand and help you remember your shots without having to know every little bit of detail.

There are other ways of expressing luminance, for instance EV or c/m2, or lumens, and as long as you find a consistent method of evaluating and expressing that exposure, your images will be consistent with your vision. Don’t get hung up on what I use, try it and if it doesn’t work, try something else. You’ll still have a working system, and you’ll still be enjoying what we love to do!

Time to get out and do some shooting, I hope you’ll be out today getting your shots in, too!

I’m looking forward to seeing your results and hearing from you. Let me know what you think and how you’re using your camera! Share your thoughts here or at the Hohenfels Volks Facebook page. Of course, commenting on both Facebook and here is always appreciated, too! Don't forget, we're on Google+, too!

Tuesday, April 17, 2012

Ambience...

Greetings, volks. Welcome to Hohenfels Volks, THE place for our place! This time of year in Hohenfels starts seeing some awesome photo opportunities springing up everywhere, I hope you’re seeing some!

First, let me apologize for the sporadic posting, an emergency has left me somewhat distracted. Such is life; I’m making lemonade from those lemons as we speak!

I hope everyone is enjoying the exercises we’ve been sharing. I’ve been shooting mostly film again as I develop a new way of looking at values and value control in digital photography. Today we’re going to cover a couple tips when shooting with ambient light.

Ambient light covers a lot of ground, from the living room lit only by the fireplace to the bright sunlit beaches of the Med. We’re going to focus on the darker side here to make this short.

The first and most important thing to be said about low ambient light shots is that a tripod is required! Without a tripod, you’ll never get a truly spot on level of sharpness that sets an image apart. A shot handheld with a 55mm lens at 1/30 with IS turned on will still be less sharp than a 55mm on a tripod at 1/25 with IS off. You’ll still get something you can use, and be proud of, but nothing like you’d get when you stick it the ground!

Second, consider how dark it is and how much light is available. You will need an ISO that will prove sensitive enough for your range of luminance, yet low enough to prevent excess noise to become a problem.

The third thing to consider is metering and exposure. In case you haven’t noticed, I’ve become big on using the meter to aid in getting things to levels I visualized. Your camera has a built in meter, so let’s put it to use. Do you want to use a small aperture or a faster shutter speed? To control the DOF, go to AV mode and set your desired aperture. To shoot something with more speed, go to TV and set your desired shutter speed. Before you meter, you need to decide where your want your levels to be. For a brighter image, you’ll need greater exposure in the shadows, and conversely less exposure for a darker image. Once you determine that, meter for your intended image. You’ll have a little leeway in editing, but remember that increasing your brightness in editing can introduce some seriously unsightly noise.

Another thing is your composition. You want to compose your image in a way that maximizes visual and emotional appeal. Move around to find that shot, try moving your subject. You may be able to move your light source. Zoom in or out to cover what you envisioned, and you'll notice some interesting things happen, and this ties in to our exercise on shooting only 1 focal length. Remember how you had to move around to get the shot?

Here are a couple more tips for low ambient light shooting. First, use a cable release. This will provide an even steadier platform. Second, if your camera has it, enable mirror lock-up. This locks your mirror in the up position, preventing the mirror vibrations from introducing shake into your image. A lot of cameras let you compose the image, activate the shutter button to lock the mirror, then wait for another shutter activation to actually expose the scene. Third, try to introduce balance into the composition between light and shadow. This allows you to create something that has fewer bright distractions against your main subject. Lastly, this is incredibly important, if your shooting at night or anywhere there is some risk of accident or injury, take a light and play it safe!

I know this all over simplified, but learning your gear and using these simple tips will help improve your low light and ambient light shots. It will also help you get that shot you visualized and not feel like your time was wasted.

Enjoy the week and keep on shooting.

Don’t forget to post any of your images you’d like to see here at the Hohenfels Volks Facebook page. Of course, commenting on both Facebook and here is always appreciated, too! Don't forget, we're on Google+, too!

Monday, February 6, 2012

Craftsmanship in Photography

Greetings, volks. Welcome to Hohenfels Volks, THE place for our place! I hope you’re staying warm; I know it’s hard for me to keep warm!

Today we’re going to start with a quote from Ansel Adams. I frequently reference him, as you may have noticed. He wrote in the introduction to his book “The Negative,” “…it is false to suggest that there are shortcuts and quick formulas for success in photography.” I for one am starting to see why he felt that way.

The recent trend in photography, as in all things modern, seems to be toward the easier, simpler, and more automated. Without any doubt, I can safely say that automation, simplicity, and ease will allow you to take some decent snapshots. Take snapshots… not make photographs. Further, with even less doubt, I can say that, like government handouts and welfare, they create an unnecessary dependence, which will hinder your development into a maker of photographs.

Ansel Adams believed in knowing your craft, knowing how to make photographs. It was simple, really, to match your print to your vision you had to know how your camera, negative, and print worked together to get the right combination. He also believed that creativity and freedom in the pursuit of your vision were only available if you knew how to make your shot match your vision. Great photos can happen because of a little knowledge and some trial and learning. As you try various techniques and settings, you learn what works and what doesn’t. Don’t be afraid to try manual mode, even if your image is less than you wanted, it can teach you what settings didn’t work. Digital gives the instant ability to know if something worked or not, we should take advantage of it. The sad thing is, too many folks become totally dependent on the camera making the rules, and thereby limit their abilities.

Things we often view at first as less than we hoped for, can become a treasured shot when viewed free from the disappointment of not making what we’d visualized. Remember that, and keep shooting. Strive for better with each shot, but enjoy them all as they happen. You’ll find things about your work that you may have never noticed before.

Enough of the soapbox! Let’s move on to the new theme. This week’s theme is I'm SO Lonely! (If You Weren't So Isolated!) by a vote of 2 to 1. As last week’s theme dealt with the positive side of isolation and solitude, it seems fitting that you have chosen this theme. Show us the negative side of solitude, the isolation of your subject. Perhaps it’s the despairing soul trapped in a lonely joyless rut, maybe it’s the widow, who mourning, longs to feel again the warmth of her husband’s breath. You could show how being alone weakens, rather than strengthens, the whole, by isolating one from a group. Express the isolation, the negative side of solitude, in your images and get them submitted by next Monday night.

Tomorrow we’re hoping to do another Around Hohenfels if things work out. Look for it, and if we end up with something else, I’ll try to be more interesting!

Don’t forget to post any of your images you’d like to see here at the Hohenfels Volks Facebook page. Of course, commenting on both Facebook and here is always appreciated, too! Don't forget, we're on Google+, too!

Wednesday, February 1, 2012

Reviewing the Basics

Greetings, volks. Welcome to Hohenfels Volks, THE place for our place! Brrr. That’s our word of the day!

Today we’re going to review some of the basics of photography and exposure. This can all be found on our Introduction to Photography page. We should all have a good idea of this stuff, but it always helps to refresh the cup, so to speak.

First, we’ll address our exposure triangle. The triangle consists of 1- ISO or film speed, 2- shutter speed, and 3- aperture. To change exposure, you change any side of the triangle. To keep the same exposure, you have to change at least 2 sides. For instance, we set up on a sunny day at ISO 100, f/16, and 1/100. According to the “sunny 16 rule,” we’re good to go. But we want less DOF, so we need to increase our aperture. We go to f/4 to give us a shallow focus. If we don’t change another side of our triangle, we overexpose and create a mess. We have a 4-stop increase in the amount of light coming in, so we need a four-stop increase in shutter speed or 4-stop decrease in ISO. Since we can’t bring our ISO lower, we need to change our shutter speed to 1/1600. At 1/1600 at f/4, that gives us the same as 1/100 at f/16. If we want to increase our exposure, we can change any 1 side and either decrease our exposure or increase it depending on our new settings. For instance we want to increase our exposure on ISO 100, f/16, 1/100 2 stops, so increasing our aperture to f/8, decreasing our shutter speed to 1/25, or increasing our ISO to 400 will do just that. Remember, when we meter something, or a scene, the meter gives us the exposure for 18% gray, which is zone 5. Knowing this allows us to place the item we meter into different zones or exposure levels.

Next up, we’ll look quickly at depth of field, or DOF. This is a product of our focal length and aperture. The longer our lens’s focal length is, the shallower our DOF. The wider our aperture is, the shallower our DOF. This can be a good way to remove or minimize distractions. A 100mm lens at f/16 has about the same DOF as a 50mm lens at f/4. Focused at 10 feet, both give a DOF running from about 9.17 to 11 feet. Seeing that, you can deduce that a shorter lens has a wider DOF.

Remember, these 2 topics we’ve reviewed go together. By adjusting your aperture for a shallower DOF, you’ll have to change something else to maintain your exposure. If you wish to move into a new zone, you’ll change your DOF if you use your aperture to move zones.

We’ll review composition and inspiration in our next talk. Remember to vote and get your pics in early. I hope you’ll all participate in this week’s theme, solitude. We’re aiming for more votes for our theme, so get involved and let’s enjoy the journey together!

Don’t forget to post any of your images you’d like to see here at the Hohenfels Volks Facebook page. Of course, commenting on both Facebook and here is always appreciated, too! Don't foget, we're on Google+, too!

Friday, January 20, 2012

Nostalgia or Something Else?

Greetings, volks. Welcome to Hohenfels Volks, THE place for our place! Over the last 2 or 3 posts, we’ve discussed some stuff that seems outdated and unnecessary.

Today’s digital cameras do everything for us. They meter, set the shutter speed, set the aperture, set the ISO, focus, and tell us when to push the button. Using all the bells and whistles in your camera makes taking photos easy, right? All the hard parts are a thing of the past, isn’t that so? Why do it, when the camera can?

There are a couple answers. The first one is probably the simplest, although they both go together. ALL photography, notice the emphasis, is built on light. Whether you shoot your shot on an old view camera, making a daguerreotype or you shoot digital, your images are ALWAYS built the same. Light strikes a surface that is sensitive to it, and there is a reaction creating something. To have an image you need the light to have form and varying intensities. If you’re using color film or a digital camera, the color information is recorded as well. That is what all photography is. Because those who shot before us went through the pains of creating the systems we have today and discovering the rules and methods, we have a way to be on the same sheet of music. By knowing these methods, formulae, and standards, we can create great images.

If you’re using a digital camera or a film camera, ISO 100 is the same. When shooting both types with identical lenses and lighting, f/16 will allow the same amount of light for film or digital. 1/125 second on a film camera takes the same amount of time as 1/125 second on a digital. Time didn’t change for digital photography. Neither did light, nor the laws of physics change. DOF is still determined the same way it was when Hurrell shot Hollywood’s most glamorous. Exposure is still figured out the same way it was when Ansel Adams made his images. Lighting is still used by us; the same way Karsh used it to capture royalty and great figures of his day. The theory hasn’t changed because the camera can do it, the camera can do it because these things don’t change.

The second answer is only slightly more complicated. Throughout the history of photography, those who picked up the camera strive to learn more, to prefect their photography, and to share their vision. This knowledge gives us the tools to do just that, as it did for those who came before us. See and shooters don’t care, but those who appreciate a good photo or enjoy making something great do care. The more control we take away from the camera, the more control over our vision we have. You wouldn’t let your stove cook your dinner, would you? So why let your camera take a picture, when you can make one. Remember, Ansel Adams said, “You don't take a photograph, you make it.”

Start using the tools available, visualize your image, and when the 2 come together, you can make something so much more than you thought. Remember to work on making your images for this week’s theme, and don’t forget to vote for next week. While you’re at it, check out the great new images in Your Works.

Have a great weekend, everyone, and try to keep warm with the cold weather coming in! Don’t forget to post any of your images you’d like to see here at the Hohenfels Volks Facebook page. Of course, commenting on both Facebook and here is always appreciated, too!

Wednesday, January 18, 2012

Tools of the Trade: Flash Part II

Greetings, volks. Welcome to Hohenfels Volks, THE place for our place! Today’s post is going to deal with using your flash in manual mode.

For some Volks, manual mode and photography don’t seem to go together. They leave everything on automatic, letting the camera tell them when to click the shutter, which seems a bit too much like serving the camera, not the camera serving us. By now, most of you have been shooting manual for a while. Chances are, though, that your flash is doing the majority of your work when you use it. I hope that this post will change that some!

First, we’re going to learn some terms and concepts. Flashes are rated by something called the GN, or Guide Number. It’s a measure of a flash's output. You have to know this number. The YN-560 that I have is rated by the manufacturer for 58 meters at 105mm, ISO 100. The actual rating is more like 35 meters at 35mm, ISO 100, which should give us about 50-55 meters at 105mm. I haven’t formally tested it in a controlled manner, but that seems about right. What that means is shooting at ISO 100, 105mm, and with the flash at full power, my max range for the flash is about 58 meters. At that distance, the light has fallen drastically in intensity, but spread out in coverage. The next thing we need to understand is aperture, or the size of the opening in our lens. A larger aperture means more light and conversely a smaller aperture means less. Aperture is measured as f/stop, a ratio of your aperture’s diameter to the level of light it allows. That’s oversimplified, but you get the idea. You already know about aperture, but will need to understand it for flash work. The last thing we’re going to bring up is distance between the flash and the subject. These 3 things are how you determine a manual flash’s power and set your exposure correctly. A flashes GN is the rating assigned to it by the manufacturer, so you have to be careful to read the specs before buying one. Some makers will call their flash GN58, but if you look at the tiny print, it’s at ISO 200 or even 400. That makes it more like a GN20 at ISO 100. Also, make sure the units your GN is listed in, feet or meters, or both are consistent throughout your calculations. Also remember that we're dealing with light, so sometimes it doesn't seem to make sense due the inverse square law. That's why we use GN!

The 3 things listed above are what you need to know to expose properly for manual flash. We’re going to start this part by giving you the equations to use, then giving some examples.

The first calculation is to determine your GN. First, set your flash to manual mode, full power, and if it has it, full zoom. Then place your flash a measured distance to your subject, say 5 meters. Then shoot a series of shots at successive f/stops. Note the aperture that gives you a proper exposure. For this we’re going to say f/8. Now multiply the distance by the f/stop. For this we’re going to multiply 5 meters by f/8, which means 5x8=40, or a GN of 40 at ISO 100, full power, max zoom, or about 20 at half power.

The next calculation is to determine your f/stop for that GN. If you have a GN 20 at ISO 100 flash, what f/stop do you use for 4.5 meters? The calculation for that is GN divided by distance. For GN 20, that would be 20/4.5=4.5 or f/4.5. Set up the above flash, GN 40 at half power, 4.5 meters and shoot using f/4.5, you should be almost dead on every time!

Last, we have figuring out your distance for a GN with a desired aperture. That is calculated by dividing GN/f/stop. As above, GN 20 at half power, we’ll say f/8. To get that we divide 20 by 8, or 20/8= 2.5, or 2.5 meters.

Here are the calculations listed:

Your GN=f/stop x distance to subject
F/stop= GN/distance to subject
Distance to subject= GN/f/stop

Here are some things to note. The distance is ALWAYS the distance from the flash head to the subject, not the camera to subject or flash to camera. Light modifiers like a Sto-Fen or umbrella lower your flash power by about 1-2.5 stops. Measure with them in place for more accurate readings. The same applies to bounce flash, count your distance as being from the flash to the reflector + the reflector to the subject, or adjust your exposure to compensate. A few times doing this with your calculator and flash manual will give you a great starting point for your flash shots, then before you know it, you’ll be nailing them every time!

Now that you know all that, use your camera's built in spot metering mode, go to AV or aperture priority, set your required f/stop, and meter for the rest of the scene. That shutter speed will allow you to balance your flash with the ambient light to create a nearly perfect exposure. Tinker with it, and you'll make that magic of having your image match your vision that much easier!

Working with your flash off camera in slave mode can also be a trial. The secret to that is point your optical sensor at the camera and rotate your flash head toward the subject. The sensor detects the flash from your camera and triggers the flash. It also has to be where it can see the flash from on camera. For some flashes, this will trigger it before it should go. The Yongnuo flashes have a mode called S1 that trips the flash at the very first blip of flash, and S2 that only triggers when the actual flash goes for the shot. Use S2 to ignore the red eye and pre-flashes your camera sends out. Also, turn of red eye reduction or pre-flash. Having your flash off camera will help prevent this phenomenon from occurring. Of course, you can also buy a wireless RF trigger and receiver from anywhere online for about $30 and avoid slave mode altogether.

A great resource for all things flash related is Strobist. We have a link to them in our links and they can really up your knowledge levels on flash. They put out some good tutorials and lessons in Lighting 101. Give them a read!

You’re probably bored after all that math and calculating. Get out there and shoot something, it’ll wake you back up! While you’re out shooting, don’t forget the milk, I mean your shots for this week’s theme! Complimentary colors with a contrasting subject. Should be something great in there and I can’t wait to see your work!

Don’t forget to post any of your images you’d like to see here at the Hohenfels Volks Facebook page. Of course, commenting on both Facebook and here is always appreciated, too!

Tuesday, January 17, 2012

Tech Talk: Candles and Calculations

Greetings, volks. Welcome to Hohenfels Volks, THE place for our place!

Today we’re going to go a little bit into what makes up your exposure numbers and how metering works. It sounds familiar, but we’ll be dealing with more math and other advanced parts of your exposure settings.

Let’s start with your ISO. Back in the old days there were lots of ways to label film sensitivity. There was by DIN number, ASA, Weston, and EV, as well as various others fallen by the wayside. Today we use ISO, which is for the most part ASA. Some folks use DIN, that’s why film still carries the DIN number. Under today’s scheme, 3 degrees DIN are equal to 1 full stop. ISO 100/21 has half the sensitivity of ISO 200/24. The Weston number, another popular standard used to gauge a film’s sensitivity, referencing Weston’s meters, is usually .8 times the ISO. Since we’re shooting today, we’ll use ISO, but there may be times we reference others in our future.

Moving on we come to light and light levels. Without the fancy gadgets we have to meter our exposure built into cameras, folks used external meters. Ansel Adams broke it down in his book The Negative. Meters used to measure light in candles, or candela, per square foot. That was the basis for your shutter speed. This will become important in a couple paragraphs.

Next we have aperture, the size of the opening through which light enters the camera. Each ISO had its native f/stop. To find the native stop for any ISO take its square root. For ISO 100 the native f/stop is f/10, for ISO 125 it’s 11, for 200 it’s about 14, and for 400 the native f/stop is 20. Apertures are measured in f/stop, which is a ratio based on the square root of 2, as each step is doubling or halving the light.

The last part is shutter speed. For a native aperture, the shutter speed should be 1/ the light measured in candles per square foot, or c/ft². If you read 125 c/ft², your shutter speed for a native aperture should be 1/125 second. It sounds easy doesn’t it? Well, don’t give up hope. Things are about to get tricky.

Since most light meters today don’t measure in c/ft², finding that speed may be difficult. Automation has taken away many of the tools used by those who came before us in every arena. You can buy a cheap ambient light meter and use it for your photography. The readings are usually in LUX. LUX can be converted, however, by dividing by 10.764. Just round to 10, and there you have it. 1000 LUX is 100 c/ft². At your native aperture, shoot 1/100 for zone 5 placement of what you just read and you’re cooking with gas. Using you digital camera’s metering, set your aperture to the ISO’s native aperture in AV mode. Then seeing the required shutter speed tells you there are that many c/ft² or 10 times that much in LUX.

It seems like talking about this doesn’t do much for you shooting digital, but knowing it will help you improve your light reading skill without your camera’s meter and make getting your exposure correct a lot easier. Plus, if you decide to go old school and shoot with an old camera or use an old meter it will help you to figure that stuff out. It also comes in handy when working with the zone system. Reading 1/100 at your native aperture, you have the knowledge of how to combine your speeds and apertures to get the right exposure for 100 c/ft². You also have the knowledge that you can move your image up or down a zone without playing guessing games as much. It’s quicker and easier to figure out once you try it a few times. A good example is on a bright, sunny, semi-cloudless day. The sky reads about 300 c/ft² when read usually. So for ISO 125 at f/11 you should be set for 1/300 as a good starting point. Then adjusting your speed inverse to any desired aperture changes, and you should have a decent exposure with the sky at zone 5. You can adjust just your aperture or speed to move the sky and other subjects into different zones and create what you visualized that way.

Ansel Adams described it as the exposure formula. He taught that zone 5 was 1/c/ft² at a film’s key aperture. It still holds true. Some minor adjustments may need to be made, but you should be almost dead on. It helps to spot meter for your highlights and shadows to get the best range in your image, but for quick shooting, try it out! I think you’ll see something very cool!

The new theme for this week is “Flattery (Not everything complimentary is flattery!)” You may have already guessed that this has to do with colors, right? Your shots should be composed with complimentary colors as a major element of your composition. Another aspect of your image must consist of contrast in your subject, as well as the contrasting complimentary colors. Perhaps age and youth, or hot and cold. I hope that you get the creative juices flowing for this one and get working on it soon! I also hope that we will see everyone out there submitting this time!

Don’t forget to post any of your images you’d like to see here at the Hohenfels Volks Facebook page. Of course, commenting on both Facebook and here is always appreciated, too!

Tuesday, January 10, 2012

Shoot Digital

Welcome back to Hohenfels Volks, THE place for our place! I trust everyone enjoyed the wonderful weather today!

Today let’s talk about thinking. So often, we’re thinking about how to get that great image onto our computer. We’re all about digits. Digital is the way of the future and analog is dead, right? Actually, that’s not true.

What? Aren’t we using digital cameras, editing on our computers, and sharing our work online? That’s digital, duh! Actually that’s true, but have we thought about how light works? Have thought about how we work? Have we thought about how our camera works? Or how our flash works?

Light travels in waves. It’s an analog signal. Those variations in intensity are caused by the signal’s amplitude. It’s a little more involved when we talk about our cameras. When we shoot fast shutter speeds, the shutter is never fully opened; a slit travels across your sensor exposing it in slices. That’s why we have sync speeds for our flash. Digital means it’s either opened or closed; it can’t be both. That’s why focal plane, diaphragm shutters give faster sync speeds, because they are opened, exposing your whole medium for the duration of the shot, although they are in the process of opening, there is still the entire sensor or film exposed.

When you get right down to it, although the medium used to capture light is digital, camera basics are pretty the same now as they were 100 years ago. A medium is placed in a light proof space, an opening is created, then shut, the medium is processed, and a photo is born. The only differences are automation, medium, and sensitivity. We have more automation in the process of creating our image, we shoot to a digital sensor that requires no chemicals or wait, and our sensors can reach speeds unheard of in past decades. Does that mean we no longer need to think through our processes of image creation? No it doesn’t, not now, and probably never.

When shooting film, people took a slower pace in creating a shot. An almost crafting of a shot. Taking the time to see the light, feel the light, and imagine the scene displayed meant fewer pictures, but more works that were pleasing. It’s the same in most pursuits like golf, drawing, or woodworking.

I’m encouraging everyone to slow down some. Take your time crafting your shot. My friend, Mark, used a good expression when he said we used to shoot film like snipers, taking our time, and now we’re machine-gunning everything we see. For even the next few days, make each shot count, and you’ll make each shot a winner. It’s time to slow down, time to “think analog, shoot digital.” You will see an improvement, and others will notice, as well.

Don’t forget our theme this week, blurring the lines. Here’s wishing a great week, and some killer shots!

Don’t forget to post any of your images you’d like to see here at the Hohenfels Volks Facebook page and to get your vote in for next week’s theme. Of course, commenting on both Facebook and here is always appreciated, too!

Thursday, January 5, 2012

What's On the Menu 3

Welcome back to Hohenfels Volks, THE place for our place! Given the weather in Hohenfels, we’re going to stay and learn some more about our cameras.

Today we're going back into the camera menu. The first 2 parts can be found here and here), so get ready to follow along in your manual and with your camera.

Today we’ll cover 2 tabs, one has 2 settings, and the other only has 6. Most of them I don’t worry too much about, as I’ve set mine up the way that works for me. You may want to try them and see what you do and don’t like, as with anything we’ve done so far.

Starting at Shooting Tab 3, we have 2 settings; the first is Dust Delete Data. This allows you to take a shot, and using the spots caused by any dust, append that data to your images. Canon’s DPP program will automatically delete the dust spots, based on the data obtained. To use this feature, take a white sheet of paper, set your lens to 50mm or longer, and your focus to infinity. When you select ok, then set, the sensor is cleaned, then you will need to fill the frame with the solid white sheet of paper, and shoot a shot from about 1 foot away. When the process is complete, all future shots will have that data appended and have those spots noted corrected in DPP.

The second setting on this tab is One-Touch RAW+JPEG. This tab allows you to shoot a RAW image if you’re only shooting JPG, or a JPG image if you’re only shooting RAW. This allows to you to get 2 different copies of the same image. Since I only shoot RAW, I never use this. Shooting RAW+JPEG takes more space and allows fewer images to be captured on your card.

Moving on to Shooting Tab 4, the first selection is Live View Enabled. This allows shooting with Live View. Live View allows you to shoot using your display instead of your viewfinder. The downsides of shooting in the mode are you can’t use the viewfinder, the sensor is exposed the entire time, and heat builds up from the sensor and displayed being powered up. There is another downside, as you will see on the next selection.

The next selection is AF Mode. This controls what type of auto-focus mode used. There are 3 choices. The first is Live Mode. This uses the live View screen for focusing, which is slower and less accurate. The second is Face Detection Live Mode. This uses a larger focus zone, and requires a face looking at the camera. Again, it is slower and can be less accurate. The third is Quick Mode. This allows focus using the same dedicated auto-focus sensor used during viewfinder shooting. This is quickest and most accurate when using Live View.

The next choice is Grid Display. This allows you to superimpose a grid on your screen. It’s useful for composing images, but not much else.

The fourth choice is Expo Simulation. Enabling this feature allows the screen brightness to vary according to your shot settings. It will get darker with less exposure set and brighter with more exposure set. It’s an artificial view, as the aperture doesn’t change, nor does the shutter.

The fifth choice is Silent Mode. There are 3 choices here. Mode 1, which allows for continuous shooting, with somewhat reduced noise, Mode 2 which means that you can only take one shot at a time, this minimizes noise, but requires release of the shutter button after every shot and disables continuous shooting, the last choice is Disabled. This mode is primarily for shooting with accessory lenses and non-Canon flashes.

The final choice for this tab is Metering Timer. This changes the amount of time your camera displays your exposure settings when taking a shot.

That’s the end of the shooting tabs. After these comes your playback tabs. We’ll cover them in future What’s On the Menu posts.

Enjoy the rest of your day, and remember to cast your vote for next week’s theme. Get yours in to have a say! Don’t forget to get your pics posted at the Hohenfels Volks Facebook page. Of course, commenting on both Facebook and here is always appreciated, too!

Wednesday, January 4, 2012

In the Zone- Zone Focusing

Greetings and welcome to Hohenfels Volks, THE place for our place. I hope you’re ready, Hohenfels, to learn about zone focusing. This is something that can make getting some of those passing moments in the can, as it were, quicker and easier.

First off, let’s explain what zone focusing is. Zone focusing is using a combination of focal length, aperture, and distance to allow for enough depth of field to make a usable print. That’s pretty straight forward, right? Well, there is more to it than that, including knowing your equipment.

Zone focus developed as a way for photographers to focus their equipment, as most older cameras had no viewfinder or way to check your focus. Many of the old time greats used zone focusing to maximize the sharpness and detail in their works. Given the nature of early lenses, high f/stops were often required to get good detail and enough DOF to be worth printing. Remember, sheets of film, and rolls, were costly to purchase, develop, and print, so lots of effort went into taking each shot. Zone focusing grew from the concept and practice of hyperfocal distance, which you use to give you the maximum DOF for each lens focal length. We’ll have more on that in another post.

The technique works best with lenses that have markings on them. A distance scale for focusing opposite an aperture scale with DOF markings as shown in the photo below works best. It’s quicker and easier. Unfortunately, most lenses today are auto-focus, and kit lenses generally don’t have such marking. Higher end lenses do have them, as do pro and manual lenses as a rule.

Hohenfels Volks- Voigtlander vitomatic ii showing scale for zone focusing
ISO 200, f/4.5, 1/30, 32mm
Notice the f/stops on the front of the ring. They go out from the diamond marking focal distance, to give you the range, or zone, of acceptable focus.

Referring to the image above, you can see that there is a diamond. That is the distance marker. On the focus ring, there are markers that aren’t shown, that tell you your focal distance. Line up the desired distance, then using the f/stops that radiate out from the diamond, identically on either side, determine your needed aperture and distance. The distance covered will line up with the marks for the desired aperture. It’s that simple, anything in that range will be in sharp enough focus for decent size prints, including 8x10 and 11x14 if your camera has the resolution.

If your lens has a focusing distance scale, much like Canon’s 28-135mm, you can figure out your DOF with a little legwork online. The key when using zone focus, is to turn off your auto-focus. The second factor is to shoot either Aperture Priority or Manual modes only! Any other mode nullifies your efforts!

Know your location, and what’s happening there, and you can figure the ranges you will need. Let’s say for our purposes you’re shooting in a decently lit area at ISO 400 and you need to cover 3 meters and 6 meters, with room to spare. You get you’re framing, that will give you your focal length. You know it’s decently lit and you can get by with f/5.6-f/8. Going with a 55mm focal length, as most kit lenses like to go from 18-55mm, you should be focused at 4 meters for f/5.6 and 3.5 meters for f/8, although 4 meters is adequate, and has the advantage of allowing you to switch over to f/5.6 without losing too much DOF. If your lens doesn’t have a focal distance scale, measure off 4 meters, focus your lens, and mark it. An easy tip for marking your focus, is take 2 fat rubber bands and wrap one around the zoom ring of your lens at the focal length you wish to use, then wrap the other around the focus ring. Mark the one on the zoom ring at the top, focus your camera, then make a mark that lines up with the first mark you made. As time progresses and your lens drifts over the course of events, you always have your focus marked and can return to it in a snap. Then set your aperture and you’re cooking with gas!

A great online DOF calculator that just requires your focal length, camera model, and scale used (feet or meters) is DOF Master's DOF table. They also have some great information on hyperfocal distance and some nifty little software to play with!

If your shooting with a flash, your f/stop will be dictated by the flash when you use manual flash. TTL and E-TTL are great for using flash, but to use it right, you need a sync cable that’s designed for your camera maker or line to get it off camera. You can get a good one that’s about a meter reasonably priced. Add in a Flashbender or Sto-fen to diffuse the light some, and you’re off to the races. This allows you to hand hold your flash off camera and get some directional TTL or E-TTL light in your images that just adds to the quality.

Zone focusing is great for street photography, event photography, candids, and may other things. Try it out in your works and see how it can help you! You can also use it for this week's theme, as it will allow you to appear less obtrusive when shooting work getting done!

Enjoy the rest of your day, and remember to cast your vote for next week’s theme. Get yours in to have a say! Don’t forget to get your pics posted at the Hohenfels Volks Facebook page. Of course, commenting on both Facebook and here is always appreciated, too!

Tuesday, January 3, 2012

Classic Shooting

Greetings and welcome to Hohenfels Volks, THE place for our place. As promised, a second dose of photography just for Hohenfels, dealing with old fashioned photography. Before we begin, I need to clarify this week's theme. Your images should be of work being done, not the people doing the work. The bulk of your subject should be the work, not the worker. I hope this helps when creating your shots.

As mentioned previously, we're talking about old fashioned photography. I got some very old cameras this weekend, inspiring me to pick up film again and try out what I've learned. It also inspired me to share pics of them with you and encourage you to pick up your film stuff and shoot that, too. It's a great way to test yourself, using film and what you've learned. It also shows you what you've learned and how well you're progressing.

Hohenfels Volks- Nettar 515/2
ISO 400, f/8, 1/25, 37mm
Zeiss Ikon up close. This shows the lens, the "brilliant glass," used to compose your shot, and the speeds available.

This weekend the family and friends surprised me with some gifts. The first gift, from Mrs. Hohenfels Volks and the princess, was an Altissar box camera from 1951.

Hohenfels Volks- Altissar Box camera, 1951
ISO 400, f/8, 1/25, 37mm
The Altissa box camera from 1951. This beauty is a real challenge, as it only has 4 settings! A great little camera with some great meaning!

Eho-Altissa started in Leipzig in 1892. Founded by Richard Knoll as a photographic shop and studio, they eventually started repairing and then manufacturing cameras. 1910 it moved to Dresden, where it was later bought by Berthold Altmann. In about 1951, Berthold Altmann decided to flee the oppressive and anti-business communist East Germany. In absentia, he was tried, convicted, and his company taken over by the communist run government. They were re-named and finally failed, with the machines being sent to Sarajevo to make imitation box cameras. This particular model of box camera, introduced in 1951, was the last while Altissa remained a free company. That scenario reminds me of Atlas Shrugged, in which all the creators and producers abandon their businesses and creations and disappear, leaving an increasingly corrupt, socialistic, and anti-business society to its own failings. Because of that story, and what I see happening today, this camera has meaning beyond photography to me. It’s functional, still works, and I’m taking photos with it! Once I get some developed, I’ll post what comes out here! This camera had 4 settings, f/8, f/16, B for bulb, and 1/25. The lens was fixed focal length and fixed focus. Using 120 film, it produces a negative that is 6cm by 6cm. Composing your image is through a window above the lens.

The next camera, from our friends, was a Zeiss Ikon 515/2. This little winner was introduced in 1937 as a lower priced Ikonta, with virtually all the features. The one I received has an 11cm lens, which runs from f/4.5 to f/32, and has shutter speeds from 1/25 to 1/125. Outside the shutter speed range is B, for bulb mode shots, and T, where you open the shutter with one click and close it with a second click. It uses standard 120 film, and produces a negative that is 6cm by 9cm. The viewfinder is a pair of metal tabs, and only serves for composition. Focusing is accomplished by adjusting the lens for the zone that should be sharpest, by distance. You can also hold it about waist high, and using the “brilliant glass,” frame up your shot. The brilliant glass is a tiny “periscope” like pair of lenses through which you compose your shot. It only allows for framing and composition. It has a PC Sync port for the flash, should you have one, and has a self-timer for setting it up and activating the shutter, allowing you to enter the scene should you desire.
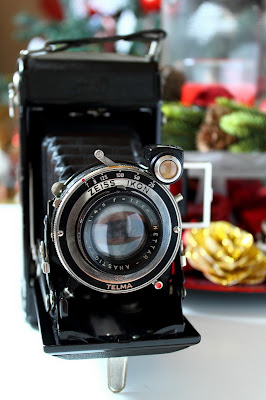
Hohenfels Volks- Zeiss Ikon Nettar 515/2, Circa 1940
ISO 400, f/4.6, 1/25, 33mm
The Zeiss Ikon in all its glory. It takes time to set up your shot with this, which helps with getting your composition tidy.

Zeiss Ikon started in 1926 by the merger of several camera manufacturers and financial backing from Zeiss. Soon several other companies joined the Zeiss Ikon syndicate. Located in Dresden, with plants in Stuttgart and Berlin, Zeiss Ikon split into a West German and an East-German part after the war. Stuttgart became the headquarters after the division of Germany. Later they merged with Voigtländer, who made higher end cameras. In 1972, they stopped producing cameras. After the reunification of Germany, the East and West German divisions re-united into a single company.

The third classic I acquired was a Voigtländer Vitomatic II. This little beauty is a 35mm Rangefinder with a fixed focal length 50mm lens. The lens runs from f/2.8 to f/22, and 1 second to 1/300 second. It uses, like the Zeiss, a leaf shutter, and has no mirror. This feature allows flash to be synched up to the lens’s maximum shutter speed, in this case 1/300. The camera came with 2 filters, a UV, and a green for B&W. This allows for brighter greens, darker reds, and greater separation of greens in your monochrome images. Also included were a lens hood, leather case, and leather strap. Again, through PC sync, my flashes can be remoted off camera and fully controlled. Voigtländer, as you read above, was a very upscale camera maker. They started in Vienna in 1756 as an optics company. Later they introduced the world’s fastest lens at that time, in 1840, it was f/3.5. They were also the first to introduce the zoom lens and the first 35mm camera with a flash built into the camera.

Hohenfels Volks- Voigtlander Vitomatic II 1958
ISO 200, f/4.5, 1/20, 29mm
The Voigtlander Vitomatic II from 1958. In the upper left corner you can see the selenium meter in the camera. Used to help judge your exposure settings.

The cool thing about these cameras is that they show you that even though technology has improved, it hasn’t changed too much since the times represented. Using what we’ve discussed about exposure, composition, and other tips, you can get a great shot, even with old cameras. Don’t give up the learning just because digital means you don’t have to do it. I’ve used my 7D to meter the light for my desired aperture, and then set the old timers accordingly. Remember, being able to sync with your flash means you can do anything with these guys you can do with your digital. I hope this will inspire you to learn more manual applications, so you can put your old film stuff to use again. You’ll be surprised how much you can do with it!

Enjoy the rest of your day, and remember to cast your vote for next week’s theme. Get yours in to have a say! Don’t forget to get your pics posted at the Hohenfels Volks Facebook page. Of course, commenting on both Facebook and here is always appreciated, too!

Friday, December 23, 2011

A Ride Along For the New Year

Greetings and welcome to Hohenfels Volks, THE place for our place. Aside from the cold and wet, it was a wonderful day here in Hohenfels. 2 days until Christmas and things are looking bright!

Today we’re going to stay in the living room for another ride along. This time we’re shooting my annual New Year’s Toast shot. Every year around this time, I like to shoot a wine and lights shot that I’ll use to greet friends and family for the New Year. So break out your flash, some wine, and let’s get working.

Hohenfels Volks  Almost
ISO 100, f/32, 30 seconds, 49mm
Here's the image.

As you can see in the photo below, I’ve included my set up. Out of the frame, camera left about 3 feet is a flash on a tripod, shooting through a 42” umbrella at 1/32nd power, at about chest height. The flash provides light for the tree and to capture some detail in the scene. By placing everything on some black card stock, we can minimize glare and reflections, or at least control them to an extent.

Hohenfels Volks setting it up
Here is the setup I used for the above image. A few more feet between the tree and the subject would have rendered some magnificent starbursts.

Having the white card to the right provides some bounce from the flash and provides a little bit of detail and edge enhancement for the wine bottle. On a side note, LBV Port is great for a toast, and while sweet, is perfect to ring in the New Year. Port wine developed a series of traditions around it, especially in naval circles, which is part of the joy of it.

I didn’t want too much detail and lighting, as the bottle has no paper label. The label is painted on, increasing the chance of huge glare and direct reflections. I knew that I would have some glare from the candlelight, as well as some reflection of the candle itself. It actually looks a lot better than I thought, as the candle looks like a thin taper, not a ball.

Shooting at f/32 allowed some great starbursts on the lighting. I thought it was a little much, and the bottle looked a little off being set apart so much. I re-did the shot with the bottle closer and shot at f/22. This allowed a small amount of starburst, but nothing overly intrusive, while keeping a long exposure. It also took out the reflection of the candle. Another nice effect is the diminishing of the bounce to a level that retains the edge of the bottle while adding just enough fall-off to create a mystery about the wine.

Here’s the final version. I think this is the one I’ll go with, even though I’ll try several more versions.

Hohenfels Volks  Happy New Year, Hohenfels
ISO 100, f/22, 30 seconds, 45mm
I think this one better captures the message and adds a bit of the old world to the image. Overall the depth of field provides detail that enhances the shot, and the composition just seems to welcome you into the scene.

I have my shot for this week’s theme in the can. How about you, have you done yours? This week’s theme and the tree allowed for several days of playing around with lighting and thought patterns. What is my reward? How do I enjoy it? I toil and work to enjoy something, but what? How do I light it? The list is endless, but I think I have something that is rewarding for me and may even interest you! It follows a pattern similar to today’s shot, if you like spoilers. How’s your shot coming along?

Here’s wishing you a very Merry Christmas. May this weekend be blessed with joy, love, family, peace, and true rewards! Remember, there is so much to life, that we haven’t even begun to measure our gifts.

Remember to cast your vote for next week’s theme. Don’t forget to get your pics posted at the Hohenfels Volks Facebook page. Of course, commenting on both Facebook and here is always appreciated, too!

Monday, December 12, 2011

Exposure and Exposing?

Greetings, Hohenfels, welcome to Hohenfels Volks, THE place for our place. Monday in Hohenfels, the start of a new week, finds the children going to school, the adults going to work or the fields, and the rest of us going in 10 different directions.

Of course, here in Hohenfels, Monday also means another theme. Based on the voting, this week’s theme will be “Expose Yourself (Umm, NOT like that!),” with 50% of the votes. 50% sounds so much nicer than 3 votes. This week, we should get a lot more votes, and a lot more participation, I hope!

The purpose of last week’s theme was to see the light, the way light moves, and the way it rises and falls. I hope, even if you didn’t participate, you were able to do some work with lighting. One of the tips I offered was to place an IPad with a white screen under a semi-transparent bowl. The bowl creates a half dome, allowing for easier viewing of the “bubble” created by the light. This “bubble” is not so much a thing you see, but something you notice in the way it interacts with the scene. I’ll have more about the nature of light and what I call “the bubble effect” in another post.

Moving on to this week’s theme, it should be easier than last week’s! At least, it should be somewhat easier. Because photography is an art, this week’s theme deals less with the technical side, and more with the expressive and artistic side of photography. This is where it may be harder, too. Because to do a shot that meets this week’s theme, "Expose Yourself (Umm, NOT like that!)," means injecting your self into the image. Notice how I separated yourself into 2 distinct words here, your self. By injecting your self into an image, you can create an impact with your photos and control the reaction of the viewer.

Here are some thoughts to make it easier for you to Expose Yourself. One way is to think of that which you value, it may be a possession, a person, or an ideal. Some ideas are a family member, the relationship you share with a special friend, integrity, hard work, and liberty, just something positive in which you place high stock. Think about how that which you value makes you feel, and how you can best show, and share, the feeling you get. The key here is not to be in or part of the image, beyond its creation.

Perhaps your memories of long ago Christmases with family gathering, and the smell of the tree can bring a feeling to you like nothing else. Share that feeling by creating an image that represents the memories. Maybe you hate the way the politicians use the commoditization of poverty to stay in power; it really gets your goat to see people enslaved to the greed of the powerful elite. Capture something that shows that, that shows us the way these people bring you down, that makes us angry right beside you. Of course, it could just be as simple as that magnificent golden pink glow as the sun sets over an idyllic village somewhere in the heart of Bavaria. Tinged with light pinks, purples, and bold fiery reds, the sunset made you feel like the magic of childhood. Share that feeling!

The most important thing for this week is to bring your feelings to fruition through your work, to share that feeling and moment with us, to make us feel something you felt when you viewed the scene before taking the image, to wow us the way you were wowed. Now doesn’t that make you feel better than what you were expecting when you saw “Expose Yourself” as one of the choices?

Remember to cast your vote for next week’s theme. Don’t forget to get your pics posted at the Hohenfels Volks Facebook page. Of course, commenting on both Facebook and here is always appreciated, too!

Friday, December 9, 2011

Shoot for the Star...bursts!

Greetings, Hohenfels, welcome to Hohenfels Volks, THE place for our place. I hope the week has been gentle to all.

How are the bubbles coming? Are they taking form, or are you stuck? Have no fear; your vision can carry the day. Just stop to see the light and you’ll come up with a winner.

Jennifer, who’s blog can be found here, liked a link the other day that I found very interesting. Click it Up a Notch is a great source for learning photography. The blog has some great tips for beginners and anyone looking to improve their images, and is backed up with some wonderful photos. Check it out!

The post she liked and I read was 5 Tips for Shooting Christmas Lights. Nice post, nice pics, cool blog. I decided to do a post about starbursts. They make for some awesome additions to a good composition.

The first thing to understand about starbursts is that they are caused by light diffraction. The light bends as it passes the blades in your diaphragm, which changes the way the light hits your sensor. Light that is brighter than the surrounding areas tends to streak as it passes over the blades, creating starbursts. We all love to see some of them in our images, especially nighttime and Christmas shots. The actual rays or spikes in the starburst are caused by light passing over the blades where 2 of them come together. The more blades you have the more rays you’ll get. The funny thing is that even numbers of blades cause the number of rays to match the number of blades. In a lens with an odd number of blades, the number of rays is actually twice the number of blades. I’m not a physicist, so I can’t explain it. You can get decent starbursts even at apertures like f/8 or f/11 depending on your focal length. Most people tend to shoot for them at f/22 and sometimes higher. The shorter the focal length you use, the smaller the aperture is at the same f/stop, and the more likely you are to get good ones, at least that’s the theory.

Another important thing to remember, if you want to print your photos at 8x10 or larger, is that over about f/16 on an APS-C sensor you start losing sharpness in the details. It’s a trade off, so think about how you wish to present your pic.

Here are some photos that show the effect and the difference in blade count between 2 lenses.


ISO 100, f/16, 30 seconds, 200mm
If you count the rays on the large light on the bridge, you'll see this lens had 9 blades. This shot and the next one were taken in Wurzburg with an old 300D from Canon.


ISO 100, f/22, 30 seconds, 165mm
You can see a slight drop-off in sharpness, but more pronounce rays.


ISO 100, f/16, 10 seconds, 18mm
Notice 6 rays emanating from the bulbs. The lens had 6 blades to the diaphragm.


ISO 100, f/8, 20 seconds, 55mm
The starbusts here are minimal, and slightly soft. At a shorter focal length, perhaps something better might have appeared. This was taken with an old Canon 300d in Hohenfels, as was the previous photo.

There is another way to get starbursts. You can buy filters for your lens. You can choose from any number of rays and they apply the effect equally to all lights. That takes the fun out of it, but they could come in handy.

Here in Hohenfels, and in the towns around us, there are so many places that light up a tree or wreaths. Get out there and you'll find something to shoot for the starbursts! You don't even have to leave your house during this time of year! Try it on your tree, you'll see some cool things happen.

Remember to cast your vote for next week’s theme. I hope to see more than the 4 votes we have right now. 19 Volks like us on Facebook, I hope 19 will vote! Are you thinking of your bubbles? I hope to get something in if time allows me to shoot today! Remember to get your pics posted at the Hohenfels Volks Facebook page. Of course, commenting on both Facebook and here is always appreciated, too!