Saturday, December 31, 2011

Out With the Old

Hohenfels Volks Happy New Year

Here's wishing everyone out the a bright and beautiful 2012. May God bless you with the best there is, with joy, love, and peace throughout the new year and beyond!

Thanks for allowing us to be part of your adventure in photography!

Friday, December 30, 2011

Tips of the Trade- More Exposing?

Greetings and welcome to Hohenfels Volks, THE place for our place. Tomorrow is the last day 2011, is everyone in Hohenfels ready for the New Year?

Today we’re going to do a short post on long exposures. By that, I don’t mean what you might be thinking… Actually, we’ll be talking about exposures made over an extended period, usually longer than 1 or 2 seconds. Most of you already know this stuff, but a little refresher is always nice. With longer nights upon us, and lovely seasonal decorations and lighting, long exposures can be a real shot maker during this time of year. To create starbursts, for instance, longer exposure means longer rays.

Chances are you already know that long exposures absolutely REQUIRE the use of a tripod. Notice the capitalization of REQUIRE. If you don’t have a tripod, and your exposure is short enough, a monopod will work, but it’s a tradeoff. 30 seconds on a monopod probably won’t get the shot you want. The best option is a slightly heavy tripod, one that has the fewest leg extensions. More leg extensions mean thinner legs and less support. When you can get way with it, don’t extend your legs, and if you have to, start with the top ones, which are thicker until you get the height you need. Try to use a tripod with a center element that doesn’t crank up, but if you do, keep it down where possible to add support.

Don’t use your finger to release your shutter. Get a good shutter release with a long enough cable for your purpose, or go wireless. Turn off your IS, if your lens has it. IS can cause blurring as the elements move looking for motion to offset. If your camera is capable, turn on mirror lock up. Even the motion of the mirror can cause subtle blurring. Compose your image, lock your mirror, and then activate your shutter. If your camera has a delay, activate it to get that extra pause to allow shake to diminish. Carry a good flashlight or other light source, as you’ll likely be working in the dark. Your kids or spouse can be helpful if you’re shooting inside to turn on the lights for focusing, then turning them off when you’re ready to start the shot.

Now I’ll give you a few ideas for using this information.

Has anyone shot star trails? This “simple” long exposure can create some interesting images. Find a strong center of interest and the North Star, Put the North Star at the center of interest and compose your image appropriately. Then expose for about 10 minutes, it will seem as if the stars are rotating around your subject. To do this, you should be in bulb mode and your remote release should have a lock function, as most cameras limit at about 30 seconds. Set your f/stop at about f/16 and your time to B. Longer times equal longer trails, shorter times equal generally brighter trails. Don’t do this during a full moon, as it works best on a moonless night.

How about light painting? Using an exposure time as above, you can use lights, flashes, and other sources to paint your scene with some good light, or create some really interesting effect. Try it with a candle or flashlight for something cool. Candles can create the illusion of fire rings and the like, check it out.

Try making a nighttime scene into a daytime shot. During the fool moon, long enough exposures can create the illusion of daylight. A nice feature of nighttime scenes is the slow shutter allows for nice effects with fog or moving water.

Of course, long exposures can be used to set a mood or allow dark areas to expose better, too. You’re only limited by your creativity! I hope you’ll post some of yours at the Facebook page and share them with us.

Enjoy the rest of your evening, and remember to cast your vote for next week’s theme. We have 2 votes now, and it’s a tie. Get yours in to have a say! Don’t forget to get your pics posted at the Hohenfels Volks Facebook page. Of course, commenting on both Facebook and here is always appreciated, too!

Thursday, December 29, 2011

Tech Talk- Print Resolution

Greetings and welcome to Hohenfels Volks, THE place for our place. Hohenfels was greeted with clear skies, which soon disappeared, as usual. However, Thursday brings us a new post, one that will get you thinking and warm things up.

Today we’re going to talk about printing and preparing your image for printing. It’s a technical issue, but we’re going to concentrate on the simplest way to get your images print shop perfect, or ready for web display. Break out your files and let’s get kicking.

First things, being by their nature, first; we’re going to assume that even though you know math, you don’t like to do too much when working on your pics. Of course, I’m basing that on a notion I pulled out of thin air, so forgive me if I’m wrong. You’re going to have to do some math, but we’ll keep it simple here.

The first question we need to address is how are we presenting our images.

For web based viewing, simple jpegs for your blog or Facebook, an image 800 on the long side should be sufficient. That’s going to take up a little less than half of a monitor running 1920x1080 in landscape mode, and or a little over ¾ when the image in portrait mode. Of course, monitors with smaller resolutions will be filled to a greater extent, based on their resolution. 72 dpi for web presentation or e-mail is sufficient and will allow most monitors or browsers to present the image as desired. Using greater dimensions or a greater than 72 dpi resolutions creates larger files and slower downloads, so if you do desire larger, keep that in mind. If you try to print an 800x600 image at 72 dpi, you can get a print size of 11.11x8.33 inches. For reasons you’ll soon see, that’s unacceptable. For e-mail, generally follow the same guidelines, unless you are e-mailing it for printing.

For print presentation, things get a little trickier. Time to get your calculator out; we’re going to do some simple math. Print resolution will generally be determined by size and viewing distance, which is a function of size. First, let’s say this now- billboard images look good at 5-10 dpi, mostly because we’re so far away and can’t make out the dots. If you want a great print that you can view from a foot away, you need 300 dpi. Let’s assume that the normal person puts an 8x10 on his wall, he probably doesn’t view it from more than 2 feet away. To get a good print at 8x10, with a viewing distance of 2 feet 180 dpi is more than adequate, with 150 dpi being acceptable to most people with normal vision. Here’s the math. To get the right file resolution, multiply the desired dpi by the desired length of that side. Then do the same for the other side. So 8x10 at 180 dpi gives us 1440 by 1800 at 180 dpi in your software.

Now, here’s another catch. When viewing in an album, whether your image is 4x6 or 8x10, print at 300 dpi, as the viewing distance will likely be about 1 foot, and not much more than 2 feet. That way the folks who move in closer than that won’t see the dots formed by the printer’s ink spray.

Another guideline is the viewing distance should be 1.5 to 2 times the diagonal of the print. For a 20x30 inch print, with a viewing distance of 54 inches 64 dpi is sufficient, although 100 is better. That allows for wiggle room. I’ve had prints made 20x30, printed at 103 dpi, and viewed them at 1-2 feet and been amazed by what a good printer can do. I use Mpix or MpixPro, others like Nations Photo Lab or Shutterfly.

For those who are interested, here is a good link to a print calculator that will help you in determining what size and resolution to go with. It's also a decent resource for more information about print resolution. B&H has a great chart by camera megapixels and print size that should be a good guideline, and save you having to enter numbers!

After you do your sizing, then apply sharpening. That way the sharpening is appropriate for your print. Next time in Tech Talk we’ll look at sharpening and how to apply it, and what those terms used when referring to sharpening mean.

Let’s hope we get everyone voting and taking their pics for this week’s theme, Knock Knock.

Enjoy the rest of your evening, and remember to cast your vote for next week’s theme. Don’t forget to get your pics posted at the Hohenfels Volks Facebook page. Of course, commenting on both Facebook and here is always appreciated, too!

Wednesday, December 28, 2011

All Work...

Greetings and welcome to Hohenfels Volks, THE place for our place. Wednesday finds us entering the downhill side of another week here in Hohenfels! I trust everyone is getting ready to ring in the New Year in an exciting and safe way!

Today we’re posting the entries in our theme for last week, Fruits of Your Labor. There were 2 entries this time around, Jennifer’s and mine. Let’s start with Jennifer’s entry.

Hohenfels Volks The Fruits of Jen's Labor
Copyright 2011 JennyO
Another great shot by Jennifer!

She described it in her own words, “Hi there, my submission is more of a layers project, the fruits of my workouts at the gym and my need to stay inspired”

My first thought was “rewarding your labor with more labor?” and I actually left that as a comment. Then I realized that after a long day, exercise is a bit of a reward, as it helps you unwind. I also realized that by working so hard, she was actually showing us the reward of her workouts, a fit and healthy lifestyle, and body. Kudos on that. The motivating quotes actually are very cool, but for the time being, I’m going to discount them, as we are talking about her photo.

I really like the idea of this image. Using the light from the window helps sculpt the form shown here and create a flowing silhouette without being a silhouette. Having lighting come in behind her allows for nice details and color to be brought out. Using the window as a light source, close up like this creates a nice bright light that wraps her body, and displays a nice fall off due to its softness. Large light sources are soft light sources! By shooting from a lower position, she creates a powerful subject, giving a bit of the dynamic to her shot! Chest height camera shots for a portrait make nice full body and 3/4 portraits, when shot from lower and looking up, it adds power and strength to your subject. A great pic using great light, with the quotes thrown in, it serves to remind us that hard work truly can be its own reward.

Next up is mine.

Hohenfels Volks A Quiet Evening
ISO 100, f/5.6, 2 seconds, 55mm
A Quiet Evening With the Princess

I chose to use a quiet Christmas scene to illustrate the reward I get from a quiet evening with my daughter, Jasmine. Of course, it’s rarely a quiet evening, but it’s almost always rewarding. Sharing her homework, eating our dinner, and enjoying either games or stories together makes the day’s labor worth the effort and more.

The cocoa had whipped topping on it, which had to be replenished to keep some form, as it melted throughout the 15 minutes of shooting for this shot. Smoothing the light with a small bounce brought out the colors in the mug, highlighted the cocoa bubbles, and added a nice bit of depth to the candle. A plus was the layering in the cocoa, from dark to white! For a similar setup, check out our last Ride Along. By allowing the light to fully hit the tree, we got some nice reflections and color from the bulbs and the tree, creating a Christmas feel, which is what spending time with the princess can be like!

Well, that’s it for tonight. For more on lighting glass, check out LIGHT—SCIENCE & MAGIC, from our last Reading List post. Also, check out Jennifer’s blog, it’s in our links to the right. She makes some great pics that deserve a look. I hope we’ll get some more pics posted in our next theme round up. Let’s get everyone voting and taking their pics for this week’s theme, Knock Knock.

Enjoy the rest of your evening, and remember to cast your vote for next week’s theme. Don’t forget to get your pics posted at the Hohenfels Volks Facebook page. Of course, commenting on both Facebook and here is always appreciated, too!

Tuesday, December 27, 2011

Elements of Composition: Negative Space

Greetings and welcome to Hohenfels Volks, THE place for our place. As we begin another workweek here in Hohenfels, let’s take a moment to reflect on what we’re working for. I extended the deadline for submitting to last week’s theme due to the holiday. I hope everyone gets submitting.

Today we’re going to talk about NEGATIVE SPACE. There’s a lot of ground to cover, it’s a wide topic, and there are a variety of views on the subject. We’re just going to touch on some of it today, with more about it another time. Of course, if you really want to, you can Google it for loads of information.

NEGATIVE SPACE is basically the area around the subject of your photo. NEGATIVE SPACE is used in all forms of art, from photography and painting to music and gardening. They even use it when designing logos and trademarks.

When we make photos we place our subject, generally following guidelines, where we feel it will create visual appeal. This subject becomes our positive space, for want of a better descriptor in today’s context. The remaining areas are your NEGATIVE SPACE used to balance the positive space, or to add context to an image. It's generally used in conjunction with other "rules" of composition, like the rule of thirds.

In the minimalist approach, NEGATIVE SPACE often refers to space that carries minimal detail, yet allows the image to work. Much like the photo below. Notice how the background is blown almost totally white or light shades of gray. Another side of this approach is not just monotone, but lacking detail. When most folks see NEGATIVE SPACE, they tend to think that any detail detracts, so like to blur it out. Bokeh comes from this, and makes for great images. You can use blur for effects, for subjects in and of itself, or to add context.

Hohenfels Volks Jasmine in Hohenfels
ISO 320, f/5.6, 1/60, 85mm
Notice the white NEGATIVE SPACE around the princess.

Another great use of NEGATIVE SPACE is to carry minor detail and add to the context of the image. In my Christmas shot, you can see the NEGATIVE SPACE is the background. It’s just a Christmas tree, but too little information creates a blurry mess, and too much creates a distraction. By selecting my f/stop and focus to allow enough detail to show up, it shows a time, Christmas, and creates a sense of being at home. Due to decorations on the tree, and their size, blurring beyond this becomes a distraction, as does greater DOF. You see now how NEGATIVE SPACE can convey time, place, and themes. Using snow-capped mountains would have felt like a ski lodge, a Christmas market would have left one with the feeling on being Nurnberg.

Hohenfels Volks Merry Christmas, Hohenfels
ISO 100, f/5.6, 2 seconds, 55mm
Merry Christmas, Hohenfels!

In both the images above, NEGATIVE SPACE has been used to create a composition that makes the image work. Don’t overlook the importance of your NEGATIVE SPACE when visualizing and composing your shots. Think about your intent and how to use NEGATIVE SPACE to aid your subject in fulfilling your intent. By knowing how to use NEGATIVE SPACE and how it affects your image, you can use it to carry some information or use it outline your subject creating an interesting image. If you use it to create a silhouette, remember the silhouette is generally your subject, not NEGATIVE SPACE.

Enjoy the rest of your evening, and remember to cast your vote for next week’s theme. Don’t forget to get your pics posted at the Hohenfels Volks Facebook page. Of course, commenting on both Facebook and here is always appreciated, too!

Monday, December 26, 2011

A New Theme Knocking

Greetings and welcome to Hohenfels Volks, THE place for our place. Aside from the cold and wet, it was a wonderful day here in Hohenfels. I trust everyone had a wonderful Christmas, I know ours was great!

This week’s voting produced a new them for the week. Only 5 votes were cast with the winner having 2 votes. The theme for this week is “Knock Knock (Nobody's There!)” It’s an interesting theme. How many of think it has to do with door-knockers? How many were thinking visitors, and how many just thought doors?

Have any of our themes been that simple? They may be in the future, but right now, our themes are kind of getting us into exploring our photography a little more. This week’s theme is no different, just a little simpler. For this week’s theme, the goal is to take photos of doors in public places. Photograph old doors, with loads of character to them. The kinds of doors we’re hoping to see are the kind found on old buildings. You can see them in places like Regensburg, Amberg, Munich, and a host of other cities. Don’t overlook the small towns; they have some nice quaint old building with tremendous doors, as well.

It sounds quite simple, doesn’t it? Of course, there is a catch. For this week, your photos should feature no one in them. The doors have to be old. There should be some sign of life, without anyone present. They should be the center of interest, but not take up more than about 1/3 of the image. This allows us to work on our composition and placement, as well. I hope this isn’t too much, given the season. Perhaps that will actually work to your favor, as seasonal decorations can make nice features in your photograph.

My image for the Fruits of Your Labor theme is posted at our Facebook page. I haven’t seen any others, but I’m hoping you will be getting them up tonight before the cut off later this evening. Tomorrow we’ll be discussing negative space as an element of composition, and its impact on our images. That will be a second post; the first one will be your images for the Fruits of Labor theme.

Enjoy the rest of your evening, and remember to cast your vote for next week’s theme. Don’t forget to get your pics posted at the Hohenfels Volks Facebook page. Of course, commenting on both Facebook and here is always appreciated, too!

Saturday, December 24, 2011

Merry Christmas From Hohenfels Volks

Greetings one and all.

Hohenfels Volks merry Christmas Hohenfels
May you be blessed with all the warmth this Christmas season brings! God bless!

We wish you the merriest of Christmases!

Friday, December 23, 2011

A Ride Along For the New Year

Greetings and welcome to Hohenfels Volks, THE place for our place. Aside from the cold and wet, it was a wonderful day here in Hohenfels. 2 days until Christmas and things are looking bright!

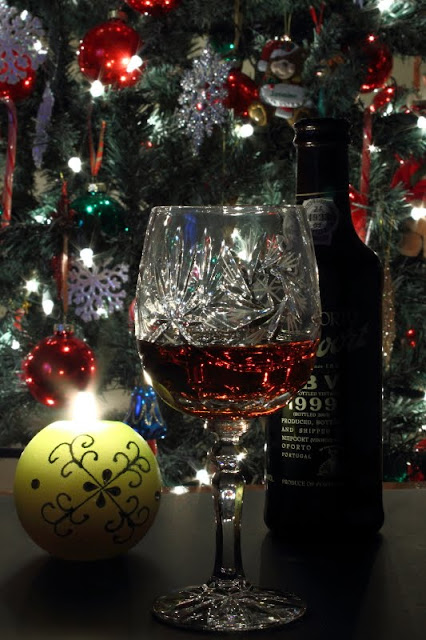
Today we’re going to stay in the living room for another ride along. This time we’re shooting my annual New Year’s Toast shot. Every year around this time, I like to shoot a wine and lights shot that I’ll use to greet friends and family for the New Year. So break out your flash, some wine, and let’s get working.

Hohenfels Volks  Almost
ISO 100, f/32, 30 seconds, 49mm
Here's the image.

As you can see in the photo below, I’ve included my set up. Out of the frame, camera left about 3 feet is a flash on a tripod, shooting through a 42” umbrella at 1/32nd power, at about chest height. The flash provides light for the tree and to capture some detail in the scene. By placing everything on some black card stock, we can minimize glare and reflections, or at least control them to an extent.

Hohenfels Volks setting it up
Here is the setup I used for the above image. A few more feet between the tree and the subject would have rendered some magnificent starbursts.

Having the white card to the right provides some bounce from the flash and provides a little bit of detail and edge enhancement for the wine bottle. On a side note, LBV Port is great for a toast, and while sweet, is perfect to ring in the New Year. Port wine developed a series of traditions around it, especially in naval circles, which is part of the joy of it.

I didn’t want too much detail and lighting, as the bottle has no paper label. The label is painted on, increasing the chance of huge glare and direct reflections. I knew that I would have some glare from the candlelight, as well as some reflection of the candle itself. It actually looks a lot better than I thought, as the candle looks like a thin taper, not a ball.

Shooting at f/32 allowed some great starbursts on the lighting. I thought it was a little much, and the bottle looked a little off being set apart so much. I re-did the shot with the bottle closer and shot at f/22. This allowed a small amount of starburst, but nothing overly intrusive, while keeping a long exposure. It also took out the reflection of the candle. Another nice effect is the diminishing of the bounce to a level that retains the edge of the bottle while adding just enough fall-off to create a mystery about the wine.

Here’s the final version. I think this is the one I’ll go with, even though I’ll try several more versions.

Hohenfels Volks  Happy New Year, Hohenfels
ISO 100, f/22, 30 seconds, 45mm
I think this one better captures the message and adds a bit of the old world to the image. Overall the depth of field provides detail that enhances the shot, and the composition just seems to welcome you into the scene.

I have my shot for this week’s theme in the can. How about you, have you done yours? This week’s theme and the tree allowed for several days of playing around with lighting and thought patterns. What is my reward? How do I enjoy it? I toil and work to enjoy something, but what? How do I light it? The list is endless, but I think I have something that is rewarding for me and may even interest you! It follows a pattern similar to today’s shot, if you like spoilers. How’s your shot coming along?

Here’s wishing you a very Merry Christmas. May this weekend be blessed with joy, love, family, peace, and true rewards! Remember, there is so much to life, that we haven’t even begun to measure our gifts.

Remember to cast your vote for next week’s theme. Don’t forget to get your pics posted at the Hohenfels Volks Facebook page. Of course, commenting on both Facebook and here is always appreciated, too!

Tuesday, December 20, 2011

Invasion of the Gnomes!

Greetings and welcome to Hohenfels Volks, THE place for our place. There are only so many ways to say, “It’s bloody cold,” so I’ll dispense with the description of Hohenfels weather and get right down to it!

Jennifer was once again the only participant for the theme. With Christmas break upon us, and some time off for me, I know I‘ll be participating more in the themes. Here is her magnificent entry.


Image copyright 2011 JennyO

In her words, “I love Gnome's at Christmas... The kind with their little noses peaking out? I love the quaint feel of Christmas past they have…”

Very interesting composition here, it shows some good boke and I love the color in the lights. Gnomes are really cool, and when they’re not scurrying around your lawn, make great subjects. The soft focus adds to the appeal, making this pic almost come to life with the wonder of Christmas and the season. The big gray hat with the red heart on it offsets that particular gnome, which seems to be Jennifer's favorite.

Thanks for sharing this pic; it works really well for the theme and for the season! It'll also be posted under our "Your Works" page.

On to this week’s theme. Something to keep in mind, the fruits of your labor do not have to be physical, nor do your labors. Time with the family can be both a labor and the reward depending on your presentation. As mentioned in the theme during the voting, hard work is its own reward. While many of us don’t think this way in today’s society, it’s a saying that still holds true. Break out the camera, visualize your rewards and how you’ll present them, and watch them appear.

Remember to cast your vote for next week’s theme, we don't want another tie. Don’t forget to get your pics posted at the Hohenfels Volks Facebook page. Of course, commenting on both Facebook and here is always appreciated, too!

Monday, December 19, 2011

A New Theme- The Fruits of Labor

Greetings and welcome to Hohenfels Volks, THE place for our place. Another week is starting, this post is late, and things are beginning to get icy here in Hohenfels. There are signs of the season all around us, both with the small amount of snow remaining and the decorations everywhere. Christmas parties are keeping everyone busy, celebrating the season, and rejoicing in the warmth of their friends and family. I hope everyone is ready for Christmas and for the break it brings.

There were 7 votes cast for this week’s theme, which led to a 2-way tie between “Flattery (Not everything complimentary is flattery!)” and “The Fruits of Labor (Hard Work Is Its Own Reward???)” each with 3 votes. That means it’s my choice, and after rolling the dice, the winner is “The Fruits of Labor (Hard Work Is Its Own Reward???).”

Everyone toils at something. Every day we strive to produce something of value. The farmer toils at raising his crops, the rancher at raising his cattle, and the vintner at creating his distinguished wines. Some of us sell our time and work at producing during that time what our employers require, for the agreed upon price. Whether you’re an employee or self-employed, you labor for something. In the end, there is an exchange of one value for another, and the value you receive is what you use to acquire or build the fruits of your labor. Maybe you spend your time gardening, maybe you spend all day cooking a wonderful dinner, complete with fresh bread and a hearty beef stew, these things are your toils. The centerpieces for your table made of your own flowers or that rib sticking stew are the fruits of your labor.

This theme is about showing those fruits and their enjoyment. If it’s just showing a few moments with the family, or the vintner sampling his wine in the fields while viewing a magnificent sunset, show us. Some fruits are intangible, for instance the soldier who toils for liberty and the doctor who labors to heal, the reward can be intangible. If your fruits, the reward you get for your toils, are intangible, go back to what art is. It’s the concretizing of values or ideas. This theme will probably require you visualize your composition more, as well as be more creative than usual. Throw some ideas around your head, pick a few, and give them a try. You'll start seeing it come together, much like the product of your labors!

All that being said, the theme this week is show something you feel is a reward for your labors. That soup, that wine, or the blanket of freedom under which we warm our souls, show us and share with us the value you receive. Even if it’s just a pair of callused hands, it shows us that hard work and its rewards can become art!

There are a lot of great things here in our Hohenfels area, reward yourself today, and show us that reward for this theme! I’ll post the submissions tomorrow for the Expose Yourself theme. So far, we only have one! I hope we’ll get some more. Next week we’ll have more, as time is becoming momentarily more available for me to participate.

Remember to cast your vote for next week’s theme. Don’t forget to get your pics posted at the Hohenfels Volks Facebook page. Of course, commenting on both Facebook and here is always appreciated, too!

Thursday, December 15, 2011

Reading List: Light– Science & Magic

Greetings and welcome to Hohenfels Volks, THE place for our place. Another wet, rainy, and cold Thursday draws to a close, making us thankful the warmth of home!

Today’s reading list is LIGHT—SCIENCE & MAGIC an Introduction to Photographic Lighting, by Fil Hunter, Steve Biver, and Paul Fuqua.

This book is a veritable goldmine of lighting knowledge. These guys have put together something that no photographer should be without. This great book introduces us to light, its characteristics, and how to use it. There are lessons, exercises, and lots of ideas to be had here. They’re on the fourth edition now, which just goes to show you how valuable a resource it is.

Much of what they cover applies even without a flash. The nature of light is the same, whether you’re using a flash or shooting ambient only. The book starts at the most basic information about light, runs through light transmission, reflection, refraction, and onto to more photographic information. They cover angles and the families of angles, as well as some very useful stuff that will make you say “Aha, that’s how they did it!”

One of the early points in the book is that not every photographer has enough lighting equipment to light everything perfect, but every photographer has enough to do things well. A flash or studio strobes are nice, but light is light. It generally acts the same every time, which allows us to use almost any light source for great results.

The other really nice thing about this book is that it covers even tricky subjects like glass and metal. That alone makes it an invaluable resource to someone trying to learn lighting. It’s definitely worth the price. Check it out and let me know what you think.

I hope things are coming along nicely as you work on exposing yourself for this week’s theme. I can’t wait to see what you Volks come up with!

Remember to cast your vote for next week’s theme. Don’t forget to get your pics posted at the Hohenfels Volks Facebook page. Of course, commenting on both Facebook and here is always appreciated, too!

Tuesday, December 13, 2011

Around Hohenfels: Christmas Time

Greetings and welcome to Hohenfels Volks, THE place for our place. Pack your camera for another trip Around Hohenfels.

Today we’re going to Nuernberg’s Christmas market, so get your camera ready!

The best way to get there for our purposes is via the train. You can get a train in Parsberg and it takes about 30-45 minutes to get there. The trip costs about 30 euros if you get the Bayern pass, which is good for round trip, up to 5 adults.


ISO 400, f/4.5, 1/50 second
Inside the old Handswerk area across from the Bahnhof. Using the lamps, leading lines take us into the tree.

As you exit the station, from underground, you are at the old walls and the Handswerk section. There are some great shots in this old area, especially at this time of year. Once you exit onto the main strip toward the market, you’ll be greeted by booths and vendors selling gluhwein, bratwurst, leibkuchen, and so on. The ½ meter feurwurst is hot and spicy, but has a nice taste and warms you up!


ISO 100, f/8, 1/4 second
Decorations on a bratwurst stall


ISO 400, f/5.6, 1/50 second
Brats of all types for sale.

As you proceed towards the actual “market proper,” you’ll encounter more booths selling everything from fruits to flowers, bratwurst to cocoa! What a walk, cold air, and a mug of your warm drink of choice. It feels like Christmas. Along the way, you're likely to see buskers dressed in holiday outfits.


ISO 100, f/8, 1/13 second
Santa and his dog take a break and pose for us.

Once you get into the market area, it’s crowded, people everywhere. Booths set up and selling all kinds of Christmas decorations, toys, food, and more gluhwein! Along the way you can buy a nice hot mug of real hot chocolate, the kind made with hot milk and real melted chocolate! Don’t dally with it, it starts skimming over, and unless you’re stirring or drinking it, gets pretty thick. If you have kids with you, it’s a real treat. They love it! Down one of the side ways is the kinder market, where rides of all types are available for the little shoppers. It’ll drain your pocket, and leave you no time for shopping if you don’t set a limit.


ISO 400, f/8, 1/32 second
Handmade decorations for sale. Putting the globes on one side, and balancing with the light makes a warm reminder of Christmases long ago, as well as a reminder of the light of Jesus entering our lives.

Back at the market, a trip through the booths and stands gives you some good choices for this year’s tree, both on it and under it! Don’t forget to take in the nativity scene and the towers erected for the celebrations, and keep an eye out for the Christmas angel making her rounds! It’s almost like a small town feeling here in the city. Don’t forget to visit the churches, as they are done up for the season, as well. Bring your flash and knowledge of the exposure triangle. Remember to make a small offering, it will be appreciated.

On your way back to the train, stop and get that cocoa or gluhwein, keep the cup, as the cost is included, Don’t forget to get that feurwurst to warm you up. Enjoy the train ride back to Parsberg and Hohenfels, while you review the great shots you got.

Back in Hohenfels now, you can work on planning and visualizing your shot for this week’s theme! It doesn’t have to be as deep as we discussed yesterday, just show a bit of your likes or dislikes, and make us see it, too. You’ll pull of something wonderful if you can make people feel what you want them to.

Remember to cast your vote for next week’s theme. Don’t forget to get your pics posted at the Hohenfels Volks Facebook page. Of course, commenting on both Facebook and here is always appreciated, too!

Your Bubbles

Greetings and welcome to Hohenfels Volks, THE place for our place. Another cold and frosty morning stirs through Hohenfels and the surrounding area like a spoon through cocoa.

Our first post today features all the submissions your submission from last week’s theme, bubbles of light. Once again, Jennifer was the only one who submitted. Here’s the great shot she gave us.


Jennifer’s bubble

It’s very interesting, and it shows us how light can have its ups and downs, as it were. Using the lamp the way she did, shows us exactly how light can form a bubble. By putting herself in the corner, and using a somewhat rounded light source, she created a bubble of light around herself. You can see the light falloff on the 2 walls and the shape of the light itself really worked in this shot.

Due to the nature of light, you can create a source that seems to be a bubble using anything rounded. One good way to see the bubble is to place an IPad with a white screen face up under a semi-transparent Tupperware bowl. When you place a vertical object next to it, you can the bubble shaping up, just like the bubble that took form in Jen’s photo. By placing more objects at differing distances from the light source, you can create even more of a bubble. It’s all caused by light and the physics behind it. The primary thing to know about light is the inverse square law. If an object’s distance to a light source is double, the light’s apparent power is quartered due to spread and the nature of light.

In a later post today, we’ll be going to Nuernberg’s Christmas market, so get your camera ready!

Remember to cast your vote for next week’s theme. Don’t forget to get your pics posted at the Hohenfels Volks Facebook page. Of course, commenting on both Facebook and here is always appreciated, too!

Monday, December 12, 2011

Exposure and Exposing?

Greetings, Hohenfels, welcome to Hohenfels Volks, THE place for our place. Monday in Hohenfels, the start of a new week, finds the children going to school, the adults going to work or the fields, and the rest of us going in 10 different directions.

Of course, here in Hohenfels, Monday also means another theme. Based on the voting, this week’s theme will be “Expose Yourself (Umm, NOT like that!),” with 50% of the votes. 50% sounds so much nicer than 3 votes. This week, we should get a lot more votes, and a lot more participation, I hope!

The purpose of last week’s theme was to see the light, the way light moves, and the way it rises and falls. I hope, even if you didn’t participate, you were able to do some work with lighting. One of the tips I offered was to place an IPad with a white screen under a semi-transparent bowl. The bowl creates a half dome, allowing for easier viewing of the “bubble” created by the light. This “bubble” is not so much a thing you see, but something you notice in the way it interacts with the scene. I’ll have more about the nature of light and what I call “the bubble effect” in another post.

Moving on to this week’s theme, it should be easier than last week’s! At least, it should be somewhat easier. Because photography is an art, this week’s theme deals less with the technical side, and more with the expressive and artistic side of photography. This is where it may be harder, too. Because to do a shot that meets this week’s theme, "Expose Yourself (Umm, NOT like that!)," means injecting your self into the image. Notice how I separated yourself into 2 distinct words here, your self. By injecting your self into an image, you can create an impact with your photos and control the reaction of the viewer.

Here are some thoughts to make it easier for you to Expose Yourself. One way is to think of that which you value, it may be a possession, a person, or an ideal. Some ideas are a family member, the relationship you share with a special friend, integrity, hard work, and liberty, just something positive in which you place high stock. Think about how that which you value makes you feel, and how you can best show, and share, the feeling you get. The key here is not to be in or part of the image, beyond its creation.

Perhaps your memories of long ago Christmases with family gathering, and the smell of the tree can bring a feeling to you like nothing else. Share that feeling by creating an image that represents the memories. Maybe you hate the way the politicians use the commoditization of poverty to stay in power; it really gets your goat to see people enslaved to the greed of the powerful elite. Capture something that shows that, that shows us the way these people bring you down, that makes us angry right beside you. Of course, it could just be as simple as that magnificent golden pink glow as the sun sets over an idyllic village somewhere in the heart of Bavaria. Tinged with light pinks, purples, and bold fiery reds, the sunset made you feel like the magic of childhood. Share that feeling!

The most important thing for this week is to bring your feelings to fruition through your work, to share that feeling and moment with us, to make us feel something you felt when you viewed the scene before taking the image, to wow us the way you were wowed. Now doesn’t that make you feel better than what you were expecting when you saw “Expose Yourself” as one of the choices?

Remember to cast your vote for next week’s theme. Don’t forget to get your pics posted at the Hohenfels Volks Facebook page. Of course, commenting on both Facebook and here is always appreciated, too!

Friday, December 9, 2011

Shoot for the Star...bursts!

Greetings, Hohenfels, welcome to Hohenfels Volks, THE place for our place. I hope the week has been gentle to all.

How are the bubbles coming? Are they taking form, or are you stuck? Have no fear; your vision can carry the day. Just stop to see the light and you’ll come up with a winner.

Jennifer, who’s blog can be found here, liked a link the other day that I found very interesting. Click it Up a Notch is a great source for learning photography. The blog has some great tips for beginners and anyone looking to improve their images, and is backed up with some wonderful photos. Check it out!

The post she liked and I read was 5 Tips for Shooting Christmas Lights. Nice post, nice pics, cool blog. I decided to do a post about starbursts. They make for some awesome additions to a good composition.

The first thing to understand about starbursts is that they are caused by light diffraction. The light bends as it passes the blades in your diaphragm, which changes the way the light hits your sensor. Light that is brighter than the surrounding areas tends to streak as it passes over the blades, creating starbursts. We all love to see some of them in our images, especially nighttime and Christmas shots. The actual rays or spikes in the starburst are caused by light passing over the blades where 2 of them come together. The more blades you have the more rays you’ll get. The funny thing is that even numbers of blades cause the number of rays to match the number of blades. In a lens with an odd number of blades, the number of rays is actually twice the number of blades. I’m not a physicist, so I can’t explain it. You can get decent starbursts even at apertures like f/8 or f/11 depending on your focal length. Most people tend to shoot for them at f/22 and sometimes higher. The shorter the focal length you use, the smaller the aperture is at the same f/stop, and the more likely you are to get good ones, at least that’s the theory.

Another important thing to remember, if you want to print your photos at 8x10 or larger, is that over about f/16 on an APS-C sensor you start losing sharpness in the details. It’s a trade off, so think about how you wish to present your pic.

Here are some photos that show the effect and the difference in blade count between 2 lenses.


ISO 100, f/16, 30 seconds, 200mm
If you count the rays on the large light on the bridge, you'll see this lens had 9 blades. This shot and the next one were taken in Wurzburg with an old 300D from Canon.


ISO 100, f/22, 30 seconds, 165mm
You can see a slight drop-off in sharpness, but more pronounce rays.


ISO 100, f/16, 10 seconds, 18mm
Notice 6 rays emanating from the bulbs. The lens had 6 blades to the diaphragm.


ISO 100, f/8, 20 seconds, 55mm
The starbusts here are minimal, and slightly soft. At a shorter focal length, perhaps something better might have appeared. This was taken with an old Canon 300d in Hohenfels, as was the previous photo.

There is another way to get starbursts. You can buy filters for your lens. You can choose from any number of rays and they apply the effect equally to all lights. That takes the fun out of it, but they could come in handy.

Here in Hohenfels, and in the towns around us, there are so many places that light up a tree or wreaths. Get out there and you'll find something to shoot for the starbursts! You don't even have to leave your house during this time of year! Try it on your tree, you'll see some cool things happen.

Remember to cast your vote for next week’s theme. I hope to see more than the 4 votes we have right now. 19 Volks like us on Facebook, I hope 19 will vote! Are you thinking of your bubbles? I hope to get something in if time allows me to shoot today! Remember to get your pics posted at the Hohenfels Volks Facebook page. Of course, commenting on both Facebook and here is always appreciated, too!

Wednesday, December 7, 2011

A Morning Moment

Greetings, Hohenfels, welcome to Hohenfels Volks, THE place for our place. I hope everyone is having a great week. Hohenfels can be beautiful this time of year, so keep your eyes open for photo ops.

Today’s post is featuring photos submitted for last week’s theme. Only one was submitted. That was by Jennifer O. I'm sorry I didn't get this up yesterday, but here you go.


The photo was an interesting thought. I wish I had thought of it! Nice idea, capturing the motion and the never-ending madness that is our day-to-day morning rush. The composition is good and the lighting is there. I like the way there is some light in the sky, letting you know it’s almost light out and makes the nice colors of the trees pops out at you. The diagonal track of the sign makes it seem like there was speed going on here and adds a nice touch. That may be an upcoming theme, speed or rush, what do you think?

The one thing I would suggest for a shot of this type is to use your zoom instead of actually driving. By using your zoom and staying stationary, you can read the words in the sign and have a sense of warp speed motion. A long exposure, focused sharply on the sign would have made an extra bit of niceness to a good photo. The secret for that is using a slow shutter speed, and maintaining your focal length for about half the exposure and zooming in, or out, over the remaining half. The big thing about doing it that way is the safety factor. Using the remote was probably safer than some folks I’ve seen, shooting out their windows while they drive by something nice!

Thank you, Jennifer, for sharing your really cool photo and your great idea with the rest of here in Hohenfels. Thanks also for spreading the word and the link. I can’t wait to see what you and everyone else comes up with for this week’s theme, bubbles of light.

Remember to cast your vote for next week’s theme. Are you thinking of your bubbles? Remember to get your pics posted at the Hohenfels Volks Facebook page. Of course, commenting on both Facebook and here is always appreciated, too!

Monday, December 5, 2011

Tiny or Big, it's Bubbles!

Greetings, Hohenfels, welcome to Hohenfels Volks, THE place for our place. I hope everyone is having a great weekend. Today is definitely a Monday; if ever there were one, this would be it. Hohenfels, complete with cold, rain, sun, hail, and whatever else came our way. Don't worry, though, Christmas will soon be here in our little Hohenfels area, and all the joys that come with it!

Well, this week one person submitted for the theme. Thanks to Jennifer for your submission, I’ll try to get it up here tomorrow after discussing it with her. Then, there is the news that the 6 votes are counted. Our theme for the week will be Bubbles (... Of Light, DUH!) This is more advanced than last week’s; so let’s get this ball rolling.

This one may make you think, it may make you scream, or it may make you rise to the challenge and create something magical. Of course, it may make you do all 3! A bubble of light? What is it? What does it do, and what’s it look like? How am I supposed to do this without any knowledge of this bubble thing, and if this one bursts and ruins the economy, who gets the blame?

Relax; it’s nothing like that. Creating a bubble of light is a trick that can be seen by looking back at our post on chiaroscuro, which can be found here. The biggest secret is that light moves and bounces according to your light source. One of the easiest ways to create the bubble for this week’s theme is to use off camera flash and a semi-translucent half dome. The effect can be even more apparent with subjects cloaked in dark and shrouded in light, with nice transition between the two. Of course, it’s not really like a bubble, but presents the illusion of one.

By examining the image from that post, you can see how it seems as if the ladies are surrounding a glowing orb. By knowing how and where light falls, Van Honthorst was able to create the magical lighting in his image. It seems as if the matchmaker is closer than the older ladies are, almost like she’s showing a treasured globe. The lighting here, and the resulting bubble, come from the shape of the candle flame. Another type is to make it seem as if your subject is encased in a bubble of light, almost like a snow globe. Examine some rounded shapes, balls, bubbles, footballs, and other items to see how the light falls on them. Knowing that can help you figure out how the light radiates from them, and what kind of bubble you might expect.

For those without a flash or the ability to trigger it remotely, you can use lamps of any kind, LED flashlights, anything that will create the type of bubble you want to make. The important thing to remember is the shape of your light source and how the light will radiate from it. Flash or other types of light will produce almost identical results in that department. You can also work some more of this type of magic with multiple lights, and colored gels. When you shoot in B&W, the color of your light can be changed, and a matching filter added to increase the effect even more. The sharper your transition to dark from light at the very edges, the more abrupt and sharp your bubble will appear. Keep that in mind.

If I get some time this week, I will try to make an example image, but I probably won’t have much time. The new poll for next week’s theme is up, it expires at midnight on Sunday night. Here's hoping we get at least 19 votes this time around! Get your votes in, vote early, and let’s bring volks into this theme.

Tonight, take the time to check out some spheres, globes, bubbles, and balls. Take a little time to visualize your own shot; even it’s an exact copy of Van Honthorst’s painting. Write down some ideas. Then during the week, refine your visions and your notes. Once you’re ready and your vision is fully fleshed out, set up your scene, blow your bubble, and get the pics posted at the Hohenfels Volks Facebook page. Of course, commenting on both Facebook and here is always appreciated, too!

Saturday, December 3, 2011

The One That Got Away

Greetings, Hohenfels, welcome to Hohenfels Volks, THE place for our place. I hope everyone is having a great weekend.

Today’s just going to be a thought for you. Something to mull over and think about when you’re going out to shoot. It’s called attention to detail. It’s something you need to practice, even when you’re visualizing your shot!

Yesterday was a long day! After work, I went over to the community tree lighting with the daughter, for her it was to see Santa, for me it was to take pics! Take pics I did, a whole lot! After getting a few shots, including some that couldn’t be redone, I discovered my IS was turned off on the lens I was using. That meant the pics I had shot at 1/30 were going to be slightly soft in the focus, and that also meant I was feeling a little down! After writing about IS in a previous post about lenses, I should have known better. D’OH!

Anyway, after kicking myself, and turning the IS back on, I went on to get some decent shots. After seeing Santa and some of our wonderful friends, we went to a little party for a friend’s birthday, and I shot a handful of keepers. Another thing I had forgotten was to bring the tripods and lighting mods, which meant more effort to get the light right, but the shots were worth it.

The point is, check your equipment before turning it on. Check it before you even begin thinking about using it. Check it as part of your visualizing; by seeing yourself take the actions to make your vision reality, you’re rehearsing the steps you need to succeed. It will make your pictures better and save you the shame of losing the one that didn’t get away until you snipped the line!

O.K., enough of that mourning the lost shots, remember to get your votes in for next week’s theme. We have a 4-way tie right now, and that means it’s my choice if we end the week that way! This week our theme is “Morning Moments.” I hope to see everyone participating! Get shooting and start posting at the Hohenfels Volks Facebook page. Of course, commenting here is always welcome, too!

Thursday, December 1, 2011

Ride Along Shot- Avoiding the Cold

Greetings, Hohenfels, welcome to Hohenfels Volks, THE place for our place. I hope everyone is having a great week and looking forward to something great this weekend.

For our ride along today, I thought we’d stay in lovely Hohenfels. In fact, it’s so cold and gloomy; I thought we’d stay inside. Let’s go to the living room and get started.

This is my first Christmas photo of the season. There’ll be many more, I’m sure, but getting this one set up and in the camera is always exciting. Last year, it was a bottle of wine with a glass and the tree.

Hohenfels Volks- our first Christmas shot
ISO 100, f/4.5, 15 Seconds, 53mm, 3000K
Merry Christmas!

Come Christmas season, I love to take creative shots that illustrate this time of year. I visualized this shot all day while cruising Nuernberg's Christkindlmarkt. Getting home, I rushed into the house to get the shot set up and going. Of course, this kind of shot requires shooting on a tripod with IS turned off. That means using a remote trigger. I like using a remote trigger cable, some folks prefer wireless. Locking up the mirror allowed for that little bit of extra sharpness in the glass and the decorations surrounding the candleholder. Focus was on the glass to minimize the DOF between tree and candle. Placing the candle holder in sharp focus at or near an intersection of thirds isolates it and makes it the obvious center of interest, while allowing the eye to wander through the tree and memories of long ago Christmases.

This shot proved more difficult than first glance implies. I’ll be trying this one a few more times to get it perfect, but I really enjoy the way it turned out. It just says “Merry Christmas!”

After several failed attempts using multiple flashes to light the tree some and the glass, I went with a longer exposure and used just one flash. After getting the exposure started, I manually fired the flash at 1/128th power with the head zoomed in to 110mm. The flash comes in from camera left at about 45 degrees to the candleholder. The second pop of the flash at the same level was again camera right, zoomed to 50mm almost dead at the tree. The third and final pop, again at 1/128th and 110mm zoom, was aimed at the platter and decorations around the candleholder from camera right.

By setting the flash at minimum power and adjusting the zoom, I was able to bring out the green of the tree, the colors of the decoration, and use the longer focal length with a wide aperture to create some nice boke, or blur, behind the glass. It also highlighted the edges of the glass, and shows the nice, almost home spun, texture of the candle glass. It also allowed some detail in the decorations around the base of the candle.

Shooting at 15 seconds allowed me to manually zoom, aim, and pop the flash. That brought the whole thing together, bringing out detail while allowing a warm winter night feel to the image. The highlights in the image were slightly overexposed to allow for detail in the shadows, and it was darkened during conversion from RAW in Canon Digital Photo Pro software. I lowered the color temperature to about 3000K to bring out the green in the tree and hint at the blue in the platter holding the decorations and candleholder.

The candleholder was one that Mrs. Hohenfels-Volks picked up at a local market. The little things you can pick up at Moebelhof and other such places can really add some flavor to your photos. I’ll definitely try this shot again, perhaps with a snoot over the flash and some black cards to darken the highlights in the glass, perhaps giving a more old timey feel to it.


Same settings as above image
Here’s another version with the color temperature raised to about 3500K. Adding in that little bit of red makes it feel almost as if a fireplace is blazing somewhere in the room.

Now on to other things, remember to get your votes in for next week’s theme. We have a 3-way tie right now, and that means it’s my choice if we end the week that way! This week our theme is “Morning Moments.” I hope to see everyone participating! Get shooting and start posting at the Hohenfels Volks Facebook page. Of course, commenting here is always welcome, too!

Wednesday, November 30, 2011

Tools of the Trade- More on Lenses

Greetings, Hohenfels, welcome to Hohenfels Volks, THE place for our place. Here’s hoping today sees you starting on the downhill run of a great week!

Today it’s time to talk a little about lens attributes and traits.

We’ve already talked a little about lenses, so today we’re going to concentrate on some of the quality issues and features of your lenses. It’s a little long, for which I apologize.

One of the first things most folks need to know is that your old film lenses will work on digital cameras. They may have a crop factor, for instance 1.6X for APS-C, but if they can mount on your camera, you can use them. On the other hand, your newer digital lenses are unusable on full frame or film cameras. When you put a film lens on an APS-C sensor, the crop factor comes from the distance from the back of the lens to the sensor. The film lenses cover a larger area than the sensor; this in turn causes an apparent increase in focal length and the crop. Canon’s recent systems, the EOS cameras, use EF lenses, which have a 1.6X crop on your APS-C sensor. Their digital line of lenses for the EOS system is the EF-S line. They require no crop factor and apparent focal length is actual focal length. The reason the digital series of lenses don’t work on full frame or film cameras is due to their smaller projection of the image onto a smaller sensor. They won’t fill the frame or film, and most likely won’t even focus properly even if they could be mounted.

Another concern about your lens on zoom lenses is often the aperture. Less expensive lenses read something like 28-135 f/3.5-5.6. This is because the aperture size doesn’t change during zooming, that is the largest it can go. The area of the aperture remains constant, requiring a change in f-number. If you remember, your f-number is a ratio of focal length and aperture. It represents the focal length divided by that number, that’s why it’s written f/2, f/5.6 etc. The longer a lens is, the less light reaches the sensor. That’s why the f/number changes throughout the range of zooms. If your area doesn’t change, your f-number must. The reason for this is the cost and weight added to vary the aperture size throughout the zoom range. That doesn’t mean a constant aperture means a cheap lens, it doesn’t mean less quality, it just means less light as you zoom in.

A great feature of lenses over the past few years is the addition of IS. The affordability of technology has made it possible to use feature that used to be unavailable to the hobbyist. IS allows slower shutter speeds when enabled. Using it hand held, you can get down to about 3 stops lower that the handheld limits. The systems work by compensating for motion with motion in the opposite direction. When hand holding your shot, using proper shooting styles, with arms tucked in etc, will enable the IS to really slug it out with vibration. The most important thing to remember is turning it on for handheld, and ALWAYS turn it off for tripod shots. When on a tripod, the IS searches for motion in the lens and can cause vibration rather than reducing it. The big drawback to IS is that it uses your camera’s battery for power.

The last thing I’ll bring up for now is a quality issue. The problem is chromatic aberration or CA. This is distortion caused by different colors, or wavelengths, of light focusing at differing areas on your sensor. There are several types and names, but we’re not going into it that deep here. It often causes the purple fringing that you see along borders with bright highlights and dark shadows together. Using a smaller aperture can help mitigate this, as can a longer lens. Low dispersion glass and good coatings can combat this effectively. There seems to be many complexities involved in CA, including the types and calculations. The best practice when purchasing a lens, if possible, is to take a test shot using that lens of a high contrast area, and zoom in looking for fringing. CA can also cause blurriness in Black and White photography, so keep that in mind. You can see examples on Google to get more information and some idea of what to look for. According to the reviews I’ve read, Canon makes the most advanced software correction to mitigate CA and other distortions available. Because Canon’s EF lens system is actually all electronic, and records the information on individual lens models, Digital Photo Pro can compensate for it. Yet another advantage of shooting RAW!

Whenever you look to purchase a lens, make sure you read a variety of reviews, and look at loads of test photos taken with that lens, it could save you some headaches! If you have a lens that you favor and would like to write it up here, let me know, and I’ll get it posted for you!

Now on to other things, remember to get your votes in for next week’s theme. This week our theme is “Morning Moments.” Dazzle me with your work! Get shooting and start posting at the Hohenfels Volks Facebook page. Of course, commenting here is always welcome, too!

Tuesday, November 29, 2011

Tech Talking

Greetings, Hohenfels, welcome to Hohenfels Volks, THE place for our place. Here’s hoping your week is off to a good start and Tuesday didn’t turn in to Monday part 2.

Today we’re going to introduce the concept of “Dynamic Range.” If you remember our introduction to the Zone System, there are 11 zones, 0-10. Ansel Adams considered this the full range, zones 1-9 were the dynamic range, and 2-8 the textural range. Zone 2 is the lowest value that retains discernable texture, and zone 8 is the highest value retaining usable texture, and in both cases the values where detail is preserved and recorded.

When we speak of dynamic range today, this still in some ways holds true. Metering from a gray card, it’s how many stops of exposure above and below middle gray that are usable. For instance, the EOS 7D has about 8 stops. Its range consists of 5 stops below gray before clipping to black or solid noise, and about 3 stops above middle before blowing to white. This means it runs from about zone 1 to zone 8, maybe a little higher. Each camera’s range is different; so don’t use one camera’s range to guess another’s. "Dynamic Range" determines the amount of contrast an image can have and how sharply that gets applied. It also can effect how you change the sides on your exposure triangle, based on your intention.

When you know your camera’s range, you can adjust your exposures appropriately. If you wish to increase middle gray, zone 5, to zone 6, you have to know your limits before the higher zones blow out. Taking 5 to 6 brings zone 7 to 8, and anything starting at or above 8 will be blown to solid, textureless white.

A camera’s range often times is limited by the size of the photocells or photosites. These are the individual receptors on the camera sensor. A larger frame sensor will usually have larger photocells, allowing more light to be received and detail retained. There are millions per most of today’s sensors.

Another way to expand your “Dynamic Range” is to always shoot RAW, as your camera records more information. You can add up to a stop and a half shooting RAW. Shooting automatically and in JPEG mode can cost you that latitude in your exposure. Keep that in mind when shooting in very bright or low light conditions.

Well, that about wraps up our discussion. Try to keep that in mind when you’re out capturing the beauty of Hohenfels, our area, and your holidays. The results will amaze you.

On to other things, I’d like to remind all of you to get your votes in and get working on your photos for this week’s theme, “Morning Moments.” I can’t wait to see what you amaze me with!

Shoot for the love, of photography, your subjects, and your art, it really will show! Get shooting and start posting at the Hohenfels Volks Facebook page. Of course, commenting here is always welcome, too!

Monday, November 28, 2011

Morning Moments?

Greetings, Hohenfels, welcome to Hohenfels Volks, THE place for our place. I hope everyone out there had a magnificent Thanksgiving. There is so much to be thankful for, that one day is never enough!

I see no one posted their photos for Thanksgiving With a Twist. It’s too bad we didn’t get to see what you came up with. I visualized several series of shots, but due to limited space had to go with something else. I wound up with a shot that only had a couple inches DOF. Nice shallow view and some nice blur, but not what I originally wanted! Oh, well, roll with it.

Hohenfels Volks cake
ISO 400, f/5.6, 1/25, Focal length 100mm
The cake here is about 3 inches thick. That gives about a 1-3 inch depth of field. the secret is a long focal length with a wider aperture.

This week’s theme, chosen by you voters out there, is “Morning Moments (Morning Shots, Wake Up!)” This theme is most likely going to cause some consternation. The guidelines for the theme are:

1- Photos must be shot between 0400 and 0700
2- You must take your photos between 0400 Tuesday morning and 0700 Sunday morning.
3- Photos are not shots of your morning routines, they should be something at least 1/2 KM away from your home. Perhaps a landscape or nice shot of your town.

Remember, when shooting in the morning or evening, bring a flashlight! Not only will it help you see, it will help you focus. Try to visualize your shot a day or 2 out to minimize wasted time in the cold, and visit the location prior to shooting it to get an idea of the ground and troubles you might expect.

Next week’s poll is up, and includes those not chosen for this week and something new to replace this week’s theme. All the themes we’re going to explore are meant to push your photography and bring together some of our lessons and talks. I hope you will enjoy them! I’m looking forward to more votes, and more participation in the theme.

Taking photos, it’s something we all love to do. Get posting and share the love at the Hohenfels Volks Facebook page, and or by commenting here!

Wednesday, November 23, 2011

Happy Thanksgiving, and Pushing the Theme

Greetings, Hohenfels, welcome to Hohenfels Volks, THE place for our place. I hope everyone out there is blessed with a wonderful Thanksgiving. Living in Hohenfels gives us lots of options for celebrating our thanks and thankfulness. May you always have an abundance for which to be thankful!

Remember, tomorrow is the time to bring your visualizations to life. Share your thanksgiving with us. Whether it’s something you’re thankful for, or your way of celebrating that, show us your vision and bring us with you for the ride along! I’ve already been visualizing so many different shots. I’m hoping to get the main one, complete with turkey! We’ll find out soon enough, right? Monday is the deadline to get your pics posted. After that, we’ll come up with a new theme. Vote for your favorite theme now, the one with the most votes will be chosen.

Again, Happy Thanksgiving. Enjoy this time to show our gratitude for all of God’s blessings, and to share the time and sentiment with our loved ones.

Remember to share your pics and post your questions at the Hohenfels Volks Facebook page, and or by commenting here!

Tuesday, November 22, 2011

Reading List: The Negative

Greetings, Hohenfels, welcome to Hohenfels Volks, THE place for our place. Shorter days and lots of fog made our visibility very limited this Tuesday. Cold, foggy, and wet, together they combine to make for some serious winter like weather. It looks like Hohenfels can expect snow before too awfully long!

This post will introduce the book “The Negative.” This is a piece of advice for those who desire more knowledge about photographic techniques and methods. Ansel Adams wrote The Negative in the 1940s as part of his series on photography. It was part 2 of a 3 book series. In its final version, written by Adams in 1981 and still published today, it provides an incredible amount of guidance to the photographer and would be photographer. It also helps the photographer understand exposure in more detail, breaks down controlling exposure and contrast, and introduces concepts and theories that will advance even the beginner along the path toward better photos.

The chapters include Visualization, Exposure, The Zone System, as well as chapters on natural light, artificial light, and filters. I find the chapters on exposure and the zone system to be the best material on the subjects. One of the main reasons is that Ansel Adams explains exposure in extreme detail, while making it understandable to anyone remotely interested. The other reason is he co-created the zone system. No one else could have brought it within the grasp of so many people.

Even though he wrote this book for users of film, Adams himself envisioned a sort of digital photography. When you take into account that photography remains writing with light, and that the concepts are the same, you can see the use of studying this handy book. Some of the terms used may no longer be common, like candles/square foot, but the information remains within grasp. For example, in the previous example of foot candles or candles per square foot, a lux meter will give you a measurement in lux, which can be converted to c/f2 by dividing the lux reading by 10. Knowing this, you can use a reflected light lux meter, do the math, and use the exposure formula in chapter 3 of this wonderful book to get your exposure correct. A concept introduced is that every ISO has a native aperture. That native aperture is the square root of the ISO. For example, ISO 200 has a native aperture of approximately f/14. ISO 125 has one of f/11; ISO 400 is f/20, and so on. Keep that in mind, as in an upcoming post we talk about the exposure formula.

Another great feature of this book is the inclusion of some of Adams’s amazing photography to emphasize a point or introduce a concept. If you only get it for the pictures, it’s worth the price. You can get it for as little as $12.00 new!

On to something else. Are you visualizing your shot for this week’s theme? Are you thinking about how to get something great, just the right DOF, and how to get the angle? I’ve had a couple cool ideas. I can’t wait to see what you come up with!

Well, Volks, here’s hoping your week stays short and interesting.

Remember to share your pics and post your questions at the Hohenfels Volks Facebook page, and or by commenting here!

Monday, November 21, 2011

Ride Along Shot- Proof of Zombies

Greetings, Hohenfels, welcome to another Monday and to Hohenfels Volks, THE place for our place.

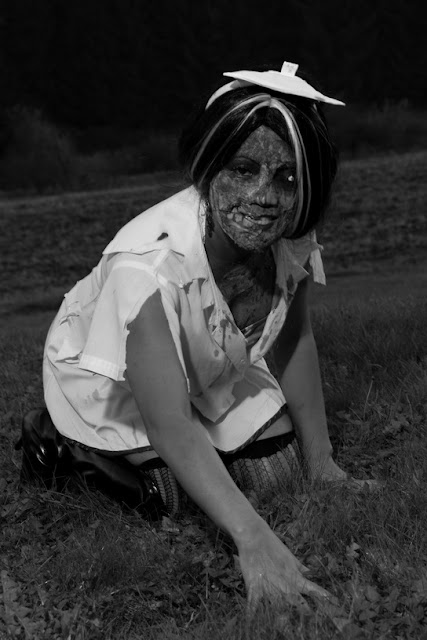
Let’s start out this short week with a ride along shot. Today we’ll look at a photo I shot of one of our local beauties, Michelle.

Halloween night, the family going to our friends for a party and some of that good old trick or treating, followed by hot soup and warm friendship. I came big, knowing the holiday spirit that pervades our place during this time, camera, flashes, umbrella, reflectors, the whole nine yards. I expected to get some decent shots, but not too much. Boy, was I in for a surprise!

After seeing Michelle and the incredible costume she built, I knew there was a shot waiting to happen. She even scared some of the adults, which was really cool. She looked like something from a George Romero movie, and I thought that it would be fitting to take a couple pics to capture that feel. We went outside and I looked around for some great angles while visualizing several shots.

Hohenfels Volks proof of zombies
ISO 800, f/8, 1/80, 60mm, monochrome with green filter, RAW

As you can see, the shot I posted here was taken with me nearly on the ground. After taking a few pics to get started, I noticed the sun was flaring a little, washing out the sky. Switching over to monochrome and applying a green filter, I shot on. I knelt down and as I readied my camera and flash, Michelle started acted like a real zombie coming out of the ground. That was the one, as the green filter darkened her makeup, while allowing the scenery’s exposure to remain constant. Allowing the background to fade to darkness makes Michelle pop out and creates some negative space to frame our zombie. I think that this shot captures the feel of a Romero film, the kind of black and white film that brings back the late late shows we used to watch as kids.

Here’s one that’s washed out with the sky, that kind of sets the mood of the sun going down and the zombies rising.

Hohenfels
ISO 800, f/8, 1/80, 28 mm, Monochrome with green filter, RAW

And here’s the color version of today’s ride along. Shooting in RAW mode allows all the color data to be preserved and used for several types of shots. Something to think about when you’re visualizing your scene. Sometimes your shot may look better with color, although for the Romero feel, black and white is necessary.

Hohenfels Volks zombie in color
ISO 800, f/8, 1/80, 60mm, daylight balance, landscape picture style, RAW

Also today, we’re introducing a new feature. We’re going to do a weekly shot. Similar to the Internet craze of 365 shots, we’ll be posting a theme and giving you a week to post your shots to our Facebook page. After a week, we’ll choose a new them and post all the photos in a separate post here.

Well, that’s it for today. I’d like to offer special thanks to Michelle for allowing us to feature her photo here, for the incredible job she did making Halloween fun, and for being such a great friend. I’d also like to offer special thanks to Jennifer O for the theme a week suggestion. Always one to help out, her idea really hit the spot!

For our first theme, I thought we'd go with Thanksgiving, with a twist. Show us your thanksgiving, but be creative in your application of Depth of Field, covered here and here. Show us a turkey and the trimmings with a shallow DOF, or maybe that wine glass frame by a sharply focused turkey. Anything that keeps with the theme, remember to post a little comment with your photo, and let us ride along with you!

Remember to share your pics and post your questions at the Hohenfels Volks Facebook page, and or by commenting here!

Thursday, November 17, 2011

Prevalent Art Styles in Our Area

Greetings, Hohenfels, welcome to Hohenfels Volks, THE place for our place. This lovely Thursday came in cold, remained cold, and leaves us shivering in it’s tightening embrace! Things are warming up spiritually, though, with the approach of the holidays, so look forward to the warmth and glow of family, friends, and cheer!

Today I thought we’d touch on some of the different art and architectural styles you’ll encounter during your journeys through our place. We’re only going to touch on a couple of styles and the basic characteristics. The reason we will discuss these is that as you explore cathedrals, palaces, churches, graveyards, and other parts of the area, you will encounter these quite a bit. It helps to know what you’re looking at when folks ask about your photos, so let’s run through a little. I’m not an art authority, so please let me know if I make any mistakes, so I can correct them.

Let’s start with Romanesque, which seems to have started around 1000 AD and ended about the 13th century. There was quite a bit of Byzantine influence, especially in the churches. The tops of columns were often carved with whole scenes. Statues of the Madonna were quite popular during this period. Most of the bright colors used in the art have faded, with the stained glass being the most colorful examples. To see this style, check out the Schottenkirche, St James’s in Regensburg.

Moving on, we run across the Gothic style or period. Gothic art was a medieval style reflecting the themes of the day. A large amount of Gothic art was religious in its nature. The architecture of the time relied heavily upon pointed arches, ribbed vaults, and the flying buttress. These allowed more emphasis of lines and light, and space in the structure. The labor and time to create these majestic Doms was immense! A trend in Gothic art was the integration of sculpture, stained glass, and architecture. Bamberg cathedral has the only life sized horse and rider statue in Europe since about 500AD, look for the "green man" below the horse's hoof. The Gothic period ran from about 1200 until about 1600. A great example of Gothic architecture is the Dom St Peter in Regensburg or the cathedral in Bamberg.

Next up, we find Baroque styles coming into importance. The baroque period ran from about 1600 until 1800. The general characteristics of baroque art were movement and energy. Strong contrasts of light and shadow, chiaroscuro, were very common in the arts of this time. Themes included scenes of ecstasies, martyrs, and other religious events. Artists tried to portray the emotions and feelings in the soul on their subjects. This time gave rise to the Dutch masters and others who worked with light in new ways, and continue to inspire us to this day! In Hohenfels, we have St Ulrich Church, a Baroque church built between 1716 and 1720. The Asam brothers did the frescoes inside.

Rococo Art is often called later Baroque. The Rococo style led to art that was more decorative and served no other real purpose than decoration. Bold colors were favored. Themes involved hobbies of the rich and the nobles, sensual activities, love, frivolity, and romantic intrigue. It was very ornate and playful, with elaborate details and craftsmanship. For some great examples of Rococo style, check out the Residenz in Munich, as well as the Residenz in Wurzburg.

Learning more about these styles can help us in more ways that one. Knowing them allows us to explain what we shot, but it also allows us to learn new ways to work our camera and art. Remember to share your pics and post your questions at the Hohenfels Volks Facebook page, and or by commenting here!

Wednesday, November 16, 2011

Gear Day- Pop Goes the...

Greetings, Hohenfels, welcome to Hohenfels Volks, THE place for our place and our Volks. Another day, trees covered in white and ready for the icy grip of winter, closes around us.

Today we’re going to talk about flash. Learning to use flash is one of the major steps you should take in getting your photos gallery ready.

Today’s electronic flashes work amazingly well and can put a great deal of light right where you need it. The secret to using flash to get the right exposure is knowing how to meter and knowing how to balance your lighting.

First, let’s talk about several terms and features of an average flash.

The first term to know is Guide Number or GN. This is an indication of your flash’s power. It means your flash can provide light up to that distance at maximum zoom, for ISO 100. It’s usually measured in meters. The Canon 580EXII has a guide number of 58, as does the Yongnuo YN-560. This is used to calculate manual flash settings for your camera.

The second term is zoom. Your flash can often zoom to a preset distance to match the zoom of your lens, allowing it to throw light more in line with what you are shooting. This is extremely useful in auto flash; the drawback to that is the camera must be connected to the flash. The longer the zoon, the further the light will travel, and the less it will spread out.

The third term is sync speed, or shutter sync speed. On most higher end cameras, like the EOS 7D and 60D this is 1/250. For the lower end cameras, like the Digital Rebel series, this is 1/200. Some cameras won’t sync above 1/125 to 1/160. The slower the maximum sync speed, the slower you have to shoot. At speeds above the sync speed, either you will need a flash with high-speed sync, or you will get dark bands on your image.

The fourth term is rear or front curtain sync. In rear curtain sync, your flash fires at the end of the exposure, and in front curtain it fires at the start. This really only applies beginning at 1/30 – 1/60, depending on your model.

The last term I’ll introduce is TTL. Most of today’s automatic flashes are capable of being controlled by the camera, provided they are mounted to the camera. Today’s cameras meter through the lens, and pass that information to the flash to set output power and zoom. Many cameras use a more advanced feature called E-TTL, which is electronic metering through the lens. Using this method can improve your flash exposures. The downside is using your flash on camera can be disappointing, as it flattens the light and removes depth and character.

The range of a flash is limited by inverse square law, which states that light drops off from a source rapidly. For instance, a flashlight shined into the dark starts out quite bright, but ends up not even visible beyond some distance based on its power. This law states that doubling the distance from a subject to a source reduces light to ¼ its original level. Almost all light sources follow this rule.

When using your flash on camera, use your E-TTL features to get the best exposure. To correctly expose flash manually, you will need to adjust your aperture to control exposure for the light from the flash and your speed to control ambient light. To find the required to take a photo of a subject use this formula- f-stop number = GN/distance to subject. To figure out the distance to place your flash for a preset aperture use this formula- distance = GN/f-stop number. These are usually measured in meters, so remember to set up accordingly. Guide number is at ISO 100, so any change in ISO, must be accounted for.

A couple points- on camera flash gives a hard light, which results in a loss of shadows in the image making the subject appear flattish. On camera, or flash on the axis of the lens, gives red-eye effect, which is when the eye reflects red light straight back in the direction it came from.

Another thing to mention about off camera flash, besides adding depth, character, and bringing out detail, when used properly it can bring out the eye colors and make them stand out a little. This is especially true in brown and dark eyes. It takes some practice, but the results are worth it!

I like to use the YN-560, as this a nice, inexpensive, and powerful manual flash, paired with my with radio triggers. This allows for shots on camera can’t get, and it creates a nice direction to the light. Having directional lighting on a portrait really adds to the magic. That’s why you see it even in the paintings from the old masters. Next time we talk about flash, we’ll discuss fill, main, and lighting ratios. We’ll also discuss basic lighting patterns for portraits, and how to take the guesswork and mathematics out of getting your manual flash exposures.

I hope this information brings you another tool in our quest for the perfect picture. Let me know if it has! Remember to share your pics and post your questions at the Hohenfels Volks Facebook page, and or by commenting here!

Tuesday, November 15, 2011

What's on the Menu Part II

Greetings, Hohenfels, welcome to Hohenfels Volks, THE place for our place. Another day, starting shrouded in mists and fog, ends on a light note, with blue skies and nice weather.

Let’s return to our series on your camera’s menu. (Part 1 is here)

Press the menu button, and you should be on the first tab. Using your multi-controller or command dial, scroll to the second tab, shooting2.

In order, the settings are as follows:

The Exposure compensation/AEB. This allows the camera to change either the shutter speed or aperture to bracket or compensate for exposure. Adjustments are made in 1/3-stop increments. 3 shots are taken, allowing you to choose the best-exposed shot. This is cancelled at power down.

Auto lighting optimizer. This allows dark or low contrast images to be corrected for in camera when shooting JPG. You can set the amount here, or if shooting RAW, in Canon’s Digital Photo Pro application.

White balance. This setting allows you to select what color temperature to use for your white balance. By selecting the right one, whites will be white, and so on. Color balance can be quicker when the right selection is made. Refer to the post on color balance here.

Custom White balance. By using a custom white balance, you ensure proper whites in all shots taken in that specific lighting. Take a photo of a white object in the lighting you will use for your photo then select that image as your custom white balance source. This allows a more accurate setting of color balance tailored for the specific situation.

White balance shift/BKT. This one is a don’t play with it setting. You need to know about color temperatures and color compensation filters. Read your manual carefully before playing with this one!!!!

Color Space. Select sRGB usually. Adobe RGB is expanded color range that is designed for commercial presses and printers, the type we most likely won’t use. Even Miller’s and Mpix recommend sRGB, to ensure proper color calibration and rendition.

Picture style. These styles are created by Canon, but you customize and create new ones. Selecting one these allows the camera to create an image that matches your intentions. Landscape and portrait are 2 commonly used styles. Another one is Monochrome. When you shoot RAW, these settings can be changed in the DPP software. JPEGs cannot be easily corrected unless you do non-destructive editing or save an original file untouched. They use contrast, color, and levels to create a scene that will usually give you what you want.

It’s important to note here that none of the above settings can be used in the fully automatic modes.

Well, that’s today’s “What’s on the Menu.”

We’ll be exploring more settings in another post. I hope this has been of some help to you. Now go out and use your settings to get some great shots and make yourself proud! Remember to share your pics and post your questions at the Hohenfels Volks Facebook page, and or by commenting here!
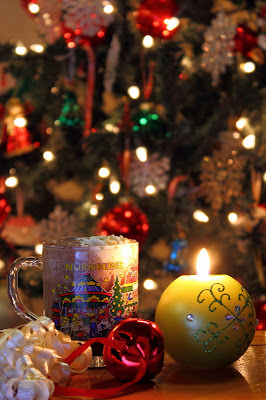
Monday, November 14, 2011

Photography as Art

Greetings, Hohenfels, welcome to Hohenfels Volks, THE place for our place. A cold morning, frosty and foggy, greets us and brings in the week!

Today we’re talking about photography as art. Photography has several things that make it different from other arts. In some ways, photography can be more of a craft, or a science, or a way of recording things as they are. It can also be an art and art form. Much like the composer of incredible symphonies is an artist, so too, a photographer can be one, which is why we speak of composing our images.

Ayn Rand defined art as a concretization of a man’s values. She stated “Art brings man’s concepts to the perceptual level of his consciousness and allows him to grasp them directly, as if they were percepts.” While she viewed most photography as more of a recording, she felt that commercial photography was an art form. This was because most people view photography as a way to capture the moment, not to create a representation of what we value. She also felt that art should have positive subjects and values and that negative parts should be small and serve as a way to emphasize the positive attributes.

Most people can agree with the above. A see and shoot photographer doesn’t create art; they merely record what they see. Most shopping mall portraits are just canned poses and lighting, done on the cheap, with no eye toward impact. As artists, we visualize a scene, and either create it or make what’s there match our vision, and we create art. When we shoot to have an impact on the viewer, one that touches them somehow, we create art. Using our camera to share a feeling, or value, such as family togetherness or man’s generosity, we create art.

The next time you’re out trying to get the shot of a lifetime, visualizing the scene, setting it up just right, pause to think about its impact on the viewer. What does it say? What have you “concretized?” Even a simple portrait can have meaning; look at Leonardo or Rembrandt. A great way to develop the skill of making art is to look at art and figure out its impact on you, and then figure out how to make that kind of impact with your camera.

A fine example of photography as art is Ansel Adams. His work brought the concept of conservation and the beauty of the world to something we can perceive as reality. His series of photos documenting Manzanar relocation camp during the war is an outstanding example of showing the positive in the midst of a negative. Dorothea Lange captured the negative and sadness, but Adams really brought out the heroism there by showing how the residents made the best of things and created a life for themselves in the middle of this unbearable situation. Nobody can doubt that these folks were heroes! Yousuf Karsh did the same with his portraits of great people and great minds. When we look at the shot of Churchill taken by Karsh, we see the art there; we feel a sense of the man’s greatness and how the weight of his position and power he wielded made the man great.

Regardless of her politics, ideals, and viewpoints, and your thoughts on them, Ayn Rand’s view of art bringing thoughts, values, and ideas to life, is incredibly insightful. Her view makes us take stock of how we represent the world and how we share our take on it.

Hohenfels Volks shot in a church
ISO 1600, f/5.6, 1/60 at 37mm
Bamberg, Michaelsberg Church. This "concretizes" two things, the importance of faith, and the importance of preserving the past to pass on to our children.

So, get out and “concretize” some values of your own. Make us feel something, bring a thought to life! Remember to share your pics and post your questions at the Hohenfels Volks Facebook page, and or by commenting here!