
Introduction to Photographic Concepts
The word "photography" comes to us from the Greek and means writing with light. Basically, photography is recording an image using the light to "draw" the scene.
Following that thought, it’s easy to see that photography depends on light more than anything to get a good recording. When we start out, we know more light equals a better recording, right? How many times have you shot a picture, just to find out it came out really dark? So let's explore photography!
Terms you need to know:
1) ISO- Simply put, how sensitive is your sensor. This is measured in numbers like 100, 200, 400, etc. Each full number doubles the sensitivity.
2) Aperture- The window within your lens. The larger your aperture, the more light gets to the sensor. Measured in f-Stop.
3) f-Stop- The smaller the number, the bigger the opening in your lens and the more light you let in. the whole stop sequence is 1, 1.4, 2, 2.8, 4, 5.6, 8, 11, 16, 22, 32, 45, 64. Most of us will work with the range of 4 to 11.
4) Shutter Speed- How long the sensor is exposed to the light.
5) Stops- This indicates the difference between the various combinations of the above terms.
Items 1, 2, and 4 are what make up your exposure. For example, an image shot at ISO 100, f 8, 1/100 second. This same shot could be made at ISO 200, f 16, 1/100 second. These are the same exposure.
Changing only one part of that leads to images that are either over exposed or under exposed in the same situation. For example, shooting the same scene as above at ISO 100, f 16, 1/100 second will underexpose your image by 1 stop. This picture will be too dark. Shooting it at ISO 100, f 5.6, 1/100 second and it will be too bright, or overexposed by 1 stop.
The following series of images should illustrate this.
This was taken at ISO 320, f 8, 1/30 second and is properly exposed.
This is underexposed by 1 stop.

This is overexposed by 1 stop.
As you can see, changing one without offsetting the change on another setting can make your image lighter or darker. Once you get used to these settings, you can use them to control how your image looks.
Shooting Modes
Shooting MODES are part of you camera settings, and should be the first step in getting to know your camera. MODE is going to be all caps in this post to get us into the habit of thinking of these settings correctly, as MODES.
Let's start by looking at a typical dial on a camera.
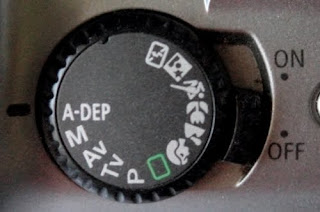
This is the MODE dial on a Canon EOS Digital Rebel, EOS 300D
For the most part, almost all cameras use the same symbols to represent similar MODES.
The green square is the fully automatic MODE. Using this mode lets your camera have full control of the photo. You have no input or choice, so avoid this MODE!
The symbols on the right side, as we look at this image, are for automated MODES based on what you tell the camera you're shooting.
In order, they are:
Portrait MODE- for taking portraits, lower f-stop, and faster shutter speeds with less contrast.
Landscape MODE- for taking landscape style shots, higher f-stop, and slower shutter speeds with more contrast.
Close-up MODE- for macro or close-up shots of things.
Action MODE- for fast moving scenes, uses a higher ISO and faster shutter where possible.
Night scene MODE- for poorly illuminated subjects, usually used at night. High ISO, lower f-stops, slow shutter speeds.
Flash off, but fully automated settings.
It is important to note that none of these MODES offer you any choice of settings, including ISO. They will also use the pop-up flash whenever the camera wants to.
Moving over to the left side, we have:
P- Programmed MODE. You can set the ISO, Exposure Compensation, but not much else. More like the above MODES, with some limited choices.
AV- Aperture priority MODE. You set the ISO and f-stop, and the camera chooses the shutter speed for a correct exposure.
TV- Shutter Priority MODE. You set the shutter speed and ISO, and the camera chooses an f-stop to get a nice exposure.
M- Manual MODE. You set everything, this is where knowing your f-stops, shutter speeds, and ISOs is very important.
On newer cameras you also have
B- Bulb MODE. You use a remote trigger and as long as it's pressed, the shutter stays open. Great for low light and night time pics!
C1...etc- these are for you to pre-program settings that you use a lot.
Most point and shoot cameras have the automated settings MODES. Look for the symbols in the above pic and choose the MODE you want. If you dig around, you can find some advanced setting. For instance, on the Fuji, you can compensate for exposure by moving it up or down, usually in 1/3 of a stop increments. This is very helpful when taking pictures in a room with bright but uneven lighting or outside on a bright day.
So, if your camera tells you it should be shooting 1/250, f8, at ISO 100, but you want the background to be sharper. Switch over to AV MODE and set your f-stop to 11, your shutter speed should automatically go to 1/125.
If you're camera tells you 1/125, ISO 100, f11 but that's too slow for something you're trying to capture. Switch over to TV MODE and set your shutter speed to 1/250, your f-stop should automatically go to f8.
One of the best things you can do right now, is read your owner's manual for your camera. After you finish, read it again, while you have your camera, and try out some of the MODES.
DEPTH OF FIELD.
Have you ever noticed that some photos are extremely sharp all the way through the whole range of the image and some stop being sharp with only a small range truly sharp? This range of sharpness in a picture is DEPTH OF FIELD.
First, here are some examples of shallow and wide DEPTH OF FIELD.
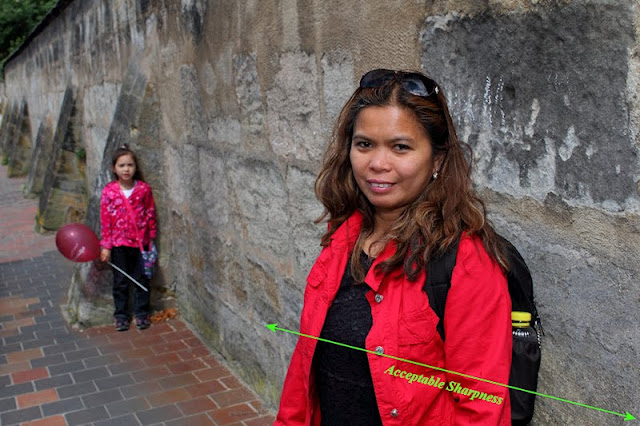
This image shows a shallow DOF, indicated by the green arrow and text. Notice how everything outside the acceptable sharpness range gets blurry.
Image info- f8, 1/120, ISO 400, c2011 James Martin
This photo has a wide DOF. Notice how it is sharp from foreground all the way through.
Image info- f8, 1/160, ISO 100, c2011 James Martin
Controlling DEPTH OF FIELD
How can we control this? There are several tools at our disposal. One is controlling the distance between subjects, another is focal point (an upcoming post), but the most valuable to us, and the one we will discuss here, is our aperture or f-stop.
You might remember that aperture is the size of the "window" in the lens. You might ask, if it controls how much light gets in, how can it control the DOF?
Optics are tricky, so let's try an experiment. If you have difficulty seeing far away, try taking your fist and making a little light tunnel through the center and peeking through. You will immediately notice that your vision has improved somewhat, like when you squint to see far away without your glasses. I tried it and was amazed at the difference. With a narrow aperture, basically, the light becomes more tightly focused, making the DOF wider and allowing an increase in sharpness.
A couple words of caution on this:
1) This is not the cure all for poorly focused or blurry images. One negative side effect of a very small aperture, or large f-stop, is diffraction blur. The bending of light as it squeezes through the aperture causes this, and can make blur more noticeable.
2) This will require longer shutter speeds. Sometimes beyond your ability to hold a camera steady. Camera shake is really bad at long exposures!
So, if a narrow aperture will increase DOF, it makes sense that a wide aperture will decrease your DOF.
Why, you ask, would anyone want to do that on purpose? The answer is simple; look at the first image above. Notice how having my wife large, gives her priority in the image. It also adds weight to her side of the image. By adding my daughter and decreasing the DOF, it further enhances her as the main subject, while allowing a pleasant feel and balance to the overall image.
Another reason, is that a shallow DOF in portraits makes your subject pop out and keeps the image from becoming to busy or cluttered. It can also soften the lighting some and make an image look more refined.
Now, it's time to break out your camera. Play with your DOF; adjust your aperture and your focus to get some images with a shallow DOF and some with more depth, or wider DOF. A great way to start is taking 2 items and placing them on your table at different distances from the camera. Shoot at the range between f4 and f16 and examine the results.
Don't you feel more artistic already? I did when I first tried it!
For more in depth information on DEPTH OF FIELD, check out Cambridge in Colour's excellent tutorial.
METERING
What is METERING and why is it important?
Basically METERING is measuring the light. It's extremely important, because it lets us know how to expose the scene.
Sounds simple, right? Unfortunately, it's not as simple as you might think, as there are several types of METERING. I will try to stick to what the camera uses and what we can see and use ourselves.
It must be stated that differing types may require the purchase of a hand held light METER. Flash METERING requires a hand held flash METER. Ambient Metering Requires a hand held light METER. We're going to concentrate on reflected light, in camera METERING. So let's get to the meat and potatoes of this subject!
Metering for proper exposure.
Cameras use reflected light METERING. Almost every camera in existence takes the reading of the scene and tries to make the exposure for the METERED area to be 18% reflected gray. Not based on color, but on a comparison to a gray level that reflects 18% of the light that hits it. Ansel Adams called this ZONE V.
Evaluative METERING- If you haven't read your camera manual, or you've decided not to change your settings, you're most likely using Evaluative METERING. This means it's averaging out the light over the entire scene to get a basic ZONE V exposure. Depending on your camera, the points, or zones, used for METERING can be a small number or a large number. The more points, the closer to correct your exposure will be. This is good for most photos, especially those that don't have too much range between lighting levels.
Partial METERING- this is set from your menu and decreases to amount of the scene used for METERING. It allows more precision when you want to have more control of your picture's exposure and range. You can set this on some cameras to different parts of the scene.
Center weighted averaging- available on some cameras. The center of the viewfinder is used for your exposure, with the rest of the scene METERED, and averaged for the final exposure.
Spot METERING- In this mode, the camera METERS off a small spot to set the exposure. This is great for tricky lighting, and for more control of your exposure. It also allows you to get some idea of the range of a scene's lighting for maual exposures.
Generally speaking, using your evaluative METERING mode will give pretty good results. There will be times when switching to partial METERING, or even center weighted, can give better results.
Spot METERING gives even more accurate results when used properly. Most people use this for extremely tricky lighting such as a brightly backlit subject. You will be properly exposed on the subject with the backlit portion being almost pure white with no detail. Using evaluative METERING leaves the subject a silhouette. Using center weighted averaging or partial METERING allows a smaller area to be METERED, but still overexposes the image by a large amount, while leaving the subject dark.
Here is an example;

When METERING from the sky the camera read 1/500 at f/8 in AV mode, when METERING from the tree the camera read 1/60 at f/8 in AV mode. METERING either way left the image too bright or dark. By METERING the grass and setting the camera to manual 1/250 at f/8, the sky is exposed better and so is the rest of the scene.
The photo above was taken using spot METERING. This allowed me to more accurately get a good picture, properly exposed throughout. Spot METERING is not for every situation, but can give you a greater amount of control if used with exposure controls and shooting modes.
The easiest way to METER a scene is to get an 18% Gray card. You have your subject hold it up, zoom in and METER from that. Take the settings you read and enter them into the camera in manual mode. As long as the light doesn't change you will have a good exposure. Using the gray card allows your camera to METER from a target that matches what it is trying to set. This is best accomplished in spot METERING mode, unless you fill the viewfinder with the card. If you do that, then use evaluative METERING, which will average out the light over the card and result in better exposures.
The Exposure Triangle
You’ll find this everywhere on the Internet. A quick Google search turned up 18,300,000 results!
What is the exposure triangle? It’s basically the combination of the three factors that affect your exposure- ISO, shutter speed, and aperture.
Here’s my version of it

My version of the Exposure triangle
While most people draw an equilateral triangle, even me, it doesn’t really explain the relationship between the three factors. Most people also seem to use the angle to represent the factors. I prefer using the sides, it can easily be manipulated and shows how one side affects the other two. Enough of that stuff.
Remembering it is easy if think of a triangle and visualize that changing as you change your settings. That’s pretty much the gist of it.
Putting it to Use
Here’s where the fun stuff starts! I’m going to make up a list here showing some useful combinations, or triangles. Use that list to visualize your triangle and you’ll be off to the races, at least for the moment. I’ll use whole stops for simplicity. Each stop is either double or half the amount of light compared to the two numbers next to it.
ISO APERTURE SHUTTER SPEED
100 f/4 1/1600
f/5.6 1/800
f/8 1/400
f/11 1/200
f/16 1/100
Looking at the first triangle 1/100, f/4, at ISO 100, you can see that any changes require a change to another side to remain the same. I can change the exposure to 1/800, f/5.6, at ISO 100 and get the same exposure. Cool, huh?
Let’s try something else. This one will demonstrate the importance of the triangle and knowing how it works. At ISO 200, f/8, 1/400, my image is overexposed. How can I fix it? Try ISO 100, f/8, 1/400. That’s half the previous exposure level!
The first example showing how to get the same exposure is useful to figure out how much DOF you want and to help you keep your exposure constant in constant lighting.
The second example gives you an idea of how to use this tool to get more of your shots usable in changing lighting.
Here are some lists of the three sides and how they affect your image. In order from darker to lighter;
ISO
100
200
400
800
1600
APERTURE
f/16
f/11
f/8
f/5.6
f/4
SHUTTER SPEEDS
1/1600
1/800
1/400
1/200
1/100
1/60
1/30
1/15
Using one from the dark end, means using one from the bright end. Always try to shoot the lowest ISO you can! It’ll make a difference.
If you shoot f/11 for a wider DOF, you will have to shoot a slower shutter speed.
Once you get used to thinking it through, you’ll get some pretty darn good exposures.
FOCAL LENGTH
FOCAL LENGTH is, at its most basic, the length of your lens. This sounds like something that doesn’t need much explaining, doesn’t it? However, like most subjects, FOCAL LENGTH has an impact on more than just thing in your final image.
Let’s start out with the basics; FOCAL LENGTH refers to the length of your lens, usually in millimeters. A 300mm lens is 300 millimeters, but crop factor can change the apparent FOCAL LENGTH of the lens. Crop Factor refers to sensor size on a digital camera. Most of us use cameras with an APS-C sensor, which provides a 1.6x crop factor, or 1.6 times the magnification of the lens’s FOCAL LENGTH. Unless a lens is made for the specific crop factor, for instance Canon’s EF-S lenses, crop factor must be counted to provide the correct focal length. Therefore, a 300mm lens at 1.6x crop factor has an apparent FOCAL LENGTH of 480mm. Since most of us now use the digital lenses that either came with our camera, or we purchased later, I’m not going to make too much of crop factor, that’s for another post.
A large number of folks believe that the perceived change between two FOCAL LENGTHS is caused entirely by magnification. This is actually not entirely true. When you zoom in closer, your lens covers a smaller area of the scene. It doesn’t really magnify it, just shows less in the same amount of space, although there is some magnification from the optics. If you look through a toilet paper tube and take note of what you see, then look through a paper towel tube of about the same diameter, you’ll notice this effect. No magnification, just a smaller amount of the scene.
Effects of FOCAL LENGTH
The FOCAL LENGTH of a lens is a factor in determining its DOF. Longer lenses provide a shallower DOF, and shorter lenses provider a wider DOF. This is because your aperture is a function of lens length. The math is not the purpose here, but you need to understand that f/4 refers to the area of your aperture, which is arrived at by the following calculation- FOCAL LENGTH/f stop. For a 300mm FOCAL LENGTH, you arrive at an aperture area of 53.5mm for an aperture of f/5.6, for 50mm, it’s 8.93mm. Therefore, the shorter FOCAL LENGTH amounts to a smaller opening, leading to greater DOF.
Knowing the area and formula is unimportant at this point. You should know now that 300mm at f/8 with a subject distance of 100 feet is about the same DOF as 100mm at f/2.8, with a subject distance of 60 feet. 300mm at f/8 is about three stops darker than 55mm at f/2.8, so would require a different exposure to get a similar image.
You will need to adjust your aperture for your desired DOF when you change focal lengths, and adjust either your ISO or your shutter speed accordingly to get the right exposure. Change your aperture to a higher f/stop when zooming in, and decrease your shutter speed. When zooming out, it’s not as important, unless you desire a shallower DOF, in which case adjust your aperture to a smaller f/stop, and increase your shutter speed.
Another effect of FOCAL LENGTH, is longer FOCAL LENGTHS, compress the distance between objects in your scene, making them appear closer together. This is great for a portrait with a shallow DOF, as it can blur out and compress the background for a nice effect. It’s something to pay attention to, as the effect can make a great picture look somewhat flat and plain.
Here are a couple images showing the effect of FOCAL LENGTH.

This shot was at 148mm at f/4.5 ISO100. Notice the decent sharpness throughout and the separation of the steps and my daughter.

This shot was at 260mm at f/5.6 ISO100. Notice the shallow DOF and the compression of the background.
Take some shots at different "FOCAL LENGTHS," and compare the results. Try using different f/stops throughout the range of "FOCAL LENGTHS." With a little practice, you'll start noticing the magic!
If you have any questions, ideas, tips, or comments, post them. You can post them here and on our Facebook page.