Showing posts with label perspective. Show all posts

Wednesday, September 11, 2013

A Tryst

Greetings and welcome to Hohenfels Volks, THE place for our place! Another rainy reminder that autumn is upon us. The colors and clarity of the season provide so much to intoxicate the spirit, and numb the body for the long cold ahead! Here, in Hohenfels, it’s no different!

It has been said that art is a tryst, for in the joy of it maker and beholder meet.
Kojiro Tomita

Again, another taste of the artistic and spiritual side. Kojiro Tomita was an early 20th century art expert from Japan. He had come to America to expose the U.S. to Japanese aesthetics and art. He was curator of the Museum of Fine Art in Boston.

I chose to use this particular quote to express what our photography can do, and how we involve our audience in our work.

When we feel our shot is the right one, when we see the scene, and visualize our final image, we often feel something beyond our technical and expressive processes. If we stop and think about what we’re expressing, and who we’re expressing it to, we begin to see a relationship take shape.

Neither party may know each other; indeed, they may be separated by centuries. At the same time, though, we are brought together for a small moment, in some connection that shares our feelings and viewpoints with those of our viewer. We connect.

Just something to think about the next time your out. If you’re out to make a portrait, find a way to include your subject, as well as your audience and yourself, in that connection. You’ll find a photo that will touch lives for generations to come! When making a still life, try to visualize the final product, and put yourself in the shoes of the viewer. How does that visualization make you feel? If your reaction brings you deeper into the scene, then your audience will no longer be your audience; they’ll be a tryst you enjoyed while expressing your vision, and enjoying your creativity! Of course, that’s just my thought!


ISO 3200, f/5, 1/30
Flowers in Vase, my tryst. This was taken in a little Vietnamese restaurant in Bayreuth during my last day trip. I made the shot knowing that the flowers in stark isolation against the background would create a sense of isolation, especially with all the negative space. I also noticed, even in that sea of isolation, that the flowers were not alone. Their isolation created a balance that allowed their relationship to transcend appearances and become tryst like in its relation of tones, shapes, and placement. I knew this one would speak to someone as a reminder that we are never alone, even when we feel like it. To paraphrase Ansel Adams, "There are always two people in every photo." That seems to go along with today's theme nicely.

I hope all our Hohenfels Volks readers will get out and create something of a tryst in their photography, and share it with us on our Hohenfels Volks Faceboook page. We’d love to see your work.

Is there anything you’d like to see here? Do you have a question? Share your thoughts here or at the Hohenfels Volks Facebook page. Of course, commenting on both Facebook and here is always appreciated, too! Don't forget, we're on Google+, too!

Monday, September 9, 2013

Presence

Greetings and welcome to Hohenfels Volks, THE place for our place! Rain, sun, wind, chills, and warmth. All the seasons were experienced in one day here in Hohenfels!

Be still with yourself until the object of your attention affirms your presence.
Minor White

It's amazing the insight in that little quote...

Communication exists between the photographer, the subject, and the viewer, and can only be understood by those few who feel the affirmation of the object upon which you've cast your attention.

I posted that earlier today on our Hohenfels Volks Facebook page. It’s meant to call attention to the fact that our expressions have a link to the subject.

Many of the early and famous photographers were quoted saying things about the importance of creativity. They were also famously quoted speaking or writing about expression and the relation of photography to communication. Ansel Adams said there are always 2 people in a photograph, even one devoid of people, the photographer, and the viewer.

It’s important to remember that even though we see no person when we make the image, we are indeed communicating our feelings, thoughts, and ideas about the subject to our future viewers. We are also expressing something of our feelings and thoughts about our potential viewers. When we think of our viewers, and what we hope for them to feel and opine on our images, we are indeed receiving their affirmation. If our viewers are not an object of our attention, then what else is? Beyond our subject and ourselves, there is little left to affirm our presence.

Of course, our subject affirming our presence may seem ridiculous, as often we photograph the inanimate. This affirmation can be almost spiritual, it’s an awareness of the light, the shade, the texture, and the myriad other things that make our expressions our own, and help us communicate across all boundaries. We generally feel this affirmation as what Cartier-Breson called the “decisive moment.”

Hohenfels Volks: Rebirth In Bayreuth
ISO 1600, f/8, 1/30
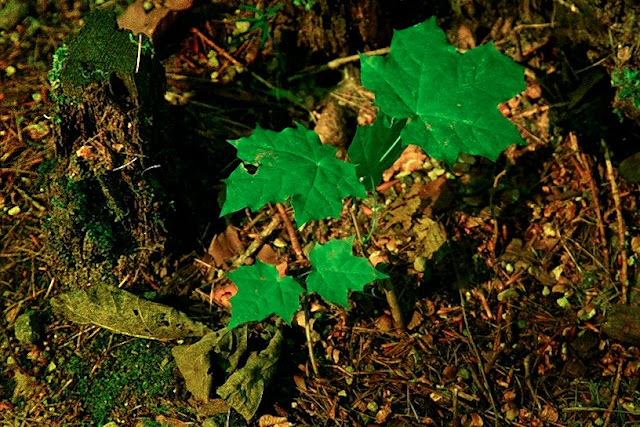
Another angle on yesterday's photo. I love the way the green leaves stand out both visually, and metaphorically, against the orange, and even above the greens of the moss. By creating a connection with the scene, I was able to express my love of the way new lives grow from the old, and yet remain part of the old.

I hope everyone gets the chance to seek the their object's affirmation, and will feel their images. I also hope you’ll share them with us on our Hohenfels Volks Facebook page. We’d love to see your work.

Is there anything you’d like to see here? Do you have a question? Share your thoughts here or at the Hohenfels Volks Facebook page. Of course, commenting on both Facebook and here is always appreciated, too! Don't forget, we're on Google+, too!
Sunday, September 8, 2013

Jaunty in Hohenfels

Greetings and welcome to Hohenfels Volks, THE place for our place! Several days of beautiful weather have made life comfortable here in Hohenfels and our surrounding areas. Bayreuth last weekend was especially beautiful, as the clouds and lighting made for some magnificent wooded shots. Yesterday’s clear skies made the Nuremberg flea market, scattered throughout the old parts of town, a place full of photographic treasures.

Today’s post is short and simple. We’re going to talk about day jaunts to local areas. We’re not going to expound too much on places, it’s more about finding and making photos we like. Expressive images make the creative process a reward in itself, and being prepared can make a big difference.

I’m planning a mid-Autumn trip to Bayreuth to make some photos. The intent is to make some beautiful photographs of the autumn state at a couple places there. The first one is the Hermitage. I fell in love with this place on my first visit. The lighting, textures, and wooded areas make for something magical. The second one is at the New Residenz, which is similar, but has a completely different feel. I also hope to make a portrait or 2, and shoot some slide film.

The reason I mention that, is our main reason for the topic today. When we make our jaunts and trips, it’s always a good idea to know what to expect. By making a trip or 2 in advance, and maybe some shots of our ideas, we can be prepared for the situations we’re likely to encounter. For instance, at the Hermitage a reflector is a good idea. On a sunny day, it can be used to fill in the shaded areas with light streaming through the trees. Because of the large volume of trees, autumn will increase the warmth of the light, and a clear day will help keep it from going to warm. In Regensburg, I might rely on a golden reflector or gelled flash, as the light in the park by the bahnhof feels quite different. In either place, flash and gels are vital to getting a portrait to be more in line with our vision and intent.

Around our area, going place to place is simply a matter of taking the train. A train to Bamberg doesn’t take too long, and can lead to some quiet contemplation of what our intentions may be. We can also relax on the way back and reflect on our efforts. Trains also provide an easy way to scout a location. They run close to our own schedules in most cases, and we can leave when we see fit, or stay as long as we want. Avoiding the traffic allows for more insightful planning and reflection.

Hohenfels Volks: Rebirth In Bayreuth
ISO 1600, f/8, 1/30
Rebirth in Bayreuth. Green against orange. Leaves intensified by shooting with a yellow filter. Yes, black and white filters can be used on digital cameras. By bringing out the green slightly, the leaves are made to stand out. Just a small fraction of the beauty in Bayreuth. The leaves growing from amidst the decay of an older tree brought a sense of rebirth, and second chances, the shallow DOF allows a more meaningful contemplation. I plan to re-do this shot when the leaves are changing for a different mood.

On another note, I’m hoping we can get some volks to contribute a small article about a place they like to shoot, and maybe some pics. It’ll help flesh out our “Your Works” and “Our Places” pages, and help others out with their day trips.

I hope all of you will get out and plan a day trip to make some shots. I also hope you’ll share it with us on our Hohenfels Volks Faceboook page. We’d love to see your work.

Is there anything you’d like to see here? Do you have a question? Share your thoughts here or at the Hohenfels Volks Facebook page. Of course, commenting on both Facebook and here is always appreciated, too! Don't forget, we're on Google+, too!

Wednesday, July 11, 2012

Creative Exercising

Greetings, volks. Welcome to Hohenfels Volks, THE place for our place! Today, starting out gray and rainy, leaves Hohenfels in the clutches of a very pleasant evening!

Running into one of our friends in the grocery yesterday, I was asked about some exercises for creativity, and photographing some beautiful scenery. I thought a great subject for a post was seeded in that great question, so today, we’ll outline a couple simple ways to get the shot that has others wondering how you did it.

We’ve been posting about exercises to improve your composition, exposure, and creativity, so this is more of a review. It also reinforces how simple photographic techniques can create some winning shots.

The first thing to mention is never take the first shot. Most folks will see something, maybe a statue or other landmark, and take the easy shot. If you have to, take it just to get it out of your system, but then look for some other way to create your unique image. Walk around, check it out from every available and possible angle, view it through your lens, and try moving through a range of focal lengths. Once you’ve settled on the shot, make your image a reality. Remember, part of the creative shooting process is visualization! Edit- Take the first shot, if you pass it up, you may never get the same feeling you had at first. Thanks to Bodensee Bob for that cool tip!

Another simple exercise is to either shoot a prime lens, or use only 1 focal length on a zoom. Remember, doing this forces you to look for other ways to get the shot. You may have to move in closer to tighten up the scene, or move away to add some context. It’s a great way to change how you view the world around you!

The last 2 things are color and scale. First, on color, see how you can use it to create mood. Use your color to balance the mood and feeling, remember complimentary colors? Perhaps shooting a scene with a large red subject, shoot the subject at about 1/3 the frame and use green to fill out the other 2/3. You’ve given importance to the subject through size, and emphasized it by making the color stand out. This is also nice if you use 3 colors in a split complimentary scheme.

Using size and scale to emphasize a subject or restrain non-subject elements is a proven method of increasing interest in an image. It not only adds context, but also can be used creatively. Everyone shoots the trick photos of someone holding up the Leaning Tower, or holding someone in their hand. Moving beyond that, the ability to trick the eyes through scale can make for magic images. Using our first tip combined with this to make an image of a local landmark will stand out. Make the scale of the subject the subject. Instead of taking the Eiffel Tower, take a piece of it, and use the size as part of a composition to reference the actual tower. The same can be done with buildings, statues, and just about anything. Your photo will stand out as more than just another shot of the local scenery. Edit- Another tip from Bodensee Bob is to take the shot of the bigger piece and crop to your liking during editing. Great tip, thanks for sharing!

Hohenfels Volks:Amber Waves of Grain
ISO 125, f/8, 1/125, 56mm, 125 C/ft2 metered at the wheat.
A field of grain in Hohenfels. Using f/8 and 56mm gave me a reasonably shallow DOF, allowing the hills to blur out, and only the foreground section to remain in focus. This combined with the color of the wheat against the color of the sky brings out the wheat as the subject. By shooting from below, I was able to fill the majority of the image with the front wheat, and allude to the size of the field with the shallow DOF. Taking a higher angle allowed more of the field to be seen, yet seemed to lack scale and impact in the final image.

Of course, your best tool for creative and magic images is your mind. A really great photo can convey your reaction and feelings to the scene. It doesn’t have to be a literal rendering; the values you decide to place in each area of exposure are part of your creative process. Making the clouds a little darker than reality or the trees a little brighter is part of spreading your reaction.

I hope this post has helped get your creative regions revving. I can’t wait to see you’re your shots. Tomorrow’s post will hopefully be ready tomorrow. I’m hoping to show a method for converting color images to monochrome in a way that recalls the images of the past. Be sure to check it out.

Do you have an image to share? We’d love to see it! Is there anything you’d like to see here? Do you have a question? Share your thoughts here or at the Hohenfels Volks Facebook page. Of course, commenting on both Facebook and here is always appreciated, too! Don't forget, we're on Google+, too!

Monday, June 18, 2012

Tips, Tricks, and Exercises

Greetings, volks. Welcome to Hohenfels Volks, THE place for our place! Here in Hohenfels, the weekend lived up to its promise. The weather and atmosphere made for some great shots. I hope everyone made a couple new favorites for their portfolios.

Today is a short post featuring a couple tips.

Tip 1- Try to get out right after the rain. Colors sing because the scene before you is fresh washed and saturations are usually pushed up. The air usually loses some of the haze seen along the horizon, and even over greater distances. Having a clean scene and air make the image look more as you envisioned it. Not to mention the receding storm leaves some awesome cloud formations to add interest to almost any image.

Tip 2- When shooting early in the morning or around sunset, remember the blue hour. You can see some beautiful additions to your image when lit with a softer, bluer light. Think architecture at twilight and you’ll know what I mean.

Tip 3- Move around. Take the shot that you thought was the winner, and then move around for a different view. Try to change perspective and use some DOF effects in different positions. Set up and take the shot you came to get, but make sure you explore the area and the light. You may find the lighting from slightly below and to the left of the subject creates a feeling unlike your first shot. Don’t limit yourself to the shot everyone takes; unleash yourself on the shot you want to make!

This week’s exercise is to shoot one location, one subject. Make multiple images of the same subject from different angles, distances, and with different lighting. Give yourself bonus points if you do it in the early evening, morning, or after the rain. Top off those points by combining all 3 tips into a small series of shots!

Here’s hoping you have a great week and capture a treasure worth sharing!

Is there anything you’d like to see here? Do you have a question? Share your thoughts here or at the Hohenfels Volks Facebook page. Of course, commenting on both Facebook and here is always appreciated, too! Don't forget, we're on Google+, too!

Wednesday, June 13, 2012

Shooting What You Eat

Greetings, volks. Welcome to Hohenfels Volks, THE place for our place! Things have been rainy here, but that gives us the chance to show the stormy side of Hohenfels and our surrounds. I trust you’ve bagged some cloud shots!

One of our Facebook readers, Lili, asks “For those of us who don't own an external flash unit, or simply can't afford any sort of lighting equipment; what are the tricks to making food look more appealing and vibrant, and not so flat and 2 dimensional?” We’re addressing that in tonight’s post, so bring your appetite and let’s get going.

The first thing to know is that flash, while an important part of your kit, isn’t necessary for all types of photography, nor at all times. Flash can help by adding light, allowing the use of faster shutter speeds, and by allowing us to shape the feeling our images evoke by shaping the light. There are other ways to accomplish this, though. Let’s look at how we can achieve that.

There are multiple ways to shape existing light. Let’s start by moving your food toward an area that has plenty of the light you’d like. From there, you can modify that light with everyday household items. A pillowcase can be used to soften and spread the light, covering a larger area with nice gentle light. You can use it to shape the light by varying your angle and position. In a previous post, we mentioned the inverse square law that says doubling the distance between a light source and subject gives ¼ the light level. You can see that by tilting the angle between your pillow case diffuser and subject creates the illusion of distance and depth.

Another way to add or shape light is to use a reflector. You can use foil or a 5 in 1 kit to bounce light in from outside the immediate area. This allows you to concentrate your light where you want it, and increase your luminance levels. Again, tilting and angling your bounce can shape the light. A nice little thing to try is bringing your light in from about 45 degrees above your subject, illuminating the top and side. This allows the light to taper, and when you add the softness of the light, creates some depth. You can use a large white piece of gator foam, a piece of matting, or even a cookie sheet.

Another thing you can do is use your pop up flash. I never thought I’d say that, but with a little ingenuity, some foil, and a diffuser, you can add some depth. The trick to this is bouncing the light in from off the lens axis. I’ve used my external flash on camera to bring in lighting from 45 degrees to the side before, just with a piece of white mat. Remember, though, that bouncing your light costs you some of its power and range.

Now we’re going to move on to the best way to add some detail and vibrance. The big secret is DOF, depth of field. Using a longer focal length at a very wide aperture will give you a limited DOF. If you are shooting at 50mm, f/5.6, and focus at 2 feet, your DOF runs from about half an inch in front of your focal point to about the same behind it. You have a little over 1 inch of depth. Anything outside that range will become progressively out of focus. Taking into account the angle from which you’re shooting, you can create some nice little focal points within your scene. I like to think of it as pools of focus. When you place these at locations other than the center, you get some nice depth and intensity. Shooting outside in open or semi-open shade can also give more light and add elements of interest. The key to this is distance between the background and subject. You also want to make sure your focus is spot on where you want it, allowing your subject to leap out from the background in the finished image.

An easy thing to do is set up some Christmas lights or other small lights several feet behind your subject and shoot focused on your subject at your widest aperture. Do this in lower light, bringing in light with a flash or reflector. You’ll see some small circles of light that are incredibly out of focus, adding immediate interest to the scene if done right.

To boost the intensity of your color, shoot at about 1/3 to 1 stop lower that you meter for. By slightly underexposing your scene, you improve color density, saturation, and vibrance. It makes for less time spent editing and more time shooting.

Here are 2 images that show how using DOF can create an interesting sense of the meal or food.

Hohenfels Volks: Ribs...
ISO 800, f/5, 1/30, 44mm
Notice the DOF on this. By focusing toward the center of the ribs and allowing the highlights to fall higher than normal, interest is added in the meat, even though the pepper would seem to dominate. The pepper is diminished in strength through a shallow DOF, and the sharply blurred foreground end of it.

Hohenfels Volks: Meat Platter
ISO 800, f/5, 1/60, 41mm
By focusing on the back edge of the meat, sharpness is retained along the kabob, while bringing down the interest in the cucumber and tomato through minimizing DOF. The spices and browning on the meat hold quite well. Having dominant, complimentary colors, such as red and green, can decrease interest in the main subject. By decreasing their dominance through either DOF or lighting values, interest is brought back to YOUR subject.

Thank you, Lili, for the great question. I hope this gives you some ideas and helps you shoot what you eat the way you like it!

Is there anything you’d like to see here? Do you have a question? Remember, I'll try to answer all your questions. Share your thoughts here or at the Hohenfels Volks Facebook page. Of course, commenting on both Facebook and here is always appreciated, too! Don't forget, we're on Google+, too!

Tuesday, April 3, 2012

Color and Perception

Greetings, volks. Welcome to Hohenfels Volks, THE place for our place! How’s everyone faring with this week’s exercise? I trust you’re seeing things take shape.

Today we’re going to take another look at metering. From previous posts, we know that we can control our exposure by increasing or decreasing our exposure time or aperture to achieve the levels we want. For instance, making a white cloud white, while retaining its texture, we’d meter the cloud and add 2 to 3 stops of exposure. If we add 2 stops, we can further close the distance between our vision and what we shot.

Today, we’re going to look at how color and saturation work with exposure to give us a better rendering of our vision. Generally, we perceive saturation different than reality. In the most general of terms, saturation appears more thorough in an image when we darken it by some small amount and increase our contrast.

The reality reason for the apparent change in saturation is the actual change in chrominance. Chrominance relates to the levels of luminance present in each particular color. For instance, taking an RGB value of r=100 and increasing it to r=200 increases the chrominance, without changing the saturation. We perceive a difference only because of the resulting change in luminance. This is an extremely basic and simplified explanation, but helps to understand what we’re discussing next.

By knowing what we just discussed, we can change the viewer’s perception of the saturation in our scene, and therefore the mood we’re trying to convey. Without knowing the above and the basics of color theory, it becomes difficult to use color in our compositions as a tool of our message or mood.

By increasing or decreasing our exposure for a certain color’s luminance to create the color we visualized, we can change our message, theme, or mood some. We also change our perception of a color’s saturation, giving either a rich look or a washed out appearance. Try taking some shots of a strong color in a scene at various exposures and comparing the results. For a more noticeable impact, you can try a brighter color in a darker environment or vice versa. As you range through several exposures, you begin to see how our key and our brightness change. You’ll also notice a change in feeling as you view your images.

By throwing a bit of the color and saturation into your metering, you’ll be better equipped for this week’s exercise. Changing your vantage will change the luminance available to you, and require ways to get around the change in feeling that comes with it. Keeping your vision in your mind as you change vantage points, and knowing that exposing for a particular color or set of colors, you can put your original intent across.

I’m looking forward to seeing the results of this week from everyone, and hope the rest of this week treats you well!

Don’t forget to post any of your images you’d like to see here at the Hohenfels Volks Facebook page. Of course, commenting on both Facebook and here is always appreciated, too! Don't forget, we're on Google+, too!

Friday, March 9, 2012

Ride Along: Golden Sky

Greetings, volks. Welcome to Hohenfels Volks, THE place for our place!

Today we’re going on another ride along. This one isn’t too far from home, so we’ll keep it short.

While exploring the backside of Hohenfels Sunday, I stumbled upon this scene and knew it was something I wanted to keep.

Hohenfels Volks: Golden Sky
ISO 400, f/22, 1/50, 35mm, Canon EOS 7D
The sun dipping slowly toward night's rest and renewal.

Going over the hill from Hohenfels proper toward Raitenbuch, you come across a small country lane meandering through the fields. Having been down this road before, I knew there were some nice scenics waiting to reward the one bringing them home. There is a tiny little chapel between 2 giant trees there, with some magnificent views of the hills around.

The shot was easy to visualize, I came up with several in fact. Composition was envisioned to include the colors all around as one the key elements. The sky was partly cloudy, with some nice golden glow from the sun hanging around the think veneer of sheeted clouds, and a nice blue in the areas without cloud cover.

I arrived moments before the color really started coming out. I took several shots, hoping to see something I could work with. I included the trees and the chapel in several, but liked this one for matching the closest to what I visualized.

I metered off the tree with the Gossen Sixtomat, at ISO 400. Giving the tree a –2-stop exposure from the meter would have washed out the sky and left the color flat and a bit comical. Metering the tree for –3 stops and the grass for about –2 stops from middle gray, meant I could shoot at f/22, which was part of getting the sun to streak in a nice little starburst. I was also able to shoot at 1/50, which limited the streaking to just a couple rays coming lightly over the hills in the distance through the clouds.

Getting it into Canon DPP, or the digital darkroom, added some magic. Canon has some “Picture Styles” for their application that come standard, allowing for the most common edits to color and contrast to be quickly applied. My first thought was Landscape, but that left the gold too vague and muddled. Having downloaded several other styles from Canon’s site, I settled on Autumn Hues for the picture style. This softened the contrast between the sun and the hills; it also made for some nice separation of the golds, oranges, and reds in the sky. I adjusted my levels, crushing them in some for clarity.

After that, I set the color temperature to about 6000K, which brought the color in line with the lighting hues. Increasing the contrast to +1 and the shadows to +2 added to the glow around the hills and tree, while allowing the levels to hold up throughout the image, including the separation in the distant hills. The last adjustment was to take saturation down –1 and sharpen.

The car coming up the road in the middle ground adds a nice little reference point for the viewer to pause. That was a lucky little bit of happenstance. I liked the lights as he was approaching and shot quickly to include his headlights. This photo captures what I visualized, and expresses the joy one gets when out looking for shots, especially when you find one that works for your vision. Shooting with a vision can make for some interesting stuff, knowing what tools you have at your disposal to make your vision a reality makes easier work of it!

Check out Canon’s site and download some of their picture styles. You’ll see some stuff that probably doesn’t appeal to you, at least I did, but you’ll also find something that does. I’m certain Nikon and other companies have something similar, if not, you can make your own in whatever app is your digital darkroom! Exposure and visualization start your image on its journey; your level controls and tools in software bring it home. Using them all together can make something that brings others to that same place with you!

Take care and enjoy your day!

Don’t forget to post any of your images you’d like to see here at the Hohenfels Volks Facebook page. Of course, commenting on both Facebook and here is always appreciated, too! Don't forget, we're on Google+, too!

Tuesday, January 3, 2012

Men Working

Greetings and welcome to Hohenfels Volks, THE place for our place. Welcome to the New Year. I hope Hohenfels is ready for 2012!

Since we had a 4-way tie, each theme being 1 vote each, I decided to go with something not on the list, and extend this poll until next week. This theme will probably be the biggest challenge yet, so here we go!

The theme is Production. You’ve shown the fruits of your labor, what you work for, and how you enjoy it. Now it’s time to show production. Here’s the kick in the pants- you can’t just shoot someone at work! For example, a large construction site, either stopped for the day, or during full-scale work is a good shot for the theme. A guy running a jackhammer isn’t! Another fine example would be a row of sewing machines, or only a couple, with the cloth in place and the hands of the seamstresses visible but no face or other body parts. Think production, and what gets the engines of industry, manufacturing, and the economy moving. These are ultimately the source of your labor’s rewards, right? Think big picture and capture a slice of that picture.

Don’t forget to your pics in for last week’s theme. You have until tonight, around midnight. Get yours in and have it featured here. Unfortunately mine wasn’t done, so I shouldn’t expect anyone else to, as the holiday weekend was quite busy!

Look for another post later today, about photography, the old fashioned way!

Enjoy the rest of your day, and remember to cast your vote for next week’s theme. Get yours in to have a say! Don’t forget to get your pics posted at the Hohenfels Volks Facebook page. Of course, commenting on both Facebook and here is always appreciated, too!

Tuesday, September 27, 2011

Visualization

Hello, again!

Welcome to another post. This time we’re going to talk about VISUALIZATION. I won’t be adding this to the Intro series, as this is more about the artistic side of photography.

Ansel Adams defined VISUALIZATION as "the ability to anticipate a finished image before making the exposure." In fact, he dedicated the first chapter of his book “The Negative” to the subject. VISUALIZATION covers more than the simple definition, but we’re dealing with it in a simple sense right now.

Most of us start out as what I call “See and Snaps.” You see something you like and just click the shutter until you get something that looks similar to what you saw. “See and Snaps” who never grow beyond that stage, usually end up giving up on photography or just settling for “seeing and snapping.” They never grow beyond it, because they never learn about VISUALIZATION.

Learning to VISUALIZE will improve your images with some certainty. The first step in VISUALIZATION is learning to separate what you see, from its context and surroundings. This sounds out of sync with reality, but as you will see, is actually easier to develop than you might think. When you take a photo, you are only capturing a piece of the whole scene, even if you go wide angle. See the scene and the piece you want to capture. Figure out how to show it with limited context and surroundings.

Another important part of VISUALIZATION is learning how to see the color, loss of color, and the effect of the light on your sensor and image. This will help you get the best exposure, DOF, and color possible. You need to get familiar with your camera to accomplish this one. This is more technical VISUALIZTION, but it is important in helping set up our shots. Remember, color can refer to the lack of color, too! Shooting black and white leads to some incredible shots, as the works of Ansel Adams, George Hurrell, Yousuf Karsh, and many of the old masters will attest and impress!

Using the technique of VISUALIZATION, you can create art from your photos; you can make some beautiful landscapes, portraits, still lifes, and keepsakes that will warm the heart later in life! VISUALIZATION leads you to think about every shot you take, and helps you to take the time to get it right. If you can’t take the time to get it right, what fun is it?

Here’s an exercise to try. Get a piece of matting or foam core about 8 inches by 10 inches and cut out a rectangle about 4 inches by 6 inches. Try to use black, as it will assist in the exercise, other colors may distract. Carry it around with you whenever you have your camera. Every time you wish to take a photo, first look at the scene, and then look at the image you want to capture through the card you made. Shift yourself, and look through the card again. Check to see if the perspective and framing are harmonious and work together to create something that will make you proud. Take your time and work the scene into what you VISUALIZE it to be. Sometimes that means waiting for the right light, sometimes it means moving, sometimes it means coming back later, but it also always means better pics! Who doesn’t want that? They used to do this exercise in photo courses and schools to teach a little bit about VISUALIZATION. It feels slightly silly, but you’ll be amazed at the outcome. Just using a small frame to get the feel of the image will aid you in developing and perfecting your VISUALIZATION, which will help you to share your vision! Eventually you can see without seeing, at least without seeing through the little card! There are so many places around Hohenfels to practice just VISUALIZING; Regensburg, Hohenfels, Grafenwoehr, Bamberg, Bayreuth, and Munich. Each one has unique things and sites to get you going!

The best source for VISUALIZATION is most likely “The Negative” by Ansel Adams. He writes quite a bit more than I can! Another great post is an article on Ron Bigelow’s Blog. Check it out and don't forget to look at the rest of his site!

Here’s hoping you’re visualizing a great week! Take care and all the best.

Friday, September 23, 2011

FOCAL LENGTH

Welcome to another post!

Our topic this time is FOCAL LENGTH, and covers more than just lens sizes.

Let’s start out with the basics; FOCAL LENGTH refers to the length of your lens, usually in millimeters. A 300mm lens is 300 millimeters, but crop factor can change the apparent FOCAL LENGTH of the lens. Crop Factor refers to sensor size on a digital camera. Most of us use cameras with an APS-C sensor, which provides a 1.6x crop factor, or 1.6 times the magnification of the lens’s FOCAL LENGTH. Unless a lens is made for the specific crop factor, for instance Canon’s EF-S lenses, crop factor must be counted to provide the correct focal length. Therefore, a 300mm lens at 1.6x crop factor has an apparent FOCAL LENGTH of 480mm. Since most of us now use the digital lenses that either came with our camera, or we purchased later, I’m not going to make too much of crop factor, that’s for another post.

A large number of folks believe that the perceived change between two FOCAL LENGTHS is caused entirely by magnification. This is actually not entirely true. When you zoom in closer, your lens covers a smaller area of the scene. It doesn’t really magnify it, just shows less in the same amount of space, although there is some magnification from the optics. If you look through a toilet paper tube and take note of what you see, then look through a paper towel tube of about the same diameter, you’ll notice this effect.

Another effect of FOCAL LENGTH, is longer FOCAL LENGTHS, compress the distance between objects in your scene, making them appear closer together. This is great for a portrait with a shallow DOF, as it can blur out and compress the background for a nice effect. It’s something to pay attention to, as the effect can make a great picture look somewhat flat and plain.

For more the rest of this article about FOCAL LENGTH, check out our Intro to Photography page, which contains our full intro series posts so far. And for a great article about the effects of FOCAL LENGTH, check out Photo Tuts+. You can also get into the maths of it at Wikipedia!

I hope this article will be useful on your photographic journey. The knowledge really helped me! Enjoy the weekend folks, and keep your eyes open for more articles, tips, and Hohenfels Volks photo goodness!