Showing posts with label center of interest. Show all posts

Wednesday, June 13, 2012

Shooting What You Eat

Greetings, volks. Welcome to Hohenfels Volks, THE place for our place! Things have been rainy here, but that gives us the chance to show the stormy side of Hohenfels and our surrounds. I trust you’ve bagged some cloud shots!

One of our Facebook readers, Lili, asks “For those of us who don't own an external flash unit, or simply can't afford any sort of lighting equipment; what are the tricks to making food look more appealing and vibrant, and not so flat and 2 dimensional?” We’re addressing that in tonight’s post, so bring your appetite and let’s get going.

The first thing to know is that flash, while an important part of your kit, isn’t necessary for all types of photography, nor at all times. Flash can help by adding light, allowing the use of faster shutter speeds, and by allowing us to shape the feeling our images evoke by shaping the light. There are other ways to accomplish this, though. Let’s look at how we can achieve that.

There are multiple ways to shape existing light. Let’s start by moving your food toward an area that has plenty of the light you’d like. From there, you can modify that light with everyday household items. A pillowcase can be used to soften and spread the light, covering a larger area with nice gentle light. You can use it to shape the light by varying your angle and position. In a previous post, we mentioned the inverse square law that says doubling the distance between a light source and subject gives ¼ the light level. You can see that by tilting the angle between your pillow case diffuser and subject creates the illusion of distance and depth.

Another way to add or shape light is to use a reflector. You can use foil or a 5 in 1 kit to bounce light in from outside the immediate area. This allows you to concentrate your light where you want it, and increase your luminance levels. Again, tilting and angling your bounce can shape the light. A nice little thing to try is bringing your light in from about 45 degrees above your subject, illuminating the top and side. This allows the light to taper, and when you add the softness of the light, creates some depth. You can use a large white piece of gator foam, a piece of matting, or even a cookie sheet.

Another thing you can do is use your pop up flash. I never thought I’d say that, but with a little ingenuity, some foil, and a diffuser, you can add some depth. The trick to this is bouncing the light in from off the lens axis. I’ve used my external flash on camera to bring in lighting from 45 degrees to the side before, just with a piece of white mat. Remember, though, that bouncing your light costs you some of its power and range.

Now we’re going to move on to the best way to add some detail and vibrance. The big secret is DOF, depth of field. Using a longer focal length at a very wide aperture will give you a limited DOF. If you are shooting at 50mm, f/5.6, and focus at 2 feet, your DOF runs from about half an inch in front of your focal point to about the same behind it. You have a little over 1 inch of depth. Anything outside that range will become progressively out of focus. Taking into account the angle from which you’re shooting, you can create some nice little focal points within your scene. I like to think of it as pools of focus. When you place these at locations other than the center, you get some nice depth and intensity. Shooting outside in open or semi-open shade can also give more light and add elements of interest. The key to this is distance between the background and subject. You also want to make sure your focus is spot on where you want it, allowing your subject to leap out from the background in the finished image.

An easy thing to do is set up some Christmas lights or other small lights several feet behind your subject and shoot focused on your subject at your widest aperture. Do this in lower light, bringing in light with a flash or reflector. You’ll see some small circles of light that are incredibly out of focus, adding immediate interest to the scene if done right.

To boost the intensity of your color, shoot at about 1/3 to 1 stop lower that you meter for. By slightly underexposing your scene, you improve color density, saturation, and vibrance. It makes for less time spent editing and more time shooting.

Here are 2 images that show how using DOF can create an interesting sense of the meal or food.

Hohenfels Volks: Ribs...
ISO 800, f/5, 1/30, 44mm
Notice the DOF on this. By focusing toward the center of the ribs and allowing the highlights to fall higher than normal, interest is added in the meat, even though the pepper would seem to dominate. The pepper is diminished in strength through a shallow DOF, and the sharply blurred foreground end of it.

Hohenfels Volks: Meat Platter
ISO 800, f/5, 1/60, 41mm
By focusing on the back edge of the meat, sharpness is retained along the kabob, while bringing down the interest in the cucumber and tomato through minimizing DOF. The spices and browning on the meat hold quite well. Having dominant, complimentary colors, such as red and green, can decrease interest in the main subject. By decreasing their dominance through either DOF or lighting values, interest is brought back to YOUR subject.

Thank you, Lili, for the great question. I hope this gives you some ideas and helps you shoot what you eat the way you like it!

Is there anything you’d like to see here? Do you have a question? Remember, I'll try to answer all your questions. Share your thoughts here or at the Hohenfels Volks Facebook page. Of course, commenting on both Facebook and here is always appreciated, too! Don't forget, we're on Google+, too!

Monday, April 16, 2012

Vision and Style

Greetings, volks. Welcome to Hohenfels Volks, THE place for our place! Hohenfels is coming to life, mixed weather bringing the lure of photo opportunities and some nice lighting our way!

Today we’re going to talk about the concept of style. No, not the dated, faded, ‘70s look, but your own photographic style.

We’ll be brief, maybe too brief, with this right now. First, we need to know what a photographic style is. In the context, we’re using it, it’s basically the way you express your self. Your photographic style should represent you and how you see things.

When you’re starting out, you don’t have much of your own style. You’re trying to learn about photography and taking photos. The first thing to do is learn about exposure. Next up comes learning your camera and gear inside out.

When you know your gear, thoroughly, and how to use it, it becomes a tool for your expression. Another thing you need to learn is about yourself. How do you see things, how do you want others to see them, and what is your vision? A great way to do this is to examine a lot of photos and other art. See what makes you feel good about it, and what turns you off. Once you know that, you can begin to use your knowledge of photography and your gear to show the world what you want it to see.

That last bit requires some honesty on your part. It’s basically opening yourself up. The cool thing about it is that you can also hide or minimize the reality in your images. If you want the world to see something a certain way, you also have to remove or hide from your image elements that detract from your intent.

This week’s exercise is to choose 1 theme or subject, and only make images revolving around that theme or subject. You have to be honest with yourself here, and choose something that appeals to you. Choosing only the 1 theme will open your eyes to a new way of expressing yourself. For an even more challenging exercise, combine this exercise with our last ones.

By now, you should be getting a feeling for your vision and for composing an image. Remember, composition is more than placement, lighting, color, time, weight, DOF, etc, are all elements of composition, but the most important element is your vision.

Enjoy the week and keep shooting. I hope everyone gets their dream shot this week!

Don’t forget to post any of your images you’d like to see here at the Hohenfels Volks Facebook page. Of course, commenting on both Facebook and here is always appreciated, too! Don't forget, we're on Google+, too!
Tuesday, December 27, 2011

Elements of Composition: Negative Space

Greetings and welcome to Hohenfels Volks, THE place for our place. As we begin another workweek here in Hohenfels, let’s take a moment to reflect on what we’re working for. I extended the deadline for submitting to last week’s theme due to the holiday. I hope everyone gets submitting.

Today we’re going to talk about NEGATIVE SPACE. There’s a lot of ground to cover, it’s a wide topic, and there are a variety of views on the subject. We’re just going to touch on some of it today, with more about it another time. Of course, if you really want to, you can Google it for loads of information.

NEGATIVE SPACE is basically the area around the subject of your photo. NEGATIVE SPACE is used in all forms of art, from photography and painting to music and gardening. They even use it when designing logos and trademarks.

When we make photos we place our subject, generally following guidelines, where we feel it will create visual appeal. This subject becomes our positive space, for want of a better descriptor in today’s context. The remaining areas are your NEGATIVE SPACE used to balance the positive space, or to add context to an image. It's generally used in conjunction with other "rules" of composition, like the rule of thirds.

In the minimalist approach, NEGATIVE SPACE often refers to space that carries minimal detail, yet allows the image to work. Much like the photo below. Notice how the background is blown almost totally white or light shades of gray. Another side of this approach is not just monotone, but lacking detail. When most folks see NEGATIVE SPACE, they tend to think that any detail detracts, so like to blur it out. Bokeh comes from this, and makes for great images. You can use blur for effects, for subjects in and of itself, or to add context.

Hohenfels Volks Jasmine in Hohenfels
ISO 320, f/5.6, 1/60, 85mm
Notice the white NEGATIVE SPACE around the princess.

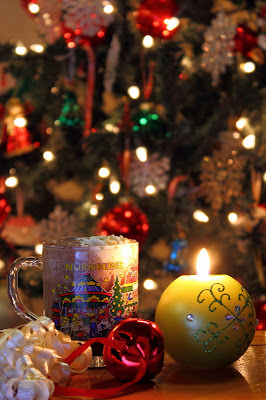
Another great use of NEGATIVE SPACE is to carry minor detail and add to the context of the image. In my Christmas shot, you can see the NEGATIVE SPACE is the background. It’s just a Christmas tree, but too little information creates a blurry mess, and too much creates a distraction. By selecting my f/stop and focus to allow enough detail to show up, it shows a time, Christmas, and creates a sense of being at home. Due to decorations on the tree, and their size, blurring beyond this becomes a distraction, as does greater DOF. You see now how NEGATIVE SPACE can convey time, place, and themes. Using snow-capped mountains would have felt like a ski lodge, a Christmas market would have left one with the feeling on being Nurnberg.

Hohenfels Volks Merry Christmas, Hohenfels
ISO 100, f/5.6, 2 seconds, 55mm
Merry Christmas, Hohenfels!

In both the images above, NEGATIVE SPACE has been used to create a composition that makes the image work. Don’t overlook the importance of your NEGATIVE SPACE when visualizing and composing your shots. Think about your intent and how to use NEGATIVE SPACE to aid your subject in fulfilling your intent. By knowing how to use NEGATIVE SPACE and how it affects your image, you can use it to carry some information or use it outline your subject creating an interesting image. If you use it to create a silhouette, remember the silhouette is generally your subject, not NEGATIVE SPACE.

Enjoy the rest of your evening, and remember to cast your vote for next week’s theme. Don’t forget to get your pics posted at the Hohenfels Volks Facebook page. Of course, commenting on both Facebook and here is always appreciated, too!

Saturday, November 5, 2011

Ride Along Shot

Welcome to Hohenfels Volks. I hope everyone is having a great weekend. The day is chilly, but the sky is blue, and the light is there. Today we’re going to try something new based on a suggestion by my friend Darris. We’re going to look at a photo and go over how and why it was made, and what kind of thoughts went into it.

I’m going to use a photo taken in Bamberg at the Residenz.

Here’s the image and the settings


ISO 1600, f/5.6, 1/60. Canon EF 28-135mm IS

The imperial hall is a magnificent room, from which you start your tour. It’s also the only room where flash photography is allowed. I wanted to capture something of that grandeur without taking it to the point where there is too much of the room,

Choosing something that would be pleasing and have a point led to this image. Visualizing something with the windows leading to the door gave several possibilities. I liked having something lead to an interesting and mysterious item or subject. The door was the way to go, as it increased interest and curiosity.

By moving around the room, and visualizing several ways of getting the picture I thought placing the door at one of the thirds, and leading in with the chairs would be a great way to draw the viewer in. I set my flash to cast a small amount of light to toward the entry into the main part of the palace. I thought that including some of the windows would be a nice touch, but realized that closing in the window frames toward each other added another way of leading the eyes into the door.The contrast between window light and the dark chairs creates more interest in where they lead.

Creating diagonals with the chairs, I’ve created one set of leading lines. By closing the windows together, the converging parallels created another set of diagonals. All the diagonals converge at the door, leading one into the apartments. What’s in there, what is the light, and where does the door lead? These questions can be created with placement of the subject and leading lines. Keeping it in glorious color helped show the glory and majesty of the hall and increase some curiosity and tension.

The short focal length allowed me to shoot at f/5.6 and keep the DOF needed to bag the shot I visualized and keep the shutter speed high enough to handhold the camera. I knew that a large aperture would be need to get the light from the flash to record properly, and somewhat slower shutter speed to get the ambient light. 1/60 allowed the ambient to record at the desired level, while f/5.6 allowed the flash exposed areas to match the ambient levels.

When shooting manual with a flash, your shutter speed controls the ambient exposure and the aperture controls your flash exposure. This will allow you to adjust either part, as ambient lighting often cannot be changed, and running between your flash and camera can make things tricky.

Remember, with shots like this, you have to include the negative lighting and added lighting in visualization. Include the impact of your counters to the poor lighting, and see the end result. If you know your camera and your exposures, you'll get the shot you want.

Painted beautifully with wonderful scenes and colors, I’ve included a pic of the ceiling.


ISO 1600, f/5.6, 1/60

I love the color, detail, and majesty of this painting.

I hope this post can be of some help. Enjoy your weekend. Today’s golden hour begins at 4 pm, so get out and get shooting! That golden light will make your shots, and you surely can find any number of subjects to photograph in it! Remember to share your pics and post your questions at the Hohenfels Volks Facebook page, and or by commenting here!

Monday, October 10, 2011

Center of Interest

Welcome to another Hohenfels Volks post.

Today we’re going to discuss CENTER OF INTEREST. A strong CENTER OF INTEREST is a major feature of great art including painting, writing, and photography. Painters like the Old Dutch masters were experts at it, as were the photographic greats like Ansel Adams and George Hurrell. Rembrandt used it to great effect, as did Michelangelo. They knew where and how to use it to greatest effect.

CENTER OF INTEREST is the main idea of the picture you’re about to shoot. As such, it requires some thought and visualization.

CENTER OF INTEREST is another tool of composition. By placing your CENTER OF INTEREST where it will have the maximum impact, you can lead the viewer into and through your image. One thing to remember is that the CENTER OF INTEREST DOES NOT mean the center of the image.

The main question today is “What is my CENTER OF INTEREST?” Where should I place it? How should I weight it? How should I light it? How does it relate to the story of the image?

If you remember, there are guidelines for composition. Knowing these is the first step in identifying and placing your CENTER OF INTEREST. Your main subject is usually thought of as your CENTER OF INTEREST, although you may be shooting more than one subject. There should only be one CENTER OF INTEREST, as more than that can be confusing. In addition, when people are included in an image where they are not the CENTER OF INTEREST, they should not look directly at the camera. By having them look at the camera, you leave the viewer with doubts about your CENTER OF INTEREST. For impact you can include them, but have them looking at your CENTER OF INTEREST. This can be a powerful way to direct your viewer into your photo. People have a way of wanting to look where others are looking, so this trick will improve your images!

Here around Hohenfels, so many things can become a CENTER OF INTEREST for you. Rivers, mountains, hills, fields, castles, and palaces all make for great CENTERS OF INTEREST. You can make anything your CENTER OF INTEREST; you just have to identify it. The way you identify your CENTER OF INTEREST is through compositional tools, like placement, focus, DOF, and lighting.

Here’s a pic that shows what we're talking about.


A photo showing the wife watching a line of cars passing by. The cars, with their colors make a nice CENTER OF INTEREST. Notice that the wife is not looking toward the camera. Their angle and placement combined with her viewing of the cool cars tends to draw your gaze there, also.

Knowing how to visualize and compose an image with a strong CENTER OF INTEREST is a valuable tool. I hope that this little post has helped someone out there! We’ll be covering more about composition, lighting, and other artistic aspects of photography soon.

Remember; leave your comments and questions here and on our Hohenfels Volks Facebook page. Your participation can make this a true gem!

Thanks to all of you, have a great day!