Showing posts with label zone system. Show all posts

Friday, February 24, 2012

Digital Density

Greetings, volks. Welcome to Hohenfels Volks, THE place for our place! Let’s start by welcoming a little sanity and quiet, as peace returns to Hohenfels and our surrounds!

The last couple weeks have been trying for everyone, I’m sure, but things are getting back on track.

I went out and shot some film today, and developed 2 rolls this evening. That got me thinking about something that we’ll discuss here today. Before we begin, I should explain that many of our recent references to Ansel Adams are because he was probably the most prolific educational writer on photography. He’s not the only great, but his vast amount of work and writings are the most widely read, studied, and approachable.

Today we’re talking about “Digital Density.” This has nothing to do with being behind the curve on technologies. I’m referring to something that hit me today while developing my film.

When old photographers spoke of their negatives, they spoke in the arcane language of photographers. A negative that was thin was dark in printing and so on. Too dense often leads to blocked, or clipped, highlights. Contrast was a product of your negative’s density. So was tonal range. The density was determined by the thickness of remaining silver, or emulsion, after development. Adams developed for a zone 8 density of 1.25-1.35 for his preferred diffusion enlargers. Density is a logarithmic number, and we’re not going into it here. Generally, zone 8 is where the brightest details can be discerned and identified. Zone 9 results only in very slight variations in tone and 10 is pure white. By exposing to keep the darkest shadow details in zone 3-4 and developing to keep highlight details in zone 8, he was able to make magnificent images.

Most of that is overly simplified, but it gives us a basis for the next part of this post.

First, let’s look at a basic representation of the zone system.
Hohenfels Volks: Zone System
The basic Zones chart

Now, we’re going to convert that to a negative.
Hohenfels Volks: Zone System in Negative
When converted to a negative, this is an approximation of the basic zone chart

You can see how things changed. Assuming a pure white light behind the negative strip, you can see that zone 1 is pure white, and so on up the scale. Below are the negative versions of a couple photos, one black and white, and the other color. Looking at them, you can see that the darker parts are actually the lighter areas when the image is returned to original.

Areas with no density, other than film base+fog, will have absolutely no detail, and tone. Areas that are pure black will have no detail and will be pure white. Knowing how the density affects photos, you can do a bit of editing on your image after converting it to negative. In Photoshop, this is done by inverting the image, or CTRL-I. In Lightroom, it’s the same. In Paintshop Pro, it’s under the Image Menu- negative image.

Here are 2 conversions of digital photos, taken with a Canon digital SLR, one in color and one black and white.
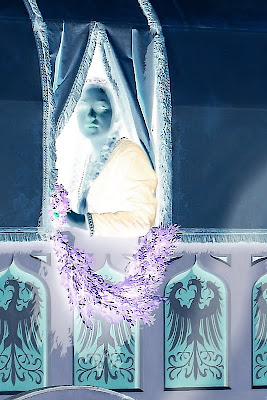
Hohenfels Volks: A Lady in Waiting
This is a color photo converted to negative. Look for the original in my works.

Hohenfels Volks: Developing for your vision
The photo we used in our last post about developing for your vision

Once you’ve done your conversion, you can clone out dust, with greater accuracy if you’re messy with the mouse. Another great thing about this feature is the ability to bring out detail in your highlights. Digital doesn’t deal too awfully well with blown highlights, but you can recover small amounts of detail by converting to a negative of your image. This is great for working with skies and snowy areas. It’s possible to recover some in the shadows, also.

The caveat is that there must be information there, or it will be less effective.

You can also increase your control over your tonal range by performing level and curve adjustments on a negative layer, then inverting it. When working on a color image, be aware, that subtle changes to exposure can be localized to perhaps a small portion by extraction that selection as a layer and converting it a negative. It allows you to expand the tonal range of any color, or the whole image, in ways that can be very impressive. You can also diminish some colorcasts! Colors are inverted in a negative, so keep that in mind, or you’ll end up all abstract and disappointed, unless that’s your vision! It’s almost like working with a large negative.

Using the tools taught to us by those who were taking photos when our folks were kids, we can learn to improve our digital art. Using your vision, seeing both the negative and the print, you can begin to get some awesome stuff going on. Give it a try and see how it works with your vision and your exposures. If it's something you're happy with, post the results, we'd all like to see!

Don’t forget to post any of your images you’d like to see here at the Hohenfels Volks Facebook page. Of course, commenting on both Facebook and here is always appreciated, too! Don't forget, we're on Google+, too!

Wednesday, February 8, 2012

Editing For Pre-Exposure?

Greetings, volks. Welcome to Hohenfels Volks, THE place for our place! I hope everyone is warm and well, and that you got the shot you wanted today!

Today we’re going to deal with an editing technique based on old film shooting. I know this was supposed to be another Around Hohenfels, but that didn’t quite pan out the way I had planned.

Back in the film days, you couldn’t change film speed mid roll. You also had some interesting things going on. Film often had a wider latitude for exposure errors, especially for overexposure, but even underexposing allowed film to still work out, if you knew how to make it. You could shoot with ISO 200 settings on ISO 100 film, and push the processing for ISO 200, and save the shots. There were several techniques for saving the shot, including push processing, pull processing, and pre-exposing. When shooting RAW format, most conversion applications, like Canon’s DPP, can be used to correct an exposure by up to 2 stops either direction. Using the exposure setting that way, though, you affect the entire image, not just certain areas. Using most image editing programs, you can dodge or burn areas to meet your needs, as well adjust your curves and levels. In fact, most applications have the common dark room tools, which is why they refer to them as a digital dark room.

Rather than discuss those choices at this time, we’ll address pre-exposure. I chose this topic, as most image applications don’t have a feature that allows that directly. Rather, you have to use a round about method to obtain similar results, and that’s what we’ll discuss today. Pre-exposing film allowed the photographer to bring out detail in deep shadows by adjusting them to higher levels or zones. By pre-exposing a hot, then shooting over that pre-exposed frame, light intensity could be raised. If you wish to bring out detail in zone 2 shadows, you could pre-expose for zone 1 or 2, then shoot for a correct overall exposure and get those elusive shadow features. You’d need to take a gray card or translucent plastic/glass, meter it exactly along your image axis, and set your exposure accordingly, then shoot the scene. You could push, pull, or otherwise develop according to your plans, and print the same. We’ll be simulating this technique. I’m going to use this image as an example.

Hohenfel Volks: Passau skyline, pre-exposure original
ISO 100, f/5.6, 1/500, 55mm
The Passau Skyline!

First, select your image, and open it in your editor of choice. Whether you use Photoshop, GIMP, or Paintshop Pro, the basic are the same, but your application needs to support layers. Once your image is open, make a new layer, and select your color selection tool. Click on the shadows you wish to open up and increase the details. Before closing, look at the settings or options for that color and increase the values by the desired amount. For this image, I chose the trees in front of the church, which came out to R-7, G-7, B-7, L-7, and doubled them all to 14. This was still in zone 1, digitally speaking, but when combined at the end, allowed for a slight bump in the shadow detail.

With that being done and applied, select your bucket too and flood fill the new layer with that color. You should have something solid, in your selected color or tone. Set you blend mode to screen, and watch the magic start. All your levels will increase except the brightest areas. You will notice a decrease in contrast as well.

Decrease the new layer’s opacity until you have a set of results that are satisfactory. Now, select levels adjustment, and crush in the curves ever so slightly. This will increase your contrast, without removing too much detail from your shadows. You can apply a curves adjustment and a clarify adjustment if you desire. Now you should see something that is pleasing to your eye, and has more detail in the shadows.

In the days of film, you shot for the shadows, to preserve detail. This often meant slightly overexposing your shot, and printing to retain the detail in the highlights. By pre-exposing your film, you had a way to create more detail without giving any up on the other end. Because exposure was cumulative on multiple shots at the same frame, you could add light as needed. The reason for dark areas benefiting most, was that you added light uniformly across the image at the same level, but your exposure of the image was not uniform. Using just quick numbers to demonstrate, at level 2, when you add 2 units you double the level. At your highlights with say 100 units, you add 2 units and the results are almost unnoticeable due to the ratios. This works in digital the same way, when you select screen mode, you only lighten values lower then your selected pre-exposure layer. Although there is some small effect at slightly higher levels, it is less drastic. By varying the opacity of the layer, you can control the effect even more. Adding masking to allow only certain areas to be painted in gives you complete control!

Here is my final image. Not a large change, but enough to bring out some of the detail within the trees. This works best with images without a large amount of bright spots or too much contrast, but this image was useful. This shows you what a little bit of old time darkroom work on today’s technology can accomplish.

Hohenfel Volks: Passau skyline, pre-exposure finished
Same as above, with pre-exposure.

Well, that’s it for today. Keep shooting, keep seeing the light, and keep your love of our art going with frequent sessions behind the lens! Don’t forget to vote and to get your works in for this week’s theme!

Don’t forget to post any of your images you’d like to see here at the Hohenfels Volks Facebook page. Of course, commenting on both Facebook and here is always appreciated, too! Don't forget, we're on Google+, too!

Friday, February 3, 2012

Home On the (Tonal) Range

Greetings, volks. Welcome to Hohenfels Volks, THE place for our place! I hope you’re staying warm; this cold can be a killer.

Today we’re introducing a new concept. We’re going to discuss tonal range. Usually tonal range is a term used in monochrome photography. But it can also be used in color, with a slightly expanded meaning.

Tonal range in B&W photography refers to the range from darkest black to whitest white. This is a vague definition; so let’s get more detailed here.

First, tonal range is limited by 3 factors. The first is your camera or film, the second is your monitor in digital photography, and the third is the printer or paper selected.

A film or image sensor can have wide tonal range, allowing for many levels between zone transitions. Though it has a wide range, it may not be capable of recording more than a few ranges at a time, which gives it more contrast. If you remember, there are 11 zones and that we generally want to get the bulk of our image in zones 2 through 8, with our true blacks in zone 0 and whites in zone 10. Zones 0 and 10 have no tone or texture; therefore convey no usable information to the image. This means we should be placing our extremes in zones 1 and 9 if we want any kind of detail. Tonal range in this context allows for more gradual shift between the extremes of each zone. As in the image “A Shot in the Dark,” narrow tonal range can increase the visual impact of an image immensely. Wider tonal range can be flat and lacking in impact if consideration isn’t given to the ranges you want to emphasize. You can use a wide tonal range, while limiting most of your imagery to one end of that range for more impact.

In film, light is recorded on a strip of film and silver halides. Where the light hits, the silver halides are concentrated, creating a thicker negative. This is referred to as your density. The greater your density, the greater the light recorded. A film's tonal range often corresponds to its density. A wide range of densities in a shot means a wider tonal range.

Your monitor also has a limited tonal range. The more modern LCDs have an incredible range, perhaps more than your camera or film. This will have an impact on your presentation and editing when using different monitors. This is part of the reason for calibrations for monitors and printers. We won’t discuss that here beyond this.

Your printer and paper also are limiting factors. As with monitors, papers and in digital, inks have different tonal ranges. One type of paper may have a wider tonal range and be capable of allowing the entire range of your image to be printed beautifully. Another type may not. The same with printers and inks.

In color photography, tonal range refers to all the above, but is applied to each of the colors, Red, Green, and Blue. Each color may have a different tonal range, in each of the devices we’ve discussed. That’s why on most newer cameras, your histogram can either show RGB, luminance, or both. This allows you to see each color in relation to the other colors.

When displaying your final image, you choose your presentation format- monitor, CRT, print, and so on. Giving the output and its tonal range the right consideration can go a long way to creating what you visualize and making your vision a reality. When you wish to print an image out, it’s best to have a test print from the target printer to ensure your monitor matches, then your image can be edited to match and you’ll get a great print. The same goes with film and silver based paper printing. Match your film to the paper that will achieve the results you desire and your photos will be better for it.

Later, we’ll look at more about this subject. In future posts, we’ll examining individual influences on, and aspects of, your tonal range. I’m looking forward to you joining us on our journey through photography.

I hope you’ll be posting your photos for this week’s theme, and get your vote tallied for next week’s theme!

Don’t forget to post any of your images you’d like to see here at the Hohenfels Volks Facebook page. Of course, commenting on both Facebook and here is always appreciated, too! Don't foget, we're on Google+, too!

Wednesday, February 1, 2012

Reviewing the Basics

Greetings, volks. Welcome to Hohenfels Volks, THE place for our place! Brrr. That’s our word of the day!

Today we’re going to review some of the basics of photography and exposure. This can all be found on our Introduction to Photography page. We should all have a good idea of this stuff, but it always helps to refresh the cup, so to speak.

First, we’ll address our exposure triangle. The triangle consists of 1- ISO or film speed, 2- shutter speed, and 3- aperture. To change exposure, you change any side of the triangle. To keep the same exposure, you have to change at least 2 sides. For instance, we set up on a sunny day at ISO 100, f/16, and 1/100. According to the “sunny 16 rule,” we’re good to go. But we want less DOF, so we need to increase our aperture. We go to f/4 to give us a shallow focus. If we don’t change another side of our triangle, we overexpose and create a mess. We have a 4-stop increase in the amount of light coming in, so we need a four-stop increase in shutter speed or 4-stop decrease in ISO. Since we can’t bring our ISO lower, we need to change our shutter speed to 1/1600. At 1/1600 at f/4, that gives us the same as 1/100 at f/16. If we want to increase our exposure, we can change any 1 side and either decrease our exposure or increase it depending on our new settings. For instance we want to increase our exposure on ISO 100, f/16, 1/100 2 stops, so increasing our aperture to f/8, decreasing our shutter speed to 1/25, or increasing our ISO to 400 will do just that. Remember, when we meter something, or a scene, the meter gives us the exposure for 18% gray, which is zone 5. Knowing this allows us to place the item we meter into different zones or exposure levels.

Next up, we’ll look quickly at depth of field, or DOF. This is a product of our focal length and aperture. The longer our lens’s focal length is, the shallower our DOF. The wider our aperture is, the shallower our DOF. This can be a good way to remove or minimize distractions. A 100mm lens at f/16 has about the same DOF as a 50mm lens at f/4. Focused at 10 feet, both give a DOF running from about 9.17 to 11 feet. Seeing that, you can deduce that a shorter lens has a wider DOF.

Remember, these 2 topics we’ve reviewed go together. By adjusting your aperture for a shallower DOF, you’ll have to change something else to maintain your exposure. If you wish to move into a new zone, you’ll change your DOF if you use your aperture to move zones.

We’ll review composition and inspiration in our next talk. Remember to vote and get your pics in early. I hope you’ll all participate in this week’s theme, solitude. We’re aiming for more votes for our theme, so get involved and let’s enjoy the journey together!

Don’t forget to post any of your images you’d like to see here at the Hohenfels Volks Facebook page. Of course, commenting on both Facebook and here is always appreciated, too! Don't foget, we're on Google+, too!

Tuesday, November 29, 2011

Tech Talking

Greetings, Hohenfels, welcome to Hohenfels Volks, THE place for our place. Here’s hoping your week is off to a good start and Tuesday didn’t turn in to Monday part 2.

Today we’re going to introduce the concept of “Dynamic Range.” If you remember our introduction to the Zone System, there are 11 zones, 0-10. Ansel Adams considered this the full range, zones 1-9 were the dynamic range, and 2-8 the textural range. Zone 2 is the lowest value that retains discernable texture, and zone 8 is the highest value retaining usable texture, and in both cases the values where detail is preserved and recorded.

When we speak of dynamic range today, this still in some ways holds true. Metering from a gray card, it’s how many stops of exposure above and below middle gray that are usable. For instance, the EOS 7D has about 8 stops. Its range consists of 5 stops below gray before clipping to black or solid noise, and about 3 stops above middle before blowing to white. This means it runs from about zone 1 to zone 8, maybe a little higher. Each camera’s range is different; so don’t use one camera’s range to guess another’s. "Dynamic Range" determines the amount of contrast an image can have and how sharply that gets applied. It also can effect how you change the sides on your exposure triangle, based on your intention.

When you know your camera’s range, you can adjust your exposures appropriately. If you wish to increase middle gray, zone 5, to zone 6, you have to know your limits before the higher zones blow out. Taking 5 to 6 brings zone 7 to 8, and anything starting at or above 8 will be blown to solid, textureless white.

A camera’s range often times is limited by the size of the photocells or photosites. These are the individual receptors on the camera sensor. A larger frame sensor will usually have larger photocells, allowing more light to be received and detail retained. There are millions per most of today’s sensors.

Another way to expand your “Dynamic Range” is to always shoot RAW, as your camera records more information. You can add up to a stop and a half shooting RAW. Shooting automatically and in JPEG mode can cost you that latitude in your exposure. Keep that in mind when shooting in very bright or low light conditions.

Well, that about wraps up our discussion. Try to keep that in mind when you’re out capturing the beauty of Hohenfels, our area, and your holidays. The results will amaze you.

On to other things, I’d like to remind all of you to get your votes in and get working on your photos for this week’s theme, “Morning Moments.” I can’t wait to see what you amaze me with!

Shoot for the love, of photography, your subjects, and your art, it really will show! Get shooting and start posting at the Hohenfels Volks Facebook page. Of course, commenting here is always welcome, too!

Thursday, October 13, 2011

The Zone System

Welcome back to Hohenfels Volks. This time we’re going to deal with the Zone System.

Ansel Adams and Fred Archer developed the Zone System. Most of us have heard of Ansel Adams, and seen some of his magnificent works. Fred Archer was another big name in the early days of photography, pioneering the use of still photography for motion picture and movie star publicity, and was an early proponent of photography in advertising. Together they developed a system that brought the concept of sensitometry and print density together, allowing for proper exposure of film and prints.

It sounds pretty complicated, and an in depth analysis of it can be, quite technical. We won’t go too deep here, but we will hit upon it more than in our exposure topic. Learning about the basics of the zone system can bring some zing into your work, and help deliver you from the dark ages of auto mode, so here goes!

There are 11 steps, or zones, from black to white. Here is an image I made showing the zones.


The actual full range is smoother, but given the nature of photography, we end up with approximately these zones.

At zone 0, there is no detail and no texture. There is no usable information at all. This is the same at zone x. At zone i and ix, there is limited tone, but not much else in the way of detail. Ansel Adams described the ranges as; full spectrum, zones 0 through x, dynamic range, zones i through ix, and textural range, zones ii through viii. In his book, The Negative, he describes the zones as:

0 Total black in print
I Black with some tonality but no texture
II The first suggestion of texture; the darkest part of the image where texture and detail are required
III Average dark materials and low values showing adequate texture
IV Average dark foliage, dark stone, or landscape shadows
V Middle gray (18% reflectance): clear north sky; dark skin, average weathered wood
VI Average Caucasian skin in sunlight; light stone; shadows on snow in sunlit landscapes
VII Very light skin; shadows in snow with acute side lighting
VIII Whites with texture: textured snow, highlights on Caucasian skin
IX white without texture; glaring snow, may print as pure white
X Pure white: light sources in the picture area and specular highlights

When metering from a source, your camera, or meter, will render the metered object in zone v. Knowing this, you can use your exposure compensation or manual settings to bring the desired part of the scene into the zone you desire.

In practical application, you identify the main element in your scene, then expose for the desired zone, the other elements exposing according the placement of your main element. If you desire an area to be zone v, then the rest of the image exposes for the zones according to what you placed in zone v. It’s fairly straightforward. Take a meter reading from the parts you want in zone 5, and you will end up with something that matches what you visualized.

A great way to see the effects of the Zone System is to look up Ansel Adams on Google, or your favorite search engine. His work is quite addictive, though, so be prepared to spend some time admiring his art. Then look into the Zone System. After a few hits and misses, you’ll be glad that Fred Archer and Ansel Adams collaborated to create such a wonderful tool to make the pursuit of our passion a little easier!

I hope you have a chance to shoot away over the next few days. Hohenfels alone has enough incredible scenery to try out the zone system, not to mention the surrounding communities and towns. Maybe in a church or a field, or even a portrait. Let the magic work for you! Who knows, you may capture a real prizewinner! Get out and give it a try!

How do you plan to use the sone system? Let us see by posting at the Hohenfels Volks Facebook page. you might inspire a convert!

Remember; leave your comments and questions here and on our Facebook pages, also.
Thanks to all of you, have a great day!