Showing posts with label f-stop. Show all posts

Wednesday, June 13, 2012

Shooting What You Eat

Greetings, volks. Welcome to Hohenfels Volks, THE place for our place! Things have been rainy here, but that gives us the chance to show the stormy side of Hohenfels and our surrounds. I trust you’ve bagged some cloud shots!

One of our Facebook readers, Lili, asks “For those of us who don't own an external flash unit, or simply can't afford any sort of lighting equipment; what are the tricks to making food look more appealing and vibrant, and not so flat and 2 dimensional?” We’re addressing that in tonight’s post, so bring your appetite and let’s get going.

The first thing to know is that flash, while an important part of your kit, isn’t necessary for all types of photography, nor at all times. Flash can help by adding light, allowing the use of faster shutter speeds, and by allowing us to shape the feeling our images evoke by shaping the light. There are other ways to accomplish this, though. Let’s look at how we can achieve that.

There are multiple ways to shape existing light. Let’s start by moving your food toward an area that has plenty of the light you’d like. From there, you can modify that light with everyday household items. A pillowcase can be used to soften and spread the light, covering a larger area with nice gentle light. You can use it to shape the light by varying your angle and position. In a previous post, we mentioned the inverse square law that says doubling the distance between a light source and subject gives ¼ the light level. You can see that by tilting the angle between your pillow case diffuser and subject creates the illusion of distance and depth.

Another way to add or shape light is to use a reflector. You can use foil or a 5 in 1 kit to bounce light in from outside the immediate area. This allows you to concentrate your light where you want it, and increase your luminance levels. Again, tilting and angling your bounce can shape the light. A nice little thing to try is bringing your light in from about 45 degrees above your subject, illuminating the top and side. This allows the light to taper, and when you add the softness of the light, creates some depth. You can use a large white piece of gator foam, a piece of matting, or even a cookie sheet.

Another thing you can do is use your pop up flash. I never thought I’d say that, but with a little ingenuity, some foil, and a diffuser, you can add some depth. The trick to this is bouncing the light in from off the lens axis. I’ve used my external flash on camera to bring in lighting from 45 degrees to the side before, just with a piece of white mat. Remember, though, that bouncing your light costs you some of its power and range.

Now we’re going to move on to the best way to add some detail and vibrance. The big secret is DOF, depth of field. Using a longer focal length at a very wide aperture will give you a limited DOF. If you are shooting at 50mm, f/5.6, and focus at 2 feet, your DOF runs from about half an inch in front of your focal point to about the same behind it. You have a little over 1 inch of depth. Anything outside that range will become progressively out of focus. Taking into account the angle from which you’re shooting, you can create some nice little focal points within your scene. I like to think of it as pools of focus. When you place these at locations other than the center, you get some nice depth and intensity. Shooting outside in open or semi-open shade can also give more light and add elements of interest. The key to this is distance between the background and subject. You also want to make sure your focus is spot on where you want it, allowing your subject to leap out from the background in the finished image.

An easy thing to do is set up some Christmas lights or other small lights several feet behind your subject and shoot focused on your subject at your widest aperture. Do this in lower light, bringing in light with a flash or reflector. You’ll see some small circles of light that are incredibly out of focus, adding immediate interest to the scene if done right.

To boost the intensity of your color, shoot at about 1/3 to 1 stop lower that you meter for. By slightly underexposing your scene, you improve color density, saturation, and vibrance. It makes for less time spent editing and more time shooting.

Here are 2 images that show how using DOF can create an interesting sense of the meal or food.

Hohenfels Volks: Ribs...
ISO 800, f/5, 1/30, 44mm
Notice the DOF on this. By focusing toward the center of the ribs and allowing the highlights to fall higher than normal, interest is added in the meat, even though the pepper would seem to dominate. The pepper is diminished in strength through a shallow DOF, and the sharply blurred foreground end of it.

Hohenfels Volks: Meat Platter
ISO 800, f/5, 1/60, 41mm
By focusing on the back edge of the meat, sharpness is retained along the kabob, while bringing down the interest in the cucumber and tomato through minimizing DOF. The spices and browning on the meat hold quite well. Having dominant, complimentary colors, such as red and green, can decrease interest in the main subject. By decreasing their dominance through either DOF or lighting values, interest is brought back to YOUR subject.

Thank you, Lili, for the great question. I hope this gives you some ideas and helps you shoot what you eat the way you like it!

Is there anything you’d like to see here? Do you have a question? Remember, I'll try to answer all your questions. Share your thoughts here or at the Hohenfels Volks Facebook page. Of course, commenting on both Facebook and here is always appreciated, too! Don't forget, we're on Google+, too!

Monday, June 11, 2012

Tools of the Trade: Our First Review...

Greetings, volks. Welcome to Hohenfels Volks, THE place for our place! Another busy week in Hohenfels left us without short on posts, but more will come! I trust all are well and enjoyed some shooting time this weekend!

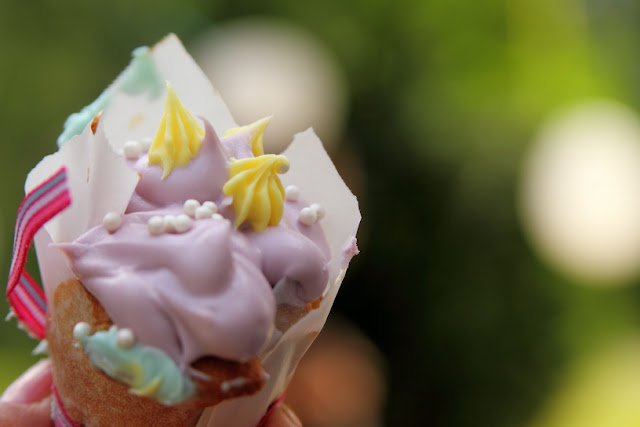
I went out shooting Saturday to test the Tamron 28-75 1:2.8 lens. This fast shooter was a nice break and allowed for some shallow DOF and creative shots, as seen in the shots below.

Hohenfels Volks: Cupcake
ISO 125, f/4, 1/400
Cupcake and icing. This cupcake was about 2 inches across, shot at 70mm with a wide aperture created some nice blur and bokeh.

Hohenfels Volks: Fruit Salad
ISO 125, f/8, 1/100
Fruit bowl. Great colors and even with f/8, at 75mm the DOF is shallow enough to be creative.

The best feature of this lens is the constant aperture throughout the entire zoom range. F/2.8 is nicely fast, and allows a nice low light performance. It also allowed some creative shots that really emphasize DOF effects to highlight part of a scene.

The lens is lightweight, and focuses down to about 13 inches at all zooms. The zoom lock feature makes a nice addition for when you’re moving around with the camera pointing down. The filter size is 67mm, which is large enough to prevent vignetting unless you’re stacking filters and shooting at 28mm.

The lens does not rotate or extend while focusing, which simplifies the use of a CP. Rotating lens barrels often necessitate adjustment of your filter after focusing. The images were sharp through all focal lengths, even wide open. Where you focus will be tack sharp when used properly.

The big downside to this lens is the lack of image stabilization. This saves battery life, but has its own drawback. When you’re shooting handheld, you have to shoot faster than the reciprocal of your focal length. If your focal length is 50mm, than you have to shoot at 1/50 or faster. With an APS-C sized sensor, the focal length has to be multiplied by 1.6 to get the corrected number. For those with APS-C sensors, this means shooting no slower than 1/50 at 28mm. While this little champion performs well in low light, being limited to faster shutter speeds may be a drawback when shooting inside places without adequate illumination. Camera shake becomes very noticeable, even in smaller display sizes, at slow speeds and may lead to some seeming nice shots having to go into the dustbin.

Another drawback to the crop factor of the lens is DOF calculations. You will need to calculate based on the original focal length, not the cropped focal length. This can lead to a DOF you may not desire. This is usually not an issue, but could lead to shallower depth than you find desirable.

With most of today’s cameras capable of giving good performance at 1600 ISO, the lack of IS may not be an issue, but in a church or other extremely low light venue, not being able to handhold is a real setback. Overall, this lens is wonderful, especially in reasonable light. The image quality is spot on. There is no noticeable chromatic aberration, color reproduction is wonderful, sharpness is very fine, and there are no color shifts often seen with lesser lenses. Tamron makes some great stuff, they also make some lower end stuff, but this lens is one to get if you don’t mind the limitation in lower light. I didn’t get the chance to push it too hard, it’s not mine, but the little workout it received proved it a worthy addition.

On other issues, has anyone had the opportunity to get out and make some storm cloud magic? The weather has lifted bits here and there to allow some great photos to be made! Give it a try. Remember to meter for the entire range, and expose for the brightest parts you desire detail at M+2-M+3. You’ll be surprised at your magic!

My thanks to Darris for allowing me to test out this little giant of a lens. Here’s hoping everyone out there has a wonderful week and makes your photo dreams come true!

Is there anything you’d like to see here? Do you have a question? Share your thoughts here or at the Hohenfels Volks Facebook page. Of course, commenting on both Facebook and here is always appreciated, too! Don't forget, we're on Google+, too!

Thursday, May 10, 2012

Luminance Values and Exposure

Greetings, volks. Welcome to Hohenfels Volks, THE place for our place! Spring, being upon us here in Hohenfels, is ripe with opportunities for our craft. Looking around, the trees are bright and clean, the flowers are bursting with color, and the Germany is waking up to a wonderful summer ahead.

Today’s post, delayed by unfortunate occurrences, is about luminance values, and how we can record, refer to, and use those values to improve our image. There will be some math here, but nothing major.

The first thing we need to discuss is the exposure formula. Ansel Adams described it as being the reciprocal of the luminance at a speeds key stop. The key stop for any speed is the square root of the speed. Here is a list of most speed/stop combinations.

Speed Key Stop
100 10
125 11
160 12
250 16
320 17
400 20
480/500 22
620 25
800 28
1000 32

I began the table at ISO 100 and ended at ISO 1000. ISO 100 is the lowest most consumer cameras go, and f/32 is about as high as most consumer lenses get today.

By setting your camera to any of the pairs in the table, you can read the luminance of your metered object, measured in candles/square foot, or c/ft2. For instance at ISO 125, f/11, metering 1/125, then the luminance value is 125 c/ft2. If your meter shows 30 seconds, then the luminance is 1/30 c/ft2. That will put you at 18%, or neutral gray reference values. This is what I refer to as M, or an M exposure.

When photographing normal scenes, we often encounter a scale of values that for any given exposure will run from approximately M-5 and lower to M+5 or higher. By learning to look at luminance values as described above, you learn to tame that range, creating an image that will make you justifiably proud.

An example of exposing for your luminance reading is when you meter the clear sky; you should read about f/11, ISO125, 1/300. This will put your sky into the range of 18% reflectance. We know that a clear Northern sky should fall about M+1, which means we should expose for the sky at f/11, ISO125, 1/150. Of course, this goes back to place and fall exposures. You must decide the key elements within your scene and where they should be placed. Once this exposure and placement is determined, all other values fall where their luminance levels impact your sensor. Knowing these values will help you determine where you wish to place elements and where your remaining elements will fall.

Even metering clouds, you will find a range of luminance values that may run from 200 c/ft2 to 1000 c/ft2. By meter the brightest part, 1000 c/ft2, then adding 3 stops, you bring your 200 c/ft2 up to nearly M+1 ½ in the exposure range, which is slightly brighter than the surrounding blue sky, and significantly darker than the brights in the clouds. Your brights will print out with slight tonal variations, and darker areas will have adequate or better textural ranges. You also bring areas metering at 50 c/ft2 up to the equivalent exposure of 400 c/ft2. These equivalent values are in relation to your original metering from the bright part of the clouds.

Recording your luminance values across the range of your scene will help you learn to recognize values, and expose with more confidence. It will also help in editing your images and preparing them for either printing or display. I would suggest metering across the range of M-4 to M+4 after determining your priorities, and noting the results. Even if you’re shooting at some combination not listed above, take the luminance readings using a combination. After reading the values, switch to your desired settings, compose, and make your image. Values for M+ and M- can be extrapolated by halving or doubling the values obtained with your meter. This is less accurate, but still of considerable value in perfecting your images.

Another great advantage of knowing your luminance and place values, is the ability to tell anyone about your exposure without giving the ISO, f/stop, EI, shutter speed, and so on. Tell them you metered this at 250 c/ft2, and gave M+1 to get the exposure where you wanted it. Regardless of your settings, they will know that to get that exposure from 250 c/ft2, then they give M+1 at whatever aperture and speed they desire, for instance ISO 125, f/8, 1/250 or ISO 400, f/5.6, 1/1600. Both will give the same results, and use the same values, 250 c/ft2 +1 stop, and make exposing a scene more consistent. It’s also useful when referring to edits performed. Taking the last example, you may have shot at M+1, and then edited it to M to decrease contrast. In this case, you can say this was shot at 250 c/ft2 +1 stop, then edited to M for the final effect. This will help others understand and help you remember your shots without having to know every little bit of detail.

There are other ways of expressing luminance, for instance EV or c/m2, or lumens, and as long as you find a consistent method of evaluating and expressing that exposure, your images will be consistent with your vision. Don’t get hung up on what I use, try it and if it doesn’t work, try something else. You’ll still have a working system, and you’ll still be enjoying what we love to do!

Time to get out and do some shooting, I hope you’ll be out today getting your shots in, too!

I’m looking forward to seeing your results and hearing from you. Let me know what you think and how you’re using your camera! Share your thoughts here or at the Hohenfels Volks Facebook page. Of course, commenting on both Facebook and here is always appreciated, too! Don't forget, we're on Google+, too!

Tuesday, April 17, 2012

Ambience...

Greetings, volks. Welcome to Hohenfels Volks, THE place for our place! This time of year in Hohenfels starts seeing some awesome photo opportunities springing up everywhere, I hope you’re seeing some!

First, let me apologize for the sporadic posting, an emergency has left me somewhat distracted. Such is life; I’m making lemonade from those lemons as we speak!

I hope everyone is enjoying the exercises we’ve been sharing. I’ve been shooting mostly film again as I develop a new way of looking at values and value control in digital photography. Today we’re going to cover a couple tips when shooting with ambient light.

Ambient light covers a lot of ground, from the living room lit only by the fireplace to the bright sunlit beaches of the Med. We’re going to focus on the darker side here to make this short.

The first and most important thing to be said about low ambient light shots is that a tripod is required! Without a tripod, you’ll never get a truly spot on level of sharpness that sets an image apart. A shot handheld with a 55mm lens at 1/30 with IS turned on will still be less sharp than a 55mm on a tripod at 1/25 with IS off. You’ll still get something you can use, and be proud of, but nothing like you’d get when you stick it the ground!

Second, consider how dark it is and how much light is available. You will need an ISO that will prove sensitive enough for your range of luminance, yet low enough to prevent excess noise to become a problem.

The third thing to consider is metering and exposure. In case you haven’t noticed, I’ve become big on using the meter to aid in getting things to levels I visualized. Your camera has a built in meter, so let’s put it to use. Do you want to use a small aperture or a faster shutter speed? To control the DOF, go to AV mode and set your desired aperture. To shoot something with more speed, go to TV and set your desired shutter speed. Before you meter, you need to decide where your want your levels to be. For a brighter image, you’ll need greater exposure in the shadows, and conversely less exposure for a darker image. Once you determine that, meter for your intended image. You’ll have a little leeway in editing, but remember that increasing your brightness in editing can introduce some seriously unsightly noise.

Another thing is your composition. You want to compose your image in a way that maximizes visual and emotional appeal. Move around to find that shot, try moving your subject. You may be able to move your light source. Zoom in or out to cover what you envisioned, and you'll notice some interesting things happen, and this ties in to our exercise on shooting only 1 focal length. Remember how you had to move around to get the shot?

Here are a couple more tips for low ambient light shooting. First, use a cable release. This will provide an even steadier platform. Second, if your camera has it, enable mirror lock-up. This locks your mirror in the up position, preventing the mirror vibrations from introducing shake into your image. A lot of cameras let you compose the image, activate the shutter button to lock the mirror, then wait for another shutter activation to actually expose the scene. Third, try to introduce balance into the composition between light and shadow. This allows you to create something that has fewer bright distractions against your main subject. Lastly, this is incredibly important, if your shooting at night or anywhere there is some risk of accident or injury, take a light and play it safe!

I know this all over simplified, but learning your gear and using these simple tips will help improve your low light and ambient light shots. It will also help you get that shot you visualized and not feel like your time was wasted.

Enjoy the week and keep on shooting.

Don’t forget to post any of your images you’d like to see here at the Hohenfels Volks Facebook page. Of course, commenting on both Facebook and here is always appreciated, too! Don't forget, we're on Google+, too!

Wednesday, March 21, 2012

Shot Records

Greetings, volks. Welcome to Hohenfels Volks, THE place for our place! The wonderful weather has given rise to many photographic opportunities; I hope you’ve taken advantage of it to create some art.

Today we’re going to discuss the importance if shot records. No… not a transcript of your vaccinations. We’re going to talk about recording information about your shots as a learning tool.


A sample shot record

In the above shot, you have fields for all the important information. If you remember in a previous post, we discussed the exposure formula. If you recall, your shutter speed should be the reciprocal of the luminance in foot-candles, at your key stop. Your key stop is the square root of your ISO, or the nearest stop to it. For ISO 100, it’s f/10, ISO 125 it’s f/11, ISO 400 it’s f/20 and so on. In the sample record, we see that shot 3 was ISO 125, metered at f/11. At our mid-tones, we metered 1/200, which means we have 200 foot-candles in the middle of the scale. Notice that trying to keep the middle values properly exposed, we changed to f/16 at 1/100, which gives us the same exposure, but more DOF.

By tracking your shots with something similar, you can keep track of what levels you want to record at the desired exposures and refer back to it once your images are on the computer. Another nice thing about it is the ability to recall where and when you took a shot.

By recording your meter readings, you know how to move your image areas to the desired exposure, according to your vision. In the same example, we see the shadows read 1/25 at f/11. That would expose for 18% gray, as we all know by now. By stopping down 2 stops, say to 1/100, we keep our texture in the shadow areas of the image, while allowing our gray to move up to 18% +1 stop, giving a brighter overall appearance to our image and creating a bit of glow about our middle values. This is especially true when they are surrounded by slightly darker tones, and an even, soft light.

The simple fact is that shot records help us learn, as we examine our images and review our settings, we see how to improve our exposures. We also see how to create better lighting and impact by changing values. I am often remiss in keeping records of my settings as I take the shot, but have a form that I use taken from Ansel Adams’s book, The Negative. It uses zones and luminance values, and includes details on development and the like.

As we move through the phases on our journey toward crafting and making the perfect photo, we can see where we’ve been, and where we’re headed if we keep records. In today’s digital age, EXIF gives us our ISO, f/stop, shutter speed, and other information. The things it can’t give us are our luminance values, meter readings for other than middle gray, and it certainly can’t tell us the real subject of the shot.

That’s enough for today. I hope everyone has the chance to work on crafting their images and creating their masterpiece! Just remember to record the details. Enjoy the rest of your week!

Don’t forget to post any of your images you’d like to see here at the Hohenfels Volks Facebook page. Of course, commenting on both Facebook and here is always appreciated, too! Don't forget, we're on Google+, too!

Friday, March 9, 2012

Ride Along: Golden Sky

Greetings, volks. Welcome to Hohenfels Volks, THE place for our place!

Today we’re going on another ride along. This one isn’t too far from home, so we’ll keep it short.

While exploring the backside of Hohenfels Sunday, I stumbled upon this scene and knew it was something I wanted to keep.

Hohenfels Volks: Golden Sky
ISO 400, f/22, 1/50, 35mm, Canon EOS 7D
The sun dipping slowly toward night's rest and renewal.

Going over the hill from Hohenfels proper toward Raitenbuch, you come across a small country lane meandering through the fields. Having been down this road before, I knew there were some nice scenics waiting to reward the one bringing them home. There is a tiny little chapel between 2 giant trees there, with some magnificent views of the hills around.

The shot was easy to visualize, I came up with several in fact. Composition was envisioned to include the colors all around as one the key elements. The sky was partly cloudy, with some nice golden glow from the sun hanging around the think veneer of sheeted clouds, and a nice blue in the areas without cloud cover.

I arrived moments before the color really started coming out. I took several shots, hoping to see something I could work with. I included the trees and the chapel in several, but liked this one for matching the closest to what I visualized.

I metered off the tree with the Gossen Sixtomat, at ISO 400. Giving the tree a –2-stop exposure from the meter would have washed out the sky and left the color flat and a bit comical. Metering the tree for –3 stops and the grass for about –2 stops from middle gray, meant I could shoot at f/22, which was part of getting the sun to streak in a nice little starburst. I was also able to shoot at 1/50, which limited the streaking to just a couple rays coming lightly over the hills in the distance through the clouds.

Getting it into Canon DPP, or the digital darkroom, added some magic. Canon has some “Picture Styles” for their application that come standard, allowing for the most common edits to color and contrast to be quickly applied. My first thought was Landscape, but that left the gold too vague and muddled. Having downloaded several other styles from Canon’s site, I settled on Autumn Hues for the picture style. This softened the contrast between the sun and the hills; it also made for some nice separation of the golds, oranges, and reds in the sky. I adjusted my levels, crushing them in some for clarity.

After that, I set the color temperature to about 6000K, which brought the color in line with the lighting hues. Increasing the contrast to +1 and the shadows to +2 added to the glow around the hills and tree, while allowing the levels to hold up throughout the image, including the separation in the distant hills. The last adjustment was to take saturation down –1 and sharpen.

The car coming up the road in the middle ground adds a nice little reference point for the viewer to pause. That was a lucky little bit of happenstance. I liked the lights as he was approaching and shot quickly to include his headlights. This photo captures what I visualized, and expresses the joy one gets when out looking for shots, especially when you find one that works for your vision. Shooting with a vision can make for some interesting stuff, knowing what tools you have at your disposal to make your vision a reality makes easier work of it!

Check out Canon’s site and download some of their picture styles. You’ll see some stuff that probably doesn’t appeal to you, at least I did, but you’ll also find something that does. I’m certain Nikon and other companies have something similar, if not, you can make your own in whatever app is your digital darkroom! Exposure and visualization start your image on its journey; your level controls and tools in software bring it home. Using them all together can make something that brings others to that same place with you!

Take care and enjoy your day!

Don’t forget to post any of your images you’d like to see here at the Hohenfels Volks Facebook page. Of course, commenting on both Facebook and here is always appreciated, too! Don't forget, we're on Google+, too!

Wednesday, March 7, 2012

Ride Along Shot- Braustuberl

Greetings, volks. Welcome to Hohenfels Volks, THE place for our place! Another beautiful day left us feeling nice here in Hohenfels.

Today we’re packing up some film and going shooting in Parsberg. That means it’s time for another Ride Along shot.

Hohenfels Volks: Ivy at the Braustuberl
ISO 400, f/8, 1/50, Zeiss Ikon Ikoflex I, 75mm lens
Ivy at the Braustuberl in Parsberg

I used a mid ‘40s Zeiss Ikon Ikoflex I TLR, with Ilford’s 120 HP5+ film. This film is ISO 400, but can be pushed to 1600, giving it wide exposure latitude. The medium format 120 film combined with the camera’s 1X1 aspect ratio produces biggish 6cmX6cm negatives, which allows for nice print sizes.

I was in Parsberg picking up some film, developer, and color prints from our day trip to Bamberg with some wonderful friends. I made sure to have my camera and look for shots that might make nice prints. The combination of ivy and the rest of the scene set me thinking about how to compose a photo using the elements I desired.

The first step was to visualize what I wanted to see in the final image. I knew I wanted the “Braustuberl” sign and both lanterns. I also wanted to make the ivy a nice part of the scene. How did I want to convey the image? What parts needed detail and how much detail led to the process of putting together the final composition.

Knowing that I wanted detail in the lanterns, enough to show the shadows cast by the lantern tops, meant that they had to be placed about 3 stops down from middle gray. The leaves needed more luminance, so had to be placed about 2 stops down. Remember, when dealing with your shadows, 2 stops down will give you variations in tone, but no texture, and 3 will give you texture and an inkling of nice detail.

Metering off the ivy from about 1 foot away, gave me f/16 at 1/5 second. Metering off the walkway in the lower right for middle gray gave me f/16 at 1/125. Metering from the lanterns gave me ½ at f/16. The final shot was f/8 at 1/50 second. This moved everything up 1 stop above where I wanted it to allow for experimenting with compensating development.

Developing was done for N+1/3 in pre-depleted Tetenal Ultrafin 1+30. The times were 30 seconds of initial inversion agitation, with 4-minute stand cycles followed by 15 seconds inversion agitation. Total developing time was 20 minutes followed by the usual washing, fixing, and a German Jet dry to prevent spots. The film was hung up to dry for about 4 hours before cutting and scanned the next day.

The developing and exposure method allows the developer to deplete rapidly at the highlights, limiting the action there, while allowing more action on the shadow details. It lowers contrast and can give shadows a luminosity that makes them stand out more than just being black.

After scanning, I brought in the levels some, adjusted the curves for a tiny inverted S, and applied sharpening. It was scanned at 4800 DPI and resized to 800x800 at 300 DPI for the web, it won’t print nicely at all at that resolution, but I have the negative and the original file for that. The beauty of the scanning and editing on the computer is that it allows us to revisit our original and edit it multiple ways and times until we are satisfied with the match.

The meter I used was an old Gossen Sixtomat from the 1960s. This meter has a 30-degree field of view, so I had to get close and cup the sides to get the correct reading for the areas that were being measured. The digital camera would have made it easier with its 7-degree field in spot mode. I probably could have gotten the shot in half the time, but doing the old fashioned way was actually quite nice and reinforced what I’ve been learning.

Well, that’s it for this ride. I hope everyone has a great week and gets some photo time!

Don’t forget to post any of your images you’d like to see here at the Hohenfels Volks Facebook page. Of course, commenting on both Facebook and here is always appreciated, too! Don't forget, we're on Google+, too!

Monday, February 27, 2012

Placing and Falling

Greetings, volks. Welcome to Hohenfels Volks, THE place for our place! Lovely weather is starting to work its way around to us again. Slowly, but it’s coming!

Today we’re going to talk about metering and level placements. First things first, though, you need to know your camera and how to set metering types.

We need to start with our visualization and an assessment of the scene we’re trying to bring to life. Where are the most important details, where do we want to keep detail, and where can we sacrifice some detail to get our image to match our vision?

Once we’ve done our initial assessment, we need to place our camera’s metering mode to spot mode. In spot mode, we’re going to meter several places in AV mode, with our aperture set to the key stop for our ISO. Remember, your key stop is the square root of your ISO. To keep things simple, we can go to ISO 125, f/11, and be set. Having 2 sides of the triangle will help us get our exposure the way we want.

Start by metering the darkest part of the scene. Meter the brightest part of the scene, and move through to the middle levels. Take note of what these shutter speeds are. Find the darkest part in which you want to retain full detail and texture and meter off it. Take note of that setting, perhaps you’re showing 1/60 in your most important dark area, and read your brightest area where you want full detail.

Deciding upon which is more important, based on your vision, highlights or shadows, you need to set your exposure. If you decide the shadows are the most important, then you’d set your exposure 2 stop down. If you metered your darkest detail area at 1/60 at f/11 for ISO 125, you’ll want to shoot 2 stops down. You could go 1/125 at f/16 for maximum DOF, or 1/500 at f/8. Alternatively, you could go 1/250 at f/11, which would be 2 stops down. That will place your shadow details 2 stops below middle gray, or about 18% reflectance. This is about zone 3 in the zone system.

This concept is known as place and fall. By deciding the most important part of your image, you are deciding where you want it exposed. As mentioned in the example above, we’re placing our shadows which we find important into zone 3, letting the other values fall where their new levels will be. The same works in reverse for highlights. By moving our desired highlights up 3 stops, we’re placing them at about zone 8. This gives us a range of exposures in our image that should be about what we visualized.

By placing our levels where we want them, we can minimize our editing time, which means more time shooting! It also gives us a starting place for our previous post on developing for our vision. Try shooting a few scenes in monochrome this way, and then try it in color. You’ll see a change in your image and the way you see and approach a scene and photographing it. You’ll also notice that you have a more vibrant color and tonal range than before.

Exposure is the base of all we do in photography. Even printing an image was traditionally done by exposing the paper to light. Most high quality printing by large firms is still exposure using lasers. Learning the triangle and how to manipulate it, in ways beyond the conventional can make for incredible images. Your vision is the starting point to making it happen!

Here’s hoping you find the right light, the right scene, and have your camera by your side to capture it!

Don’t forget to post any of your images you’d like to see here at the Hohenfels Volks Facebook page. Of course, commenting on both Facebook and here is always appreciated, too! Don't forget, we're on Google+, too!

Wednesday, February 1, 2012

Reviewing the Basics

Greetings, volks. Welcome to Hohenfels Volks, THE place for our place! Brrr. That’s our word of the day!

Today we’re going to review some of the basics of photography and exposure. This can all be found on our Introduction to Photography page. We should all have a good idea of this stuff, but it always helps to refresh the cup, so to speak.

First, we’ll address our exposure triangle. The triangle consists of 1- ISO or film speed, 2- shutter speed, and 3- aperture. To change exposure, you change any side of the triangle. To keep the same exposure, you have to change at least 2 sides. For instance, we set up on a sunny day at ISO 100, f/16, and 1/100. According to the “sunny 16 rule,” we’re good to go. But we want less DOF, so we need to increase our aperture. We go to f/4 to give us a shallow focus. If we don’t change another side of our triangle, we overexpose and create a mess. We have a 4-stop increase in the amount of light coming in, so we need a four-stop increase in shutter speed or 4-stop decrease in ISO. Since we can’t bring our ISO lower, we need to change our shutter speed to 1/1600. At 1/1600 at f/4, that gives us the same as 1/100 at f/16. If we want to increase our exposure, we can change any 1 side and either decrease our exposure or increase it depending on our new settings. For instance we want to increase our exposure on ISO 100, f/16, 1/100 2 stops, so increasing our aperture to f/8, decreasing our shutter speed to 1/25, or increasing our ISO to 400 will do just that. Remember, when we meter something, or a scene, the meter gives us the exposure for 18% gray, which is zone 5. Knowing this allows us to place the item we meter into different zones or exposure levels.

Next up, we’ll look quickly at depth of field, or DOF. This is a product of our focal length and aperture. The longer our lens’s focal length is, the shallower our DOF. The wider our aperture is, the shallower our DOF. This can be a good way to remove or minimize distractions. A 100mm lens at f/16 has about the same DOF as a 50mm lens at f/4. Focused at 10 feet, both give a DOF running from about 9.17 to 11 feet. Seeing that, you can deduce that a shorter lens has a wider DOF.

Remember, these 2 topics we’ve reviewed go together. By adjusting your aperture for a shallower DOF, you’ll have to change something else to maintain your exposure. If you wish to move into a new zone, you’ll change your DOF if you use your aperture to move zones.

We’ll review composition and inspiration in our next talk. Remember to vote and get your pics in early. I hope you’ll all participate in this week’s theme, solitude. We’re aiming for more votes for our theme, so get involved and let’s enjoy the journey together!

Don’t forget to post any of your images you’d like to see here at the Hohenfels Volks Facebook page. Of course, commenting on both Facebook and here is always appreciated, too! Don't foget, we're on Google+, too!

Monday, January 30, 2012

Ride Along Shot- The Snowy Track

Greetings, volks. Welcome to Hohenfels Volks, THE place for our place! A sunny Monday greeted us with a chilling embrace. –15 is no way to start the day!

The winner of this week’s poll is The Fortress (For the Superman Fans). Sounds silly, doesn’t it? Well let’s outline it for you!

In the Superman movies, Superman had a place where he could go to be alone and recharge. It was called the Fortress of Solitude. You guessed it; our theme for the week is Solitude, with a kick. Your shots should show the positive aspects of solitude, not loneliness or a single thing, but something positive, in solitude. It could be someone enjoying a moment alone, or someone escaping the world, any image showing something positive about solitude. Maybe your image will even contain more than one person, but will show solitude in a positive light. Remember; get your images for last week in tonight! We’ll feature them here.

Now on to our Ride Along Shot.

Hohenfels Volks: Snowy road through the woods
ISO 400, f/16, 1/500, 50mm
Tracks in the Snow, winter has hit Hohenfels!

While out and about, I noticed an old road. After approaching the road, I saw some tire tracks, as well as tracks from animals. Rather than isolate one or the other, I chose to highlight the road and have both sets of tracks in the shot. While the tire tracks feature more strongly and lead the eye through the frame, seeing the signs of animals, possibly a fox and a rabbit, adds a little dimension to the shot.

Given the time of day, I had to use a fast shutter speed and tight aperture to keep the snow in the range of zone 6-7. That allowed some texture and detail in the snow, and allows darker trees and surrounds that provide nice depth and contrast.

Having the tire tracks curving up through the frame, the eye, as mentioned, is led through the image, but it also creates some tension that brings it to life. Where are the tracks leading? Who was here? Where’d they come from? Several questions can be raised that add that little bit of drama, while preserving the serenity of the scene. Keeping the tracks from being dead center allows them to become the leading line, and add some grace and sweep to the shot.

I thought black and white was the only way to go with this scene. Color distracts from the snow and tracks, and it makes the image somewhat less appealing. Keeping the classic monochrome allows the tones to wander from nearly blown highlights to some slightly clipped shadows and increases the range of the image. I shot this set to monochrome and added a red filter. Putting a red filter on black and white darkens blues and greens, while brightening reds and oranges. This can add some crispness to your shots. Shooting at f/16 allows for both limiting the light, and increasing the DOF.

Remember that when making your photo, visualizing it is the key to getting your image. Take the time to view the scene, absorb what you're seeing, and find the light that allows you to make that magic with your camera. Sometimes, you stumble upon something, sometimes, you have to take what you find and make it work. Ansel Adams said “Sometimes I arrive just when God's ready to have someone click the shutter.” This seems to have been one of those times for me! Find someplace and keep going back, get to know it during all kinds of conditions. You’ll start seeing all sorts of images you can make with it, and one day, you’ll find the one you’ve been seeing.

Well, that’s it for today. Keep seeing the light and your shots before you take them. Keep shooting, and remember this week’s theme on solitude. I hope your week is a great one!

Don’t forget to post any of your images you’d like to see here at the Hohenfels Volks Facebook page. Of course, commenting on both Facebook and here is always appreciated, too! Don't forget our new Hohenfels Volks Google+, too.

Thursday, January 19, 2012

Tech Talk: Hyperfocal Distance

Greetings, volks. Welcome to Hohenfels Volks, THE place for our place! Today we’re going to learn about hyperfocal distance.

What is hyperfocal distance? It’s the distance you focus your lens for to have a maximum DOF. When you focus at this distance, everything from about half that distance to infinity is in acceptably sharp focus. To accomplish this and to define acceptably sharp focus you need to know your circle of confusion (COC.) COC is the largest size that a point or spot can be without appearing out of focus. For an APS-C size sensor, which most of us have, that number is .019. The smaller your COC, the greater your sharpness. Although, for different sensors and films that number is different. For 6cmx9cm film, it’s generally accepted to be .07, and for 35mm or full frame sensors, it’s about .03.

Things get mathematical here, so you may want your calculator. You can calculate the hyperfocal distance for a given lens and aperture using this method. Take the focal length of your lens and square it to get variable a, next take your aperture or f/stop and multiply it by the COC to get variable b. Divide a by b, and there you have your hyperfocal distance. Here’s how it looks in mathematical terms

H =F²/(f x C)

In the equation above
H = hyperfocal distance
F = focal length
f = f/stop
C = COC

As an example, your lens is 50mm, you wish to focus on something 10 meters away, use f/11, and you’re using an APS-C sensor. 50x50/(11x.019). This gives us 2500/(11x.019) or 2500/.209, and finally approximately 11.9 meters. If you focus at infinity on your lens, your DOF will run from 11.9 meters to infinity. If you focus at 11.9 meters, your DOF will run about 6 meters to infinity. By focusing at your hyperfocal distance, you can maximize your DOF in an image and get that winning shot. By using this calculation on a variety of focal lengths and f/stops, you can see why smaller apertures (bigger f-numbers) give you greater DOF.

There are 2 other ways to figure it out. Both are much easier, if you are using a higher end lens with a scale on it, you set the infinity symbol on your lens to line up on your f/stop at the far scale, then everything from the matching f/stop on the near scale to infinity will be acceptably sharp. That allows for Maximum DOF and zone focusing. The other easier way is to look it online. There are so many sites that you can find on Google just searching for hyperfocal distance, that you’ll never be at a loss. I prefer using DOF Master, as they have some great stuff there and it’s too easy. You just enter your info and away you go!

I hope this gives you some idea of how to use your focus for maximum DOF and how to get that extra bit of oomph to make your image stand out. Next time we’ll be calculating DOF, more math so keep that calculator handy!

Don’t forget to post any of your images you’d like to see here at the Hohenfels Volks Facebook page. Of course, commenting on both Facebook and here is always appreciated, too!

Wednesday, January 18, 2012

Tools of the Trade: Flash Part II

Greetings, volks. Welcome to Hohenfels Volks, THE place for our place! Today’s post is going to deal with using your flash in manual mode.

For some Volks, manual mode and photography don’t seem to go together. They leave everything on automatic, letting the camera tell them when to click the shutter, which seems a bit too much like serving the camera, not the camera serving us. By now, most of you have been shooting manual for a while. Chances are, though, that your flash is doing the majority of your work when you use it. I hope that this post will change that some!

First, we’re going to learn some terms and concepts. Flashes are rated by something called the GN, or Guide Number. It’s a measure of a flash's output. You have to know this number. The YN-560 that I have is rated by the manufacturer for 58 meters at 105mm, ISO 100. The actual rating is more like 35 meters at 35mm, ISO 100, which should give us about 50-55 meters at 105mm. I haven’t formally tested it in a controlled manner, but that seems about right. What that means is shooting at ISO 100, 105mm, and with the flash at full power, my max range for the flash is about 58 meters. At that distance, the light has fallen drastically in intensity, but spread out in coverage. The next thing we need to understand is aperture, or the size of the opening in our lens. A larger aperture means more light and conversely a smaller aperture means less. Aperture is measured as f/stop, a ratio of your aperture’s diameter to the level of light it allows. That’s oversimplified, but you get the idea. You already know about aperture, but will need to understand it for flash work. The last thing we’re going to bring up is distance between the flash and the subject. These 3 things are how you determine a manual flash’s power and set your exposure correctly. A flashes GN is the rating assigned to it by the manufacturer, so you have to be careful to read the specs before buying one. Some makers will call their flash GN58, but if you look at the tiny print, it’s at ISO 200 or even 400. That makes it more like a GN20 at ISO 100. Also, make sure the units your GN is listed in, feet or meters, or both are consistent throughout your calculations. Also remember that we're dealing with light, so sometimes it doesn't seem to make sense due the inverse square law. That's why we use GN!

The 3 things listed above are what you need to know to expose properly for manual flash. We’re going to start this part by giving you the equations to use, then giving some examples.

The first calculation is to determine your GN. First, set your flash to manual mode, full power, and if it has it, full zoom. Then place your flash a measured distance to your subject, say 5 meters. Then shoot a series of shots at successive f/stops. Note the aperture that gives you a proper exposure. For this we’re going to say f/8. Now multiply the distance by the f/stop. For this we’re going to multiply 5 meters by f/8, which means 5x8=40, or a GN of 40 at ISO 100, full power, max zoom, or about 20 at half power.

The next calculation is to determine your f/stop for that GN. If you have a GN 20 at ISO 100 flash, what f/stop do you use for 4.5 meters? The calculation for that is GN divided by distance. For GN 20, that would be 20/4.5=4.5 or f/4.5. Set up the above flash, GN 40 at half power, 4.5 meters and shoot using f/4.5, you should be almost dead on every time!

Last, we have figuring out your distance for a GN with a desired aperture. That is calculated by dividing GN/f/stop. As above, GN 20 at half power, we’ll say f/8. To get that we divide 20 by 8, or 20/8= 2.5, or 2.5 meters.

Here are the calculations listed:

Your GN=f/stop x distance to subject
F/stop= GN/distance to subject
Distance to subject= GN/f/stop

Here are some things to note. The distance is ALWAYS the distance from the flash head to the subject, not the camera to subject or flash to camera. Light modifiers like a Sto-Fen or umbrella lower your flash power by about 1-2.5 stops. Measure with them in place for more accurate readings. The same applies to bounce flash, count your distance as being from the flash to the reflector + the reflector to the subject, or adjust your exposure to compensate. A few times doing this with your calculator and flash manual will give you a great starting point for your flash shots, then before you know it, you’ll be nailing them every time!

Now that you know all that, use your camera's built in spot metering mode, go to AV or aperture priority, set your required f/stop, and meter for the rest of the scene. That shutter speed will allow you to balance your flash with the ambient light to create a nearly perfect exposure. Tinker with it, and you'll make that magic of having your image match your vision that much easier!

Working with your flash off camera in slave mode can also be a trial. The secret to that is point your optical sensor at the camera and rotate your flash head toward the subject. The sensor detects the flash from your camera and triggers the flash. It also has to be where it can see the flash from on camera. For some flashes, this will trigger it before it should go. The Yongnuo flashes have a mode called S1 that trips the flash at the very first blip of flash, and S2 that only triggers when the actual flash goes for the shot. Use S2 to ignore the red eye and pre-flashes your camera sends out. Also, turn of red eye reduction or pre-flash. Having your flash off camera will help prevent this phenomenon from occurring. Of course, you can also buy a wireless RF trigger and receiver from anywhere online for about $30 and avoid slave mode altogether.

A great resource for all things flash related is Strobist. We have a link to them in our links and they can really up your knowledge levels on flash. They put out some good tutorials and lessons in Lighting 101. Give them a read!

You’re probably bored after all that math and calculating. Get out there and shoot something, it’ll wake you back up! While you’re out shooting, don’t forget the milk, I mean your shots for this week’s theme! Complimentary colors with a contrasting subject. Should be something great in there and I can’t wait to see your work!

Don’t forget to post any of your images you’d like to see here at the Hohenfels Volks Facebook page. Of course, commenting on both Facebook and here is always appreciated, too!

Wednesday, January 4, 2012

In the Zone- Zone Focusing

Greetings and welcome to Hohenfels Volks, THE place for our place. I hope you’re ready, Hohenfels, to learn about zone focusing. This is something that can make getting some of those passing moments in the can, as it were, quicker and easier.

First off, let’s explain what zone focusing is. Zone focusing is using a combination of focal length, aperture, and distance to allow for enough depth of field to make a usable print. That’s pretty straight forward, right? Well, there is more to it than that, including knowing your equipment.

Zone focus developed as a way for photographers to focus their equipment, as most older cameras had no viewfinder or way to check your focus. Many of the old time greats used zone focusing to maximize the sharpness and detail in their works. Given the nature of early lenses, high f/stops were often required to get good detail and enough DOF to be worth printing. Remember, sheets of film, and rolls, were costly to purchase, develop, and print, so lots of effort went into taking each shot. Zone focusing grew from the concept and practice of hyperfocal distance, which you use to give you the maximum DOF for each lens focal length. We’ll have more on that in another post.

The technique works best with lenses that have markings on them. A distance scale for focusing opposite an aperture scale with DOF markings as shown in the photo below works best. It’s quicker and easier. Unfortunately, most lenses today are auto-focus, and kit lenses generally don’t have such marking. Higher end lenses do have them, as do pro and manual lenses as a rule.

Hohenfels Volks- Voigtlander vitomatic ii showing scale for zone focusing
ISO 200, f/4.5, 1/30, 32mm
Notice the f/stops on the front of the ring. They go out from the diamond marking focal distance, to give you the range, or zone, of acceptable focus.

Referring to the image above, you can see that there is a diamond. That is the distance marker. On the focus ring, there are markers that aren’t shown, that tell you your focal distance. Line up the desired distance, then using the f/stops that radiate out from the diamond, identically on either side, determine your needed aperture and distance. The distance covered will line up with the marks for the desired aperture. It’s that simple, anything in that range will be in sharp enough focus for decent size prints, including 8x10 and 11x14 if your camera has the resolution.

If your lens has a focusing distance scale, much like Canon’s 28-135mm, you can figure out your DOF with a little legwork online. The key when using zone focus, is to turn off your auto-focus. The second factor is to shoot either Aperture Priority or Manual modes only! Any other mode nullifies your efforts!

Know your location, and what’s happening there, and you can figure the ranges you will need. Let’s say for our purposes you’re shooting in a decently lit area at ISO 400 and you need to cover 3 meters and 6 meters, with room to spare. You get you’re framing, that will give you your focal length. You know it’s decently lit and you can get by with f/5.6-f/8. Going with a 55mm focal length, as most kit lenses like to go from 18-55mm, you should be focused at 4 meters for f/5.6 and 3.5 meters for f/8, although 4 meters is adequate, and has the advantage of allowing you to switch over to f/5.6 without losing too much DOF. If your lens doesn’t have a focal distance scale, measure off 4 meters, focus your lens, and mark it. An easy tip for marking your focus, is take 2 fat rubber bands and wrap one around the zoom ring of your lens at the focal length you wish to use, then wrap the other around the focus ring. Mark the one on the zoom ring at the top, focus your camera, then make a mark that lines up with the first mark you made. As time progresses and your lens drifts over the course of events, you always have your focus marked and can return to it in a snap. Then set your aperture and you’re cooking with gas!

A great online DOF calculator that just requires your focal length, camera model, and scale used (feet or meters) is DOF Master's DOF table. They also have some great information on hyperfocal distance and some nifty little software to play with!

If your shooting with a flash, your f/stop will be dictated by the flash when you use manual flash. TTL and E-TTL are great for using flash, but to use it right, you need a sync cable that’s designed for your camera maker or line to get it off camera. You can get a good one that’s about a meter reasonably priced. Add in a Flashbender or Sto-fen to diffuse the light some, and you’re off to the races. This allows you to hand hold your flash off camera and get some directional TTL or E-TTL light in your images that just adds to the quality.

Zone focusing is great for street photography, event photography, candids, and may other things. Try it out in your works and see how it can help you! You can also use it for this week's theme, as it will allow you to appear less obtrusive when shooting work getting done!

Enjoy the rest of your day, and remember to cast your vote for next week’s theme. Get yours in to have a say! Don’t forget to get your pics posted at the Hohenfels Volks Facebook page. Of course, commenting on both Facebook and here is always appreciated, too!

Tuesday, January 3, 2012

Classic Shooting

Greetings and welcome to Hohenfels Volks, THE place for our place. As promised, a second dose of photography just for Hohenfels, dealing with old fashioned photography. Before we begin, I need to clarify this week's theme. Your images should be of work being done, not the people doing the work. The bulk of your subject should be the work, not the worker. I hope this helps when creating your shots.

As mentioned previously, we're talking about old fashioned photography. I got some very old cameras this weekend, inspiring me to pick up film again and try out what I've learned. It also inspired me to share pics of them with you and encourage you to pick up your film stuff and shoot that, too. It's a great way to test yourself, using film and what you've learned. It also shows you what you've learned and how well you're progressing.

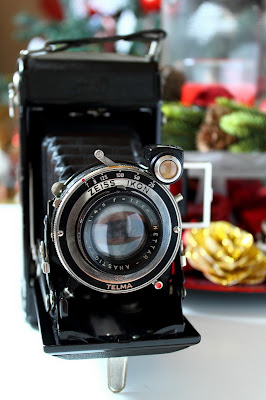
Hohenfels Volks- Nettar 515/2
ISO 400, f/8, 1/25, 37mm
Zeiss Ikon up close. This shows the lens, the "brilliant glass," used to compose your shot, and the speeds available.

This weekend the family and friends surprised me with some gifts. The first gift, from Mrs. Hohenfels Volks and the princess, was an Altissar box camera from 1951.

Hohenfels Volks- Altissar Box camera, 1951
ISO 400, f/8, 1/25, 37mm
The Altissa box camera from 1951. This beauty is a real challenge, as it only has 4 settings! A great little camera with some great meaning!

Eho-Altissa started in Leipzig in 1892. Founded by Richard Knoll as a photographic shop and studio, they eventually started repairing and then manufacturing cameras. 1910 it moved to Dresden, where it was later bought by Berthold Altmann. In about 1951, Berthold Altmann decided to flee the oppressive and anti-business communist East Germany. In absentia, he was tried, convicted, and his company taken over by the communist run government. They were re-named and finally failed, with the machines being sent to Sarajevo to make imitation box cameras. This particular model of box camera, introduced in 1951, was the last while Altissa remained a free company. That scenario reminds me of Atlas Shrugged, in which all the creators and producers abandon their businesses and creations and disappear, leaving an increasingly corrupt, socialistic, and anti-business society to its own failings. Because of that story, and what I see happening today, this camera has meaning beyond photography to me. It’s functional, still works, and I’m taking photos with it! Once I get some developed, I’ll post what comes out here! This camera had 4 settings, f/8, f/16, B for bulb, and 1/25. The lens was fixed focal length and fixed focus. Using 120 film, it produces a negative that is 6cm by 6cm. Composing your image is through a window above the lens.

The next camera, from our friends, was a Zeiss Ikon 515/2. This little winner was introduced in 1937 as a lower priced Ikonta, with virtually all the features. The one I received has an 11cm lens, which runs from f/4.5 to f/32, and has shutter speeds from 1/25 to 1/125. Outside the shutter speed range is B, for bulb mode shots, and T, where you open the shutter with one click and close it with a second click. It uses standard 120 film, and produces a negative that is 6cm by 9cm. The viewfinder is a pair of metal tabs, and only serves for composition. Focusing is accomplished by adjusting the lens for the zone that should be sharpest, by distance. You can also hold it about waist high, and using the “brilliant glass,” frame up your shot. The brilliant glass is a tiny “periscope” like pair of lenses through which you compose your shot. It only allows for framing and composition. It has a PC Sync port for the flash, should you have one, and has a self-timer for setting it up and activating the shutter, allowing you to enter the scene should you desire.

Hohenfels Volks- Zeiss Ikon Nettar 515/2, Circa 1940
ISO 400, f/4.6, 1/25, 33mm
The Zeiss Ikon in all its glory. It takes time to set up your shot with this, which helps with getting your composition tidy.

Zeiss Ikon started in 1926 by the merger of several camera manufacturers and financial backing from Zeiss. Soon several other companies joined the Zeiss Ikon syndicate. Located in Dresden, with plants in Stuttgart and Berlin, Zeiss Ikon split into a West German and an East-German part after the war. Stuttgart became the headquarters after the division of Germany. Later they merged with Voigtländer, who made higher end cameras. In 1972, they stopped producing cameras. After the reunification of Germany, the East and West German divisions re-united into a single company.

The third classic I acquired was a Voigtländer Vitomatic II. This little beauty is a 35mm Rangefinder with a fixed focal length 50mm lens. The lens runs from f/2.8 to f/22, and 1 second to 1/300 second. It uses, like the Zeiss, a leaf shutter, and has no mirror. This feature allows flash to be synched up to the lens’s maximum shutter speed, in this case 1/300. The camera came with 2 filters, a UV, and a green for B&W. This allows for brighter greens, darker reds, and greater separation of greens in your monochrome images. Also included were a lens hood, leather case, and leather strap. Again, through PC sync, my flashes can be remoted off camera and fully controlled. Voigtländer, as you read above, was a very upscale camera maker. They started in Vienna in 1756 as an optics company. Later they introduced the world’s fastest lens at that time, in 1840, it was f/3.5. They were also the first to introduce the zoom lens and the first 35mm camera with a flash built into the camera.

Hohenfels Volks- Voigtlander Vitomatic II 1958
ISO 200, f/4.5, 1/20, 29mm
The Voigtlander Vitomatic II from 1958. In the upper left corner you can see the selenium meter in the camera. Used to help judge your exposure settings.

The cool thing about these cameras is that they show you that even though technology has improved, it hasn’t changed too much since the times represented. Using what we’ve discussed about exposure, composition, and other tips, you can get a great shot, even with old cameras. Don’t give up the learning just because digital means you don’t have to do it. I’ve used my 7D to meter the light for my desired aperture, and then set the old timers accordingly. Remember, being able to sync with your flash means you can do anything with these guys you can do with your digital. I hope this will inspire you to learn more manual applications, so you can put your old film stuff to use again. You’ll be surprised how much you can do with it!

Enjoy the rest of your day, and remember to cast your vote for next week’s theme. Get yours in to have a say! Don’t forget to get your pics posted at the Hohenfels Volks Facebook page. Of course, commenting on both Facebook and here is always appreciated, too!

Friday, December 9, 2011

Shoot for the Star...bursts!

Greetings, Hohenfels, welcome to Hohenfels Volks, THE place for our place. I hope the week has been gentle to all.

How are the bubbles coming? Are they taking form, or are you stuck? Have no fear; your vision can carry the day. Just stop to see the light and you’ll come up with a winner.

Jennifer, who’s blog can be found here, liked a link the other day that I found very interesting. Click it Up a Notch is a great source for learning photography. The blog has some great tips for beginners and anyone looking to improve their images, and is backed up with some wonderful photos. Check it out!

The post she liked and I read was 5 Tips for Shooting Christmas Lights. Nice post, nice pics, cool blog. I decided to do a post about starbursts. They make for some awesome additions to a good composition.

The first thing to understand about starbursts is that they are caused by light diffraction. The light bends as it passes the blades in your diaphragm, which changes the way the light hits your sensor. Light that is brighter than the surrounding areas tends to streak as it passes over the blades, creating starbursts. We all love to see some of them in our images, especially nighttime and Christmas shots. The actual rays or spikes in the starburst are caused by light passing over the blades where 2 of them come together. The more blades you have the more rays you’ll get. The funny thing is that even numbers of blades cause the number of rays to match the number of blades. In a lens with an odd number of blades, the number of rays is actually twice the number of blades. I’m not a physicist, so I can’t explain it. You can get decent starbursts even at apertures like f/8 or f/11 depending on your focal length. Most people tend to shoot for them at f/22 and sometimes higher. The shorter the focal length you use, the smaller the aperture is at the same f/stop, and the more likely you are to get good ones, at least that’s the theory.

Another important thing to remember, if you want to print your photos at 8x10 or larger, is that over about f/16 on an APS-C sensor you start losing sharpness in the details. It’s a trade off, so think about how you wish to present your pic.

Here are some photos that show the effect and the difference in blade count between 2 lenses.


ISO 100, f/16, 30 seconds, 200mm
If you count the rays on the large light on the bridge, you'll see this lens had 9 blades. This shot and the next one were taken in Wurzburg with an old 300D from Canon.


ISO 100, f/22, 30 seconds, 165mm
You can see a slight drop-off in sharpness, but more pronounce rays.


ISO 100, f/16, 10 seconds, 18mm
Notice 6 rays emanating from the bulbs. The lens had 6 blades to the diaphragm.


ISO 100, f/8, 20 seconds, 55mm
The starbusts here are minimal, and slightly soft. At a shorter focal length, perhaps something better might have appeared. This was taken with an old Canon 300d in Hohenfels, as was the previous photo.

There is another way to get starbursts. You can buy filters for your lens. You can choose from any number of rays and they apply the effect equally to all lights. That takes the fun out of it, but they could come in handy.

Here in Hohenfels, and in the towns around us, there are so many places that light up a tree or wreaths. Get out there and you'll find something to shoot for the starbursts! You don't even have to leave your house during this time of year! Try it on your tree, you'll see some cool things happen.

Remember to cast your vote for next week’s theme. I hope to see more than the 4 votes we have right now. 19 Volks like us on Facebook, I hope 19 will vote! Are you thinking of your bubbles? I hope to get something in if time allows me to shoot today! Remember to get your pics posted at the Hohenfels Volks Facebook page. Of course, commenting on both Facebook and here is always appreciated, too!

Wednesday, November 30, 2011

Tools of the Trade- More on Lenses

Greetings, Hohenfels, welcome to Hohenfels Volks, THE place for our place. Here’s hoping today sees you starting on the downhill run of a great week!

Today it’s time to talk a little about lens attributes and traits.

We’ve already talked a little about lenses, so today we’re going to concentrate on some of the quality issues and features of your lenses. It’s a little long, for which I apologize.

One of the first things most folks need to know is that your old film lenses will work on digital cameras. They may have a crop factor, for instance 1.6X for APS-C, but if they can mount on your camera, you can use them. On the other hand, your newer digital lenses are unusable on full frame or film cameras. When you put a film lens on an APS-C sensor, the crop factor comes from the distance from the back of the lens to the sensor. The film lenses cover a larger area than the sensor; this in turn causes an apparent increase in focal length and the crop. Canon’s recent systems, the EOS cameras, use EF lenses, which have a 1.6X crop on your APS-C sensor. Their digital line of lenses for the EOS system is the EF-S line. They require no crop factor and apparent focal length is actual focal length. The reason the digital series of lenses don’t work on full frame or film cameras is due to their smaller projection of the image onto a smaller sensor. They won’t fill the frame or film, and most likely won’t even focus properly even if they could be mounted.

Another concern about your lens on zoom lenses is often the aperture. Less expensive lenses read something like 28-135 f/3.5-5.6. This is because the aperture size doesn’t change during zooming, that is the largest it can go. The area of the aperture remains constant, requiring a change in f-number. If you remember, your f-number is a ratio of focal length and aperture. It represents the focal length divided by that number, that’s why it’s written f/2, f/5.6 etc. The longer a lens is, the less light reaches the sensor. That’s why the f/number changes throughout the range of zooms. If your area doesn’t change, your f-number must. The reason for this is the cost and weight added to vary the aperture size throughout the zoom range. That doesn’t mean a constant aperture means a cheap lens, it doesn’t mean less quality, it just means less light as you zoom in.

A great feature of lenses over the past few years is the addition of IS. The affordability of technology has made it possible to use feature that used to be unavailable to the hobbyist. IS allows slower shutter speeds when enabled. Using it hand held, you can get down to about 3 stops lower that the handheld limits. The systems work by compensating for motion with motion in the opposite direction. When hand holding your shot, using proper shooting styles, with arms tucked in etc, will enable the IS to really slug it out with vibration. The most important thing to remember is turning it on for handheld, and ALWAYS turn it off for tripod shots. When on a tripod, the IS searches for motion in the lens and can cause vibration rather than reducing it. The big drawback to IS is that it uses your camera’s battery for power.

The last thing I’ll bring up for now is a quality issue. The problem is chromatic aberration or CA. This is distortion caused by different colors, or wavelengths, of light focusing at differing areas on your sensor. There are several types and names, but we’re not going into it that deep here. It often causes the purple fringing that you see along borders with bright highlights and dark shadows together. Using a smaller aperture can help mitigate this, as can a longer lens. Low dispersion glass and good coatings can combat this effectively. There seems to be many complexities involved in CA, including the types and calculations. The best practice when purchasing a lens, if possible, is to take a test shot using that lens of a high contrast area, and zoom in looking for fringing. CA can also cause blurriness in Black and White photography, so keep that in mind. You can see examples on Google to get more information and some idea of what to look for. According to the reviews I’ve read, Canon makes the most advanced software correction to mitigate CA and other distortions available. Because Canon’s EF lens system is actually all electronic, and records the information on individual lens models, Digital Photo Pro can compensate for it. Yet another advantage of shooting RAW!

Whenever you look to purchase a lens, make sure you read a variety of reviews, and look at loads of test photos taken with that lens, it could save you some headaches! If you have a lens that you favor and would like to write it up here, let me know, and I’ll get it posted for you!

Now on to other things, remember to get your votes in for next week’s theme. This week our theme is “Morning Moments.” Dazzle me with your work! Get shooting and start posting at the Hohenfels Volks Facebook page. Of course, commenting here is always welcome, too!

Wednesday, November 16, 2011

Gear Day- Pop Goes the...

Greetings, Hohenfels, welcome to Hohenfels Volks, THE place for our place and our Volks. Another day, trees covered in white and ready for the icy grip of winter, closes around us.

Today we’re going to talk about flash. Learning to use flash is one of the major steps you should take in getting your photos gallery ready.

Today’s electronic flashes work amazingly well and can put a great deal of light right where you need it. The secret to using flash to get the right exposure is knowing how to meter and knowing how to balance your lighting.

First, let’s talk about several terms and features of an average flash.

The first term to know is Guide Number or GN. This is an indication of your flash’s power. It means your flash can provide light up to that distance at maximum zoom, for ISO 100. It’s usually measured in meters. The Canon 580EXII has a guide number of 58, as does the Yongnuo YN-560. This is used to calculate manual flash settings for your camera.

The second term is zoom. Your flash can often zoom to a preset distance to match the zoom of your lens, allowing it to throw light more in line with what you are shooting. This is extremely useful in auto flash; the drawback to that is the camera must be connected to the flash. The longer the zoon, the further the light will travel, and the less it will spread out.

The third term is sync speed, or shutter sync speed. On most higher end cameras, like the EOS 7D and 60D this is 1/250. For the lower end cameras, like the Digital Rebel series, this is 1/200. Some cameras won’t sync above 1/125 to 1/160. The slower the maximum sync speed, the slower you have to shoot. At speeds above the sync speed, either you will need a flash with high-speed sync, or you will get dark bands on your image.

The fourth term is rear or front curtain sync. In rear curtain sync, your flash fires at the end of the exposure, and in front curtain it fires at the start. This really only applies beginning at 1/30 – 1/60, depending on your model.

The last term I’ll introduce is TTL. Most of today’s automatic flashes are capable of being controlled by the camera, provided they are mounted to the camera. Today’s cameras meter through the lens, and pass that information to the flash to set output power and zoom. Many cameras use a more advanced feature called E-TTL, which is electronic metering through the lens. Using this method can improve your flash exposures. The downside is using your flash on camera can be disappointing, as it flattens the light and removes depth and character.

The range of a flash is limited by inverse square law, which states that light drops off from a source rapidly. For instance, a flashlight shined into the dark starts out quite bright, but ends up not even visible beyond some distance based on its power. This law states that doubling the distance from a subject to a source reduces light to ¼ its original level. Almost all light sources follow this rule.

When using your flash on camera, use your E-TTL features to get the best exposure. To correctly expose flash manually, you will need to adjust your aperture to control exposure for the light from the flash and your speed to control ambient light. To find the required to take a photo of a subject use this formula- f-stop number = GN/distance to subject. To figure out the distance to place your flash for a preset aperture use this formula- distance = GN/f-stop number. These are usually measured in meters, so remember to set up accordingly. Guide number is at ISO 100, so any change in ISO, must be accounted for.

A couple points- on camera flash gives a hard light, which results in a loss of shadows in the image making the subject appear flattish. On camera, or flash on the axis of the lens, gives red-eye effect, which is when the eye reflects red light straight back in the direction it came from.

Another thing to mention about off camera flash, besides adding depth, character, and bringing out detail, when used properly it can bring out the eye colors and make them stand out a little. This is especially true in brown and dark eyes. It takes some practice, but the results are worth it!

I like to use the YN-560, as this a nice, inexpensive, and powerful manual flash, paired with my with radio triggers. This allows for shots on camera can’t get, and it creates a nice direction to the light. Having directional lighting on a portrait really adds to the magic. That’s why you see it even in the paintings from the old masters. Next time we talk about flash, we’ll discuss fill, main, and lighting ratios. We’ll also discuss basic lighting patterns for portraits, and how to take the guesswork and mathematics out of getting your manual flash exposures.

I hope this information brings you another tool in our quest for the perfect picture. Let me know if it has! Remember to share your pics and post your questions at the Hohenfels Volks Facebook page, and or by commenting here!

Saturday, November 5, 2011

Ride Along Shot

Welcome to Hohenfels Volks. I hope everyone is having a great weekend. The day is chilly, but the sky is blue, and the light is there. Today we’re going to try something new based on a suggestion by my friend Darris. We’re going to look at a photo and go over how and why it was made, and what kind of thoughts went into it.

I’m going to use a photo taken in Bamberg at the Residenz.

Here’s the image and the settings


ISO 1600, f/5.6, 1/60. Canon EF 28-135mm IS

The imperial hall is a magnificent room, from which you start your tour. It’s also the only room where flash photography is allowed. I wanted to capture something of that grandeur without taking it to the point where there is too much of the room,

Choosing something that would be pleasing and have a point led to this image. Visualizing something with the windows leading to the door gave several possibilities. I liked having something lead to an interesting and mysterious item or subject. The door was the way to go, as it increased interest and curiosity.

By moving around the room, and visualizing several ways of getting the picture I thought placing the door at one of the thirds, and leading in with the chairs would be a great way to draw the viewer in. I set my flash to cast a small amount of light to toward the entry into the main part of the palace. I thought that including some of the windows would be a nice touch, but realized that closing in the window frames toward each other added another way of leading the eyes into the door.The contrast between window light and the dark chairs creates more interest in where they lead.

Creating diagonals with the chairs, I’ve created one set of leading lines. By closing the windows together, the converging parallels created another set of diagonals. All the diagonals converge at the door, leading one into the apartments. What’s in there, what is the light, and where does the door lead? These questions can be created with placement of the subject and leading lines. Keeping it in glorious color helped show the glory and majesty of the hall and increase some curiosity and tension.

The short focal length allowed me to shoot at f/5.6 and keep the DOF needed to bag the shot I visualized and keep the shutter speed high enough to handhold the camera. I knew that a large aperture would be need to get the light from the flash to record properly, and somewhat slower shutter speed to get the ambient light. 1/60 allowed the ambient to record at the desired level, while f/5.6 allowed the flash exposed areas to match the ambient levels.

When shooting manual with a flash, your shutter speed controls the ambient exposure and the aperture controls your flash exposure. This will allow you to adjust either part, as ambient lighting often cannot be changed, and running between your flash and camera can make things tricky.

Remember, with shots like this, you have to include the negative lighting and added lighting in visualization. Include the impact of your counters to the poor lighting, and see the end result. If you know your camera and your exposures, you'll get the shot you want.

Painted beautifully with wonderful scenes and colors, I’ve included a pic of the ceiling.


ISO 1600, f/5.6, 1/60

I love the color, detail, and majesty of this painting.

I hope this post can be of some help. Enjoy your weekend. Today’s golden hour begins at 4 pm, so get out and get shooting! That golden light will make your shots, and you surely can find any number of subjects to photograph in it! Remember to share your pics and post your questions at the Hohenfels Volks Facebook page, and or by commenting here!

Wednesday, September 21, 2011

The Exposure Triangle

Today’s post is on the “Exposure Triangle.”

You’ll find this everywhere on the Internet. A quick Google search turned up 18,300,000 results!

What is the exposure triangle? It’s basically the combination of the three factors that affect your exposure- ISO, shutter speed, and aperture. I put a pic on the Intro to Photography page with the rest of this article.

Remembering it is easy if think of a triangle and visualize that changing as you change your settings. That’s pretty much the gist of it.

Here’s a list as an example. Use that list to visualize your triangle and you’ll be off to the races, at least for the moment. I’ll use whole stops for simplicity. Each stop is either double or half the amount of light compared to the two numbers next to it.

ISO                                    APERTURE                SHUTTER SPEED
100                                           f/4                                  1/1600
                                                 f/5.6                               1/800
                                                 f/8                                  1/400
                                                 f/11                                1/200
                                                 f/16                                1/100

Looking at the first triangle 1/1600, f/4, at ISO 100, you can see that any changes require a change to another side to remain the same. I can change the exposure to 1/800, f/5.6, at ISO 100 and get the same exposure. Cool, huh?

Let’s try something else. This one will demonstrate the importance of the triangle and knowing how it works. At ISO 200, f/8, 1/400, my image is overexposed. How can I fix it? Try ISO 100, f/8, 1/400. That’s half the previous exposure level!

The first example showing how to get the same exposure is useful to figure out how much DOF you want and to help you keep your exposure constant in constant lighting.

The second example gives you an idea of how to use this tool to get more of your shots usable in changing lighting.

For the rest of this, visit our Intro to Photography page, and do a web search on it. Don't worry, though, more about exposure will be coming around soon!

Focal length will be our next topic.

Please leave your feedback here and on our Facebook page.

Enjoy the rest of your week!

Thursday, September 15, 2011

Depth of Field

Welcome back!

This time we're going to explore DEPTH OF FIELD, commonly referred to as DOF.

Have you ever noticed that some photos are extremely sharp all the way through the whole range of the image and some stop being sharp with only a small range truly sharp? This range of sharpness in a picture is DEPTH OF FIELD.

How can we control this? There are several tools at our disposal. One is controlling the distance between subjects, another is focal point (an upcoming post), but the most valuable to us, and the one we will discuss here, is our aperture or f-stop.

You might remember that aperture is the size of the "window" in the lens. You might ask, if it controls how much light gets in, how can it control the DOF?

With a narrow aperture, basically, the light becomes more tightly focused, making the DOF wider and allowing an increase in sharpness.

A couple words of caution on this:

1) This is not the cure all for poorly focused or blurry images. One negative side effect of a very small aperture, or large f-stop, is diffraction blur. The bending of light as it squeezes through the aperture causes this, and can make blur more noticeable.

2) This will require longer shutter speeds. Sometimes beyond your ability to hold a camera steady. Camera shake is really bad at long exposures!

So, if a narrow aperture will increase DOF, it makes sense that a wide aperture will decrease your DOF.

Now, it's time to break out your camera. Play with your DOF; adjust your aperture and your focus to get some images with a shallow DOF and some with more depth, or wider DOF. A great way to start is taking 2 items and placing them on your table at different distances from the camera. Shoot at the range between f4 and f16 and examine the results.

Don't you feel more artistic already? I did when I first tried it!

For more information on DEPTH OF FIELD, check out our Intro to Photography page and don't miss out on Cambridge in Colour's excellent in-depth tutorial.

That's it for this post. Here's hoping you have a great week and get some good shooting in this week-end!

And remember, if you have any questions or comments feel free to share them here or on our Facebook page.