Showing posts with label process. Show all posts

Thursday, June 28, 2012

Process Hang-ups

Greetings, volks. Welcome to Hohenfels Volks, THE place for our place! The skies and lighting these past couple days have created an environment rich with opportunities for making some great shots!

I hope everyone is enjoying the wonderful weather here in our Hohenfels area. Photography is a magic thing during this time, when the sun is up late, and the skies can work their mood into your images. The golden and blue hours can be used to great effect when shooting during this time, and add some drama or serenity to the image you’re creating.

Tonight’s post is based on something I read at Photofocus, by Scott Bourne, about pedantry in learning photography. To sum it up- there are those who are all about the process and sticklers for the “rules” and numbers. I had planned a post about making your image nearly perfect in camera to minimize editing time, but his article struck me as being something to share.

I’m familiar with the process concentration, as I tend to get wrapped up in the process at times. For me, nailing the process leads me to look at ways to improve my images by finding other ways to make the same thing. Learning to do it “correctly” is important to learning how to do it “right.” By correctly, I’m referencing the process and numbers, and by right, I’m referencing the final image I visualized.

The process is a vital tool in making an image, as this is where we start. Learning that reciprocity makes our exposures easier by allowing us to work the exposure triangle is a part of that. Learning that controlling DOF is done through focus and aperture is a part of learning the process. The key is in knowing that the process is not the end, but the beginning. Before we can make impacting departures from the process, we must know the process.

Ansel Adams, one of my favorite photographers and sources of knowledge and inspiration, was well aware of this. Throughout his books, he refers back to visualization and placements. Each book in his series on the Camera, Negative, and Print begins with a chapter on visualization. He constantly references expression while teaching the basic processes and departures from them.

By working together to share our knowledge, we can bring more to expressive and creative photography than just numbers and processes. By sharing our vision and visualizations, we help our fellow photographers in their journey through this wonderful endeavor. The important thing is how does your image feel and how does it impact you and your intended audience. Other than that, the opinions of others, especially the pedants out there, should matter very little. Their opinion requires weighing, and the helpful bits used while the rest are discarded like week old leftovers.

Don’t let those folks disappoint you, don’t let them bring doubt into your mindset, and don’t let them change your style. Your photography is for you, your vision, while shared with others, is still yours. The biggest point in all this is enjoyment. Make sure you’re getting the most enjoyment you can from the time you spend making images, and from those photos you worked to give life to.

You really should check out Photofocus, Scott posts some incredible photos and his articles are a great resource for those of us addicted to the magic of bringing that feeling to life in our art.
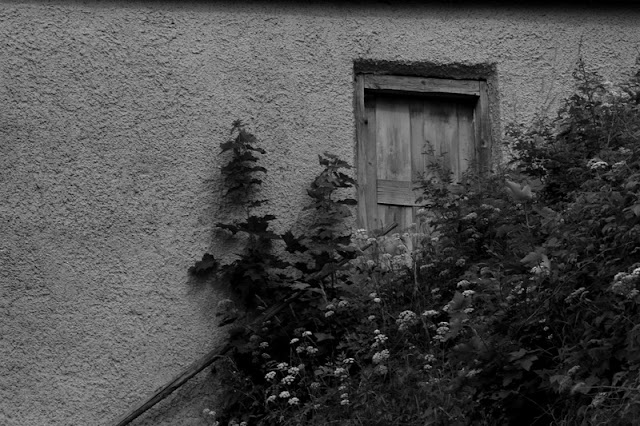
Hohenfels Volks: Abandoned Door
ISO 125, f/11, 1/60
This image is likely to be called too dark by those who think only of the process and "correctness" of an image. It was intentionally left dark to add to the mood and impression of abandonment. By departing from the process we can make our art more meaningful.

I hope you have some great plans for the weekend, and are ready to share your visions with us. We’re all eager to see folks sharing their images, their vision, and thoughts. Enjoy your Friday, and enjoy your time behind the camera!

Do you have an image to share? We’d love to see it! Is there anything you’d like to see here? Do you have a question? Share your thoughts here or at the Hohenfels Volks Facebook page. Of course, commenting on both Facebook and here is always appreciated, too! Don't forget, we're on Google+, too!

Friday, May 4, 2012

Tech Talk: Rating Your Sensor

Greetings, volks. Welcome to Hohenfels Volks, THE place for our place! WOW! The annual Hohenfels Volksfest was a great time and the weather was perfect. Now the clouds are puffing up some, and that makes for great outdoor photos that include the sky!

Today we’re going to introduce rating and EI.

Your camera has a range of ISOs you can choose from, most likely running from ISO100 to ISO3200 in third stop increments. Camera and film manufacturers used the International Standards Organization methods to set the speed, or ISO, of your sensor or film. They generally are set to favor overexposure, as underexposure is harder to correct. Therefore, in test conditions ISO 100 performs at ISO 80-100 to get you exposed at the general target for the contrast and exposure standards set by the organization. This used to be referred to as a film’s “box speed.” For digital work, I’ve come to think of it as “nominal.” Therefore, when I say I shot it at ISO 125, that’s what I was set and exposed for.

The ISO recognized that most scenes deviated from test conditions, as did developing or processing. A film may be rated at ISO 100, when developed in a certain developer for a specific time, but not for any other combination. Film shooters would “rate” their film at different speeds for their methods, including exposure and development controls. For instance, some would shoot FP4+, which is ISO125 in Ilford’s ID11 developer, rated at EI80 developed in Kodak D-76 for their preferred method of exposing and developing a standard shot.

EI, or “exposure index,” is what you rate your film at for your methods, and usually refers to speed rating assigned that’s different from the film's actual speed. Generally, when you shoot with your digital SLR, you shoot maybe at ISO 100, and edit it in your manufacturer’s provided application and get decent results. You are shooting and making your shot at nominal speed, or box speed with film.

You may find that in high contrast scenes at nominal speed, you are getting shadows that are clipped to black and whites that are blown and have no detail. In that case, it’s time to change your EI, or rate your speed different. To do this correctly, you should test your camera, and we’re going to cover the procedures to do that for YOUR best results. Since this test is based on your equipment, metering, and editing, someone else will get different results using the same equipment. This test is based on your style and methods, which others may not follow. Keep that in mind when “rating” your gear, you can recommend your “rating” to others with the same camera, they will most likely appreciate the information, but each “rating” is subjective, and will work best in your hands.

This testing becomes especially important when shooting at extremes of lighting. In very low light, like that in most old buildings, noise is a real concern when trying to increase your image brightness during editing, and in bright daylight lit landscapes skies and clouds can become just blotches of white without any detail.

The procedures for setting your EI involved a gray card, meter, and your camera. You should be set up for this in light conditions that match your intended shooting conditions to effectively use this method.

Step 1, set up your gray card in lighting that matches your shooting conditions. Step 2, set your desired ISO reading on your camera, and select RAW mode. Step 3; set your camera to f/8 or f/11 and AV mode. Step 4, meter your gray card, use spot metering and fill as much of the frame as possible with the gray card. Note the shutter speed. Step 4, set your camera to manual mode, and enter the shutter speed metered in step3, which should give you an 18% gray image. Step 5: compose your test shot. You can pull back some, including other elements. I have a test screen that includes black and white pieces and collapses nicely into a camera bag, and prefer to use that to check contrast ranges while doing this test. Step 6, take the following series of shots- at the metered reading obtained previously, -1/3 stop, -2/3 stop, -1 stop, +1/3 stop, +2/3 stop, and +1 stop. Step 7, load the images onto your computer. Then open your image editing application. Step 8, Open each image in turn, and find the one that is MOST CLOSELY identical to the gray card in exposure for your set up. Make sure to perform absolutely no adjustments to the images, as we are looking for the most closely identical image. Take note of the settings used for this shot. Step 9, this is your EI for that type of scene with that ISO selected. For example if –1/3 stop produced the best rendition for ISO100, then your EI would be 125 or EI125. You will effectively be rating your ISO100 shots at 125, and removing 1/3 stop on all your shots in those conditions. To accomplish this, when shooting at ISO100 simply remove 1/3 stop exposure, either by increasing your shutter speed 1/3 stop or closing down your aperture 1/3 stop.

Rating your sensor or speed before shooting can save a lot of time editing and the heartbreak of a shot that doesn’t live up to your expectations. It’s not perfect, and varies based up taste, style, and personal preference, but it will bring you closer to achieving your vision. It’s definitely something to try in conjunction with this week’s exercise on contrast and contrast control. Combine it with M+ and M- exposure placement for even better results. By exposing properly, you can keep your contrast in the desired range, and make it easier to achieve your vision in your final processing stage.

For those interested in more information about film speed, Wikipedia has a great article. It includes formulae and details about how box speed and nominal are attained.

I’m looking forward to seeing your results and hearing from you. Let me know what you think and how you’re using your camera! Share your thoughts here or at the Hohenfels Volks Facebook page. Of course, commenting on both Facebook and here is always appreciated, too! Don't forget, we're on Google+, too!

Tuesday, February 21, 2012

Developing for Your Vision

Greetings, volks. Welcome to Hohenfels Volks, THE place for our place! Welcome to another delayed post.

Lots of things going on have delayed posting for several days, yet again! So here we go, continuing our last post about exposing for your vision.

We posted a photo that we referred to as N development, or normal. That going to be our starting point. Going back to our RAW conversion, we’re going to change that some. Since I use Canon’s Digital Photo Pro that came with my camera, I’ll refer to that.

Our first step is to adjust the slider for exposure. I took it down to -.33 stop. That added some depth to the sky and brighter areas, allowing for some slight texture and tonality. Then I set the white balance to color temperature, at 4200. You’ll see why I did that later.

After that, I crushed in the levels some, the method is shown below. That increases contrast and allows you to bring your levels at the extreme end in some. It gives deeper shadows and highlights. Some of this will be offset, while allowing the levels to be set in our next step.

Hohenfels Volks: Crushing levels
Looking at the arrows, you can see how the levels are crushed in using your sliding limits. This adds clarity, contrast, and depth to an image.

Bringing the contrast up to 2, and the highlights to –2, allowed for some slight increase in highlight detail along the snowy roof of the church and in the snow on the fields. Bringing the shadows up to +2, added depth to the forest and some detail to the church tower and tonality to the almost black barn. It also allowed the shadows to move higher along the exposure scale, increasing the open feeling of the spaces and the shadows from the buildings.

After setting my monochrome filter to red, which darkens greens and blues, the snow appeared brighter without fading or washing out, while adding some shadows back to the open parts of the further hill and forest. Adjusting the color temperature down to about 3900 cleared things up a little.

After rotating the image to a more suitable angle, due to my camera not being level while I shot, I was ready to sharpen, convert, and save. Below is the finished image.

Hohenfels Volks: N-.3 village outside Hohenfels
ISO 400, f/16, 1/500, 115mm
Our finished shot of this charming village.

Here is the photo in color with almost the same settings, with the biggest change coming from the color temperature. Outdoor shadows, and snow, usually have more blue light, so bumping up the color temperature allowed for white snow, blacker shadows, and still retained the color on the far hills.

Hohenfels Volks: N-.3 village outside Hohenfels
ISO 400, f/16, 1/500, 115mm
Our color shot of this charming village.

Some small edits in RAW can save tons of time fixing photos. They also allow us to create our vision, not just re-create what we saw. Using some dodging and burning tools and sharpening brushes, as well as the other tools, in editing applications can further that vision to a concrete expression of what our mind saw and wanted to show.

I hope to see some of your vision soon! Start sharing your work and showing us how you saw something, not what you saw. Making great photos is a great way to spend some time, and get in touch with the world around you! I hope you have a wonderful week and enjoy the weather we have right now!

Don’t forget to post any of your images you’d like to see here at the Hohenfels Volks Facebook page. Of course, commenting on both Facebook and here is always appreciated, too! Don't forget, we're on Google+, too!

Tuesday, October 4, 2011

Intro to Composition

Today we’re going to talk about COMPOSITION.

Simply put, COMPOSITION is bringing the image you’ve just visualized to life in a pleasing and attractive fashion. Pretty straight forward, isn’t it? Like many things related to photography, it goes deeper than that, simple- yes, easy - no.

Diving into the subject on a basic level, we’re going to cover some basics today.

First, there is subject and object placement to consider. Then there are color, exposure, DOF, weight, balance, and various other considerations.

The tips I’m outlining are not hard and fast rules! While often called rules, you can break them anytime. The trick is to know when and why to break them. That takes some time and practice.

The most commonly discussed is the “rule of thirds.” This rule states that your subject, or subjects, should be placed along an imaginary line dividing the image into thirds. For a more powerful composition, intersections of horizontal and vertical thirds are used. I’ve included a chart showing this and a sample using it below.


This is just a basic chart to show where things line up.


This is an example using a photo I recently took. Notice how the right line runs through the middle of her eye and the bottom right intersection is right about on the corner of her smile. Also, notice the diagonal lines formed by her eyes, smile, and head.

Another rule is the “Golden Spiral.” This one seems to have several names. This is placing your subject near one of the points of intersection in the thirds, and using a nautilus type spiral to lead the eye through the image to the subject. There is some mathematics behind this using the Fibonacci sequence and the “Golden Ratio” of 1.618 to 1. This can be more appealing than a simple rule of thirds, as this more natural. It just takes some practice and patience. I’ve included a link to a site that shows an applet demonstrating this and several others.

Java Adjuster A cool applet that shows the effects and use of the rules regarding composition.
Golden Section and the Rule of Thirds An informative sight covering more about using these rules.

Place your subjects and objects according to how you visualized their importance to the scene. A subject that is important to the overall composition can be placed on one the intersections, or in the center of your “Golden Spiral,” while objects of lower importance can be placed along either a vertical or horizontal third only. Giving each object or subject a weight or ranking based on how you visualize the scene can help in using, and breaking, the rules.

Another important element in COMPOSITION is lines. By having lines in your image, you can lead your viewer through your vision and tell a story in your work.

Diagonal lines add a dynamic and powerful element to an image. C and S shaped lines create a sense of grace and harmony. Vertical and horizontal lines are static. Including a graceful element, like a river, and ensuring that is either C or S shaped, gives the viewer a sense of calm and grace. Use your leading lines, and you will see a change in how you look at a scene and how you start to visualize your images.

Here's a link to a nice little page about COMPOSITION. It's short, simple, and very helpful! 10 Top Photography Composition Rules

Well enough for today. We’ll dive more into COMPOSITION in another post.

Try this out and let me know how it works for you! There are a large number of places that will help you feel more at ease with your COMPOSITIONS around Hohenfels! I’d love to know if it helps! If you have a question, post it to our Facebook account. Also post it here as a comment on the related post, I’ll review it and get back to you! If you have a photo you’d like to share, add it to our wall on Facebook, and I’ll get it posted here.