Showing posts with label film. Show all posts

Tuesday, September 17, 2013

Autumn Care

Greetings and welcome to Hohenfels Volks, THE place for our place! Here in Hohenfels, the Sun made a couple cameo appearances but wasn’t able to stir up any kind of significant warmth. The rain put a damper on the spirits, as did the fact that it’s a workday!

With autumn’s brutally chilled arrival, we’re nearing the time to shoot some real color! There’s always some excitement about the colors, shapes, textures, and patterns that accompany autumnal photography. As I mentioned in yesterday’s quote, now’s a great time to think about negative space and the use of color to create tension, balance, and harmony in your photos, and bring about the connection you’d like to make.

Hohenfels Volks: Black Velvet, flowers in Bayreuth
ISO 800, f/11, 1/60
These flowers were shot at the Hermitage in Bayreuth. A Wratten #8, yellow, filter was used. By using the filter, the green was brought up slightly, and the white flowers separated from both the red flowers and green leaves. By allowing a rich grey-black to fall on the leaves and red flowers, a velvety feeling of negative space results. While fragmented and carrying visual detail, it is by no means the subject, and yet becomes a subject of its own.

Along with the march of color into the dreariness ahead, comes other factors that photographers should take note of. First, is the rapid decrease in temperatures, the drop in temperature can take the starch out of an exciting day. Another factor is the rain, always something to be ready for in our Hohenfels area. Getting your camera wet can lead to issues that no one wants!

One of the biggies, I’ve found, is the increase in static. For the most part, photographers don’t have to worry about while photographing with digital cameras. It’s when the time comes to change cards or clean your sensor, or even change your lens that it becomes an issue. A typical “zap” can have as much as 30,000 volts jumping from one surface to another. Enough to ruin your day if it arcs over onto your sensor. Since most folks don’t clean their sensors beyond a squirt from a bulb blower, it’s pretty reasonable to say that the standard precautions are sufficient.

With film, though, static can be a big problem. Advancing film, rewinding film, activating the shutter, removing a dark slide, all these things can cause an arc that will ruin your shot. The can also damage your shutter curtains if your camera uses cloth. In the driest and coldest weather, it could damage your sensor, but that’s unlikely.

The biggest threat to digital cameras during this time of year is the condensation from thermal transitions. That’s a fancy way of saying going inside from outside. I’ve found one of the best ways to protect anything is a Ziploc bag and 30 minutes. Don’t plug your camera in, put your card in your reader, or power on your camera when you first come in. The temperature change can cause moisture, which we all know, doesn’t sit well with electronics! Think about glasses fogging over when you come in from the cold!

Another awesome tip- when you get in from the cold, make a big cup of hot cocoa, with extra chocolate. It’ll warm you up, and give time for your gear to reach a suitable temperature! It helps if you have someone to share it with. A nice cup of cocoa with my little princess makes for some fun talk time, and 30 minutes is gone before you know it!

Now’s the time get scouting and planning your autumn shots. Figure out where and when, the rest will follow. Then, make your shot and share it with us on our Hohenfels Volks Facebook page. We’d love to see your work.

Is there anything you’d like to see here? Do you have a question? Share your thoughts here or at the Hohenfels Volks Facebook page. Of course, commenting on both Facebook and here is always appreciated, too! Don't forget, Hohenfels Volks is on Google+, too!

Friday, May 4, 2012

Tech Talk: Rating Your Sensor

Greetings, volks. Welcome to Hohenfels Volks, THE place for our place! WOW! The annual Hohenfels Volksfest was a great time and the weather was perfect. Now the clouds are puffing up some, and that makes for great outdoor photos that include the sky!

Today we’re going to introduce rating and EI.

Your camera has a range of ISOs you can choose from, most likely running from ISO100 to ISO3200 in third stop increments. Camera and film manufacturers used the International Standards Organization methods to set the speed, or ISO, of your sensor or film. They generally are set to favor overexposure, as underexposure is harder to correct. Therefore, in test conditions ISO 100 performs at ISO 80-100 to get you exposed at the general target for the contrast and exposure standards set by the organization. This used to be referred to as a film’s “box speed.” For digital work, I’ve come to think of it as “nominal.” Therefore, when I say I shot it at ISO 125, that’s what I was set and exposed for.

The ISO recognized that most scenes deviated from test conditions, as did developing or processing. A film may be rated at ISO 100, when developed in a certain developer for a specific time, but not for any other combination. Film shooters would “rate” their film at different speeds for their methods, including exposure and development controls. For instance, some would shoot FP4+, which is ISO125 in Ilford’s ID11 developer, rated at EI80 developed in Kodak D-76 for their preferred method of exposing and developing a standard shot.

EI, or “exposure index,” is what you rate your film at for your methods, and usually refers to speed rating assigned that’s different from the film's actual speed. Generally, when you shoot with your digital SLR, you shoot maybe at ISO 100, and edit it in your manufacturer’s provided application and get decent results. You are shooting and making your shot at nominal speed, or box speed with film.

You may find that in high contrast scenes at nominal speed, you are getting shadows that are clipped to black and whites that are blown and have no detail. In that case, it’s time to change your EI, or rate your speed different. To do this correctly, you should test your camera, and we’re going to cover the procedures to do that for YOUR best results. Since this test is based on your equipment, metering, and editing, someone else will get different results using the same equipment. This test is based on your style and methods, which others may not follow. Keep that in mind when “rating” your gear, you can recommend your “rating” to others with the same camera, they will most likely appreciate the information, but each “rating” is subjective, and will work best in your hands.

This testing becomes especially important when shooting at extremes of lighting. In very low light, like that in most old buildings, noise is a real concern when trying to increase your image brightness during editing, and in bright daylight lit landscapes skies and clouds can become just blotches of white without any detail.

The procedures for setting your EI involved a gray card, meter, and your camera. You should be set up for this in light conditions that match your intended shooting conditions to effectively use this method.

Step 1, set up your gray card in lighting that matches your shooting conditions. Step 2, set your desired ISO reading on your camera, and select RAW mode. Step 3; set your camera to f/8 or f/11 and AV mode. Step 4, meter your gray card, use spot metering and fill as much of the frame as possible with the gray card. Note the shutter speed. Step 4, set your camera to manual mode, and enter the shutter speed metered in step3, which should give you an 18% gray image. Step 5: compose your test shot. You can pull back some, including other elements. I have a test screen that includes black and white pieces and collapses nicely into a camera bag, and prefer to use that to check contrast ranges while doing this test. Step 6, take the following series of shots- at the metered reading obtained previously, -1/3 stop, -2/3 stop, -1 stop, +1/3 stop, +2/3 stop, and +1 stop. Step 7, load the images onto your computer. Then open your image editing application. Step 8, Open each image in turn, and find the one that is MOST CLOSELY identical to the gray card in exposure for your set up. Make sure to perform absolutely no adjustments to the images, as we are looking for the most closely identical image. Take note of the settings used for this shot. Step 9, this is your EI for that type of scene with that ISO selected. For example if –1/3 stop produced the best rendition for ISO100, then your EI would be 125 or EI125. You will effectively be rating your ISO100 shots at 125, and removing 1/3 stop on all your shots in those conditions. To accomplish this, when shooting at ISO100 simply remove 1/3 stop exposure, either by increasing your shutter speed 1/3 stop or closing down your aperture 1/3 stop.

Rating your sensor or speed before shooting can save a lot of time editing and the heartbreak of a shot that doesn’t live up to your expectations. It’s not perfect, and varies based up taste, style, and personal preference, but it will bring you closer to achieving your vision. It’s definitely something to try in conjunction with this week’s exercise on contrast and contrast control. Combine it with M+ and M- exposure placement for even better results. By exposing properly, you can keep your contrast in the desired range, and make it easier to achieve your vision in your final processing stage.

For those interested in more information about film speed, Wikipedia has a great article. It includes formulae and details about how box speed and nominal are attained.

I’m looking forward to seeing your results and hearing from you. Let me know what you think and how you’re using your camera! Share your thoughts here or at the Hohenfels Volks Facebook page. Of course, commenting on both Facebook and here is always appreciated, too! Don't forget, we're on Google+, too!

Wednesday, March 7, 2012

Ride Along Shot- Braustuberl

Greetings, volks. Welcome to Hohenfels Volks, THE place for our place! Another beautiful day left us feeling nice here in Hohenfels.

Today we’re packing up some film and going shooting in Parsberg. That means it’s time for another Ride Along shot.

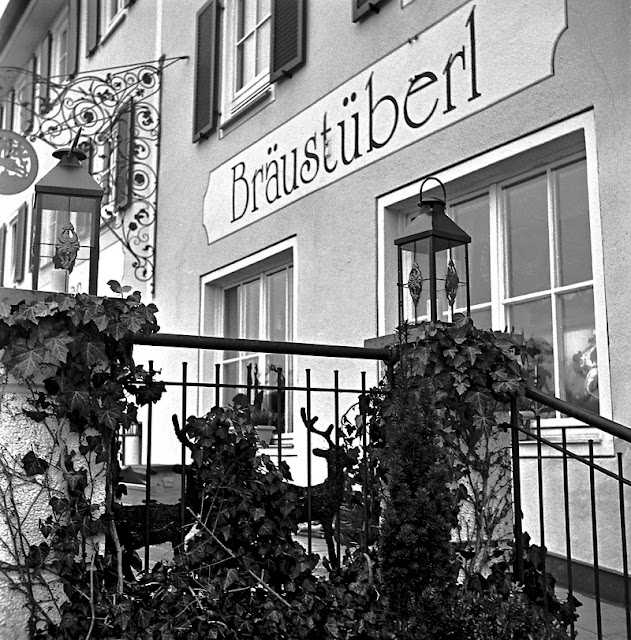
Hohenfels Volks: Ivy at the Braustuberl
ISO 400, f/8, 1/50, Zeiss Ikon Ikoflex I, 75mm lens
Ivy at the Braustuberl in Parsberg

I used a mid ‘40s Zeiss Ikon Ikoflex I TLR, with Ilford’s 120 HP5+ film. This film is ISO 400, but can be pushed to 1600, giving it wide exposure latitude. The medium format 120 film combined with the camera’s 1X1 aspect ratio produces biggish 6cmX6cm negatives, which allows for nice print sizes.

I was in Parsberg picking up some film, developer, and color prints from our day trip to Bamberg with some wonderful friends. I made sure to have my camera and look for shots that might make nice prints. The combination of ivy and the rest of the scene set me thinking about how to compose a photo using the elements I desired.

The first step was to visualize what I wanted to see in the final image. I knew I wanted the “Braustuberl” sign and both lanterns. I also wanted to make the ivy a nice part of the scene. How did I want to convey the image? What parts needed detail and how much detail led to the process of putting together the final composition.

Knowing that I wanted detail in the lanterns, enough to show the shadows cast by the lantern tops, meant that they had to be placed about 3 stops down from middle gray. The leaves needed more luminance, so had to be placed about 2 stops down. Remember, when dealing with your shadows, 2 stops down will give you variations in tone, but no texture, and 3 will give you texture and an inkling of nice detail.

Metering off the ivy from about 1 foot away, gave me f/16 at 1/5 second. Metering off the walkway in the lower right for middle gray gave me f/16 at 1/125. Metering from the lanterns gave me ½ at f/16. The final shot was f/8 at 1/50 second. This moved everything up 1 stop above where I wanted it to allow for experimenting with compensating development.

Developing was done for N+1/3 in pre-depleted Tetenal Ultrafin 1+30. The times were 30 seconds of initial inversion agitation, with 4-minute stand cycles followed by 15 seconds inversion agitation. Total developing time was 20 minutes followed by the usual washing, fixing, and a German Jet dry to prevent spots. The film was hung up to dry for about 4 hours before cutting and scanned the next day.

The developing and exposure method allows the developer to deplete rapidly at the highlights, limiting the action there, while allowing more action on the shadow details. It lowers contrast and can give shadows a luminosity that makes them stand out more than just being black.

After scanning, I brought in the levels some, adjusted the curves for a tiny inverted S, and applied sharpening. It was scanned at 4800 DPI and resized to 800x800 at 300 DPI for the web, it won’t print nicely at all at that resolution, but I have the negative and the original file for that. The beauty of the scanning and editing on the computer is that it allows us to revisit our original and edit it multiple ways and times until we are satisfied with the match.

The meter I used was an old Gossen Sixtomat from the 1960s. This meter has a 30-degree field of view, so I had to get close and cup the sides to get the correct reading for the areas that were being measured. The digital camera would have made it easier with its 7-degree field in spot mode. I probably could have gotten the shot in half the time, but doing the old fashioned way was actually quite nice and reinforced what I’ve been learning.

Well, that’s it for this ride. I hope everyone has a great week and gets some photo time!

Don’t forget to post any of your images you’d like to see here at the Hohenfels Volks Facebook page. Of course, commenting on both Facebook and here is always appreciated, too! Don't forget, we're on Google+, too!

Wednesday, February 8, 2012

Editing For Pre-Exposure?

Greetings, volks. Welcome to Hohenfels Volks, THE place for our place! I hope everyone is warm and well, and that you got the shot you wanted today!

Today we’re going to deal with an editing technique based on old film shooting. I know this was supposed to be another Around Hohenfels, but that didn’t quite pan out the way I had planned.

Back in the film days, you couldn’t change film speed mid roll. You also had some interesting things going on. Film often had a wider latitude for exposure errors, especially for overexposure, but even underexposing allowed film to still work out, if you knew how to make it. You could shoot with ISO 200 settings on ISO 100 film, and push the processing for ISO 200, and save the shots. There were several techniques for saving the shot, including push processing, pull processing, and pre-exposing. When shooting RAW format, most conversion applications, like Canon’s DPP, can be used to correct an exposure by up to 2 stops either direction. Using the exposure setting that way, though, you affect the entire image, not just certain areas. Using most image editing programs, you can dodge or burn areas to meet your needs, as well adjust your curves and levels. In fact, most applications have the common dark room tools, which is why they refer to them as a digital dark room.

Rather than discuss those choices at this time, we’ll address pre-exposure. I chose this topic, as most image applications don’t have a feature that allows that directly. Rather, you have to use a round about method to obtain similar results, and that’s what we’ll discuss today. Pre-exposing film allowed the photographer to bring out detail in deep shadows by adjusting them to higher levels or zones. By pre-exposing a hot, then shooting over that pre-exposed frame, light intensity could be raised. If you wish to bring out detail in zone 2 shadows, you could pre-expose for zone 1 or 2, then shoot for a correct overall exposure and get those elusive shadow features. You’d need to take a gray card or translucent plastic/glass, meter it exactly along your image axis, and set your exposure accordingly, then shoot the scene. You could push, pull, or otherwise develop according to your plans, and print the same. We’ll be simulating this technique. I’m going to use this image as an example.

Hohenfel Volks: Passau skyline, pre-exposure original
ISO 100, f/5.6, 1/500, 55mm
The Passau Skyline!

First, select your image, and open it in your editor of choice. Whether you use Photoshop, GIMP, or Paintshop Pro, the basic are the same, but your application needs to support layers. Once your image is open, make a new layer, and select your color selection tool. Click on the shadows you wish to open up and increase the details. Before closing, look at the settings or options for that color and increase the values by the desired amount. For this image, I chose the trees in front of the church, which came out to R-7, G-7, B-7, L-7, and doubled them all to 14. This was still in zone 1, digitally speaking, but when combined at the end, allowed for a slight bump in the shadow detail.

With that being done and applied, select your bucket too and flood fill the new layer with that color. You should have something solid, in your selected color or tone. Set you blend mode to screen, and watch the magic start. All your levels will increase except the brightest areas. You will notice a decrease in contrast as well.

Decrease the new layer’s opacity until you have a set of results that are satisfactory. Now, select levels adjustment, and crush in the curves ever so slightly. This will increase your contrast, without removing too much detail from your shadows. You can apply a curves adjustment and a clarify adjustment if you desire. Now you should see something that is pleasing to your eye, and has more detail in the shadows.

In the days of film, you shot for the shadows, to preserve detail. This often meant slightly overexposing your shot, and printing to retain the detail in the highlights. By pre-exposing your film, you had a way to create more detail without giving any up on the other end. Because exposure was cumulative on multiple shots at the same frame, you could add light as needed. The reason for dark areas benefiting most, was that you added light uniformly across the image at the same level, but your exposure of the image was not uniform. Using just quick numbers to demonstrate, at level 2, when you add 2 units you double the level. At your highlights with say 100 units, you add 2 units and the results are almost unnoticeable due to the ratios. This works in digital the same way, when you select screen mode, you only lighten values lower then your selected pre-exposure layer. Although there is some small effect at slightly higher levels, it is less drastic. By varying the opacity of the layer, you can control the effect even more. Adding masking to allow only certain areas to be painted in gives you complete control!

Here is my final image. Not a large change, but enough to bring out some of the detail within the trees. This works best with images without a large amount of bright spots or too much contrast, but this image was useful. This shows you what a little bit of old time darkroom work on today’s technology can accomplish.

Hohenfel Volks: Passau skyline, pre-exposure finished
Same as above, with pre-exposure.

Well, that’s it for today. Keep shooting, keep seeing the light, and keep your love of our art going with frequent sessions behind the lens! Don’t forget to vote and to get your works in for this week’s theme!

Don’t forget to post any of your images you’d like to see here at the Hohenfels Volks Facebook page. Of course, commenting on both Facebook and here is always appreciated, too! Don't forget, we're on Google+, too!

Friday, January 27, 2012

Rice? Sand? Nope, It's Film!

Greetings, volks. Welcome to Hohenfels Volks, THE place for our place! Well, so much for no snow here in Hohenfels.

As promised last night, here’s our post on editing your digital images for the film look. We’re going to be using GIMP with some script-fu plug-ins. Even though we’re assuming you use and have GIMP there are 2 things before we begin; 1- these concepts apply to Photoshop and Paint Shop as well, but may be called something else, and 2- choose an image you think would look good as a film shot, and let’s get ready.

hohenfels Volks: Starting out, in B&W
ISO 125, f/4.5, 1/60, 53mm
We're going to start with this image. You can see the settings above. It was shot monochrome on the Canon EOS 7D, with a red filter applied and some very minor crushing of levels.

First, open GIMP. When it’s finished loading, select Open from the File menu. Navigate to your image and click Open. Once your image loads, right click on the layers palette and select Duplicate Layer. This is the layer we will be using as our background, which allows us to perform our edits without actually touching the pixels on the original image. Right click on your background and select Delete, leaving only the duplicate layer.

Right click on the duplicate layer and select New Layer. In the dialog box, Name your layer grain and select Transparency, then click OK. Make sure brush color is set for 50% gray, although darker shades will increase contrast and lighter shades will decrease it. I generally choose a darker shade to get an older style feel to the image, but the choice is up to your style and taste. Choose your Flood Fill tool, AKA Bucket Tool, and click inside the image area with your grain layer selected. You should see nothing but your selected color now. In the Mode drop down select Overlay. You can see your image now, although it will have some contrast changes.

Click on your filters menu. Select Noise, and then select Hurl. In the dialog box that appears, click the New Seed button, Then adjust your Randomization slide for about 10-15% and your repeat for 1-5. Then click OK. Your image now looks slightly contrasty and noisy, and quite unappealing. From the menu bar select Colors, then Hue-Saturation and decrease your lightness slightly and your saturation all the way down. Things are looking better, but it still needs some work. Go back to your filters menu and select Blur. From there, click Gaussian Blur. Set your radius to about 1-1.5 and click OK. The noise now looks like the grain on film, but we’re not done yet.

Next, select your background. Click on Script Fu in your menu and go to Sharpness. Select Sharper and finally click on High Pass Sharpen. Select your desired level of sharpening and click OK. You now have a new layer that is the sharpening level and looks like the lines from your original. Click the Eye Button to turn off your background.

Go back to the Colors menu and select Brightness-Contrast. I usually bring the brightness down, around 30 for most B&W photos, and increase the contrast to about 25, then click OK. Click the eye on your background layer again, turning it back on. You should be about right. The grain, contrast, and sharpness should be about what you’d expect from a general use film like ISO 200-400. If it’s too grainy, blur your noise layer in .25 pixel steps until it looks good. If your contrast is too high or low, adjust the brightness or transparency of your grain and sharpened layers.

And here's the final product. Although at this size, the grain isn't quite as prominent as it would be zoomed in, you can see the difference and the impact adding grain can have.

hohenfels Volks: finished grain in BW
This is more film like, although not quite as contrasty as pushing a little more could make it. Higher contrast can make for some nice old time photos that bring people back in time.

It isn’t perfect, but with some practice, patience, and trial and error, you can get something that looks like real film. Photoshop has plug-ins to do, as does GIMP, but the results are more natural when done manually. One important thing to remember is to make sure you remove all saturation from your grain layer. If you don’t, you’ll end up with colored noise that has no resemblance to film grain.

I hope you're working on your shots for the theme! Have a great weekend and shoot that trophy photo you've always wanted!

Don’t forget to post any of your images you’d like to see here at the Hohenfels Volks Facebook page. Of course, commenting on both Facebook and here is always appreciated, too!

Tuesday, January 3, 2012

Classic Shooting

Greetings and welcome to Hohenfels Volks, THE place for our place. As promised, a second dose of photography just for Hohenfels, dealing with old fashioned photography. Before we begin, I need to clarify this week's theme. Your images should be of work being done, not the people doing the work. The bulk of your subject should be the work, not the worker. I hope this helps when creating your shots.

As mentioned previously, we're talking about old fashioned photography. I got some very old cameras this weekend, inspiring me to pick up film again and try out what I've learned. It also inspired me to share pics of them with you and encourage you to pick up your film stuff and shoot that, too. It's a great way to test yourself, using film and what you've learned. It also shows you what you've learned and how well you're progressing.

Hohenfels Volks- Nettar 515/2
ISO 400, f/8, 1/25, 37mm
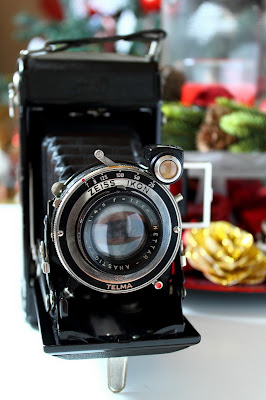
Zeiss Ikon up close. This shows the lens, the "brilliant glass," used to compose your shot, and the speeds available.

This weekend the family and friends surprised me with some gifts. The first gift, from Mrs. Hohenfels Volks and the princess, was an Altissar box camera from 1951.

Hohenfels Volks- Altissar Box camera, 1951
ISO 400, f/8, 1/25, 37mm
The Altissa box camera from 1951. This beauty is a real challenge, as it only has 4 settings! A great little camera with some great meaning!

Eho-Altissa started in Leipzig in 1892. Founded by Richard Knoll as a photographic shop and studio, they eventually started repairing and then manufacturing cameras. 1910 it moved to Dresden, where it was later bought by Berthold Altmann. In about 1951, Berthold Altmann decided to flee the oppressive and anti-business communist East Germany. In absentia, he was tried, convicted, and his company taken over by the communist run government. They were re-named and finally failed, with the machines being sent to Sarajevo to make imitation box cameras. This particular model of box camera, introduced in 1951, was the last while Altissa remained a free company. That scenario reminds me of Atlas Shrugged, in which all the creators and producers abandon their businesses and creations and disappear, leaving an increasingly corrupt, socialistic, and anti-business society to its own failings. Because of that story, and what I see happening today, this camera has meaning beyond photography to me. It’s functional, still works, and I’m taking photos with it! Once I get some developed, I’ll post what comes out here! This camera had 4 settings, f/8, f/16, B for bulb, and 1/25. The lens was fixed focal length and fixed focus. Using 120 film, it produces a negative that is 6cm by 6cm. Composing your image is through a window above the lens.

The next camera, from our friends, was a Zeiss Ikon 515/2. This little winner was introduced in 1937 as a lower priced Ikonta, with virtually all the features. The one I received has an 11cm lens, which runs from f/4.5 to f/32, and has shutter speeds from 1/25 to 1/125. Outside the shutter speed range is B, for bulb mode shots, and T, where you open the shutter with one click and close it with a second click. It uses standard 120 film, and produces a negative that is 6cm by 9cm. The viewfinder is a pair of metal tabs, and only serves for composition. Focusing is accomplished by adjusting the lens for the zone that should be sharpest, by distance. You can also hold it about waist high, and using the “brilliant glass,” frame up your shot. The brilliant glass is a tiny “periscope” like pair of lenses through which you compose your shot. It only allows for framing and composition. It has a PC Sync port for the flash, should you have one, and has a self-timer for setting it up and activating the shutter, allowing you to enter the scene should you desire.

Hohenfels Volks- Zeiss Ikon Nettar 515/2, Circa 1940
ISO 400, f/4.6, 1/25, 33mm
The Zeiss Ikon in all its glory. It takes time to set up your shot with this, which helps with getting your composition tidy.

Zeiss Ikon started in 1926 by the merger of several camera manufacturers and financial backing from Zeiss. Soon several other companies joined the Zeiss Ikon syndicate. Located in Dresden, with plants in Stuttgart and Berlin, Zeiss Ikon split into a West German and an East-German part after the war. Stuttgart became the headquarters after the division of Germany. Later they merged with Voigtländer, who made higher end cameras. In 1972, they stopped producing cameras. After the reunification of Germany, the East and West German divisions re-united into a single company.

The third classic I acquired was a Voigtländer Vitomatic II. This little beauty is a 35mm Rangefinder with a fixed focal length 50mm lens. The lens runs from f/2.8 to f/22, and 1 second to 1/300 second. It uses, like the Zeiss, a leaf shutter, and has no mirror. This feature allows flash to be synched up to the lens’s maximum shutter speed, in this case 1/300. The camera came with 2 filters, a UV, and a green for B&W. This allows for brighter greens, darker reds, and greater separation of greens in your monochrome images. Also included were a lens hood, leather case, and leather strap. Again, through PC sync, my flashes can be remoted off camera and fully controlled. Voigtländer, as you read above, was a very upscale camera maker. They started in Vienna in 1756 as an optics company. Later they introduced the world’s fastest lens at that time, in 1840, it was f/3.5. They were also the first to introduce the zoom lens and the first 35mm camera with a flash built into the camera.

Hohenfels Volks- Voigtlander Vitomatic II 1958
ISO 200, f/4.5, 1/20, 29mm
The Voigtlander Vitomatic II from 1958. In the upper left corner you can see the selenium meter in the camera. Used to help judge your exposure settings.

The cool thing about these cameras is that they show you that even though technology has improved, it hasn’t changed too much since the times represented. Using what we’ve discussed about exposure, composition, and other tips, you can get a great shot, even with old cameras. Don’t give up the learning just because digital means you don’t have to do it. I’ve used my 7D to meter the light for my desired aperture, and then set the old timers accordingly. Remember, being able to sync with your flash means you can do anything with these guys you can do with your digital. I hope this will inspire you to learn more manual applications, so you can put your old film stuff to use again. You’ll be surprised how much you can do with it!

Enjoy the rest of your day, and remember to cast your vote for next week’s theme. Get yours in to have a say! Don’t forget to get your pics posted at the Hohenfels Volks Facebook page. Of course, commenting on both Facebook and here is always appreciated, too!