Greetings, volks. Welcome to Hohenfels Volks, THE place for our place! I hope everyone managed to break away from the Olympics this weekend and get some great shots of our Hohenfels area.
Some beautiful cloudscapes this weekend started me thinking about how we meter and where we place our exposures. Of course, this led to a short post today about shooting bright scenes, or scenes with a large amount of brighter objects.
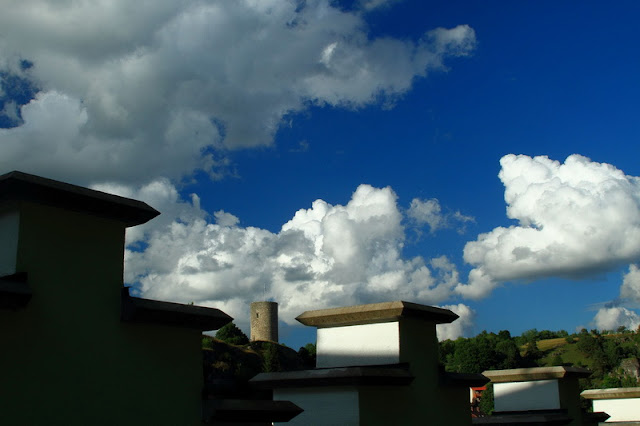
This shot was metered for the bottom of the clouds on the left. This left the bright clouds on the right a little overexposed. The values were brought down using the luminance curves in Canon's Digital Photo Pro to match my visualizing. By composing with the crenelations creating a stairstep effect and framing the castle tower, a brighter image could be created. It also brings the eye back to the tower and clouds, adding interest and depth.
The first thing we should be thinking about is our visualization. Where do we want to place our elements? For instance, if your scene contains fields, nice blue skies, and big fluffy clouds, perhaps metering for the fields will turn the sky white, and metering for the clouds will turn the fields black. Knowing where we want our elements in the range of values is the first step in putting our visualization to work.
After we’ve visually composed our image and noted the areas where significant detail must be maintained, we begin to meter. It’s generally best to make several readings from the different values within the scene, as this lets us know our range. In the above mentioned scene with the fields and clouds, we determine the sky itself to be the middle range. If we give this a +1 exposure, the sky is properly exposed, the fields are likely to be also, but the clouds will usually be overexposed. We can try to fix it on the computer, which is often difficult when the highlights are too far gone, or we can expose the clouds for +1 to +2 stops over their meter reading. This will darken the sky to a nice rich blue, and generally provide some slight underexposure in the field. The lowering of values throughout the scene also increases your overall saturation. It also gives you greater control over the chiaroscuro and play of light in your work.
Of course, none of this is useful to you if you don’t know what you want from your shot. Trying to capture the feeling you wish to share may require something else. Having this general idea, though, gives you another tool in the quest for the perfect shot.
Please feel free to share your photos on our Faceboook page. Everyone here would love the chance to see your work! Is there anything you’d like to see here? Do you have a question? Share your thoughts here or at the Hohenfels Volks Facebook page. Of course, commenting on both Facebook and here is always appreciated, too! Don't forget, we're on Google+, too!
Tuesday, July 31, 2012
Tuesday, July 17, 2012
Converting Your Image
Greetings, volks. Welcome to Hohenfels Volks, THE place for our place! I hope everyone is faring well as press into the week.
Today we’re going to go over a simple, but interesting way to convert your photo to black and white.
As we all know, sometimes color can change the way an image feels. It can take a moody photo and make it seem wrong or out of place. It can distract from the subject and take away from the beauty of the light. There are many reasons for shooting, or converting to, black and white. For this post, we’re going to do something that takes our shot to a better place.
This is the image we’re working on. I’m using Corel’s Paintshop Pro Photo X4, but the concept is the same in Photoshop, Lightroom, or Gimp.
ISO 6400, f/3.4, 1/15
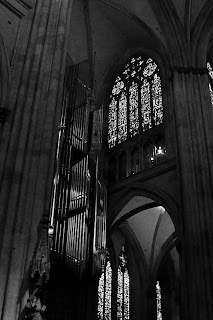
Looking into the Cathedral. The scene was beautiful, yet the image lacks some pop. We'll fix that!
I shot this photo inside the Dom in Regensburg. The beautiful Gothic architecture and art inside this cathedral seem best suited for black and white, and seem quite garish in color. The color temperature also becomes an issue when shooting at high ISOs, although I photographed this with the intent of making it black and white.
Once we’ve converted our image and opened it in our application of choice, we’re going to separate the image into red, green, and blue layers. There we’ll lighten and darken the different layers to our desired levels using curves and levels, and remove the noise. For this image, I slightly decreased the red and blue layers, while only dodging the green along the pipes of the organ. Once you’re content with your adjustments, combine the layers into a new image. For this shot, I slightly darkened the red layer, darkened the blue layer quite a bit, and dodged the pipes of the organ to increase the levels to offset the overall decrease in brightness. The finished combination now looks rather odd, and has some tinting/toning in it.
This is our image after splitting the color channels and recombining them. Notice the green tint on the pipes.
Our next step is to split the image again, this time to hue, saturation, and lightness layers. You can discard the hue and saturation layers, as we will now use the lightness layer for our final canvas. For this image, I adjusted the levels, performed a minor curves adjustment, and increased sharpness. I chose to over-sharpen, using a radius of 1.00, as I would be softening the noisy area under the arch, and applying an edge preserving smooth filter.
Almost finished, a few tweaks and we're there.
The finished result, while no masterpiece, is rewarding. It leaves you with a sense of place and scale that the color version tends to minimize. The chiaroscuro also seems quite well suited to the Gothic cathedral.
And here we go. I think this really brings out the mood and scale of the Dom. Its incredible Gothic architecture and art are magnificent.
Well, that’s one way you can do it. This is by no means the only way. You can also adjust color channels without splitting the image, and then desaturate the image. There are as many ways to convert your image as there are folks playing around to figure out what works best for their photo. One of the biggest keys, though, is color contrast and levels. Getting that where you want it can lead to some very nice results!
Enjoy the rest of your week.
Please feel free to share your photos on our Faceboook page. Everyone here would love the chance to see your work! Is there anything you’d like to see here? Do you have a question? Share your thoughts here or at the Hohenfels Volks Facebook page. Of course, commenting on both Facebook and here is always appreciated, too! Don't forget, we're on Google+, too!
Monday, July 16, 2012
Shooting the Spires
Greetings, volks. Welcome to Hohenfels Volks, THE place for our place! Welcome to another Monday. I hope your week is off to a great start.
Yesterday I posted the following photo, along with a message that I would post more about it tonight.
ISO 125, f/16, 1/125, 85mm.
This shot is straight from the camera. I applied some sharpening to retain detail during the resize, but no other edits were made. By placing the spires to the right, and using the clouds to create interest in otherwise negative space, mood is created and enhanced.
This photo was made in Regensburg on Saturday. Dachauplatz has a nice garage, located to be within a few minutes walk to just about anywhere in the old part of town. Parking on the roof and scanning the other roofs, this scene just begged to be photographed. The sky was stormy looking, and clouds appeared ominously ready to ruin our afternoon. I metered for the bright clouds and added about 2/3-stop exposure. This left the dark clouds about 1 and 1/3 stop below the meter reading on my 7D.
Composing to minimize intrusion of the garage and several other out of place structures, I made 2 shots about 1/3 stop apart. The mood of the image captured the light, sky, and feeling of that dreadful appearing scene.
After getting the image onto the computer, I decreased the exposure 1/2 stop, brought in the shadow levels to just right of the edge, the highlight levels a slight amount, set contrast to 3, and shadows to 2. I set the color temperature to 3500K, and adjusted the curves for maximum impact. Under the RGB tab, I reduced saturation to 0 and tweaked the curves again to create a balanced scene, resulting in the following B&W image. I applied maximum sharpening on both tabs, and felt pretty good about this image.
The rest of that afternoon was incredibly nice, the weather was on our side, we enjoyed some nice family time, and of course, some ice cream at Eis am Dom, in the Domplatz. Of course, no visit to Regensburg can be complete without a visit to Fotohaus Zacharias. I got to see their latest offerings in the old camera department and pick up some 120 film. They always have so much to choose from. I get lost dreaming about the cameras! I saw a couple old time large format cameras that were incredible. It’s definitely a place to spend a couple hours just looking!
Here's the finished version. It looks old fashioned in monochrome, and the mood is enhanced without color to distract. Converting images can often be a very simple process when you shoot for a mood.
Well, that about wraps it up for today, but I’ll be back with some more photos from the trip and techniques to get that B&W image you visualized!
Did you get any exciting images this weekend? If so, feel free to share them on our Faceboook page. Is there anything you’d like to see here? Do you have a question? Share your thoughts here or at the Hohenfels Volks Facebook page. Of course, commenting on both Facebook and here is always appreciated, too! Don't forget, we're on Google+, too!
Thursday, July 12, 2012
Continuing Yesterday
Greetings, volks. Welcome to Hohenfels Volks, THE place for our place! Another rainy day and pleasant evening pass through Hohenfels.
I had planned a post about converting color to black and white today, but didn’t get it done. Instead, we’re going to put up a couple more pointers on bringing your vision to life.
The first tip comes from a Facebook post by Clyde Butcher. Clyde is one of the greats. His photos of the Everglades and Florida in general, are incredible. Clyde’s working hard to preserve the Everglades. His tip of the day is to move forward a few feet when you’re shooting wide-angle lenses. This will bring your composition into your visualized range and remove some of the stray elements from the scene. This can be done through cropping, as mentioned in my edit on yesterday’s post, but combining the 2 can make your shots that much easier to edit. Take it from Clyde, he’s waist deep or higher in swamp water and shooting an 8x10 inch Deardorf view camera or an 12x20 Wisner. Check out his homepage, you’ll be amazed.
Our second tip comes from Strobist. The tips is simple, make an idea list. Taking it one step further, make a short term or single trip list, and make a long-term list. I won’t go into a lot of detail here, click the link and read the article. This site has some great stuff!
Our last tip comes from Photofocus. Try to look beyond the obvious. See what you don’t see right away. Try taking in the scene, closing your eyes, and visualizing the scene. You’ll notice more this way and may find your new subject. Again, I’m paraphrasing. Check out Scott’s page, you’ll be glad you did!
Well, that it for this evening. I hope to have the promised conversion post up Monday! I hope everyone has a great Friday, and an even better weekend! Enjoy and get your dream shot. Make sure to share it with us, too!
Do you have an image to share? We’d love to see it! Is there anything you’d like to see here? Do you have a question? Share your thoughts here or at the Hohenfels Volks Facebook page. Of course, commenting on both Facebook and here is always appreciated, too! Don't forget, we're on Google+, too!
Wednesday, July 11, 2012
Creative Exercising
Greetings, volks. Welcome to Hohenfels Volks, THE place for our place! Today, starting out gray and rainy, leaves Hohenfels in the clutches of a very pleasant evening!
Running into one of our friends in the grocery yesterday, I was asked about some exercises for creativity, and photographing some beautiful scenery. I thought a great subject for a post was seeded in that great question, so today, we’ll outline a couple simple ways to get the shot that has others wondering how you did it.
We’ve been posting about exercises to improve your composition, exposure, and creativity, so this is more of a review. It also reinforces how simple photographic techniques can create some winning shots.
The first thing to mention is never take the first shot. Most folks will see something, maybe a statue or other landmark, and take the easy shot. If you have to, take it just to get it out of your system, but then look for some other way to create your unique image. Walk around, check it out from every available and possible angle, view it through your lens, and try moving through a range of focal lengths. Once you’ve settled on the shot, make your image a reality. Remember, part of the creative shooting process is visualization! Edit- Take the first shot, if you pass it up, you may never get the same feeling you had at first. Thanks to Bodensee Bob for that cool tip!
Another simple exercise is to either shoot a prime lens, or use only 1 focal length on a zoom. Remember, doing this forces you to look for other ways to get the shot. You may have to move in closer to tighten up the scene, or move away to add some context. It’s a great way to change how you view the world around you!
The last 2 things are color and scale. First, on color, see how you can use it to create mood. Use your color to balance the mood and feeling, remember complimentary colors? Perhaps shooting a scene with a large red subject, shoot the subject at about 1/3 the frame and use green to fill out the other 2/3. You’ve given importance to the subject through size, and emphasized it by making the color stand out. This is also nice if you use 3 colors in a split complimentary scheme.
Using size and scale to emphasize a subject or restrain non-subject elements is a proven method of increasing interest in an image. It not only adds context, but also can be used creatively. Everyone shoots the trick photos of someone holding up the Leaning Tower, or holding someone in their hand. Moving beyond that, the ability to trick the eyes through scale can make for magic images. Using our first tip combined with this to make an image of a local landmark will stand out. Make the scale of the subject the subject. Instead of taking the Eiffel Tower, take a piece of it, and use the size as part of a composition to reference the actual tower. The same can be done with buildings, statues, and just about anything. Your photo will stand out as more than just another shot of the local scenery. Edit- Another tip from Bodensee Bob is to take the shot of the bigger piece and crop to your liking during editing. Great tip, thanks for sharing!
ISO 125, f/8, 1/125, 56mm, 125 C/ft2 metered at the wheat.
A field of grain in Hohenfels. Using f/8 and 56mm gave me a reasonably shallow DOF, allowing the hills to blur out, and only the foreground section to remain in focus. This combined with the color of the wheat against the color of the sky brings out the wheat as the subject. By shooting from below, I was able to fill the majority of the image with the front wheat, and allude to the size of the field with the shallow DOF. Taking a higher angle allowed more of the field to be seen, yet seemed to lack scale and impact in the final image.
Of course, your best tool for creative and magic images is your mind. A really great photo can convey your reaction and feelings to the scene. It doesn’t have to be a literal rendering; the values you decide to place in each area of exposure are part of your creative process. Making the clouds a little darker than reality or the trees a little brighter is part of spreading your reaction.
I hope this post has helped get your creative regions revving. I can’t wait to see you’re your shots. Tomorrow’s post will hopefully be ready tomorrow. I’m hoping to show a method for converting color images to monochrome in a way that recalls the images of the past. Be sure to check it out.
Do you have an image to share? We’d love to see it! Is there anything you’d like to see here? Do you have a question? Share your thoughts here or at the Hohenfels Volks Facebook page. Of course, commenting on both Facebook and here is always appreciated, too! Don't forget, we're on Google+, too!
Tuesday, July 3, 2012
Happy Independence Day
Greetings, volks. Welcome to Hohenfels Volks, THE place for our place! Another Tuesday draws to a close, as America prepares to celebrate Independence Day.
For those of us who love photography, this is a wonderful opportunity to give our camera a workout. Between picnics, barbecues, and fireworks, the range of photographic expression can be experienced to its fullest. From brightly lit fun in the sun, to dark skies lit only by the bursts of those lovely blossoms reminding us of our celebration, the conditions are ripe to get in your dream shot! I hope everyone will be out chasing theirs.
Independence Day is also a day to celebrate our forefathers and their fortitude. The undertaking before them was ripe with danger and the constant risk of losing their lives. Once committed to their course, they were branded traitors to the crown, and became outlaws. They knew that, but they also knew that to embrace the security of loyalty was the same as living a life dependant on the whim of the king. They knew that future generations would be enslaved to a monarchy that held them in contempt, as colonists enjoyed far less privileges than those at home.
Every time the crown needed money, the colonies were forced to pay huge taxes, without any say in the government, or any value provided in return. Banding together, they risked all they had, including their lives, for the noble idea that freedom is worth fighting for, for the cause of liberty, that people should have a say in their government, for the belief that governments exist to serve their constituents, and for the future.
While you’re out getting that shot, remember what we’re celebrating, it’ll add meaning to your shots and give some depth to your vision.
Of course, the 4th means fireworks, also. Here's a link to a quick post on fireworks. It's worth a short read. Make sure to watch the video, too!
God bless and Happy Independence Day!
Do you have an image to share? We’d love to see it! Is there anything you’d like to see here? Do you have a question? Share your thoughts here or at the Hohenfels Volks Facebook page. Of course, commenting on both Facebook and here is always appreciated, too! Don't forget, we're on Google+, too!
Subscribe to:
Posts (Atom)