Greetings, volks. Welcome to Hohenfels Volks, THE place for our place! Today is going to be short and sweet.
Today I was reading a post at DIY Photography about someone shooting a photo through their old MF viewfinder. They had a great pic, so I thought I’d try it out.
When I got home, I set up some of my old timers and started to work on getting an image I could live with. After a lot of trial and error, I ended up with the image you see below. I like the dark tones and the way the image in the viewfinder of this WWII era TLR pop out of the dark without the distraction of color or too much brightness.
ISO 800, f/4, 1/60, 47mm
A shot in the dark. Low light and a wide aperture draw your eye to the image on the TLR's ground glass.
I posted this image to show you how inspiration can be found anywhere. Keep your eyes and mind open, and BOOM, you get the thought that launches your photography session for at least a day or 2.
Here’s hoping that some great inspiration comes your way! It’ll help with this week’s theme! Get clicking and posting. Have a great week!
Don’t forget to post any of your images you’d like to see here at the Hohenfels Volks Facebook page. Of course, commenting on both Facebook and here is always appreciated, too!
Tuesday, January 31, 2012
Monday, January 30, 2012
Ride Along Shot- The Snowy Track
Greetings, volks. Welcome to Hohenfels Volks, THE place for our place! A sunny Monday greeted us with a chilling embrace. –15 is no way to start the day!
The winner of this week’s poll is The Fortress (For the Superman Fans). Sounds silly, doesn’t it? Well let’s outline it for you!
In the Superman movies, Superman had a place where he could go to be alone and recharge. It was called the Fortress of Solitude. You guessed it; our theme for the week is Solitude, with a kick. Your shots should show the positive aspects of solitude, not loneliness or a single thing, but something positive, in solitude. It could be someone enjoying a moment alone, or someone escaping the world, any image showing something positive about solitude. Maybe your image will even contain more than one person, but will show solitude in a positive light. Remember; get your images for last week in tonight! We’ll feature them here.
Now on to our Ride Along Shot.
ISO 400, f/16, 1/500, 50mm
Tracks in the Snow, winter has hit Hohenfels!
While out and about, I noticed an old road. After approaching the road, I saw some tire tracks, as well as tracks from animals. Rather than isolate one or the other, I chose to highlight the road and have both sets of tracks in the shot. While the tire tracks feature more strongly and lead the eye through the frame, seeing the signs of animals, possibly a fox and a rabbit, adds a little dimension to the shot.
Given the time of day, I had to use a fast shutter speed and tight aperture to keep the snow in the range of zone 6-7. That allowed some texture and detail in the snow, and allows darker trees and surrounds that provide nice depth and contrast.
Having the tire tracks curving up through the frame, the eye, as mentioned, is led through the image, but it also creates some tension that brings it to life. Where are the tracks leading? Who was here? Where’d they come from? Several questions can be raised that add that little bit of drama, while preserving the serenity of the scene. Keeping the tracks from being dead center allows them to become the leading line, and add some grace and sweep to the shot.
I thought black and white was the only way to go with this scene. Color distracts from the snow and tracks, and it makes the image somewhat less appealing. Keeping the classic monochrome allows the tones to wander from nearly blown highlights to some slightly clipped shadows and increases the range of the image. I shot this set to monochrome and added a red filter. Putting a red filter on black and white darkens blues and greens, while brightening reds and oranges. This can add some crispness to your shots. Shooting at f/16 allows for both limiting the light, and increasing the DOF.
Remember that when making your photo, visualizing it is the key to getting your image. Take the time to view the scene, absorb what you're seeing, and find the light that allows you to make that magic with your camera. Sometimes, you stumble upon something, sometimes, you have to take what you find and make it work. Ansel Adams said “Sometimes I arrive just when God's ready to have someone click the shutter.” This seems to have been one of those times for me! Find someplace and keep going back, get to know it during all kinds of conditions. You’ll start seeing all sorts of images you can make with it, and one day, you’ll find the one you’ve been seeing.
Well, that’s it for today. Keep seeing the light and your shots before you take them. Keep shooting, and remember this week’s theme on solitude. I hope your week is a great one!
Don’t forget to post any of your images you’d like to see here at the Hohenfels Volks Facebook page. Of course, commenting on both Facebook and here is always appreciated, too! Don't forget our new Hohenfels Volks Google+, too.
Friday, January 27, 2012
Rice? Sand? Nope, It's Film!
Greetings, volks. Welcome to Hohenfels Volks, THE place for our place! Well, so much for no snow here in Hohenfels.
As promised last night, here’s our post on editing your digital images for the film look. We’re going to be using GIMP with some script-fu plug-ins. Even though we’re assuming you use and have GIMP there are 2 things before we begin; 1- these concepts apply to Photoshop and Paint Shop as well, but may be called something else, and 2- choose an image you think would look good as a film shot, and let’s get ready.
ISO 125, f/4.5, 1/60, 53mm
We're going to start with this image. You can see the settings above. It was shot monochrome on the Canon EOS 7D, with a red filter applied and some very minor crushing of levels.
First, open GIMP. When it’s finished loading, select Open from the File menu. Navigate to your image and click Open. Once your image loads, right click on the layers palette and select Duplicate Layer. This is the layer we will be using as our background, which allows us to perform our edits without actually touching the pixels on the original image. Right click on your background and select Delete, leaving only the duplicate layer.
Right click on the duplicate layer and select New Layer. In the dialog box, Name your layer grain and select Transparency, then click OK. Make sure brush color is set for 50% gray, although darker shades will increase contrast and lighter shades will decrease it. I generally choose a darker shade to get an older style feel to the image, but the choice is up to your style and taste. Choose your Flood Fill tool, AKA Bucket Tool, and click inside the image area with your grain layer selected. You should see nothing but your selected color now. In the Mode drop down select Overlay. You can see your image now, although it will have some contrast changes.
Click on your filters menu. Select Noise, and then select Hurl. In the dialog box that appears, click the New Seed button, Then adjust your Randomization slide for about 10-15% and your repeat for 1-5. Then click OK. Your image now looks slightly contrasty and noisy, and quite unappealing. From the menu bar select Colors, then Hue-Saturation and decrease your lightness slightly and your saturation all the way down. Things are looking better, but it still needs some work. Go back to your filters menu and select Blur. From there, click Gaussian Blur. Set your radius to about 1-1.5 and click OK. The noise now looks like the grain on film, but we’re not done yet.
Next, select your background. Click on Script Fu in your menu and go to Sharpness. Select Sharper and finally click on High Pass Sharpen. Select your desired level of sharpening and click OK. You now have a new layer that is the sharpening level and looks like the lines from your original. Click the Eye Button to turn off your background.
Go back to the Colors menu and select Brightness-Contrast. I usually bring the brightness down, around 30 for most B&W photos, and increase the contrast to about 25, then click OK. Click the eye on your background layer again, turning it back on. You should be about right. The grain, contrast, and sharpness should be about what you’d expect from a general use film like ISO 200-400. If it’s too grainy, blur your noise layer in .25 pixel steps until it looks good. If your contrast is too high or low, adjust the brightness or transparency of your grain and sharpened layers.
And here's the final product. Although at this size, the grain isn't quite as prominent as it would be zoomed in, you can see the difference and the impact adding grain can have.
This is more film like, although not quite as contrasty as pushing a little more could make it. Higher contrast can make for some nice old time photos that bring people back in time.
It isn’t perfect, but with some practice, patience, and trial and error, you can get something that looks like real film. Photoshop has plug-ins to do, as does GIMP, but the results are more natural when done manually. One important thing to remember is to make sure you remove all saturation from your grain layer. If you don’t, you’ll end up with colored noise that has no resemblance to film grain.
I hope you're working on your shots for the theme! Have a great weekend and shoot that trophy photo you've always wanted!
Don’t forget to post any of your images you’d like to see here at the Hohenfels Volks Facebook page. Of course, commenting on both Facebook and here is always appreciated, too!
Wednesday, January 25, 2012
What's On the Menu 4
Greetings, volks. Welcome to Hohenfels Volks, THE place for our place! Well, so much for no snow here in Hohenfels.
Today were going to talk about the playback pages in your camera’s menu. Of course, this is part 4, so you can read the originals right here. Grab your manual and your camera and follow along as we get started.
Today we’ll cover the playback menu. There are 2 pages in this section; they’re the blue tabs. Starting with the first tab, we have:
Protect images- this setting can prevent images from being erased. If you format your card, they will be deleted. After entering playback menu, select protect images; scroll the images on your card and press set for the desired images. After you have protected the images you want protected, press menu.
Rotate- this setting allows you to rotate your image to the desired format, either landscape or portrait. You can do that here or in your set up for auto rotate. Select rotate, press set and scroll to the desired images. Pressing set will rotate the image to 90, then 270, then back to 0 degrees. When you finish rotating your images, press menu.
Erase images- this allows you to erase images. Press set. After that, you will need to choose all images, all images in folder, or select and erase images. Highlight select and erase images and press set. Scroll through your images and press set at each image when you have it visible. When selected for erasure, a check mark will appear on the image. Once you have finished selecting images, press the delete button, the one that looks like a trashcan, and the selected images will be deleted.
Print order- this selection allows you to make settings for Digital Print Ordering. You can change print type here- standard, index, or standard and index; you can also choose to have the date printed on the image. The last change you can make is to print the file number on the image. These settings are for all images when ordered through DPOF, and cannot be set per image.
Moving on to tab 2, we have the following:
Highlight alert- this selection is either enabled or disabled. When enabled, areas that are overexposed will blink between black and white. You can enter a negative amount in your exposure compensation setting and shoot again, or leave it as is. This is what some folks call the blinkies and means blown highlights. Blown highlights will lose detail, as they extend into zone 9 or better.
AF point disp.- this is another enabled or disabled choice. Setting it to enabled allows the auto focus point or points that achieve focus to lighten, indicating where in the image your focus is before shooting.
Histogram- this allows you to choose between brightness or RGB as your main histogram display when you select the info button. We’ll be covering histograms in another post, so I’m not going to cover it too much here.
Image jump- this allows you to choose your method of scrolling through images during playback. Your options are to scroll 1 at a time, 10 at a time, 100 at a time, by date, by folder on your card, or by movies or stills. I find 1 or date to be the most useful.
Next time we cover the menu, we’ll be going into Set up 1, the yellow tabs. This can be a fun area to work with. It allows some level of customization of your camera and how it interacts with you.
I hope this little article has been of help. Is everyone working on their shots for the theme? Remember, it’s all about repeating patterns this week. I hope we’ll see something impressive, and everyone out there doing something. I’m shooting black and white film now, hoping to see something good this weekend when I get some developed. I hope to have something to post come Monday! Enjoy the rest of your week and have fun shooting!
Don’t forget to post any of your images you’d like to see here at the Hohenfels Volks Facebook page. Of course, commenting on both Facebook and here is always appreciated, too!
Monday, January 23, 2012
A New Theme and Kodak
Greetings, volks. Welcome to Hohenfels Volks, THE place for our place!
Everyone knows by now that Kodak filed for Chapter 11 bankruptcy. Everyone’s analyzed it and declared the giant slain. Based in Rochester, NY since 1880 the leading pioneer in photography seems to be on its last legs.
I grew up with Kodak, as did most of us. Kodak was the first film I shot on, and the first digital camera I had. George Eastman invented roll film and made photography accessible as a hobby! Their Wratten gel filters were a mainstay of photographers for the better part of a century. It’s sad to think of losing one of our greatest champions.
The fact is, even in bankruptcy, Kodak will continue to operate. They apparently have a deal with Citigroup that gives them a little over a year to reorganize their business. This means our oldest photographic friend will be around for some time more.
I have some thoughts on how things might change, while keeping them alive. They were one of the first to charge into digital, and were pretty much a leader in consumer and professional film. If they divest themselves of non-photography ventures and concentrate on creating digital systems that other companies can use in their cameras and gear, while pushing the traditional film and paper side, things can turn around. Another area they probably need to keep going is in the x-ray side. I remember just about every x-ray for broken bones, and other things, involved Kodak x-ray film. Given the push in healthcare, a profit must be sustainable for that part of the company.
It’s sad to see a long time friend to photographers around the world stumble. The thought that we may lose a bastion of photographic innovation and quality is saddening at best. The thought of some minor third world company acquiring the rights to their innovations, and making them without Kodak’s quality and consistency is frightening.
You might want to buy a roll of their film, who knows if they can pull it off. That little yellow box may stir some memories in the future of your early days behind the lens.
This is just my 2 cents, but I’d love to hear what you think. Drop us a note with your thoughts.
On to other business. Given the 3-way tie, with 3 votes being split among 3 themes for the week, I’m going to choose the theme. I’ve decided to go with Say Again...(Do I Have to Repeat Everything?)
It’s an easy theme, kind of… Seriously, though, it shouldn’t be too difficult to get something for this theme. The subject has to be repeating patterns. Colors, lines, shadow, light; patterns that repeat can be a great subject for your images. We’re not looking for the easy ones, for instance, a checkerboard laid out on your coffee table. But you shouldn’t have to go too far a-field to find something scintillating and repetitive. Just no paisley, it’s not 1970!
Here’s hoping everyone gets their shot and has a grand week!
Don’t forget to post any of your images you’d like to see here at the Hohenfels Volks Facebook page. Of course, commenting on both Facebook and here is always appreciated, too!
Friday, January 20, 2012
Nostalgia or Something Else?
Greetings, volks. Welcome to Hohenfels Volks, THE place for our place! Over the last 2 or 3 posts, we’ve discussed some stuff that seems outdated and unnecessary.
Today’s digital cameras do everything for us. They meter, set the shutter speed, set the aperture, set the ISO, focus, and tell us when to push the button. Using all the bells and whistles in your camera makes taking photos easy, right? All the hard parts are a thing of the past, isn’t that so? Why do it, when the camera can?
There are a couple answers. The first one is probably the simplest, although they both go together. ALL photography, notice the emphasis, is built on light. Whether you shoot your shot on an old view camera, making a daguerreotype or you shoot digital, your images are ALWAYS built the same. Light strikes a surface that is sensitive to it, and there is a reaction creating something. To have an image you need the light to have form and varying intensities. If you’re using color film or a digital camera, the color information is recorded as well. That is what all photography is. Because those who shot before us went through the pains of creating the systems we have today and discovering the rules and methods, we have a way to be on the same sheet of music. By knowing these methods, formulae, and standards, we can create great images.
If you’re using a digital camera or a film camera, ISO 100 is the same. When shooting both types with identical lenses and lighting, f/16 will allow the same amount of light for film or digital. 1/125 second on a film camera takes the same amount of time as 1/125 second on a digital. Time didn’t change for digital photography. Neither did light, nor the laws of physics change. DOF is still determined the same way it was when Hurrell shot Hollywood’s most glamorous. Exposure is still figured out the same way it was when Ansel Adams made his images. Lighting is still used by us; the same way Karsh used it to capture royalty and great figures of his day. The theory hasn’t changed because the camera can do it, the camera can do it because these things don’t change.
The second answer is only slightly more complicated. Throughout the history of photography, those who picked up the camera strive to learn more, to prefect their photography, and to share their vision. This knowledge gives us the tools to do just that, as it did for those who came before us. See and shooters don’t care, but those who appreciate a good photo or enjoy making something great do care. The more control we take away from the camera, the more control over our vision we have. You wouldn’t let your stove cook your dinner, would you? So why let your camera take a picture, when you can make one. Remember, Ansel Adams said, “You don't take a photograph, you make it.”
Start using the tools available, visualize your image, and when the 2 come together, you can make something so much more than you thought. Remember to work on making your images for this week’s theme, and don’t forget to vote for next week. While you’re at it, check out the great new images in Your Works.
Have a great weekend, everyone, and try to keep warm with the cold weather coming in! Don’t forget to post any of your images you’d like to see here at the Hohenfels Volks Facebook page. Of course, commenting on both Facebook and here is always appreciated, too!
Thursday, January 19, 2012
Tech Talk: Hyperfocal Distance
Greetings, volks. Welcome to Hohenfels Volks, THE place for our place! Today we’re going to learn about hyperfocal distance.
What is hyperfocal distance? It’s the distance you focus your lens for to have a maximum DOF. When you focus at this distance, everything from about half that distance to infinity is in acceptably sharp focus. To accomplish this and to define acceptably sharp focus you need to know your circle of confusion (COC.) COC is the largest size that a point or spot can be without appearing out of focus. For an APS-C size sensor, which most of us have, that number is .019. The smaller your COC, the greater your sharpness. Although, for different sensors and films that number is different. For 6cmx9cm film, it’s generally accepted to be .07, and for 35mm or full frame sensors, it’s about .03.
Things get mathematical here, so you may want your calculator. You can calculate the hyperfocal distance for a given lens and aperture using this method. Take the focal length of your lens and square it to get variable a, next take your aperture or f/stop and multiply it by the COC to get variable b. Divide a by b, and there you have your hyperfocal distance. Here’s how it looks in mathematical terms
H =F²/(f x C)
In the equation above
H = hyperfocal distance
F = focal length
f = f/stop
C = COC
As an example, your lens is 50mm, you wish to focus on something 10 meters away, use f/11, and you’re using an APS-C sensor. 50x50/(11x.019). This gives us 2500/(11x.019) or 2500/.209, and finally approximately 11.9 meters. If you focus at infinity on your lens, your DOF will run from 11.9 meters to infinity. If you focus at 11.9 meters, your DOF will run about 6 meters to infinity. By focusing at your hyperfocal distance, you can maximize your DOF in an image and get that winning shot. By using this calculation on a variety of focal lengths and f/stops, you can see why smaller apertures (bigger f-numbers) give you greater DOF.
There are 2 other ways to figure it out. Both are much easier, if you are using a higher end lens with a scale on it, you set the infinity symbol on your lens to line up on your f/stop at the far scale, then everything from the matching f/stop on the near scale to infinity will be acceptably sharp. That allows for Maximum DOF and zone focusing. The other easier way is to look it online. There are so many sites that you can find on Google just searching for hyperfocal distance, that you’ll never be at a loss. I prefer using DOF Master, as they have some great stuff there and it’s too easy. You just enter your info and away you go!
I hope this gives you some idea of how to use your focus for maximum DOF and how to get that extra bit of oomph to make your image stand out. Next time we’ll be calculating DOF, more math so keep that calculator handy!
Don’t forget to post any of your images you’d like to see here at the Hohenfels Volks Facebook page. Of course, commenting on both Facebook and here is always appreciated, too!
Wednesday, January 18, 2012
Tools of the Trade: Flash Part II
Greetings, volks. Welcome to Hohenfels Volks, THE place for our place! Today’s post is going to deal with using your flash in manual mode.
For some Volks, manual mode and photography don’t seem to go together. They leave everything on automatic, letting the camera tell them when to click the shutter, which seems a bit too much like serving the camera, not the camera serving us. By now, most of you have been shooting manual for a while. Chances are, though, that your flash is doing the majority of your work when you use it. I hope that this post will change that some!
First, we’re going to learn some terms and concepts. Flashes are rated by something called the GN, or Guide Number. It’s a measure of a flash's output. You have to know this number. The YN-560 that I have is rated by the manufacturer for 58 meters at 105mm, ISO 100. The actual rating is more like 35 meters at 35mm, ISO 100, which should give us about 50-55 meters at 105mm. I haven’t formally tested it in a controlled manner, but that seems about right. What that means is shooting at ISO 100, 105mm, and with the flash at full power, my max range for the flash is about 58 meters. At that distance, the light has fallen drastically in intensity, but spread out in coverage. The next thing we need to understand is aperture, or the size of the opening in our lens. A larger aperture means more light and conversely a smaller aperture means less. Aperture is measured as f/stop, a ratio of your aperture’s diameter to the level of light it allows. That’s oversimplified, but you get the idea. You already know about aperture, but will need to understand it for flash work. The last thing we’re going to bring up is distance between the flash and the subject. These 3 things are how you determine a manual flash’s power and set your exposure correctly. A flashes GN is the rating assigned to it by the manufacturer, so you have to be careful to read the specs before buying one. Some makers will call their flash GN58, but if you look at the tiny print, it’s at ISO 200 or even 400. That makes it more like a GN20 at ISO 100. Also, make sure the units your GN is listed in, feet or meters, or both are consistent throughout your calculations. Also remember that we're dealing with light, so sometimes it doesn't seem to make sense due the inverse square law. That's why we use GN!
The 3 things listed above are what you need to know to expose properly for manual flash. We’re going to start this part by giving you the equations to use, then giving some examples.
The first calculation is to determine your GN. First, set your flash to manual mode, full power, and if it has it, full zoom. Then place your flash a measured distance to your subject, say 5 meters. Then shoot a series of shots at successive f/stops. Note the aperture that gives you a proper exposure. For this we’re going to say f/8. Now multiply the distance by the f/stop. For this we’re going to multiply 5 meters by f/8, which means 5x8=40, or a GN of 40 at ISO 100, full power, max zoom, or about 20 at half power.
The next calculation is to determine your f/stop for that GN. If you have a GN 20 at ISO 100 flash, what f/stop do you use for 4.5 meters? The calculation for that is GN divided by distance. For GN 20, that would be 20/4.5=4.5 or f/4.5. Set up the above flash, GN 40 at half power, 4.5 meters and shoot using f/4.5, you should be almost dead on every time!
Last, we have figuring out your distance for a GN with a desired aperture. That is calculated by dividing GN/f/stop. As above, GN 20 at half power, we’ll say f/8. To get that we divide 20 by 8, or 20/8= 2.5, or 2.5 meters.
Here are the calculations listed:
Your GN=f/stop x distance to subject
F/stop= GN/distance to subject
Distance to subject= GN/f/stop
Here are some things to note. The distance is ALWAYS the distance from the flash head to the subject, not the camera to subject or flash to camera. Light modifiers like a Sto-Fen or umbrella lower your flash power by about 1-2.5 stops. Measure with them in place for more accurate readings. The same applies to bounce flash, count your distance as being from the flash to the reflector + the reflector to the subject, or adjust your exposure to compensate. A few times doing this with your calculator and flash manual will give you a great starting point for your flash shots, then before you know it, you’ll be nailing them every time!
Now that you know all that, use your camera's built in spot metering mode, go to AV or aperture priority, set your required f/stop, and meter for the rest of the scene. That shutter speed will allow you to balance your flash with the ambient light to create a nearly perfect exposure. Tinker with it, and you'll make that magic of having your image match your vision that much easier!
Working with your flash off camera in slave mode can also be a trial. The secret to that is point your optical sensor at the camera and rotate your flash head toward the subject. The sensor detects the flash from your camera and triggers the flash. It also has to be where it can see the flash from on camera. For some flashes, this will trigger it before it should go. The Yongnuo flashes have a mode called S1 that trips the flash at the very first blip of flash, and S2 that only triggers when the actual flash goes for the shot. Use S2 to ignore the red eye and pre-flashes your camera sends out. Also, turn of red eye reduction or pre-flash. Having your flash off camera will help prevent this phenomenon from occurring. Of course, you can also buy a wireless RF trigger and receiver from anywhere online for about $30 and avoid slave mode altogether.
A great resource for all things flash related is Strobist. We have a link to them in our links and they can really up your knowledge levels on flash. They put out some good tutorials and lessons in Lighting 101. Give them a read!
You’re probably bored after all that math and calculating. Get out there and shoot something, it’ll wake you back up! While you’re out shooting, don’t forget the milk, I mean your shots for this week’s theme! Complimentary colors with a contrasting subject. Should be something great in there and I can’t wait to see your work!
Don’t forget to post any of your images you’d like to see here at the Hohenfels Volks Facebook page. Of course, commenting on both Facebook and here is always appreciated, too!
Tuesday, January 17, 2012
Tech Talk: Candles and Calculations
Greetings, volks. Welcome to Hohenfels Volks, THE place for our place!
Today we’re going to go a little bit into what makes up your exposure numbers and how metering works. It sounds familiar, but we’ll be dealing with more math and other advanced parts of your exposure settings.
Let’s start with your ISO. Back in the old days there were lots of ways to label film sensitivity. There was by DIN number, ASA, Weston, and EV, as well as various others fallen by the wayside. Today we use ISO, which is for the most part ASA. Some folks use DIN, that’s why film still carries the DIN number. Under today’s scheme, 3 degrees DIN are equal to 1 full stop. ISO 100/21 has half the sensitivity of ISO 200/24. The Weston number, another popular standard used to gauge a film’s sensitivity, referencing Weston’s meters, is usually .8 times the ISO. Since we’re shooting today, we’ll use ISO, but there may be times we reference others in our future.
Moving on we come to light and light levels. Without the fancy gadgets we have to meter our exposure built into cameras, folks used external meters. Ansel Adams broke it down in his book The Negative. Meters used to measure light in candles, or candela, per square foot. That was the basis for your shutter speed. This will become important in a couple paragraphs.
Next we have aperture, the size of the opening through which light enters the camera. Each ISO had its native f/stop. To find the native stop for any ISO take its square root. For ISO 100 the native f/stop is f/10, for ISO 125 it’s 11, for 200 it’s about 14, and for 400 the native f/stop is 20. Apertures are measured in f/stop, which is a ratio based on the square root of 2, as each step is doubling or halving the light.
The last part is shutter speed. For a native aperture, the shutter speed should be 1/ the light measured in candles per square foot, or c/ft². If you read 125 c/ft², your shutter speed for a native aperture should be 1/125 second. It sounds easy doesn’t it? Well, don’t give up hope. Things are about to get tricky.
Since most light meters today don’t measure in c/ft², finding that speed may be difficult. Automation has taken away many of the tools used by those who came before us in every arena. You can buy a cheap ambient light meter and use it for your photography. The readings are usually in LUX. LUX can be converted, however, by dividing by 10.764. Just round to 10, and there you have it. 1000 LUX is 100 c/ft². At your native aperture, shoot 1/100 for zone 5 placement of what you just read and you’re cooking with gas. Using you digital camera’s metering, set your aperture to the ISO’s native aperture in AV mode. Then seeing the required shutter speed tells you there are that many c/ft² or 10 times that much in LUX.
It seems like talking about this doesn’t do much for you shooting digital, but knowing it will help you improve your light reading skill without your camera’s meter and make getting your exposure correct a lot easier. Plus, if you decide to go old school and shoot with an old camera or use an old meter it will help you to figure that stuff out. It also comes in handy when working with the zone system. Reading 1/100 at your native aperture, you have the knowledge of how to combine your speeds and apertures to get the right exposure for 100 c/ft². You also have the knowledge that you can move your image up or down a zone without playing guessing games as much. It’s quicker and easier to figure out once you try it a few times. A good example is on a bright, sunny, semi-cloudless day. The sky reads about 300 c/ft² when read usually. So for ISO 125 at f/11 you should be set for 1/300 as a good starting point. Then adjusting your speed inverse to any desired aperture changes, and you should have a decent exposure with the sky at zone 5. You can adjust just your aperture or speed to move the sky and other subjects into different zones and create what you visualized that way.
Ansel Adams described it as the exposure formula. He taught that zone 5 was 1/c/ft² at a film’s key aperture. It still holds true. Some minor adjustments may need to be made, but you should be almost dead on. It helps to spot meter for your highlights and shadows to get the best range in your image, but for quick shooting, try it out! I think you’ll see something very cool!
The new theme for this week is “Flattery (Not everything complimentary is flattery!)” You may have already guessed that this has to do with colors, right? Your shots should be composed with complimentary colors as a major element of your composition. Another aspect of your image must consist of contrast in your subject, as well as the contrasting complimentary colors. Perhaps age and youth, or hot and cold. I hope that you get the creative juices flowing for this one and get working on it soon! I also hope that we will see everyone out there submitting this time!
Don’t forget to post any of your images you’d like to see here at the Hohenfels Volks Facebook page. Of course, commenting on both Facebook and here is always appreciated, too!
Labels:
ansel adams,
aperture,
camera,
composition,
equipment,
exposure,
exposure formula,
exposure triangle,
Hohenfels,
lenses,
light,
meter,
photography,
seeing,
shutter speed,
the negative,
visualization
Friday, January 13, 2012
Quick Touch Ups
Greetings, volks. Welcome to Hohenfels Volks, THE place for our place! Time for a quick post.
With the announcement and release of Lightroom 4 Beta, I thought we’d have a quick hit on image editing. We’ll be short; there won’t be anything in depth here.
Let’s start out by saying shooting RAW is the best way to go. It gives you more control and latitude in your exposure and color. The best way to edit is in head, then in camera. What does that mean? It means get it right before your expose your image. Make sure your settings are correct for your exposure and focus. It means less time fixing and more time shooting. I know we all love shooting more than we love fixing our images.
Once the image is on the computer, you have to convert from RAW to JPEG. I use Canon’s DPP. It was bundled with my camera, and I’ve updated it whenever a new version is available. Once your Raw is in your converter, make any exposure corrections you feel are needed. Then adjust your contrast, followed by minor levels adjustments.
To adjust levels, drag in the top, bottom, and sides of your histogram to get the contrast and levels right. I usually do a little crushing of the highlights and shadows, nothing more. This pops your contrast without affecting the entire image as much as the contrast adjustment. By clipping your shadows to black a little and your highlights slightly less, you create some pop to a properly exposed photo.
A touch (+1) to saturation, then finish with sharpening to make the image crisp, and that’s it. For most images, this is all you need! Convert your image and save it, and you’re done. Remember to make your resolution match your intention.
That’s all I’m going to cover for editing today. Everyone has there own vision and style. I just wanted to get the idea of getting it right in camera across, and to get folks thinking about their own editing styles.
Editing is a lot more than this, though. The amount of tools available in applications ranging from Corel’s Paintshop Pro and Adobe’s Lightroom is enough to create magic with your images. Maybe we’ll touch on that editing in another post, how we can fix minor issues and make our work that much better!
Vote now for the next theme, get your pics going, and submit them to our Facebook page. Let’s try to get more Volks participating, the more we have going on, the more opportunities we’ll have to make our photos better, and to share that love we all have of photography with others like us! Have a great weekend and enjoy the shooting!
Don’t forget to post any of your images you’d like to see here at the Hohenfels Volks Facebook page. Of course, commenting on both Facebook and here is always appreciated, too!
Wednesday, January 11, 2012
Around Hohenfels: A Bite of Munich
Welcome back to Hohenfels Volks, THE place for our place! Time for another trip!
Get your camera and train tickets, we’re heading out to see part of Munich.
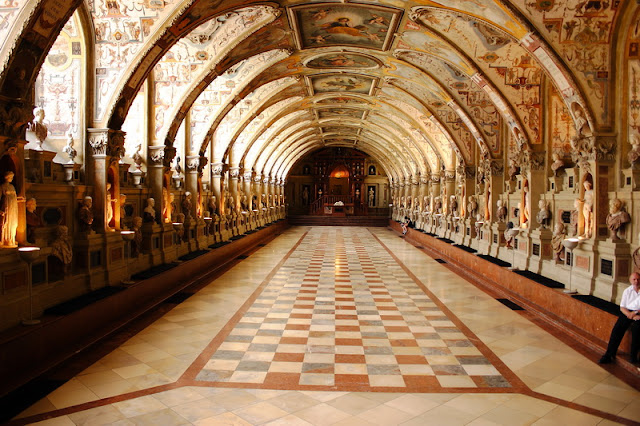
Munich, like a formal meal, is large, and should be taken in single bites, rather than gulped down in a hurry. Therefore, we’re going to cover it that way, with today’s trip being to the Residenz. We’ll have a little time to hit the Hofbrauhaus, and wander through the gardens, but we’re going to get some exposure in the palace itself more than anything else.
ISO 100, f/4, 1/5
An Angel of the Tribulation, from the Antiquarium in Munich
From the Bahnhof, take the u-bahn to Odeonsplatz. From there, it’s a short walk through to the Residenz. Once you’re there, there are some nice cafés and places to grab a quick brunch and relax before beginning a tour through the palace.
Inside, you’ll be transported to another time. Wandering through this magnificent palace gives you a taste of how life was lived and how the royalty of the era enjoyed the excesses that were their privilege.
In the late 1300’s, the first palace or structure was built here. Later a new fortress was built here for the Wittlesbach dukes. As time progressed through several centuries, the site and building grew outward and incorporated tastes and styles of the time, including the Gothic base, and Renaissance, Baroque, and Rococo art and architecture.
The Antiquarium was built in 1571. It was basically a home for the antique collection and is the largest Renaissance hall north of the Alps. The court chapel and imperial hall, as well as several others, are common examples of the early 17th century. The baroque papal rooms and the ancestral gallery serve as good examples of the Rococo style.
ISO 100, f/3.5, 1/10
The Antiquarium in Munich Residenz. You can even sit here and read.
After the tour of the palace itself, there is the treasury. For anyone who loves artistic presentations and historical displays, this is the place! They have the crown of the Empress Cunigunde, as well as a reliquary of the cross, which belonged to Emperor Henry II. They also have a gold crown from 1370 that is the oldest surviving crown of England and the famous ruby decorated statue of St George slaying the dragon.
ISO 100, f/4.5, 1/8
The crown of the English Queen, from around 1370. It appears to be the dowry from the King of England on the marriage of his daughter.
The Hofgarten outside is incredible, especially in early summer. The gazebos and structures combine with walkways and flowers to make for a memorable sight. Bring a blanket and have a picnic. It’s a great way to spend the afternoon! Don’t forget to tip the buskers serenading you with their accordions and violins.
A couple of blocks away is the Hofbrauhaus, where you can get dinner and a nice beer before you catch the train home. Back to Odeonsplatz, then the bahnhof and we’re again on our way. Safely back home, we can view the magnificent shots we took and share them with those who weren’t fortunate enough to join our journey!
Throughout the tours are great opportunities for your camera to bring home memories, but don’t use your flash in the treasury or palace, it’s not allowed and you will be kicked out! Make sure to shoot manual, as you’re likely to get more winners that way.
Remember to get your vote in and to get started on your pics for this week’s theme, blurring the lines. A tip for this theme, when you’re creating your image, use blur to emphasize the way we as a society blur the lines in our day-to-day lives. It can create a real enhancement to your scene if used right!
Don’t forget to post any of your images you’d like to see here at the Hohenfels Volks Facebook page and to get your vote in for next week’s theme. Of course, commenting on both Facebook and here is always appreciated, too!
Labels:
around hohenfels,
baroque,
Gothic,
Hohenfels,
photography,
Renaissance,
rococo,
sites,
tourism,
trips
Tuesday, January 10, 2012
Shoot Digital
Welcome back to Hohenfels Volks, THE place for our place! I trust everyone enjoyed the wonderful weather today!
Today let’s talk about thinking. So often, we’re thinking about how to get that great image onto our computer. We’re all about digits. Digital is the way of the future and analog is dead, right? Actually, that’s not true.
What? Aren’t we using digital cameras, editing on our computers, and sharing our work online? That’s digital, duh! Actually that’s true, but have we thought about how light works? Have thought about how we work? Have we thought about how our camera works? Or how our flash works?
Light travels in waves. It’s an analog signal. Those variations in intensity are caused by the signal’s amplitude. It’s a little more involved when we talk about our cameras. When we shoot fast shutter speeds, the shutter is never fully opened; a slit travels across your sensor exposing it in slices. That’s why we have sync speeds for our flash. Digital means it’s either opened or closed; it can’t be both. That’s why focal plane, diaphragm shutters give faster sync speeds, because they are opened, exposing your whole medium for the duration of the shot, although they are in the process of opening, there is still the entire sensor or film exposed.
When you get right down to it, although the medium used to capture light is digital, camera basics are pretty the same now as they were 100 years ago. A medium is placed in a light proof space, an opening is created, then shut, the medium is processed, and a photo is born. The only differences are automation, medium, and sensitivity. We have more automation in the process of creating our image, we shoot to a digital sensor that requires no chemicals or wait, and our sensors can reach speeds unheard of in past decades. Does that mean we no longer need to think through our processes of image creation? No it doesn’t, not now, and probably never.
When shooting film, people took a slower pace in creating a shot. An almost crafting of a shot. Taking the time to see the light, feel the light, and imagine the scene displayed meant fewer pictures, but more works that were pleasing. It’s the same in most pursuits like golf, drawing, or woodworking.
I’m encouraging everyone to slow down some. Take your time crafting your shot. My friend, Mark, used a good expression when he said we used to shoot film like snipers, taking our time, and now we’re machine-gunning everything we see. For even the next few days, make each shot count, and you’ll make each shot a winner. It’s time to slow down, time to “think analog, shoot digital.” You will see an improvement, and others will notice, as well.
Don’t forget our theme this week, blurring the lines. Here’s wishing a great week, and some killer shots!
Don’t forget to post any of your images you’d like to see here at the Hohenfels Volks Facebook page and to get your vote in for next week’s theme. Of course, commenting on both Facebook and here is always appreciated, too!
Monday, January 9, 2012
Blurry Lines...
Welcome back to Hohenfels Volks, THE place for our place! Another rainy and cold Hohenfels Monday brings shivering into the new week and a new theme.
Our new theme for the week is “Blurring the Lines (Not in Polite Society!).” It won with 2 votes. So onward we ride toward a description.
For centuries, societies have been stratified. You had the upper class, the middle class, the untouchables, the eta, and numerous ways to keep societies organized. Today is not much different. Only instead of class per se, we have things like employer and employee, service persons and the served, leaders and followers. The list is limited only by your vision.
The purpose of this week’s theme is to show interactions between the “classes” or groups. It could be a waiter serving a meal, a shoeshine in progress, or simply a store clerk ringing up a customer. It could be something that shows the transition from one level to another, previously unattainable. Create an image perhaps showing a graduation or promotion, or someone preparing to begin their day at work. We all transition several times a day from server to served, from leader to follower, etc.
No longer are we limited to one layer of society and that, in itself, could be an image. Hence, we have the blurring the lines part. Here’s the kicker, sharpest focus or concentration should be on the interaction or transition, not the people involved. This highlight could come from high contrast lighting or sharpness, perhaps from compositional elements like color, or even a shallow DOF. Explain the contrast without words, using just your image. Remember, there are also many societies within our society. Gender roles, marital roles, workplace roles, the options are as limitless as your ability to see how the roles and layers within a society can be crossed or transitioned.
Don’t forget to get your images for last week’s theme in tonight. I didn’t do one, as I was too busy trying out some old cameras and trying out my skills. I won’t have any results until all the film is developed next week! I’ll be shooting something this week for the theme, though; as I’m back on schedule and hopefully time will be slightly more available.
Don’t forget to post any of your images you’d like to see here at the Hohenfels Volks Facebook page and to get your vote in for next week’s theme. Of course, commenting on both Facebook and here is always appreciated, too!
Saturday, January 7, 2012
Quotes and Inspiration
Welcome back to Hohenfels Volks, THE place for our place! Given the lateness of the hour, I’ll dispense with the long post I had planned.
I’ll leave you here with some thoughts, quotes from some of the masters of photography. Some food for photographic thought!
Above all, I craved to seize the whole essence, in the confines of one single photograph, of some situation that was in the process of unrolling itself before my eyes.
Henri Cartier-Bresson
To photograph truthfully and effectively is to see beneath the surfaces and record the qualities of nature and humanity that live or are latent in all things.
Ansel Adams
It’s all so simple; no one believes me … you strike a pose, then you light it. Then you clown around and get some action in the expressions. Then, you shoot.
George Hurrell
Look and think before opening the shutter. The heart and mind are the true lens of the camera.
Yousuf Karsh
Here’s one taken from Scott Kelby’s blog. It’s from David Ziser’s guest post from June 18, 2008, but it sums up our journey so nicely.
We can’t be an “I know it all” photographer. We need to be an “I want to know it all” photographer.
David Ziser
By taking that attitude we provide ourselves with that extra drive to move beyond our self imposed limitations. Show your work and seek feedback, learn from it, and feel good about what you’ve accomplished. It makes learning something new easier and more fun. Most of us are into photography as a hobby or passion, because we enjoy it. Wanting to know it all encourages learning and helps to make the photography we love, so much more exciting. Can you remember the first time you got that shot? The one that had it all, correct exposure, sharp focus, and great colors? Wanting to know more makes every step of your journey an opportunity to enjoy that feeling.
Don't forget to visit David Ziser and Scott Kelby by clicking their links on the right! You'll appreciate their pics and learn something, too!
I hope you have a great weekend, and keep enjoying your photos! Remember to cast your vote for next week’s theme. The deadline for voting is tomorrow night, and for submissions is Monday night. Don’t forget to get your pics posted at the Hohenfels Volks Facebook page. Of course, commenting on both Facebook and here is always appreciated, too!
Thursday, January 5, 2012
What's On the Menu 3
Welcome back to Hohenfels Volks, THE place for our place! Given the weather in Hohenfels, we’re going to stay and learn some more about our cameras.
Today we're going back into the camera menu. The first 2 parts can be found here and here), so get ready to follow along in your manual and with your camera.
Today we’ll cover 2 tabs, one has 2 settings, and the other only has 6. Most of them I don’t worry too much about, as I’ve set mine up the way that works for me. You may want to try them and see what you do and don’t like, as with anything we’ve done so far.
Starting at Shooting Tab 3, we have 2 settings; the first is Dust Delete Data. This allows you to take a shot, and using the spots caused by any dust, append that data to your images. Canon’s DPP program will automatically delete the dust spots, based on the data obtained. To use this feature, take a white sheet of paper, set your lens to 50mm or longer, and your focus to infinity. When you select ok, then set, the sensor is cleaned, then you will need to fill the frame with the solid white sheet of paper, and shoot a shot from about 1 foot away. When the process is complete, all future shots will have that data appended and have those spots noted corrected in DPP.
The second setting on this tab is One-Touch RAW+JPEG. This tab allows you to shoot a RAW image if you’re only shooting JPG, or a JPG image if you’re only shooting RAW. This allows to you to get 2 different copies of the same image. Since I only shoot RAW, I never use this. Shooting RAW+JPEG takes more space and allows fewer images to be captured on your card.
Moving on to Shooting Tab 4, the first selection is Live View Enabled. This allows shooting with Live View. Live View allows you to shoot using your display instead of your viewfinder. The downsides of shooting in the mode are you can’t use the viewfinder, the sensor is exposed the entire time, and heat builds up from the sensor and displayed being powered up. There is another downside, as you will see on the next selection.
The next selection is AF Mode. This controls what type of auto-focus mode used. There are 3 choices. The first is Live Mode. This uses the live View screen for focusing, which is slower and less accurate. The second is Face Detection Live Mode. This uses a larger focus zone, and requires a face looking at the camera. Again, it is slower and can be less accurate. The third is Quick Mode. This allows focus using the same dedicated auto-focus sensor used during viewfinder shooting. This is quickest and most accurate when using Live View.
The next choice is Grid Display. This allows you to superimpose a grid on your screen. It’s useful for composing images, but not much else.
The fourth choice is Expo Simulation. Enabling this feature allows the screen brightness to vary according to your shot settings. It will get darker with less exposure set and brighter with more exposure set. It’s an artificial view, as the aperture doesn’t change, nor does the shutter.
The fifth choice is Silent Mode. There are 3 choices here. Mode 1, which allows for continuous shooting, with somewhat reduced noise, Mode 2 which means that you can only take one shot at a time, this minimizes noise, but requires release of the shutter button after every shot and disables continuous shooting, the last choice is Disabled. This mode is primarily for shooting with accessory lenses and non-Canon flashes.
The final choice for this tab is Metering Timer. This changes the amount of time your camera displays your exposure settings when taking a shot.
That’s the end of the shooting tabs. After these comes your playback tabs. We’ll cover them in future What’s On the Menu posts.
Enjoy the rest of your day, and remember to cast your vote for next week’s theme. Get yours in to have a say! Don’t forget to get your pics posted at the Hohenfels Volks Facebook page. Of course, commenting on both Facebook and here is always appreciated, too!
Wednesday, January 4, 2012
In the Zone- Zone Focusing
Greetings and welcome to Hohenfels Volks, THE place for our place. I hope you’re ready, Hohenfels, to learn about zone focusing. This is something that can make getting some of those passing moments in the can, as it were, quicker and easier.
First off, let’s explain what zone focusing is. Zone focusing is using a combination of focal length, aperture, and distance to allow for enough depth of field to make a usable print. That’s pretty straight forward, right? Well, there is more to it than that, including knowing your equipment.
Zone focus developed as a way for photographers to focus their equipment, as most older cameras had no viewfinder or way to check your focus. Many of the old time greats used zone focusing to maximize the sharpness and detail in their works. Given the nature of early lenses, high f/stops were often required to get good detail and enough DOF to be worth printing. Remember, sheets of film, and rolls, were costly to purchase, develop, and print, so lots of effort went into taking each shot. Zone focusing grew from the concept and practice of hyperfocal distance, which you use to give you the maximum DOF for each lens focal length. We’ll have more on that in another post.
The technique works best with lenses that have markings on them. A distance scale for focusing opposite an aperture scale with DOF markings as shown in the photo below works best. It’s quicker and easier. Unfortunately, most lenses today are auto-focus, and kit lenses generally don’t have such marking. Higher end lenses do have them, as do pro and manual lenses as a rule.
ISO 200, f/4.5, 1/30, 32mm
Notice the f/stops on the front of the ring. They go out from the diamond marking focal distance, to give you the range, or zone, of acceptable focus.
Referring to the image above, you can see that there is a diamond. That is the distance marker. On the focus ring, there are markers that aren’t shown, that tell you your focal distance. Line up the desired distance, then using the f/stops that radiate out from the diamond, identically on either side, determine your needed aperture and distance. The distance covered will line up with the marks for the desired aperture. It’s that simple, anything in that range will be in sharp enough focus for decent size prints, including 8x10 and 11x14 if your camera has the resolution.
If your lens has a focusing distance scale, much like Canon’s 28-135mm, you can figure out your DOF with a little legwork online. The key when using zone focus, is to turn off your auto-focus. The second factor is to shoot either Aperture Priority or Manual modes only! Any other mode nullifies your efforts!
Know your location, and what’s happening there, and you can figure the ranges you will need. Let’s say for our purposes you’re shooting in a decently lit area at ISO 400 and you need to cover 3 meters and 6 meters, with room to spare. You get you’re framing, that will give you your focal length. You know it’s decently lit and you can get by with f/5.6-f/8. Going with a 55mm focal length, as most kit lenses like to go from 18-55mm, you should be focused at 4 meters for f/5.6 and 3.5 meters for f/8, although 4 meters is adequate, and has the advantage of allowing you to switch over to f/5.6 without losing too much DOF. If your lens doesn’t have a focal distance scale, measure off 4 meters, focus your lens, and mark it. An easy tip for marking your focus, is take 2 fat rubber bands and wrap one around the zoom ring of your lens at the focal length you wish to use, then wrap the other around the focus ring. Mark the one on the zoom ring at the top, focus your camera, then make a mark that lines up with the first mark you made. As time progresses and your lens drifts over the course of events, you always have your focus marked and can return to it in a snap. Then set your aperture and you’re cooking with gas!
A great online DOF calculator that just requires your focal length, camera model, and scale used (feet or meters) is DOF Master's DOF table. They also have some great information on hyperfocal distance and some nifty little software to play with!
If your shooting with a flash, your f/stop will be dictated by the flash when you use manual flash. TTL and E-TTL are great for using flash, but to use it right, you need a sync cable that’s designed for your camera maker or line to get it off camera. You can get a good one that’s about a meter reasonably priced. Add in a Flashbender or Sto-fen to diffuse the light some, and you’re off to the races. This allows you to hand hold your flash off camera and get some directional TTL or E-TTL light in your images that just adds to the quality.
Zone focusing is great for street photography, event photography, candids, and may other things. Try it out in your works and see how it can help you! You can also use it for this week's theme, as it will allow you to appear less obtrusive when shooting work getting done!
Enjoy the rest of your day, and remember to cast your vote for next week’s theme. Get yours in to have a say! Don’t forget to get your pics posted at the Hohenfels Volks Facebook page. Of course, commenting on both Facebook and here is always appreciated, too!
Labels:
camera,
composition,
depth of field,
dof,
equipment,
f-stop,
focal length,
focus,
gear,
Hohenfels,
lens,
lenses,
modes,
photography,
shooting modes,
zone focusing,
zones
Tuesday, January 3, 2012
Classic Shooting
Greetings and welcome to Hohenfels Volks, THE place for our place. As promised, a second dose of photography just for Hohenfels, dealing with old fashioned photography. Before we begin, I need to clarify this week's theme. Your images should be of work being done, not the people doing the work. The bulk of your subject should be the work, not the worker. I hope this helps when creating your shots.
As mentioned previously, we're talking about old fashioned photography. I got some very old cameras this weekend, inspiring me to pick up film again and try out what I've learned. It also inspired me to share pics of them with you and encourage you to pick up your film stuff and shoot that, too. It's a great way to test yourself, using film and what you've learned. It also shows you what you've learned and how well you're progressing.
ISO 400, f/8, 1/25, 37mm
Zeiss Ikon up close. This shows the lens, the "brilliant glass," used to compose your shot, and the speeds available.
This weekend the family and friends surprised me with some gifts. The first gift, from Mrs. Hohenfels Volks and the princess, was an Altissar box camera from 1951.
ISO 400, f/8, 1/25, 37mm
The Altissa box camera from 1951. This beauty is a real challenge, as it only has 4 settings! A great little camera with some great meaning!
Eho-Altissa started in Leipzig in 1892. Founded by Richard Knoll as a photographic shop and studio, they eventually started repairing and then manufacturing cameras. 1910 it moved to Dresden, where it was later bought by Berthold Altmann. In about 1951, Berthold Altmann decided to flee the oppressive and anti-business communist East Germany. In absentia, he was tried, convicted, and his company taken over by the communist run government. They were re-named and finally failed, with the machines being sent to Sarajevo to make imitation box cameras. This particular model of box camera, introduced in 1951, was the last while Altissa remained a free company. That scenario reminds me of Atlas Shrugged, in which all the creators and producers abandon their businesses and creations and disappear, leaving an increasingly corrupt, socialistic, and anti-business society to its own failings. Because of that story, and what I see happening today, this camera has meaning beyond photography to me. It’s functional, still works, and I’m taking photos with it! Once I get some developed, I’ll post what comes out here! This camera had 4 settings, f/8, f/16, B for bulb, and 1/25. The lens was fixed focal length and fixed focus. Using 120 film, it produces a negative that is 6cm by 6cm. Composing your image is through a window above the lens.
The next camera, from our friends, was a Zeiss Ikon 515/2. This little winner was introduced in 1937 as a lower priced Ikonta, with virtually all the features. The one I received has an 11cm lens, which runs from f/4.5 to f/32, and has shutter speeds from 1/25 to 1/125. Outside the shutter speed range is B, for bulb mode shots, and T, where you open the shutter with one click and close it with a second click. It uses standard 120 film, and produces a negative that is 6cm by 9cm. The viewfinder is a pair of metal tabs, and only serves for composition. Focusing is accomplished by adjusting the lens for the zone that should be sharpest, by distance. You can also hold it about waist high, and using the “brilliant glass,” frame up your shot. The brilliant glass is a tiny “periscope” like pair of lenses through which you compose your shot. It only allows for framing and composition. It has a PC Sync port for the flash, should you have one, and has a self-timer for setting it up and activating the shutter, allowing you to enter the scene should you desire.
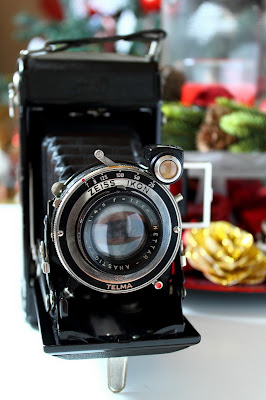
ISO 400, f/4.6, 1/25, 33mm
The Zeiss Ikon in all its glory. It takes time to set up your shot with this, which helps with getting your composition tidy.
Zeiss Ikon started in 1926 by the merger of several camera manufacturers and financial backing from Zeiss. Soon several other companies joined the Zeiss Ikon syndicate. Located in Dresden, with plants in Stuttgart and Berlin, Zeiss Ikon split into a West German and an East-German part after the war. Stuttgart became the headquarters after the division of Germany. Later they merged with Voigtländer, who made higher end cameras. In 1972, they stopped producing cameras. After the reunification of Germany, the East and West German divisions re-united into a single company.
The third classic I acquired was a Voigtländer Vitomatic II. This little beauty is a 35mm Rangefinder with a fixed focal length 50mm lens. The lens runs from f/2.8 to f/22, and 1 second to 1/300 second. It uses, like the Zeiss, a leaf shutter, and has no mirror. This feature allows flash to be synched up to the lens’s maximum shutter speed, in this case 1/300. The camera came with 2 filters, a UV, and a green for B&W. This allows for brighter greens, darker reds, and greater separation of greens in your monochrome images. Also included were a lens hood, leather case, and leather strap. Again, through PC sync, my flashes can be remoted off camera and fully controlled. Voigtländer, as you read above, was a very upscale camera maker. They started in Vienna in 1756 as an optics company. Later they introduced the world’s fastest lens at that time, in 1840, it was f/3.5. They were also the first to introduce the zoom lens and the first 35mm camera with a flash built into the camera.
ISO 200, f/4.5, 1/20, 29mm
The Voigtlander Vitomatic II from 1958. In the upper left corner you can see the selenium meter in the camera. Used to help judge your exposure settings.
The cool thing about these cameras is that they show you that even though technology has improved, it hasn’t changed too much since the times represented. Using what we’ve discussed about exposure, composition, and other tips, you can get a great shot, even with old cameras. Don’t give up the learning just because digital means you don’t have to do it. I’ve used my 7D to meter the light for my desired aperture, and then set the old timers accordingly. Remember, being able to sync with your flash means you can do anything with these guys you can do with your digital. I hope this will inspire you to learn more manual applications, so you can put your old film stuff to use again. You’ll be surprised how much you can do with it!
Enjoy the rest of your day, and remember to cast your vote for next week’s theme. Get yours in to have a say! Don’t forget to get your pics posted at the Hohenfels Volks Facebook page. Of course, commenting on both Facebook and here is always appreciated, too!
Labels:
camera,
composition,
equipment,
exposure,
f-stop,
film,
flash,
Hohenfels,
inspiration,
meter,
photography,
shutter speed,
theme,
weekly theme
Men Working
Greetings and welcome to Hohenfels Volks, THE place for our place. Welcome to the New Year. I hope Hohenfels is ready for 2012!
Since we had a 4-way tie, each theme being 1 vote each, I decided to go with something not on the list, and extend this poll until next week. This theme will probably be the biggest challenge yet, so here we go!
The theme is Production. You’ve shown the fruits of your labor, what you work for, and how you enjoy it. Now it’s time to show production. Here’s the kick in the pants- you can’t just shoot someone at work! For example, a large construction site, either stopped for the day, or during full-scale work is a good shot for the theme. A guy running a jackhammer isn’t! Another fine example would be a row of sewing machines, or only a couple, with the cloth in place and the hands of the seamstresses visible but no face or other body parts. Think production, and what gets the engines of industry, manufacturing, and the economy moving. These are ultimately the source of your labor’s rewards, right? Think big picture and capture a slice of that picture.
Don’t forget to your pics in for last week’s theme. You have until tonight, around midnight. Get yours in and have it featured here. Unfortunately mine wasn’t done, so I shouldn’t expect anyone else to, as the holiday weekend was quite busy!
Look for another post later today, about photography, the old fashioned way!
Enjoy the rest of your day, and remember to cast your vote for next week’s theme. Get yours in to have a say! Don’t forget to get your pics posted at the Hohenfels Volks Facebook page. Of course, commenting on both Facebook and here is always appreciated, too!
Subscribe to:
Posts (Atom)