Greetings, volks. Welcome to Hohenfels Volks, THE place for our place! The skies and lighting these past couple days have created an environment rich with opportunities for making some great shots!
I hope everyone is enjoying the wonderful weather here in our Hohenfels area. Photography is a magic thing during this time, when the sun is up late, and the skies can work their mood into your images. The golden and blue hours can be used to great effect when shooting during this time, and add some drama or serenity to the image you’re creating.
Tonight’s post is based on something I read at Photofocus, by Scott Bourne, about pedantry in learning photography. To sum it up- there are those who are all about the process and sticklers for the “rules” and numbers. I had planned a post about making your image nearly perfect in camera to minimize editing time, but his article struck me as being something to share.
I’m familiar with the process concentration, as I tend to get wrapped up in the process at times. For me, nailing the process leads me to look at ways to improve my images by finding other ways to make the same thing. Learning to do it “correctly” is important to learning how to do it “right.” By correctly, I’m referencing the process and numbers, and by right, I’m referencing the final image I visualized.
The process is a vital tool in making an image, as this is where we start. Learning that reciprocity makes our exposures easier by allowing us to work the exposure triangle is a part of that. Learning that controlling DOF is done through focus and aperture is a part of learning the process. The key is in knowing that the process is not the end, but the beginning. Before we can make impacting departures from the process, we must know the process.
Ansel Adams, one of my favorite photographers and sources of knowledge and inspiration, was well aware of this. Throughout his books, he refers back to visualization and placements. Each book in his series on the Camera, Negative, and Print begins with a chapter on visualization. He constantly references expression while teaching the basic processes and departures from them.
By working together to share our knowledge, we can bring more to expressive and creative photography than just numbers and processes. By sharing our vision and visualizations, we help our fellow photographers in their journey through this wonderful endeavor. The important thing is how does your image feel and how does it impact you and your intended audience. Other than that, the opinions of others, especially the pedants out there, should matter very little. Their opinion requires weighing, and the helpful bits used while the rest are discarded like week old leftovers.
Don’t let those folks disappoint you, don’t let them bring doubt into your mindset, and don’t let them change your style. Your photography is for you, your vision, while shared with others, is still yours. The biggest point in all this is enjoyment. Make sure you’re getting the most enjoyment you can from the time you spend making images, and from those photos you worked to give life to.
You really should check out Photofocus, Scott posts some incredible photos and his articles are a great resource for those of us addicted to the magic of bringing that feeling to life in our art.
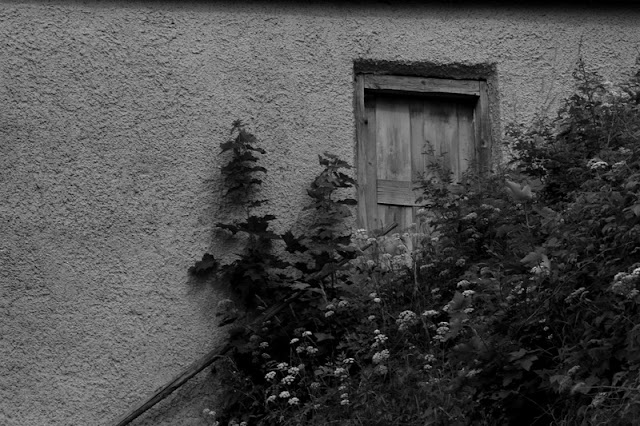
ISO 125, f/11, 1/60
This image is likely to be called too dark by those who think only of the process and "correctness" of an image. It was intentionally left dark to add to the mood and impression of abandonment. By departing from the process we can make our art more meaningful.
I hope you have some great plans for the weekend, and are ready to share your visions with us. We’re all eager to see folks sharing their images, their vision, and thoughts. Enjoy your Friday, and enjoy your time behind the camera!
Do you have an image to share? We’d love to see it! Is there anything you’d like to see here? Do you have a question? Share your thoughts here or at the Hohenfels Volks Facebook page. Of course, commenting on both Facebook and here is always appreciated, too! Don't forget, we're on Google+, too!
Thursday, June 28, 2012
Wednesday, June 27, 2012
Projecting Your Vision
Greetings, volks. Welcome to Hohenfels Volks, THE place for our place! Lovely weather, beautiful skies, and an abundance of time give rise for photo opportunities and exercises here.
We’re blessed in the Hohenfels area with such a variety of things to cater to all our interests, at least photographically. Many volks find the castles and historic locations to be the ticket for them, others love the country scenes, and still other volks love seeing the cities. We’re located where you can find something to interest you and fuel your creative fire.
Today we’re going to try to throw some fuel on your fire by revisiting the subject of projects. As we discussed in a previous post, projects can get you thinking and lead to some creative ideas and photos. We’re going to do a short post about getting a project going as an exercise this week.
The first step to completing your project is getting together some ideas thinking through an outline. It’s important to have a theme, something that will tie each image to the other images, and to the project as a whole. Some ideas for projects in the Hohenfels area are shooting only trees, shooting playgrounds, a series of stream shots, or even the local Rathauses. Once you have a general theme, narrow it down some. For instance, if you choose to shoot trees, limit yourself to small trees or something to narrow your scope to less than just “trees.”
Decide on what tools you want to use. Decide on what items you’ll be using in your photography, and put together a kit to bring along. Make sure you have the right tool for the job! If you decide to shoot bugs for instance, don’t use a 24mm wide-angle lens, unless your theme is little specks of bugs in a big scene. Planning now can save you some missed shots later.
Also, think of some limitations on your tools. Perhaps shooting without a flash or using only a prime lens. By adding some creative limitations, you boost your creativity by working with what you have. A very important limitation is limiting the edits you can perform in software. Limit yourself to adjusting levels, curves, brightness, contrast, and saturation. Include these limitations in your visualization, or you may be disappointed with your results. Most photo contests you’re likely to enter limit editing to those listed above. For the purposes of this article, we’re going to use those limitations to help us get the most of the tools we have.
Once all the above have been decided, it’s time to make of list of places where we can the shots to work our project. Know where you’re going, research the places and lighting. You should visit a couple times at different times of day. Know the lighting and knowing how we make the most of it gives you the ability to make your image inspire others.
With everything in place, it’s time to get out and start shooting. Add some variety within your theme by shooting black and white, shooting some color, and low light shots. Keeping to your theme will bring everything together.
Projects can be created for the weekend, for vacation, or even for special days and times. One of my friends, Jen, recently did a series of lighthouses. Her shots were great, and although they have edits like vignettes applied, show how beautiful the structures, and more importantly the locations, are. These things are a marvel for anyone who’s ever seen one, and Jen crafted some wonderful images that fit that to a t! Check out her blog, Jennifer O on our links page, you’ll definitely enjoy her work!
I’ll leave you with a couple shots from one of my on-going projects, featuring crosses and small chapels in our Hohenfels Area.
EI80, f/8, 1/60 Developed N-20% to control tonal range and contrast.
Crosses and Crenelations. Shot on film, exposed to bring the range near bright white on the walls and crenelations of the wall and developed to bring that back to a tone that holds detail. Even though that area is pushing white, the tonal range and detail are available.
ISO 125, f/8, 1/30
Castle and Cross. By shooting the sky at about m+1/3, then decreasing exposure by about 1/2 stop and applying an inverted s-curve to the image, the clouds, cross, and castle all add an element to the image, and create a decent balance.
I hope this inspires everyone to undertake a project of their own. A project can take on a life of its own, and can add some inspiration to your time behind the camera. It doesn't have to take all your photo time, but you may end up giving it a more than fair amount! Take care and enjoy the rest of the week!
Is there anything you’d like to see here? Do you have a question? Let us know what project you're working on! Share your thoughts here or at the Hohenfels Volks Facebook page. Of course, commenting on both Facebook and here is always appreciated, too! Don't forget, we're on Google+, too!
Labels:
art,
composition,
creativity,
equipment,
food for thought,
Hohenfels,
inspiration,
inspiring,
motivation,
opportunities,
photography,
projects,
theme,
thoughts,
visualization,
visualizing
Thursday, June 21, 2012
On the Range...
Greetings, volks. Welcome to Hohenfels Volks, THE place for our place! Today’s weather turned out to be quite nice. There is a wide variety of things and places to shoot in our little part of Germany. Clouds and fields are just coming around to being incredibly photogenic.
Today we’re going to take a quick look at contrast and exposure. When we refer to contrast, we’re generally speaking about the range of values within an image or scene. From the brightest areas to the darkest is our range, and the contrast ratios can be quite high for a full range scene to rather low for a lower contrast image, such as a portrait.
As a general rule, higher contrast images tend to be more dramatic, while lower contrast images run toward the softer side. That’s the reason we call lower contrast “softer.” An image’s sharpness is also dependant upon contrast. When you decrease contrast, you can quickly decrease sharpness if your not careful.
Contrast can be varied by exposure. When an image runs toward high key, it loses contrast due the lower values being absent. The inverse is true in low-key images, though to a lesser extent. By adding shadow and decreasing brightness or overall exposure, contrast can apparently be increased. Decreasing exposure by 1/3 stop can be just the trick. The same can be said for color contrast, which is the range of tones in a single color within your image.
Drama can be added through darkening, and tranquility, or stillness, through lightening. Local contrast can be adjusted within a narrow range of tones, improving appearance, detail, and bringing interest to an area within the image. By using levels for general contrast adjustments, and curves for local effects, an interesting image can be created.
Combined with visualizing the desired outcome, or range of outcomes, limitless possibilities exist within each image. By exposing your brightest areas for M+2 and your darkest for M-3, a visual feast can be created from one shot, if done right. Visualize the effect of several adjustments and contrast ranges, and then set the shot so that each one can be accomplished using limited adjustments.
I hope this gives you something to think about and play with. Throw in some work with this week’s exercise, and you’ll be sure to get something that fills with that pride of accomplishment that comes from a shot well made.
Take care and enjoy the rest of the week!
Is there anything you’d like to see here? Do you have a question? Share your thoughts here or at the Hohenfels Volks Facebook page. Of course, commenting on both Facebook and here is always appreciated, too! Don't forget, we're on Google+, too!
Monday, June 18, 2012
Tips, Tricks, and Exercises
Greetings, volks. Welcome to Hohenfels Volks, THE place for our place! Here in Hohenfels, the weekend lived up to its promise. The weather and atmosphere made for some great shots. I hope everyone made a couple new favorites for their portfolios.
Today is a short post featuring a couple tips.
Tip 1- Try to get out right after the rain. Colors sing because the scene before you is fresh washed and saturations are usually pushed up. The air usually loses some of the haze seen along the horizon, and even over greater distances. Having a clean scene and air make the image look more as you envisioned it. Not to mention the receding storm leaves some awesome cloud formations to add interest to almost any image.
Tip 2- When shooting early in the morning or around sunset, remember the blue hour. You can see some beautiful additions to your image when lit with a softer, bluer light. Think architecture at twilight and you’ll know what I mean.
Tip 3- Move around. Take the shot that you thought was the winner, and then move around for a different view. Try to change perspective and use some DOF effects in different positions. Set up and take the shot you came to get, but make sure you explore the area and the light. You may find the lighting from slightly below and to the left of the subject creates a feeling unlike your first shot. Don’t limit yourself to the shot everyone takes; unleash yourself on the shot you want to make!
This week’s exercise is to shoot one location, one subject. Make multiple images of the same subject from different angles, distances, and with different lighting. Give yourself bonus points if you do it in the early evening, morning, or after the rain. Top off those points by combining all 3 tips into a small series of shots!
Here’s hoping you have a great week and capture a treasure worth sharing!
Is there anything you’d like to see here? Do you have a question? Share your thoughts here or at the Hohenfels Volks Facebook page. Of course, commenting on both Facebook and here is always appreciated, too! Don't forget, we're on Google+, too!

Friday, June 15, 2012
Necessary Tools
Greetings, volks. Welcome to Hohenfels Volks, THE place for our place! The weekend, upon us, should lead to some exciting photo opportunities in and around the Hohenfels area.
I often talk about using accessories. A flash and some light modifiers can be essential tools in our kits. Today we’re going to talk about tools and not having them.
The first thing to know is that you don’t need it all. You don’t need a flash or lighting kit, you don’t need the wide fixed focal length lens, and you don’t need fancy intervalometers. In fact, you only really need your camera and your lens. Actually, you need 2 more things, your vision, and your knowledge.
Your vision is more than how you see things. It consists of how you see things and how you choose to express those things. It also consists of being able to visualize the intended final image and the steps to make it happen. Visualization allows us to plan and compose our image being we even approach our camera. It allows us to create a roadmap of our image’s creation and gives us the ability to follow through on our expression of the scene. One long time technique to aid in visualizing an image is to take an old 35mm slide frame and view your potential scene through the opening. You’ll see new ways to frame and compose an image. You can use a piece of black matting with a 1.5 to 1 ratio rectangle cut out. That opening can be 6x9, 10x15, or 4x6. The 1.5 to 1 is what 35mm film and today’s digital cameras use. This isn’t a tool in creating your image, but it is a tool in crafting your vision. Try it out, and let me know how it works for you. There are many nuances to vision and visualization that we’re not touching on in this post, so don’t think that’s all there is to it.
Our knowledge refers to our ability to use our camera for our purposes and art rather than letting the camera use us for its work. It’s knowing how to evoke a response to a scene and how to compose that scene for aesthetic rather that literal rendering. It involves knowing how our camera operates and how exposure works. Learning the exposure triangle and where along the range of values a brightness falls will be a giant step in mastering your vision. Knowing how and when to use DOF effects for impact and contrast to increase drama, knowing that a cloud should be exposed at about 2 stops over meter, maybe 3 if the your vision feels the need, is a key knowledge. So is knowing that long evening shadows cast by the low lying sun journeying home need to be at 2-3 stops below meter to capture the full range of detail.
Combining vision and knowledge can be a frustrating journey. It can also be incredibly rewarding. The key is to open yourself to learning and seeing every day. Once you feel your vision, you’ll start noticing things you never saw, and trying to figure out the best way to make your vision real. You’ll also notice that it isn’t about the gear, it’s about your image and art.
Do I still think of my tools as necessities? Of course I do. I love a portrait with shaped, directional light. I love getting a tiny bit of bounce into a shadow area. Using an umbrella to soften your light is a tried and true way to improve many photographs, not just portraits. Can I visualize an image without thinking about my tools? Of course I can. When I’m shooting large landscapes, a flash won’t help, neither will a reflector. The key is thinking the shot through before making it.
Enjoy the weekend, everyone. I hope you spend it capturing the moments that express your vision best!
Is there anything you’d like to see here? Do you have a question? Share your thoughts here or at the Hohenfels Volks Facebook page. Of course, commenting on both Facebook and here is always appreciated, too! Don't forget, we're on Google+, too!
Thursday, June 14, 2012
A Tip for Composition
Greetings, volks. Welcome to Hohenfels Volks, THE place for our place! I hope everyone is doing well.
Here’s a little compositional tip, straight from Clyde Butcher- Close 1 eye when you approach the camera. Because an image is 2 dimensional and we see in 3 dimensions, you can get the feel of your composition before taking the shot. 3D sight requires both eyes open, you see this when you switch between your left eye open to your right eye open. It gives us depth perception. It really works, try it.
Speaking of composition, adding depth to your image by using shadows and the perception of light falloff with increasing distance can make for some great mood in your photos. It can lead the eye to your intended subject when shaped, and increase the 3D feeling when light falls off. Things will seem to pop right off the page. Of course, DOF and sharpness play a role in this, too.
With careful subject placement and light effects, you can create some real drama, or make a powerful scene seem serene. Crafting light and depth are a big part of giving your image life!
Here’s hoping the rest of the week brings you some great shots!
Is there anything you’d like to see here? Do you have a question? Share your thoughts here or at the Hohenfels Volks Facebook page. Of course, commenting on both Facebook and here is always appreciated, too! Don't forget, we're on Google+, too!
Labels:
composing,
composition,
depth,
depth of field,
Hohenfels,
light,
photography,
tips
Wednesday, June 13, 2012
Shooting What You Eat
Greetings, volks. Welcome to Hohenfels Volks, THE place for our place! Things have been rainy here, but that gives us the chance to show the stormy side of Hohenfels and our surrounds. I trust you’ve bagged some cloud shots!
One of our Facebook readers, Lili, asks “For those of us who don't own an external flash unit, or simply can't afford any sort of lighting equipment; what are the tricks to making food look more appealing and vibrant, and not so flat and 2 dimensional?” We’re addressing that in tonight’s post, so bring your appetite and let’s get going.
The first thing to know is that flash, while an important part of your kit, isn’t necessary for all types of photography, nor at all times. Flash can help by adding light, allowing the use of faster shutter speeds, and by allowing us to shape the feeling our images evoke by shaping the light. There are other ways to accomplish this, though. Let’s look at how we can achieve that.
There are multiple ways to shape existing light. Let’s start by moving your food toward an area that has plenty of the light you’d like. From there, you can modify that light with everyday household items. A pillowcase can be used to soften and spread the light, covering a larger area with nice gentle light. You can use it to shape the light by varying your angle and position. In a previous post, we mentioned the inverse square law that says doubling the distance between a light source and subject gives ¼ the light level. You can see that by tilting the angle between your pillow case diffuser and subject creates the illusion of distance and depth.
Another way to add or shape light is to use a reflector. You can use foil or a 5 in 1 kit to bounce light in from outside the immediate area. This allows you to concentrate your light where you want it, and increase your luminance levels. Again, tilting and angling your bounce can shape the light. A nice little thing to try is bringing your light in from about 45 degrees above your subject, illuminating the top and side. This allows the light to taper, and when you add the softness of the light, creates some depth. You can use a large white piece of gator foam, a piece of matting, or even a cookie sheet.
Another thing you can do is use your pop up flash. I never thought I’d say that, but with a little ingenuity, some foil, and a diffuser, you can add some depth. The trick to this is bouncing the light in from off the lens axis. I’ve used my external flash on camera to bring in lighting from 45 degrees to the side before, just with a piece of white mat. Remember, though, that bouncing your light costs you some of its power and range.
Now we’re going to move on to the best way to add some detail and vibrance. The big secret is DOF, depth of field. Using a longer focal length at a very wide aperture will give you a limited DOF. If you are shooting at 50mm, f/5.6, and focus at 2 feet, your DOF runs from about half an inch in front of your focal point to about the same behind it. You have a little over 1 inch of depth. Anything outside that range will become progressively out of focus. Taking into account the angle from which you’re shooting, you can create some nice little focal points within your scene. I like to think of it as pools of focus. When you place these at locations other than the center, you get some nice depth and intensity. Shooting outside in open or semi-open shade can also give more light and add elements of interest. The key to this is distance between the background and subject. You also want to make sure your focus is spot on where you want it, allowing your subject to leap out from the background in the finished image.
An easy thing to do is set up some Christmas lights or other small lights several feet behind your subject and shoot focused on your subject at your widest aperture. Do this in lower light, bringing in light with a flash or reflector. You’ll see some small circles of light that are incredibly out of focus, adding immediate interest to the scene if done right.
To boost the intensity of your color, shoot at about 1/3 to 1 stop lower that you meter for. By slightly underexposing your scene, you improve color density, saturation, and vibrance. It makes for less time spent editing and more time shooting.
Here are 2 images that show how using DOF can create an interesting sense of the meal or food.
ISO 800, f/5, 1/30, 44mm
Notice the DOF on this. By focusing toward the center of the ribs and allowing the highlights to fall higher than normal, interest is added in the meat, even though the pepper would seem to dominate. The pepper is diminished in strength through a shallow DOF, and the sharply blurred foreground end of it.
ISO 800, f/5, 1/60, 41mm
By focusing on the back edge of the meat, sharpness is retained along the kabob, while bringing down the interest in the cucumber and tomato through minimizing DOF. The spices and browning on the meat hold quite well. Having dominant, complimentary colors, such as red and green, can decrease interest in the main subject. By decreasing their dominance through either DOF or lighting values, interest is brought back to YOUR subject.
Thank you, Lili, for the great question. I hope this gives you some ideas and helps you shoot what you eat the way you like it!
Is there anything you’d like to see here? Do you have a question? Remember, I'll try to answer all your questions. Share your thoughts here or at the Hohenfels Volks Facebook page. Of course, commenting on both Facebook and here is always appreciated, too! Don't forget, we're on Google+, too!
Monday, June 11, 2012
Tools of the Trade: Our First Review...
Greetings, volks. Welcome to Hohenfels Volks, THE place for our place! Another busy week in Hohenfels left us without short on posts, but more will come! I trust all are well and enjoyed some shooting time this weekend!
I went out shooting Saturday to test the Tamron 28-75 1:2.8 lens. This fast shooter was a nice break and allowed for some shallow DOF and creative shots, as seen in the shots below.
ISO 125, f/4, 1/400
Cupcake and icing. This cupcake was about 2 inches across, shot at 70mm with a wide aperture created some nice blur and bokeh.
ISO 125, f/8, 1/100
Fruit bowl. Great colors and even with f/8, at 75mm the DOF is shallow enough to be creative.
The best feature of this lens is the constant aperture throughout the entire zoom range. F/2.8 is nicely fast, and allows a nice low light performance. It also allowed some creative shots that really emphasize DOF effects to highlight part of a scene.
The lens is lightweight, and focuses down to about 13 inches at all zooms. The zoom lock feature makes a nice addition for when you’re moving around with the camera pointing down. The filter size is 67mm, which is large enough to prevent vignetting unless you’re stacking filters and shooting at 28mm.
The lens does not rotate or extend while focusing, which simplifies the use of a CP. Rotating lens barrels often necessitate adjustment of your filter after focusing. The images were sharp through all focal lengths, even wide open. Where you focus will be tack sharp when used properly.
The big downside to this lens is the lack of image stabilization. This saves battery life, but has its own drawback. When you’re shooting handheld, you have to shoot faster than the reciprocal of your focal length. If your focal length is 50mm, than you have to shoot at 1/50 or faster. With an APS-C sized sensor, the focal length has to be multiplied by 1.6 to get the corrected number. For those with APS-C sensors, this means shooting no slower than 1/50 at 28mm. While this little champion performs well in low light, being limited to faster shutter speeds may be a drawback when shooting inside places without adequate illumination. Camera shake becomes very noticeable, even in smaller display sizes, at slow speeds and may lead to some seeming nice shots having to go into the dustbin.
Another drawback to the crop factor of the lens is DOF calculations. You will need to calculate based on the original focal length, not the cropped focal length. This can lead to a DOF you may not desire. This is usually not an issue, but could lead to shallower depth than you find desirable.
With most of today’s cameras capable of giving good performance at 1600 ISO, the lack of IS may not be an issue, but in a church or other extremely low light venue, not being able to handhold is a real setback. Overall, this lens is wonderful, especially in reasonable light. The image quality is spot on. There is no noticeable chromatic aberration, color reproduction is wonderful, sharpness is very fine, and there are no color shifts often seen with lesser lenses. Tamron makes some great stuff, they also make some lower end stuff, but this lens is one to get if you don’t mind the limitation in lower light. I didn’t get the chance to push it too hard, it’s not mine, but the little workout it received proved it a worthy addition.
On other issues, has anyone had the opportunity to get out and make some storm cloud magic? The weather has lifted bits here and there to allow some great photos to be made! Give it a try. Remember to meter for the entire range, and expose for the brightest parts you desire detail at M+2-M+3. You’ll be surprised at your magic!
My thanks to Darris for allowing me to test out this little giant of a lens. Here’s hoping everyone out there has a wonderful week and makes your photo dreams come true!
Is there anything you’d like to see here? Do you have a question? Share your thoughts here or at the Hohenfels Volks Facebook page. Of course, commenting on both Facebook and here is always appreciated, too! Don't forget, we're on Google+, too!
Monday, June 4, 2012
To Enter...
Greetings, volks. Welcome to Hohenfels Volks, THE place for our place! A great weekend slips into the past for those of here in Hohenfels, and a new week has begun.
This afternoon presented some great opportunities for shooting the stormy nature of the season; with high billowy clouds backlit by a sheet like layer of clouds cover. Dramatic skies are incredible photos, and for those willing to take the time, are quite rewarding.
Today we’re going to provide an intro to photo contests.
By now, most of you are doing good stuff with your cameras and making the photos you want. You’re getting great feedback from those who see your pics, and maybe some pointers, too. You should be feeling pretty good, which shows that you’re moving further than the camera thought you could when you were shooting in automatic modes.
A great way to move that feeling along and get some serious feedback is through photo contests. I’m sure some of you have entered online photo contests, and maybe even some juried contests. There are a couple different types, so we’re going to move along to a basic intro to the types you’re likely to encounter.
The first type is the public vote type. This type used to be held in galleries and libraries and occasionally still is. You submit a photo and the public votes on it according their idea of its merits. An offshoot of this type is the online poll. It’s an online posting of photos entered into the contest. These are voted on by the public at large, and may even be linked to your social media accounts. When linked to your social media, this type is often a popularity contest. AFN Bavaria has a monthly contest on their Facebook page that I have entered several times that serves as an example of this type.
The second type we’re going into today is the juried, or judged, type. You submit a work to the contest, then a judge or panel of photography and or art experts reviews all the works submitted. Voting by a panel or a decision by the judge determines the winner. Many of this type charge an entry fee, which goes to cover prizes and other items, such a book of all the finalists.
The popularity contest, or voting, type can be quite frustrating. It can also be incredibly rewarding. The frustration comes in when you don’t get many votes, and you notice the leaders have 100 of their social media friends voting for them. You’ll find that you get discouraged or put off by this. DON’T!!!! These contests are also a great way to get rewarding feedback. Even if no one comments on your work, by counting the tally of votes, and noting how may of those were from other than your friends, you can see how your photograph truly fared. You’ll soon notice that even though you don’t win, folks are responding to your photos, and isn’t that what it’s all about? If you get 20 votes, and 15 of those are from someone other than your friends, that means your photo made an impact on at least 15 viewers, a positive impact at that. Keep entering and keep trying, you’ll start feeling that the notice your image gets is all the reward you need.
The juried contests often offer large prizes, including whole camera kits, gold medals, and cash. These ones require entry fees and your image may not be accepted. Reputable contests, such as the Trierenberg Circuit, will include a catalog or book of all the finalists. Another feature of the reputable ones is that they do not require forfeiture of your rights. They may, however, require rights to use your work in connection with the contest. Bigger ones often refer those entries that are accepted to one of the photography associations for recognition and listing, as well.
In both cases, themes are often involved. When entering, make sure read all the fine print, but make sure to read the entire description of the themes. Not adhering to the theme can get your entry returned without further consideration for other areas where it might fit. These contests usually have some great works in them; so don’t be disappointed should you not win. The main objective is feedback, exposure, and the thrill of being in something beyond the basics of photography.
This post just touched upon some of the basics, there much more information online that can help you get started in choosing the right contest for you. For this week’s exercise, I hope everyone will enter a contest and be thrilled with the chance to share your work with the world!
Is there anything you’d like to see here? Do you have a question? Share your thoughts here or at the Hohenfels Volks Facebook page. Of course, commenting on both Facebook and here is always appreciated, too! Don't forget, we're on Google+, too!
Friday, June 1, 2012
Weekend
Greetings, volks. Welcome to Hohenfels Volks, THE place for our place! I hope everyone in Hohenfels is ready for the weekend. The clouds are out, with their full range and the skies are moody, it’s the perfect time for photos!
Just a quick tips for all of planning to shoot outside this weekend. Bring a clear shower cap and a couple zip lock bags. The shower cap can be used to keep your camera dry during a surprise rain shower, and the zip locks can be used to keep your spare batteries and lenses dry if you use the 1-gallon size.
With the onset of wet weather, it pays to be prepared and have a way to keep your expensive gear dry. The savings could be quite substantial! That doesn’t even take into account your stress level and disappointment.
Keep your eyes open to scenes that include lots of clouds, they’ll bring interest to an otherwise flat landscape. Another great thing about lots of clouds is the soft light they produce when shooting people outside.
Enjoy the weekend and keep shooting. I hope everyone will post at least 1 pic from this weekend, I know we’d all like to see your work!
I’d love to know what you think and what you’re doing with your photography. Where are you headed, and is there anything you’d like to see here? Share your thoughts here or at the Hohenfels Volks Facebook page. Of course, commenting on both Facebook and here is always appreciated, too! Don't forget, we're on Google+, too!
Subscribe to:
Posts (Atom)