Greetings and welcome to Hohenfels Volks, THE place for our place! Hohenfels was greeted this morning with the sky belching great flashes of light and a seemingly torrential downpour that lasted all of 15 minutes. Of course, our area spent the rest of the day under blue skies and wonderful cloudscapes.
Heading out to Regensburg to get some prints done, I was struck by the fact that we also place faith in others when we hand over our precious photos for processing. Of course, that faith was justified today when I saw the prints from this weekend.
Today, we’re going to touch a little on calibrating your monitor. We’re not using anything fancy, or doing too much involving more than the basic monitor settings in Windows.
For black and white work, I recommend heading over to Ilford and downloading their Monitor Set-Up Print chart. Get the chart printed at your favorite vendor; I use MPIX or Photohaus Zacharias in Regensburg.
When you get the print back, adjust your brightness and contrast settings with the image on display. Make the displayed image match the print, then save your profile. That’s it for Black and White. It should provide good brightness and contrast for general photographic use, as well.
For color, it’s a little more involved. Head over to Digital Dog and download their printer test file. Again, you’ll need to get it printed. With print in hand, make your adjustments in Windows, only this time you’ll want to adjust your color settings as well. Saturation and hue may need adjustment, and possibly your individual colors. Once everything matches, save this profile as something different.
When you’re working on color images, load your color profile before your edits. This will match your colors and levels between the display and the printer. The same applies for Black and White. Knowing your levels through calibration will make your prints match your vision far more closely than an uncalibrated monitor will. It also allows you to work more accurately.
I hope this helps; it works, and leads to great prints. Enjoy the rest of the week, as Hohenfels slides into the weekend. Create something stunning, and share with all of us!
Please feel free to share your photos on our Faceboook page. Everyone here would love the chance to see your work! Is there anything you’d like to see here? Do you have a question? Share your thoughts here or at the Hohenfels Volks Facebook page. Of course, commenting on both Facebook and here is always appreciated, too! Don't forget, we're on Google+, too!

Wednesday, August 22, 2012

Tuesday, August 21, 2012
Faith and the Photographer
Greetings and welcome to Hohenfels Volks, THE place for our place! Greeted by rain and thunder in the early morning, the day ended nicely, perfect for getting some nice evening shots.
Today we’re going to talk about faith and photography. Believe it or not, the 2 are related.
First, let’s set a definition for faith. Webster’s lists “complete trust” as one of their definitions. For the purposes of this post, we’re going with that, although the definition “something that is believed, especially with strong conviction,” again from Webster’s, fits also.
The first way that faith is relevant to our topic relates to the photographer and the stages of progression. We start out with a decent camera, having complete trust and conviction that our camera will make nice photos. It’s sort of like believing in the government to be our nanny. It’s reassuring to know our camera can do everything for us, leaving us no need to do things for ourselves.
The next stage is trying to do more for yourself. You start believing you can do it, and going out of “P” mode. Trying out AV and TV modes gives you some control, and can lead to images that are more creative. At this level, curiosity about the basics takes root, and starts leading you generally to the next level.
At this level, you start having faith in others and what they can teach you. You start learning from all the resources you can find, and trying out manual mode and value controls. You’ve generally reached the level of most advanced amateurs, and are quite content with your work. You can see the difference between your work and that of others, and for the most part, you’re happy with it.
The last level is a combination of all the above. You have faith that your camera will do what you tell it to do. You have faith that for a given setting, a given image will result. You have faith that your image, when shot a certain way, will end up matching your vision. You have faith that the knowledge of others can be applied to improve your work, and faith in yourself to apply it. You have reached a stage of photographic faith that allows you to find your flaws, and seek solutions with confidence. You can control all the little aspects into visualizing and editing an image that will have a desired impact.
Faith, for the photographer, is an ongoing thing, and something that we sometimes battle. Much like our faith in government or our religious faith, our photographic faith is shaken from time to time. At the lower layers, it leads to growth and improvement. At the later stages, it can concentrate our efforts or it can discourage us if we let it. Fighting that discouragement is another act of faith. Believe me, it’s worth the fight!
On a second aspect of faith and the photographer, I’ve been noticing a general trend to revert to the first stage. There are folks who say things like “Why should I learn to shoot manual?” “My camera does it all for me.”, and “It’s easier to shoot “P” mode, I don’t have to think.” My personal favorite is “It’s digital, so it’s free. Just delete the bad ones.” This trend leads to stagnation and mediocrity. Just because you can shoot 1000 images and delete the 975 that are worthless, doesn’t mean you should. You’ll never grow when you lack faith.

ISO 125, f/14, 1/60
Faith allowed me to make this image, shot to make:

This image. Knowledge, confidence, and faith combine to allow creations like this to be made. Visualizing your image and shooting for that vision are acts of faith.
I hope our Hohenfels Volks enjoy the rest of the week. Keep the faith and get that shot you’ve been seeing in your mind’s eye!
Please feel free to share your photos on our Faceboook page. Everyone here would love the chance to see your work! Is there anything you’d like to see here? Do you have a question? Share your thoughts here or at the Hohenfels Volks Facebook page. Of course, commenting on both Facebook and here is always appreciated, too! Don't forget, we're on Google+, too!
Today we’re going to talk about faith and photography. Believe it or not, the 2 are related.
First, let’s set a definition for faith. Webster’s lists “complete trust” as one of their definitions. For the purposes of this post, we’re going with that, although the definition “something that is believed, especially with strong conviction,” again from Webster’s, fits also.
The first way that faith is relevant to our topic relates to the photographer and the stages of progression. We start out with a decent camera, having complete trust and conviction that our camera will make nice photos. It’s sort of like believing in the government to be our nanny. It’s reassuring to know our camera can do everything for us, leaving us no need to do things for ourselves.
The next stage is trying to do more for yourself. You start believing you can do it, and going out of “P” mode. Trying out AV and TV modes gives you some control, and can lead to images that are more creative. At this level, curiosity about the basics takes root, and starts leading you generally to the next level.
At this level, you start having faith in others and what they can teach you. You start learning from all the resources you can find, and trying out manual mode and value controls. You’ve generally reached the level of most advanced amateurs, and are quite content with your work. You can see the difference between your work and that of others, and for the most part, you’re happy with it.
The last level is a combination of all the above. You have faith that your camera will do what you tell it to do. You have faith that for a given setting, a given image will result. You have faith that your image, when shot a certain way, will end up matching your vision. You have faith that the knowledge of others can be applied to improve your work, and faith in yourself to apply it. You have reached a stage of photographic faith that allows you to find your flaws, and seek solutions with confidence. You can control all the little aspects into visualizing and editing an image that will have a desired impact.
Faith, for the photographer, is an ongoing thing, and something that we sometimes battle. Much like our faith in government or our religious faith, our photographic faith is shaken from time to time. At the lower layers, it leads to growth and improvement. At the later stages, it can concentrate our efforts or it can discourage us if we let it. Fighting that discouragement is another act of faith. Believe me, it’s worth the fight!
On a second aspect of faith and the photographer, I’ve been noticing a general trend to revert to the first stage. There are folks who say things like “Why should I learn to shoot manual?” “My camera does it all for me.”, and “It’s easier to shoot “P” mode, I don’t have to think.” My personal favorite is “It’s digital, so it’s free. Just delete the bad ones.” This trend leads to stagnation and mediocrity. Just because you can shoot 1000 images and delete the 975 that are worthless, doesn’t mean you should. You’ll never grow when you lack faith.
ISO 125, f/14, 1/60
Faith allowed me to make this image, shot to make:
This image. Knowledge, confidence, and faith combine to allow creations like this to be made. Visualizing your image and shooting for that vision are acts of faith.
I hope our Hohenfels Volks enjoy the rest of the week. Keep the faith and get that shot you’ve been seeing in your mind’s eye!
Please feel free to share your photos on our Faceboook page. Everyone here would love the chance to see your work! Is there anything you’d like to see here? Do you have a question? Share your thoughts here or at the Hohenfels Volks Facebook page. Of course, commenting on both Facebook and here is always appreciated, too! Don't forget, we're on Google+, too!
Wednesday, August 15, 2012
Ride Along Rome
Greetings, volks. Welcome to Hohenfels Volks, THE place for our place! Another sunny day in Hohenfels, as we ride out the summer, brings us warmth and brightness.
Today we’re going out on a ride along shot. So, get ready to leave Hohenfels behind, and take a trip through time to ancient Rome.
First, here’s the shot from the camera.

ISO 160, f/8, 1/100, Canon EOS 7D
This is washed out and appears to be a failure, but when you shoot for your final result, this is only half the image.
It’s not very pretty, but this goes to show you how you create an image with your vision. I shot it this way fully expecting to get to the final image with some editing in Canon’s DPP. I didn’t use Photoshop or any other program; everything was done in RAW conversion.
We were in Rome a couple weeks ago on a wonderful family vacation with some great friends. The whole family has always wanted to go there, so off we went.
Of course, the Colosseum was a mandatory stop, especially for me. This was shot during our tour, including the underground portion. I got quite a few shots inside, but wanted something that would leave the viewer wondering. I also wanted something that showed its incredible nature, without getting the usual fare.
I was shooting film and digital that day, so used my 7D to meter for both cameras. The film was Kodak Portra 160, which is a color film with a box speed of ISO 160. I metered for the lower wall. I wasn’t concerned about the sky blowing out, as the important details in the tunnel and brick were needed. By metering the lower mid values and exposing for M-1, shadow detail was preserved, as were the mids.
They hardly seem the same. I edited the image by setting my white balance to color temperature. This allows for some contrast control in the final image. The reason color temperature and white balance can be used to control contrast is that our color levels will be adjusted under the RGB tab. After setting the color balance, and setting the exposure to –2/3 stop and adjusting the contrast, I moved over to the RGB tab.
When converting this way, the image starts looking worse as you progress. It simulates color filters. The beauty of digital is that you can simulate different colors for different levels. By increasing the levels of red in the shadows, pretty much removing blue, and giving green a slight decrease, the image looked wonky. Of course, it starts to come together when you slide your saturation under the RGB tab to 0. A little dip of the luminance curve and it’s back to Raw.
By adjusting the color balance back toward blue, you can darken the image. You also increase contrast. Then, once you’re happy with those adjustments, under the RAW tab’s saturation you can further tweak your contrast. With the red bricks, green spots of grass, and blue sky the image was quite suited to this type of conversion. Another suitable type is when one color dominates several neutral or contrasting colors.
Here’s a screen shot of the 2 tabs and the final settings. Shooting RAW gives you so many options to capture shots that bring together your camera work and your vision.

Here is the RGB tab and the color adjustments.

And here we see the RAW tab in Canon DPP
Finally, here is the finished image.

ISO 160, f/8, 1/100
Colosseum Section, Rome, finished. The increased contrast from the color temperature brings detail into the bright stones topping the section. It also makes the entry dark and increases overall image interest.
The tunnel entrance, in dark mysterious shadows, referred to as the vomitorium, allowed for rapid exit during an emergency. The little arches below were entryways into another seating area. The site had a capacity of 50,000 spectators, and even though this small section doesn’t show the full capacity, it does give an impression of the scale and architectural marvel. I also shot a back up to be in color, which pops for the contrast between the sky and walls.
Here’s hoping you finish the week with some great shots. Hohenfels is full of opportunities for photography, and this weekend may be the perfect time to get something in your camera!
Please feel free to share your photos on our Faceboook page. Everyone here would love the chance to see your work! Is there anything you’d like to see here? Do you have a question? Share your thoughts here or at the Hohenfels Volks Facebook page. Of course, commenting on both Facebook and here is always appreciated, too! Don't forget, we're on Google+, too!
Today we’re going out on a ride along shot. So, get ready to leave Hohenfels behind, and take a trip through time to ancient Rome.
First, here’s the shot from the camera.
ISO 160, f/8, 1/100, Canon EOS 7D
This is washed out and appears to be a failure, but when you shoot for your final result, this is only half the image.
It’s not very pretty, but this goes to show you how you create an image with your vision. I shot it this way fully expecting to get to the final image with some editing in Canon’s DPP. I didn’t use Photoshop or any other program; everything was done in RAW conversion.
We were in Rome a couple weeks ago on a wonderful family vacation with some great friends. The whole family has always wanted to go there, so off we went.
Of course, the Colosseum was a mandatory stop, especially for me. This was shot during our tour, including the underground portion. I got quite a few shots inside, but wanted something that would leave the viewer wondering. I also wanted something that showed its incredible nature, without getting the usual fare.
I was shooting film and digital that day, so used my 7D to meter for both cameras. The film was Kodak Portra 160, which is a color film with a box speed of ISO 160. I metered for the lower wall. I wasn’t concerned about the sky blowing out, as the important details in the tunnel and brick were needed. By metering the lower mid values and exposing for M-1, shadow detail was preserved, as were the mids.
They hardly seem the same. I edited the image by setting my white balance to color temperature. This allows for some contrast control in the final image. The reason color temperature and white balance can be used to control contrast is that our color levels will be adjusted under the RGB tab. After setting the color balance, and setting the exposure to –2/3 stop and adjusting the contrast, I moved over to the RGB tab.
When converting this way, the image starts looking worse as you progress. It simulates color filters. The beauty of digital is that you can simulate different colors for different levels. By increasing the levels of red in the shadows, pretty much removing blue, and giving green a slight decrease, the image looked wonky. Of course, it starts to come together when you slide your saturation under the RGB tab to 0. A little dip of the luminance curve and it’s back to Raw.
By adjusting the color balance back toward blue, you can darken the image. You also increase contrast. Then, once you’re happy with those adjustments, under the RAW tab’s saturation you can further tweak your contrast. With the red bricks, green spots of grass, and blue sky the image was quite suited to this type of conversion. Another suitable type is when one color dominates several neutral or contrasting colors.
Here’s a screen shot of the 2 tabs and the final settings. Shooting RAW gives you so many options to capture shots that bring together your camera work and your vision.
Here is the RGB tab and the color adjustments.
And here we see the RAW tab in Canon DPP
Finally, here is the finished image.
ISO 160, f/8, 1/100
Colosseum Section, Rome, finished. The increased contrast from the color temperature brings detail into the bright stones topping the section. It also makes the entry dark and increases overall image interest.
The tunnel entrance, in dark mysterious shadows, referred to as the vomitorium, allowed for rapid exit during an emergency. The little arches below were entryways into another seating area. The site had a capacity of 50,000 spectators, and even though this small section doesn’t show the full capacity, it does give an impression of the scale and architectural marvel. I also shot a back up to be in color, which pops for the contrast between the sky and walls.
Here’s hoping you finish the week with some great shots. Hohenfels is full of opportunities for photography, and this weekend may be the perfect time to get something in your camera!
Please feel free to share your photos on our Faceboook page. Everyone here would love the chance to see your work! Is there anything you’d like to see here? Do you have a question? Share your thoughts here or at the Hohenfels Volks Facebook page. Of course, commenting on both Facebook and here is always appreciated, too! Don't forget, we're on Google+, too!
Tuesday, August 14, 2012
Your Vision...
Greetings, volks. Welcome to Hohenfels Volks, THE place for our place! I hope this hump-day brings All of Hohenfels into the downside of a great week.
Today’s a quick post on creating an image from an artistic approach.
As we often mention here at Hohenfels Volks, the first part of creating an image is to visualize the final image. During this process, we’re trying to see in our mid and in our heart the image we want to present. Don’t close your eyes and see the scene how it is, see it how you want to show it.
Once you know what you’re trying to show, you can work on visualizing the steps to create that image. One of the things often overlooked is an inventory of the tools you have and how to use them. Perhaps you have Photoshop and want that area of lower color to be more saturated, how do you do it? Photoshop has some great tools to make that happen, including the vibrancy tool, which helps bring out color in under saturated areas without increasing overall saturation. The tools you can use are more than your camera; you can use a flash to highlight part of a scene, bringing the levels to your vision, or add an ND filter to allow longer exposures to make the water more flowing. Know your tools and how to use them. That will get you a long way to creating a wonderful scene.
Another thing to visualize, or know, is how you wish to present your image. Will you make it large? Will it be printed or on a monitor? Knowing these things will improve your images. Should you decide to print it, you may want to make a photo that slightly lighter, and take another for monitor display. What size will you print? The larger the print you desire, the more information you will need to capture. You will also need to have a more accurate focus. This generally means a larger file size. Although, making it a point to always shoot RAW will make you’re your files consistent in size.
Remember to think about how the colors and levels present can affect the viewer. Are they happy or moody? Is there any color? By harmonizing your tones and color, you create an image that impacts far more than a shot made without consideration.
Once you’re ready to make your shot, go for it. Remember though, it won’t look like you visualized without some cleaning up and editing. This isn’t always true, but best kept in mind. When you look on the tiny monitor in your camera, it’s not edited or presented according to your vision. Don’t be disappointed, remember, you planned your shot. Stick to the plan and you’ll get some amazing photos.
The technical side of photography is incredibly important. We need to learn aperture, shutter speed, sensor (or film) speed, and how they work together. However, they are only 1 part of the process. Without vision, creativity, and some thought you’re making snapshots. The see and snaps out there are abundant, but with these things on your side, your images will rock those who view them.

ISO 1600, f/5, 1/30 70mm Canon EOS 7D
Vittorio Emanuele II Memorial in Rome. I wanted to capture this 2 ways, this way in black and white, and again in full color. Knowing the tools I use, including Canon's DPP, allowed me to capture a shot that could be both. In the color version, you can sense the evening in the shot, as the sky behind is dark, and the lights behind the column add beautiful color and depth. By visualizing the shot and taking a little extra time, I got the one I wanted.
Take care, enjoy the downside of your week, and get the shot you’ve been thinking about all day! You’ll feel incredibly accomplished with the shot in your camera. Just think, it’s almost autumn, and that means Hohenfels and our places will be bursting with awesome colors soon! Time to start your visualization!
Please feel free to share your photos on our Faceboook page. Everyone here would love the chance to see your work! Is there anything you’d like to see here? Do you have a question? Share your thoughts here or at the Hohenfels Volks Facebook page. Of course, commenting on both Facebook and here is always appreciated, too! Don't forget, we're on Google+, too!
Today’s a quick post on creating an image from an artistic approach.
As we often mention here at Hohenfels Volks, the first part of creating an image is to visualize the final image. During this process, we’re trying to see in our mid and in our heart the image we want to present. Don’t close your eyes and see the scene how it is, see it how you want to show it.
Once you know what you’re trying to show, you can work on visualizing the steps to create that image. One of the things often overlooked is an inventory of the tools you have and how to use them. Perhaps you have Photoshop and want that area of lower color to be more saturated, how do you do it? Photoshop has some great tools to make that happen, including the vibrancy tool, which helps bring out color in under saturated areas without increasing overall saturation. The tools you can use are more than your camera; you can use a flash to highlight part of a scene, bringing the levels to your vision, or add an ND filter to allow longer exposures to make the water more flowing. Know your tools and how to use them. That will get you a long way to creating a wonderful scene.
Another thing to visualize, or know, is how you wish to present your image. Will you make it large? Will it be printed or on a monitor? Knowing these things will improve your images. Should you decide to print it, you may want to make a photo that slightly lighter, and take another for monitor display. What size will you print? The larger the print you desire, the more information you will need to capture. You will also need to have a more accurate focus. This generally means a larger file size. Although, making it a point to always shoot RAW will make you’re your files consistent in size.
Remember to think about how the colors and levels present can affect the viewer. Are they happy or moody? Is there any color? By harmonizing your tones and color, you create an image that impacts far more than a shot made without consideration.
Once you’re ready to make your shot, go for it. Remember though, it won’t look like you visualized without some cleaning up and editing. This isn’t always true, but best kept in mind. When you look on the tiny monitor in your camera, it’s not edited or presented according to your vision. Don’t be disappointed, remember, you planned your shot. Stick to the plan and you’ll get some amazing photos.
The technical side of photography is incredibly important. We need to learn aperture, shutter speed, sensor (or film) speed, and how they work together. However, they are only 1 part of the process. Without vision, creativity, and some thought you’re making snapshots. The see and snaps out there are abundant, but with these things on your side, your images will rock those who view them.
ISO 1600, f/5, 1/30 70mm Canon EOS 7D
Vittorio Emanuele II Memorial in Rome. I wanted to capture this 2 ways, this way in black and white, and again in full color. Knowing the tools I use, including Canon's DPP, allowed me to capture a shot that could be both. In the color version, you can sense the evening in the shot, as the sky behind is dark, and the lights behind the column add beautiful color and depth. By visualizing the shot and taking a little extra time, I got the one I wanted.
Take care, enjoy the downside of your week, and get the shot you’ve been thinking about all day! You’ll feel incredibly accomplished with the shot in your camera. Just think, it’s almost autumn, and that means Hohenfels and our places will be bursting with awesome colors soon! Time to start your visualization!
Please feel free to share your photos on our Faceboook page. Everyone here would love the chance to see your work! Is there anything you’d like to see here? Do you have a question? Share your thoughts here or at the Hohenfels Volks Facebook page. Of course, commenting on both Facebook and here is always appreciated, too! Don't forget, we're on Google+, too!
Tuesday, July 31, 2012
Metering for Effect
Greetings, volks. Welcome to Hohenfels Volks, THE place for our place! I hope everyone managed to break away from the Olympics this weekend and get some great shots of our Hohenfels area.
Some beautiful cloudscapes this weekend started me thinking about how we meter and where we place our exposures. Of course, this led to a short post today about shooting bright scenes, or scenes with a large amount of brighter objects.
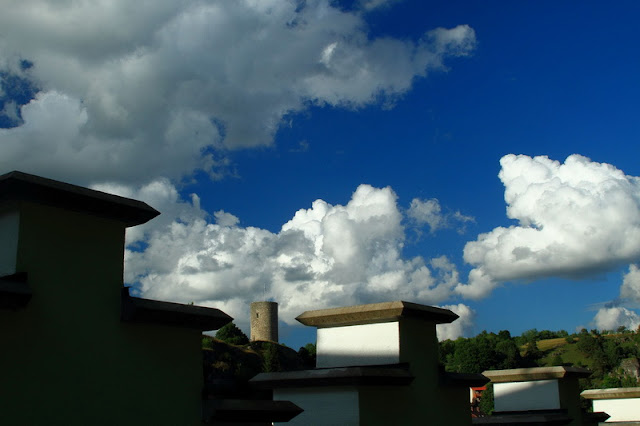
This shot was metered for the bottom of the clouds on the left. This left the bright clouds on the right a little overexposed. The values were brought down using the luminance curves in Canon's Digital Photo Pro to match my visualizing. By composing with the crenelations creating a stairstep effect and framing the castle tower, a brighter image could be created. It also brings the eye back to the tower and clouds, adding interest and depth.
The first thing we should be thinking about is our visualization. Where do we want to place our elements? For instance, if your scene contains fields, nice blue skies, and big fluffy clouds, perhaps metering for the fields will turn the sky white, and metering for the clouds will turn the fields black. Knowing where we want our elements in the range of values is the first step in putting our visualization to work.
After we’ve visually composed our image and noted the areas where significant detail must be maintained, we begin to meter. It’s generally best to make several readings from the different values within the scene, as this lets us know our range. In the above mentioned scene with the fields and clouds, we determine the sky itself to be the middle range. If we give this a +1 exposure, the sky is properly exposed, the fields are likely to be also, but the clouds will usually be overexposed. We can try to fix it on the computer, which is often difficult when the highlights are too far gone, or we can expose the clouds for +1 to +2 stops over their meter reading. This will darken the sky to a nice rich blue, and generally provide some slight underexposure in the field. The lowering of values throughout the scene also increases your overall saturation. It also gives you greater control over the chiaroscuro and play of light in your work.
Of course, none of this is useful to you if you don’t know what you want from your shot. Trying to capture the feeling you wish to share may require something else. Having this general idea, though, gives you another tool in the quest for the perfect shot.
Please feel free to share your photos on our Faceboook page. Everyone here would love the chance to see your work! Is there anything you’d like to see here? Do you have a question? Share your thoughts here or at the Hohenfels Volks Facebook page. Of course, commenting on both Facebook and here is always appreciated, too! Don't forget, we're on Google+, too!
Some beautiful cloudscapes this weekend started me thinking about how we meter and where we place our exposures. Of course, this led to a short post today about shooting bright scenes, or scenes with a large amount of brighter objects.
This shot was metered for the bottom of the clouds on the left. This left the bright clouds on the right a little overexposed. The values were brought down using the luminance curves in Canon's Digital Photo Pro to match my visualizing. By composing with the crenelations creating a stairstep effect and framing the castle tower, a brighter image could be created. It also brings the eye back to the tower and clouds, adding interest and depth.
The first thing we should be thinking about is our visualization. Where do we want to place our elements? For instance, if your scene contains fields, nice blue skies, and big fluffy clouds, perhaps metering for the fields will turn the sky white, and metering for the clouds will turn the fields black. Knowing where we want our elements in the range of values is the first step in putting our visualization to work.
After we’ve visually composed our image and noted the areas where significant detail must be maintained, we begin to meter. It’s generally best to make several readings from the different values within the scene, as this lets us know our range. In the above mentioned scene with the fields and clouds, we determine the sky itself to be the middle range. If we give this a +1 exposure, the sky is properly exposed, the fields are likely to be also, but the clouds will usually be overexposed. We can try to fix it on the computer, which is often difficult when the highlights are too far gone, or we can expose the clouds for +1 to +2 stops over their meter reading. This will darken the sky to a nice rich blue, and generally provide some slight underexposure in the field. The lowering of values throughout the scene also increases your overall saturation. It also gives you greater control over the chiaroscuro and play of light in your work.
Of course, none of this is useful to you if you don’t know what you want from your shot. Trying to capture the feeling you wish to share may require something else. Having this general idea, though, gives you another tool in the quest for the perfect shot.
Please feel free to share your photos on our Faceboook page. Everyone here would love the chance to see your work! Is there anything you’d like to see here? Do you have a question? Share your thoughts here or at the Hohenfels Volks Facebook page. Of course, commenting on both Facebook and here is always appreciated, too! Don't forget, we're on Google+, too!
Subscribe to:
Posts (Atom)