Showing posts with label flash. Show all posts

Monday, September 30, 2013

On the Cheap

Greetings and welcome to Hohenfels Volks, THE place for our place!

“Valor is strength, not of legs and arms, but of heart and soul; it consists not in the worth of our horse or our weapons, but in our own.” Michel de Montaigne, Cannibales

“The Master said, “A true gentleman is one who has set his heart upon the Way. A fellow who is ashamed merely of shabby clothing or modest meals is not even worth conversing with.” (Analects 4.9)” Confucius

Both the above quotes refer to the fact that expensive is not always the best, nor is it always necessary. That’s the topic of today’s post, inexpensive lighting mods.

Firstly, this is not to say good equipment isn’t worth the price. A good set of lighting modifiers can be worth their weight, if they’re used. For most of us, a reflector, flash, and maybe something like a Rogue Flashbender are more than enough. There are also times when having something like a soft box or snoot can add a little something to your photo, especially in portraits.

Hohenfels Volks: The Ultimate Ransom
ISO 400, f/5.6, 1/30
This was shot in a local church. I used a Rogue Flashbender on my YN-560 flash wirelessly triggered. The flash was above and to the right of the camera. The soft light wraps, but still has direction to it, giving a nicely lit portrait of our Jesus' love for us!

When I first started out with homemade light mods, the first thing I built was an ice chest soft box. By cutting a hole in the bottom of a Styrofoam cooler the size of my flash head and covering the front with a white pillowcase, I had a soft box. The soft box softens the lights by giving us a larger light source, diffusing the lights internally to the box, and softening the light as it exits the box with a piece of diffusing fabric.

Take your ice chest, with the hole cut in it, and line it with aluminum foil, shiny side out. Tape of glue the foil to the inside of the chest. Let it crinkle up and have lots of texture, as this diffuses the light more. Once that’s done, tape, or glue a piece of white fabric to the inside of the ice chest to cover the opening. Taping it about 1 inch back from the edge gives you some spill control and allows for more directionality of the light. If you’re particularly ambitious, you can add some support to keep it from sagging, perhaps mounting it to a tripod.

Another great mod is a snoot. This allows a focused ray of light to be targeted to your application. One easy method is to cut both ends from a Pringles can. Using one end over your flash, and the other end open, you have a beam of light for a spot effect or hair light. Cover the flash end to prevent light leaks. You can even wrap the can with some colored paper and have a nice looking snoot. Placing the cap over the end of the can softens the spot a little, giving you a wider beam. A snoot can also be made from a rolled up cereal box, although you may want to line it with foil.

Another simple mod is a pie pan beauty dish. By taking a solid pie pan, or even some larger, a very nice light can be created. Cut an opening in the back for your flash, and drill 3 small holes. Place a 2-3 inch disk about 2-3 inches above the opening using stand offs or long screws, and voila, instant mod! Great for a more focused, glamorous light and ring like catch lights in your subject’s eyes, that adds drama to your scene.

For more advanced stuff, like large scrims or reflectors, PVC can be used as a frame with white sheets cut and sewn to fit. You can even make adjustable mods this way, and add legs or stands. Scrims are great for shooting in sunlight, as they soften the sun’s light and create nice shadows. You can even use a space blanket for extra large reflectors. They have a gold side and a silver side, like most commercial reflectors, and smaller sections can be used for fill light on product shots or close ups of flowers. When you’re making the larger sizes, it pays to measure everything out and have your fabric cut and sewn to match the several options you’ll have available. There are instructions online for making the larger PVC mods, and that’s a great way to build up your kit without breaking the bank.

With a little effort and ingenuity, a lot can be done. Even going back to Ansel Adams and many of the older era photographers, simple and cheap was a good thing. Ansel Adams was known to use the white side of his dark cloth for fill light when needed. Improvisation was often necessary, and following in that vein, we can get great shots without breaking the bank. A great place to start is DIY photography. They’re listed on our resources page!

We want you to share your photos with us on our Hohenfels Volks Facebook page. You can also e-mail questions, photos, or comments to HohenfelsVolks(at)tks-net.com, and we’ll get them posted!

Is there anything you’d like to see here? Do you have a question? Share your thoughts here or at the Hohenfels Volks Facebook page. Of course, commenting on both Facebook and here is always appreciated, too! Don't forget, we're on Google+, too!

Wednesday, January 18, 2012

Tools of the Trade: Flash Part II

Greetings, volks. Welcome to Hohenfels Volks, THE place for our place! Today’s post is going to deal with using your flash in manual mode.

For some Volks, manual mode and photography don’t seem to go together. They leave everything on automatic, letting the camera tell them when to click the shutter, which seems a bit too much like serving the camera, not the camera serving us. By now, most of you have been shooting manual for a while. Chances are, though, that your flash is doing the majority of your work when you use it. I hope that this post will change that some!

First, we’re going to learn some terms and concepts. Flashes are rated by something called the GN, or Guide Number. It’s a measure of a flash's output. You have to know this number. The YN-560 that I have is rated by the manufacturer for 58 meters at 105mm, ISO 100. The actual rating is more like 35 meters at 35mm, ISO 100, which should give us about 50-55 meters at 105mm. I haven’t formally tested it in a controlled manner, but that seems about right. What that means is shooting at ISO 100, 105mm, and with the flash at full power, my max range for the flash is about 58 meters. At that distance, the light has fallen drastically in intensity, but spread out in coverage. The next thing we need to understand is aperture, or the size of the opening in our lens. A larger aperture means more light and conversely a smaller aperture means less. Aperture is measured as f/stop, a ratio of your aperture’s diameter to the level of light it allows. That’s oversimplified, but you get the idea. You already know about aperture, but will need to understand it for flash work. The last thing we’re going to bring up is distance between the flash and the subject. These 3 things are how you determine a manual flash’s power and set your exposure correctly. A flashes GN is the rating assigned to it by the manufacturer, so you have to be careful to read the specs before buying one. Some makers will call their flash GN58, but if you look at the tiny print, it’s at ISO 200 or even 400. That makes it more like a GN20 at ISO 100. Also, make sure the units your GN is listed in, feet or meters, or both are consistent throughout your calculations. Also remember that we're dealing with light, so sometimes it doesn't seem to make sense due the inverse square law. That's why we use GN!

The 3 things listed above are what you need to know to expose properly for manual flash. We’re going to start this part by giving you the equations to use, then giving some examples.

The first calculation is to determine your GN. First, set your flash to manual mode, full power, and if it has it, full zoom. Then place your flash a measured distance to your subject, say 5 meters. Then shoot a series of shots at successive f/stops. Note the aperture that gives you a proper exposure. For this we’re going to say f/8. Now multiply the distance by the f/stop. For this we’re going to multiply 5 meters by f/8, which means 5x8=40, or a GN of 40 at ISO 100, full power, max zoom, or about 20 at half power.

The next calculation is to determine your f/stop for that GN. If you have a GN 20 at ISO 100 flash, what f/stop do you use for 4.5 meters? The calculation for that is GN divided by distance. For GN 20, that would be 20/4.5=4.5 or f/4.5. Set up the above flash, GN 40 at half power, 4.5 meters and shoot using f/4.5, you should be almost dead on every time!

Last, we have figuring out your distance for a GN with a desired aperture. That is calculated by dividing GN/f/stop. As above, GN 20 at half power, we’ll say f/8. To get that we divide 20 by 8, or 20/8= 2.5, or 2.5 meters.

Here are the calculations listed:

Your GN=f/stop x distance to subject
F/stop= GN/distance to subject
Distance to subject= GN/f/stop

Here are some things to note. The distance is ALWAYS the distance from the flash head to the subject, not the camera to subject or flash to camera. Light modifiers like a Sto-Fen or umbrella lower your flash power by about 1-2.5 stops. Measure with them in place for more accurate readings. The same applies to bounce flash, count your distance as being from the flash to the reflector + the reflector to the subject, or adjust your exposure to compensate. A few times doing this with your calculator and flash manual will give you a great starting point for your flash shots, then before you know it, you’ll be nailing them every time!

Now that you know all that, use your camera's built in spot metering mode, go to AV or aperture priority, set your required f/stop, and meter for the rest of the scene. That shutter speed will allow you to balance your flash with the ambient light to create a nearly perfect exposure. Tinker with it, and you'll make that magic of having your image match your vision that much easier!

Working with your flash off camera in slave mode can also be a trial. The secret to that is point your optical sensor at the camera and rotate your flash head toward the subject. The sensor detects the flash from your camera and triggers the flash. It also has to be where it can see the flash from on camera. For some flashes, this will trigger it before it should go. The Yongnuo flashes have a mode called S1 that trips the flash at the very first blip of flash, and S2 that only triggers when the actual flash goes for the shot. Use S2 to ignore the red eye and pre-flashes your camera sends out. Also, turn of red eye reduction or pre-flash. Having your flash off camera will help prevent this phenomenon from occurring. Of course, you can also buy a wireless RF trigger and receiver from anywhere online for about $30 and avoid slave mode altogether.

A great resource for all things flash related is Strobist. We have a link to them in our links and they can really up your knowledge levels on flash. They put out some good tutorials and lessons in Lighting 101. Give them a read!

You’re probably bored after all that math and calculating. Get out there and shoot something, it’ll wake you back up! While you’re out shooting, don’t forget the milk, I mean your shots for this week’s theme! Complimentary colors with a contrasting subject. Should be something great in there and I can’t wait to see your work!

Don’t forget to post any of your images you’d like to see here at the Hohenfels Volks Facebook page. Of course, commenting on both Facebook and here is always appreciated, too!

Tuesday, January 3, 2012

Classic Shooting

Greetings and welcome to Hohenfels Volks, THE place for our place. As promised, a second dose of photography just for Hohenfels, dealing with old fashioned photography. Before we begin, I need to clarify this week's theme. Your images should be of work being done, not the people doing the work. The bulk of your subject should be the work, not the worker. I hope this helps when creating your shots.

As mentioned previously, we're talking about old fashioned photography. I got some very old cameras this weekend, inspiring me to pick up film again and try out what I've learned. It also inspired me to share pics of them with you and encourage you to pick up your film stuff and shoot that, too. It's a great way to test yourself, using film and what you've learned. It also shows you what you've learned and how well you're progressing.

Hohenfels Volks- Nettar 515/2
ISO 400, f/8, 1/25, 37mm
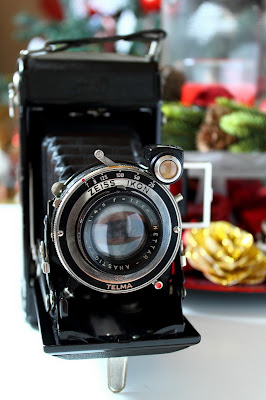
Zeiss Ikon up close. This shows the lens, the "brilliant glass," used to compose your shot, and the speeds available.

This weekend the family and friends surprised me with some gifts. The first gift, from Mrs. Hohenfels Volks and the princess, was an Altissar box camera from 1951.

Hohenfels Volks- Altissar Box camera, 1951
ISO 400, f/8, 1/25, 37mm
The Altissa box camera from 1951. This beauty is a real challenge, as it only has 4 settings! A great little camera with some great meaning!

Eho-Altissa started in Leipzig in 1892. Founded by Richard Knoll as a photographic shop and studio, they eventually started repairing and then manufacturing cameras. 1910 it moved to Dresden, where it was later bought by Berthold Altmann. In about 1951, Berthold Altmann decided to flee the oppressive and anti-business communist East Germany. In absentia, he was tried, convicted, and his company taken over by the communist run government. They were re-named and finally failed, with the machines being sent to Sarajevo to make imitation box cameras. This particular model of box camera, introduced in 1951, was the last while Altissa remained a free company. That scenario reminds me of Atlas Shrugged, in which all the creators and producers abandon their businesses and creations and disappear, leaving an increasingly corrupt, socialistic, and anti-business society to its own failings. Because of that story, and what I see happening today, this camera has meaning beyond photography to me. It’s functional, still works, and I’m taking photos with it! Once I get some developed, I’ll post what comes out here! This camera had 4 settings, f/8, f/16, B for bulb, and 1/25. The lens was fixed focal length and fixed focus. Using 120 film, it produces a negative that is 6cm by 6cm. Composing your image is through a window above the lens.

The next camera, from our friends, was a Zeiss Ikon 515/2. This little winner was introduced in 1937 as a lower priced Ikonta, with virtually all the features. The one I received has an 11cm lens, which runs from f/4.5 to f/32, and has shutter speeds from 1/25 to 1/125. Outside the shutter speed range is B, for bulb mode shots, and T, where you open the shutter with one click and close it with a second click. It uses standard 120 film, and produces a negative that is 6cm by 9cm. The viewfinder is a pair of metal tabs, and only serves for composition. Focusing is accomplished by adjusting the lens for the zone that should be sharpest, by distance. You can also hold it about waist high, and using the “brilliant glass,” frame up your shot. The brilliant glass is a tiny “periscope” like pair of lenses through which you compose your shot. It only allows for framing and composition. It has a PC Sync port for the flash, should you have one, and has a self-timer for setting it up and activating the shutter, allowing you to enter the scene should you desire.

Hohenfels Volks- Zeiss Ikon Nettar 515/2, Circa 1940
ISO 400, f/4.6, 1/25, 33mm
The Zeiss Ikon in all its glory. It takes time to set up your shot with this, which helps with getting your composition tidy.

Zeiss Ikon started in 1926 by the merger of several camera manufacturers and financial backing from Zeiss. Soon several other companies joined the Zeiss Ikon syndicate. Located in Dresden, with plants in Stuttgart and Berlin, Zeiss Ikon split into a West German and an East-German part after the war. Stuttgart became the headquarters after the division of Germany. Later they merged with Voigtländer, who made higher end cameras. In 1972, they stopped producing cameras. After the reunification of Germany, the East and West German divisions re-united into a single company.

The third classic I acquired was a Voigtländer Vitomatic II. This little beauty is a 35mm Rangefinder with a fixed focal length 50mm lens. The lens runs from f/2.8 to f/22, and 1 second to 1/300 second. It uses, like the Zeiss, a leaf shutter, and has no mirror. This feature allows flash to be synched up to the lens’s maximum shutter speed, in this case 1/300. The camera came with 2 filters, a UV, and a green for B&W. This allows for brighter greens, darker reds, and greater separation of greens in your monochrome images. Also included were a lens hood, leather case, and leather strap. Again, through PC sync, my flashes can be remoted off camera and fully controlled. Voigtländer, as you read above, was a very upscale camera maker. They started in Vienna in 1756 as an optics company. Later they introduced the world’s fastest lens at that time, in 1840, it was f/3.5. They were also the first to introduce the zoom lens and the first 35mm camera with a flash built into the camera.

Hohenfels Volks- Voigtlander Vitomatic II 1958
ISO 200, f/4.5, 1/20, 29mm
The Voigtlander Vitomatic II from 1958. In the upper left corner you can see the selenium meter in the camera. Used to help judge your exposure settings.

The cool thing about these cameras is that they show you that even though technology has improved, it hasn’t changed too much since the times represented. Using what we’ve discussed about exposure, composition, and other tips, you can get a great shot, even with old cameras. Don’t give up the learning just because digital means you don’t have to do it. I’ve used my 7D to meter the light for my desired aperture, and then set the old timers accordingly. Remember, being able to sync with your flash means you can do anything with these guys you can do with your digital. I hope this will inspire you to learn more manual applications, so you can put your old film stuff to use again. You’ll be surprised how much you can do with it!

Enjoy the rest of your day, and remember to cast your vote for next week’s theme. Get yours in to have a say! Don’t forget to get your pics posted at the Hohenfels Volks Facebook page. Of course, commenting on both Facebook and here is always appreciated, too!

Thursday, December 15, 2011

Reading List: Light– Science & Magic

Greetings and welcome to Hohenfels Volks, THE place for our place. Another wet, rainy, and cold Thursday draws to a close, making us thankful the warmth of home!

Today’s reading list is LIGHT—SCIENCE & MAGIC an Introduction to Photographic Lighting, by Fil Hunter, Steve Biver, and Paul Fuqua.

This book is a veritable goldmine of lighting knowledge. These guys have put together something that no photographer should be without. This great book introduces us to light, its characteristics, and how to use it. There are lessons, exercises, and lots of ideas to be had here. They’re on the fourth edition now, which just goes to show you how valuable a resource it is.

Much of what they cover applies even without a flash. The nature of light is the same, whether you’re using a flash or shooting ambient only. The book starts at the most basic information about light, runs through light transmission, reflection, refraction, and onto to more photographic information. They cover angles and the families of angles, as well as some very useful stuff that will make you say “Aha, that’s how they did it!”

One of the early points in the book is that not every photographer has enough lighting equipment to light everything perfect, but every photographer has enough to do things well. A flash or studio strobes are nice, but light is light. It generally acts the same every time, which allows us to use almost any light source for great results.

The other really nice thing about this book is that it covers even tricky subjects like glass and metal. That alone makes it an invaluable resource to someone trying to learn lighting. It’s definitely worth the price. Check it out and let me know what you think.

I hope things are coming along nicely as you work on exposing yourself for this week’s theme. I can’t wait to see what you Volks come up with!

Remember to cast your vote for next week’s theme. Don’t forget to get your pics posted at the Hohenfels Volks Facebook page. Of course, commenting on both Facebook and here is always appreciated, too!

Monday, December 5, 2011

Tiny or Big, it's Bubbles!

Greetings, Hohenfels, welcome to Hohenfels Volks, THE place for our place. I hope everyone is having a great weekend. Today is definitely a Monday; if ever there were one, this would be it. Hohenfels, complete with cold, rain, sun, hail, and whatever else came our way. Don't worry, though, Christmas will soon be here in our little Hohenfels area, and all the joys that come with it!

Well, this week one person submitted for the theme. Thanks to Jennifer for your submission, I’ll try to get it up here tomorrow after discussing it with her. Then, there is the news that the 6 votes are counted. Our theme for the week will be Bubbles (... Of Light, DUH!) This is more advanced than last week’s; so let’s get this ball rolling.

This one may make you think, it may make you scream, or it may make you rise to the challenge and create something magical. Of course, it may make you do all 3! A bubble of light? What is it? What does it do, and what’s it look like? How am I supposed to do this without any knowledge of this bubble thing, and if this one bursts and ruins the economy, who gets the blame?

Relax; it’s nothing like that. Creating a bubble of light is a trick that can be seen by looking back at our post on chiaroscuro, which can be found here. The biggest secret is that light moves and bounces according to your light source. One of the easiest ways to create the bubble for this week’s theme is to use off camera flash and a semi-translucent half dome. The effect can be even more apparent with subjects cloaked in dark and shrouded in light, with nice transition between the two. Of course, it’s not really like a bubble, but presents the illusion of one.

By examining the image from that post, you can see how it seems as if the ladies are surrounding a glowing orb. By knowing how and where light falls, Van Honthorst was able to create the magical lighting in his image. It seems as if the matchmaker is closer than the older ladies are, almost like she’s showing a treasured globe. The lighting here, and the resulting bubble, come from the shape of the candle flame. Another type is to make it seem as if your subject is encased in a bubble of light, almost like a snow globe. Examine some rounded shapes, balls, bubbles, footballs, and other items to see how the light falls on them. Knowing that can help you figure out how the light radiates from them, and what kind of bubble you might expect.

For those without a flash or the ability to trigger it remotely, you can use lamps of any kind, LED flashlights, anything that will create the type of bubble you want to make. The important thing to remember is the shape of your light source and how the light will radiate from it. Flash or other types of light will produce almost identical results in that department. You can also work some more of this type of magic with multiple lights, and colored gels. When you shoot in B&W, the color of your light can be changed, and a matching filter added to increase the effect even more. The sharper your transition to dark from light at the very edges, the more abrupt and sharp your bubble will appear. Keep that in mind.

If I get some time this week, I will try to make an example image, but I probably won’t have much time. The new poll for next week’s theme is up, it expires at midnight on Sunday night. Here's hoping we get at least 19 votes this time around! Get your votes in, vote early, and let’s bring volks into this theme.

Tonight, take the time to check out some spheres, globes, bubbles, and balls. Take a little time to visualize your own shot; even it’s an exact copy of Van Honthorst’s painting. Write down some ideas. Then during the week, refine your visions and your notes. Once you’re ready and your vision is fully fleshed out, set up your scene, blow your bubble, and get the pics posted at the Hohenfels Volks Facebook page. Of course, commenting on both Facebook and here is always appreciated, too!

Wednesday, November 16, 2011

Gear Day- Pop Goes the...

Greetings, Hohenfels, welcome to Hohenfels Volks, THE place for our place and our Volks. Another day, trees covered in white and ready for the icy grip of winter, closes around us.

Today we’re going to talk about flash. Learning to use flash is one of the major steps you should take in getting your photos gallery ready.

Today’s electronic flashes work amazingly well and can put a great deal of light right where you need it. The secret to using flash to get the right exposure is knowing how to meter and knowing how to balance your lighting.

First, let’s talk about several terms and features of an average flash.

The first term to know is Guide Number or GN. This is an indication of your flash’s power. It means your flash can provide light up to that distance at maximum zoom, for ISO 100. It’s usually measured in meters. The Canon 580EXII has a guide number of 58, as does the Yongnuo YN-560. This is used to calculate manual flash settings for your camera.

The second term is zoom. Your flash can often zoom to a preset distance to match the zoom of your lens, allowing it to throw light more in line with what you are shooting. This is extremely useful in auto flash; the drawback to that is the camera must be connected to the flash. The longer the zoon, the further the light will travel, and the less it will spread out.

The third term is sync speed, or shutter sync speed. On most higher end cameras, like the EOS 7D and 60D this is 1/250. For the lower end cameras, like the Digital Rebel series, this is 1/200. Some cameras won’t sync above 1/125 to 1/160. The slower the maximum sync speed, the slower you have to shoot. At speeds above the sync speed, either you will need a flash with high-speed sync, or you will get dark bands on your image.

The fourth term is rear or front curtain sync. In rear curtain sync, your flash fires at the end of the exposure, and in front curtain it fires at the start. This really only applies beginning at 1/30 – 1/60, depending on your model.

The last term I’ll introduce is TTL. Most of today’s automatic flashes are capable of being controlled by the camera, provided they are mounted to the camera. Today’s cameras meter through the lens, and pass that information to the flash to set output power and zoom. Many cameras use a more advanced feature called E-TTL, which is electronic metering through the lens. Using this method can improve your flash exposures. The downside is using your flash on camera can be disappointing, as it flattens the light and removes depth and character.

The range of a flash is limited by inverse square law, which states that light drops off from a source rapidly. For instance, a flashlight shined into the dark starts out quite bright, but ends up not even visible beyond some distance based on its power. This law states that doubling the distance from a subject to a source reduces light to ¼ its original level. Almost all light sources follow this rule.

When using your flash on camera, use your E-TTL features to get the best exposure. To correctly expose flash manually, you will need to adjust your aperture to control exposure for the light from the flash and your speed to control ambient light. To find the required to take a photo of a subject use this formula- f-stop number = GN/distance to subject. To figure out the distance to place your flash for a preset aperture use this formula- distance = GN/f-stop number. These are usually measured in meters, so remember to set up accordingly. Guide number is at ISO 100, so any change in ISO, must be accounted for.

A couple points- on camera flash gives a hard light, which results in a loss of shadows in the image making the subject appear flattish. On camera, or flash on the axis of the lens, gives red-eye effect, which is when the eye reflects red light straight back in the direction it came from.

Another thing to mention about off camera flash, besides adding depth, character, and bringing out detail, when used properly it can bring out the eye colors and make them stand out a little. This is especially true in brown and dark eyes. It takes some practice, but the results are worth it!

I like to use the YN-560, as this a nice, inexpensive, and powerful manual flash, paired with my with radio triggers. This allows for shots on camera can’t get, and it creates a nice direction to the light. Having directional lighting on a portrait really adds to the magic. That’s why you see it even in the paintings from the old masters. Next time we talk about flash, we’ll discuss fill, main, and lighting ratios. We’ll also discuss basic lighting patterns for portraits, and how to take the guesswork and mathematics out of getting your manual flash exposures.

I hope this information brings you another tool in our quest for the perfect picture. Let me know if it has! Remember to share your pics and post your questions at the Hohenfels Volks Facebook page, and or by commenting here!

Tuesday, October 4, 2011

Tools of the Trade

Today we’re going to talk about the tools used in photography. It doesn’t need to be expensive to get good images!

Camera

Let’s start with the camera. There are lots of options in this area. From the Canon ELPH and Powershot at the point and shoot category, through the Digital Rebel T3 and the EOS 1000d in the entry level DSLR, to the EOS 7d and the EOS 1d at the pro end, options abound. The important thing is to get one that allows you the option of manual control.

Canon’s S95 and PowerShot SX230HS make for great models in the point and shoot area, with manual modes. The 1000d and Rebel T3 are quite reasonably priced beginner DSLRs. Although they seem to have the features of higher priced cameras, you may outgrow most of the lower end DSLRs before too long.

The mid-range DSLRs, like the 50d and 60d, are something that will make your time behind the camera even more enjoyable!

The important thing to remember is that you can take shots that are breathtaking, even with a point and shoot. Don’t become trapped in the technology pitfall. So many people are fooled into thinking that a more expensive or higher level camera means better photos. The fact is, the higher-level cameras require more knowledge and experience to get it right. The higher end cameras usually don’t offer the automated modes, other than P, which is fully automatic.

The most important thing in the camera is the user’s manual. Read it, study it, and learn it! If you know your camera, you can make images that stand out.

Flash

The first piece of gear you should get, after a camera, is a flash. Even with a point and shoot, you can use a flash. Most of your lower priced flashes have a slave mode that will trigger the flash from your on camera flash. Getting your flash off camera is the first step to getting good light.

You can get a great flash from Yongnuo, for less than a cheap OEM flash, with most of the features. The YN-560 is a fully manual flash that costs around $70.00, and has the power of Canon’s 580EXII flash. It doesn’t offer TTL or HSS, but gives some great light to your image. Their YN-565 offers E-TTL and a modeling light for around $200.00, and it will work with the built in flash remote control on the 7D or as a slave to a canon 580EXII with full E-TTL.

Another good thing to get at the same time is a flash RF trigger. You can get a set of two receivers and one transmitter for around $50.00. This increases your range and allows you to use the flash in interesting places and ways. It’s also more reliable than using a trigger from a flash or your on camera flash.

Tripods

A good tripod is a requirement for long shutter speeds. Without one, your images will be blurry when handheld at slow speeds. The high end ones can run several hundreds of dollars, but even a $30.00 tripod will produce what you need.

You can also use your tripod for holding your flash, so a second one is a great investment.

One more thing to get is a remote shutter release. They come in wireless and wired varieties and are reasonably priced. When you set your camera on a tripod, it’s necessary to use one, as it will reduce camera shake quite visibly.

What I wrote above is just a basic intro to getting your kit together. Look for more articles on tools and accessories for photography in future posts. I’ll also try to provide some reliable reviews. If you have a favorite piece of gear and would like to write a review, let me know. We’ll get your review on here.

Should you have a question, post it to our Facebook account. Also post it here as a comment on the related post, I’ll review it and get back to you! If you have a photo you’d like to share, add it to our wall on Facebook, and we'll try to get it up here!

Have a great day!