Tuesday, April 10, 2012

Ride Along Shot: High...

Greetings, volks. Welcome to Hohenfels Volks, THE place for our place! Welcoming Tuesday, Hohenfels finds a nice day breaking out and greeting us back.

Let’s visit Regensburg for another ride along shot. This time we’re going to look at a shot taken on film in the old part of town.

Here’s the image.
Hohenfels Volks: High Key Shopping
ISO 100 Agfa APX100, f/8, 1/50, 50mm
A shop window in Regensburg's old town.

This was taken outside one of the many little shops lining the square, and not far from the Dom, or cathedral. I was immediately attracted to the material, old boxes, wreaths, and some cool roses. Throw in the bottles and glassware in the window, and it really seemed like a “must have” shot.

Metering from the white portion in the bottom right window gave too little exposure, so I shot at M+3 and developed for N. This left white zone to about M+3 and leaves a nice tonal range. This also gives us a nice high key image, with a very suitable contrast, and detail in the brightest parts. The reflections in the windows could have been removed with a CP filter, but I would lose the high key effect of the light reflecting around the scene.

The meter gave me f/16 at 1/100. I think this was shot on Agfa APX100 film. I shot with a 50mm f/1.8 prime, as I did the entire day. The final exposure was f/8 and 1/50, with an ISO of 100. I didn’t want to go slower, as the old cameras had no IS, and any wider would have left the DOF inadequate to express what I had envisioned. The sun was out, it was mid-day, and the weather had warmed up a little that day. It was still snowing back in Hohenfels, which was a bit surprising as I got off the train.

After scanning the negative, editing was most certainly required. The sharpness was quite nearly gone, the contrast had come down, and the whites were nearly blown. By applying curves in an inverse S and adjusting the levels to bring down the shadows, and raise the midtones and highlights, I was nearly complete. The next step was to reduce noise and apply an unsharp mask at about 3px radius, 90 strength, and 2 clipping.

The final image grew on me. At first, being satisfied with the image, it was ok. After editing and revisiting the image several times, I realize it had become something I really liked. It showed that the system of metering for the highlights when you plan an image to be presented digitally, can lead to some really nice results.

By exposing on the plus side, it brought out some detail in the shadows, allowing just enough to bring the eye to them in the middle of the brights. Our eyes are generally drawn to the brightest part of a scene first, which is why we often keep our subject 1/3 to 1 stop brighter that the surrounding. In cases like this, it sets our darks apart and brings focus to the play between shadow and light.

I hope I haven’t bored you too much! Enjoy the rest of a lovely evening, maybe using this time to get some blue or golden hour shots in. Take care and keep shooting.

Don’t forget to post any of your images you’d like to see here at the Hohenfels Volks Facebook page. Of course, commenting on both Facebook and here is always appreciated, too! Don't forget, we're on Google+, too!

Monday, April 9, 2012

Exercise, Not Just for the Body!

Greetings, volks. Welcome to Hohenfels Volks, THE place for our place! I hope everyone had a great Easter, and enjoyed the weekend, snow and all.

This week’s exercise is going to go hand in hand with our last post. Last week, we shot only on a single prime, or if you only have a zoom, at a single focal length. Keeping that limitation in place, we’re moving on to this week’s.

Hohenfels Volks: Down the Alley
ISO 400, f/11, 1/50, HP5+ developed normal with tea for slight compensation in shadows.
Looking down the alley between the bakery and St. Ulrich in Hohenfels towards the priest's residence. One of 48 taken at 75mm with the fixed focal length Ikoflex TLR.

Friday we spoke of the golden hour and the blue hour, and the quality of light present during these times. Have you given any thought to shooting at these times? Perhaps you’ve shot a magnificent sunset, but didn’t stick around to see the amazing light after that. Don’t worry; with this exercise, the chance is here to do just that.

This week, you should choose a very narrow window of time during the day, either the golden hour or the blue hour, and only shoot at that time during the entire week. Maybe every day, or maybe just one, but every shot during the week should be at about that same time every day over the course of the week.

Of course, to add depth and a challenge to the exercise, you can, and maybe should, continue using one focal length or prime lens. By learning to use only 1 length or lens, and only shooting at 1 time of day, you learn to see the light and how you can make it work for you.

Learning to see the possibilities of lighting, and equipment limitations can vastly improve your compositional skills and make for some unexpected awesomeness. You may need to use a flash or some other artificial light source, but that’s to be expected. Use what tools you have. Silhouettes work great during the blue hour, and during the golden hour, partial silhouettes can make for some great expressions of your vision.

I hope everyone will be out doing the exercise this week and share the wonderful results that they create. I also hope you’ll look beyond the limitations and see the opportunities.

Enjoy the rest of your week!

Don’t forget to post any of your images you’d like to see here at the Hohenfels Volks Facebook page. Of course, commenting on both Facebook and here is always appreciated, too! Don't forget, we're on Google+, too!
Friday, April 6, 2012

Golden Blue

Greetings, volks. Welcome to Hohenfels Volks, THE place for our place! I trust you’re ready for Easter, as we move into the holy weekend.

How are things going with shooting only 1 focal length? Have you worked through the limitations and found the strengths associated with your chosen lens or focal length? This weekend should provide many opportunities for working the exercise. Easter processions, children pushing carts to tell the time, family gatherings, and of course, the ubiquitous Easter fountain in every village. Work around your subject and see the angles, the lighting, and the lines. Enough on the exercise, though.

Today we’re going to introduce a couple concepts you may know about. The first is “golden hour” and the second is “blue hour.”

First up, the “golden Hour.” The golden hour is typically the first and last hour of sunlight in the day. It’s usually the hour after sunrise and before sunset. During this time, lighting is softer and more diffuse. The light also takes on a golden or warm hue and imparts warm tones to your overall image. It makes for some great landscape shots, and when applied to portraits makes for some magic images. It allows for slightly longer exposure times, and in the process adds detail to shadows and prevents blown highlights. Of course, that all depends on your exposure settings, but we know about that. For landscapes, it impacts color and saturation in desirable and magical ways. Artist were painting during this time hundreds of years ago. They knew the magic and its impact on their art, now you do, too.

The “blue hour” is the time between full dark and daylight. It generally refers to the period of twilight that is neither dark nor light, and is thought of in terms of the hour before sunrise and after sunset. The lighting is very soft and cool. It lends itself well to landscapes and cityscapes, but also to sea and waterscapes, where the light can compliment the water’s darker blues and blacks. It works great also with night lighting by signs, windows, and other warmer light sources. The blue hour comes on quick, nipping at the heels of sunset, or ushering in sunrise. Get to your chosen location early in the evening, shoot through sunset, and then be prepared for some incredible twilight shots. I encourage you to try some portraits during this time. Bring a couple flashes and click away for some dramatic results.

I hope this has given you something to consider the next you’re shooting our Hohenfels area in the evening or pursuing the perfect sunset photo. Remember to stick to the exercise over the weekend and look for next week’s on Monday. Enjoy the weekend and Happy Easter to all. God bless!

Don’t forget to post any of your images you’d like to see here at the Hohenfels Volks Facebook page. Of course, commenting on both Facebook and here is always appreciated, too! Don't forget, we're on Google+, too!

Tuesday, April 3, 2012

Color and Perception

Greetings, volks. Welcome to Hohenfels Volks, THE place for our place! How’s everyone faring with this week’s exercise? I trust you’re seeing things take shape.

Today we’re going to take another look at metering. From previous posts, we know that we can control our exposure by increasing or decreasing our exposure time or aperture to achieve the levels we want. For instance, making a white cloud white, while retaining its texture, we’d meter the cloud and add 2 to 3 stops of exposure. If we add 2 stops, we can further close the distance between our vision and what we shot.

Today, we’re going to look at how color and saturation work with exposure to give us a better rendering of our vision. Generally, we perceive saturation different than reality. In the most general of terms, saturation appears more thorough in an image when we darken it by some small amount and increase our contrast.

The reality reason for the apparent change in saturation is the actual change in chrominance. Chrominance relates to the levels of luminance present in each particular color. For instance, taking an RGB value of r=100 and increasing it to r=200 increases the chrominance, without changing the saturation. We perceive a difference only because of the resulting change in luminance. This is an extremely basic and simplified explanation, but helps to understand what we’re discussing next.

By knowing what we just discussed, we can change the viewer’s perception of the saturation in our scene, and therefore the mood we’re trying to convey. Without knowing the above and the basics of color theory, it becomes difficult to use color in our compositions as a tool of our message or mood.

By increasing or decreasing our exposure for a certain color’s luminance to create the color we visualized, we can change our message, theme, or mood some. We also change our perception of a color’s saturation, giving either a rich look or a washed out appearance. Try taking some shots of a strong color in a scene at various exposures and comparing the results. For a more noticeable impact, you can try a brighter color in a darker environment or vice versa. As you range through several exposures, you begin to see how our key and our brightness change. You’ll also notice a change in feeling as you view your images.

By throwing a bit of the color and saturation into your metering, you’ll be better equipped for this week’s exercise. Changing your vantage will change the luminance available to you, and require ways to get around the change in feeling that comes with it. Keeping your vision in your mind as you change vantage points, and knowing that exposing for a particular color or set of colors, you can put your original intent across.

I’m looking forward to seeing the results of this week from everyone, and hope the rest of this week treats you well!

Don’t forget to post any of your images you’d like to see here at the Hohenfels Volks Facebook page. Of course, commenting on both Facebook and here is always appreciated, too! Don't forget, we're on Google+, too!

Monday, April 2, 2012

Monday's Exercise

Greetings, volks. Welcome to Hohenfels Volks, THE place for our place! I hope everyone had a chance to grab a shot you can be proud of this weekend.

As promised, today we’re introducing our first exercise. With this exercise, you can learn a lot about composition, as well as spatial compression, DOF, and lighting.

The exercise is simple, for the next week, you’re to only shoot with 1 prime lens. That means if you choose your 50mm, then you can only shoot your 50mm. Whatever the focal length, stick to only one prime focal length lens. If you don’t have a prime, if you only have your kit or some other zoom lens, then choose only 1 focal length, either racked out full zoom, or minimum zoom. Don’t cheat and use the zoom for any of your work.

This simple exercise will teach you how to be creative in your composition. It means you will need to visualize your shot, see the framing and cropping before shooting. You will almost definitely need to move to get the shot. Either move in, out, or change your angle, and you will have something entirely different. Just using zoom doesn’t give you that.

Zooming your lens will change your perspective and create the framing you’d like. However, it also compresses the perspective, which can make for really good DOF. Zooming with your feet and opening your aperture can give some nice DOF effects, too, and does so without compressing perspective. Zooming can change the impact of your lighting, so can moving.

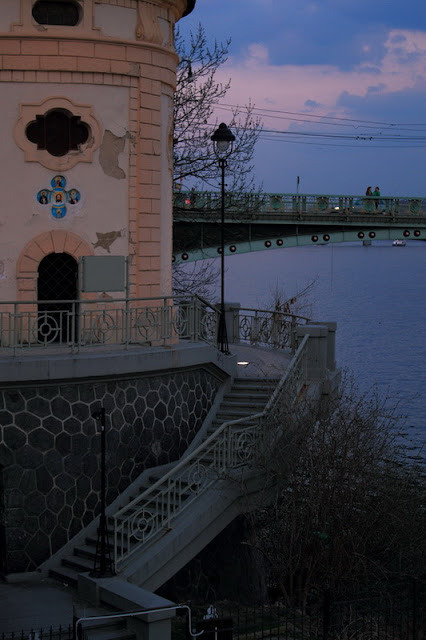
Hohenfels Volks: Sunset in Prague
ISO 400, f/5, 1/100, 44mm, daylight balanced. The shot was metered for the rotunda and exposed for M+1, then edited for M-1, increasing the saturation and improving the tonal range.
This was one of the sunset shots taken in Prague last weekend. It took several attempts to get it right, but just moving around made the scene match what I had envisioned. Give it a try for yourself before you shoot that next pic!

Take a walk around your subject. Approach from different angles and distances. You will start seeing how these little limitations can open up a whole world of possibility. The old masters had to work with 1 focal length or lens for a long time. Lenses were heavy, cumbersome, and often not the way to get the shot. Learning to see in this way is a great tool to open up your creativity and improve your composition.

Rise to the challenge and share your shots. We’d love to see your work and the fruits of your exercise. Enjoy the rest of a wonderful week and make sure you get 1 in the can!

Don’t forget to post any of your images you’d like to see here at the Hohenfels Volks Facebook page. Of course, commenting on both Facebook and here is always appreciated, too! Don't forget, we're on Google+, too!